

IOS开发基础知识--碎片29
1:心跳效果,并可去除心跳
- (void)initScaleLayer
{
    self.view.backgroundColor=[UIColor blueColor];
    UIButton *myTelButtom=[[UIButton alloc]initWithFrame: CGRectMake(60, 240, 50, 50)];
    UIImage *btnTelImage=[UIImage imageNamed:@"customer_tel_icon"];
    [myTelButtom setBackgroundImage:btnTelImage forState:UIControlStateNormal];
    [myTelButtom setBackgroundImage:[UIImage imageNamed:@"customer_tel_icon"] forState:UIControlStateHighlighted];
    [myTelButtom addTarget:self action:@selector(btnSave:) forControlEvents:UIControlEventTouchUpInside];
    [self.view addSubview:myTelButtom];

    //设定剧本
    CABasicAnimation *scaleAnimation = [CABasicAnimation animationWithKeyPath:@"transform.scale"];
    scaleAnimation.fromValue = [NSNumber numberWithFloat:1.0];
    scaleAnimation.toValue = [NSNumber numberWithFloat:1.2];
    scaleAnimation.autoreverses = YES;
    scaleAnimation.fillMode = kCAFillModeForwards;
    scaleAnimation.repeatCount = MAXFLOAT;
    scaleAnimation.duration = 0.8;

    //开演
    [myTelButtom.layer addAnimation:scaleAnimation forKey:@"scaleAnimation"];
}

-(void)btnSave:(id)sender
{
    UIButton *btn=(UIButton *)sender;
    [btn.layer removeAnimationForKey:@"scaleAnimation"];

}
2:启动动画效果实现
原理:启动页同样是放一张静态图,只是在启动时再创建一个图片视图把一张跟启动页的图片做动画;如下:
@interface AppDelegate ()

@property (strong,nonatomic) UIImageView *niceView;

@end

@implementation AppDelegate

@synthesize niceView;

- (BOOL)application:(UIApplication *)application didFinishLaunchingWithOptions:(NSDictionary *)launchOptions {

    self.window.rootViewController = [[ViewController alloc]init];;
    [self.window makeKeyAndVisible];

    //圖片擴大淡出的效果开始;

    //设置一个图片;
    niceView = [[UIImageView alloc] initWithFrame:[UIScreen mainScreen].bounds];
    niceView.tag=11;
    niceView.image = [UIImage imageNamed:@"launch4.7.png"];

    //添加到场景
    [self.window addSubview:niceView];

    //放到最顶层;
    [self.window bringSubviewToFront:niceView];

    CABasicAnimation *animation=[CABasicAnimation animationWithKeyPath:@"transform.scale"];
    niceView.layer.anchorPoint = CGPointMake(.5,.5);
    animation.fromValue = @1.0f;
    animation.toValue = @1.3f;
    animation.fillMode=kCAFillModeForwards;


    animation.removedOnCompletion = NO;

    [animation setAutoreverses:NO];

    //动画时间
    animation.duration=0.9;
    animation.delegate=self;

    [niceView.layer addAnimation:animation forKey:@"scale"];


    //结束;

    return YES;

}


-(void)animationDidStop:(CAAnimation *)anim finished:(BOOL)flag
{
    [niceView removeFromSuperview];

}
3:计算标签的宽度并计算是否换行显示
-(void)creatUI:(NSMutableArray *)tagArr{

    self.tagArr = [NSMutableArray arrayWithArray:[tagArr mutableCopy]];

    if (self.is_can_addTag) {//如果可以添加标签,那么数组就多一个添加标签按钮
        [self.tagArr addObject:self.addTagStr.length>0?self.addTagStr:@"添加标签"];
    }
    tagView_height = 0;

    self.backgroundColor = self.tagViewBackgroundColor?self.tagViewBackgroundColor:[UIColor whiteColor];

    previousFrame = CGRectZero;

    [self.tagArr enumerateObjectsUsingBlock:^(id value, NSUInteger idx, BOOL *stop) {

        //Tag标题(看传入的是字典还是字符串)
        NSMutableString *titleStr = [NSMutableString stringWithString:self.tagStateType==1?@"  ":@""];
        if ([value isKindOfClass:[NSString class]]) {
            [titleStr appendString:value];
        }else if([value isKindOfClass:[NSDictionary class]]){
            if (!self.tagArrkey) {
                //获取不到Value,因为没传入Key
                NSLog(@"获取不到Value,因为没传入Key");
                return ;
            }
            [titleStr appendString:[value valueForKey:self.tagArrkey]];
        }

        //创建Label
        UILabel*tagLabel = [[UILabel alloc]initWithFrame:CGRectZero];
        [self creatTagUI:tagLabel];
        tagLabel.text = titleStr;
        tagLabel.tag = KTapLabelTag+idx;

        //计算label的大小
        NSDictionary *attrs = @{NSFontAttributeName : [UIFont systemFontOfSize:self.tagFont?self.tagFont:KTagFont]};
        CGSize Size_str = [titleStr sizeWithAttributes:attrs];
        Size_str.width += K_Tag_Title_H_Marin*2;
        Size_str.height += K_Tag_Title_V_Marin*2;

        CGRect newRect = CGRectZero;

        if (previousFrame.origin.x + previousFrame.size.width + Size_str.width + K_Tag_Right_Margin > JF_Screen_Width) {

            newRect.origin = CGPointMake(10, previousFrame.origin.y + Size_str.height + K_Tag_Bottom_Margin);
            tagView_height += Size_str.height + K_Tag_Bottom_Margin;
        }
        else {
            newRect.origin = CGPointMake(previousFrame.origin.x + previousFrame.size.width + K_Tag_Right_Margin, previousFrame.origin.y);

        }
        newRect.size = Size_str;
        [tagLabel setFrame:newRect];
        previousFrame=tagLabel.frame;

        //改变控件高度
        if (idx==self.tagArr.count-1) {
            [self setHight:self andHight:tagView_height+Size_str.height + K_Tag_Bottom_Margin];
        }
        [self addSubview:tagLabel];


        //新增删除、添加功能
        if (self.is_can_addTag&&idx==self.tagArr.count-1) {//能添加状态&&最后一个-->(进入添加tag界面不用显示删除图片)

        }else{
            if (self.tagStateType==1) {
                //移除的图片
                UIImageView *removeImage = [[UIImageView alloc] initWithFrame:CGRectMake(tagLabel.jf_right-Image_Width*1.5, tagLabel.jf_top+(tagLabel.jf_height-Image_Height)/2, Image_Width, Image_Height)];
                //删除图片可以换成自己的图片
                removeImage.image = [UIImage imageNamed:@"btn_removeTag"];
                [self addSubview:removeImage];
            }
        }


        //点击按钮
        UIButton *button = [[UIButton alloc] initWithFrame:CGRectMake(tagLabel.frame.origin.x, tagLabel.frame.origin.y, tagLabel.frame.size.width, tagLabel.frame.size.height)];
        [button setTag:KButtonTag+idx];
        [button addTarget:self action:@selector(clickTag:) forControlEvents:UIControlEventTouchUpInside];
        [self addSubview:button];


    }];
}
4:Fabric增加脚本KEY的操作内容
把相应的DSYM文件也上传到官网;
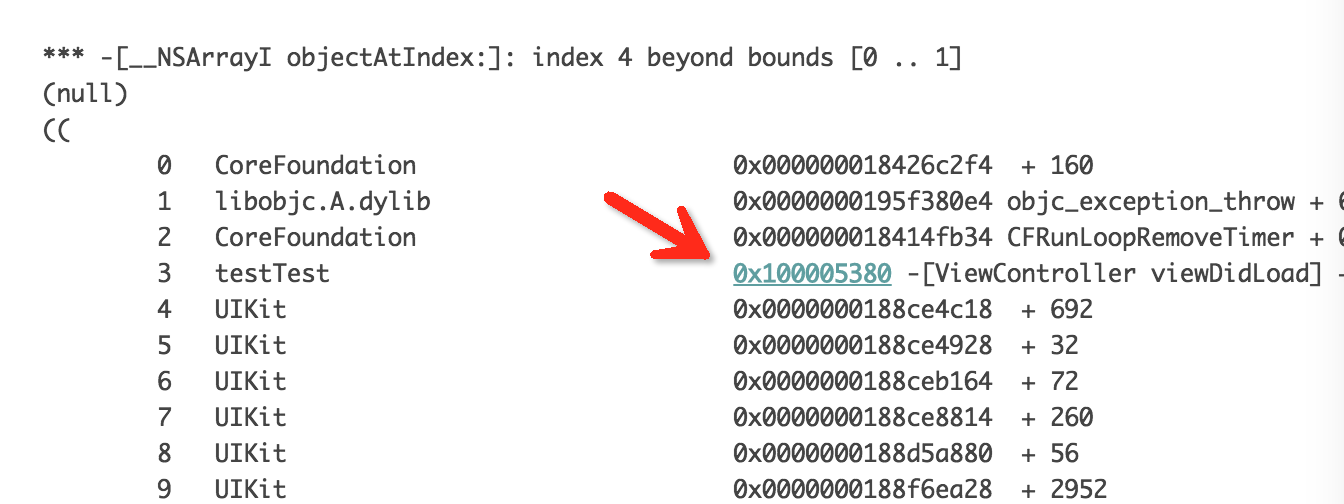
5:通过xcrun atos查看dsym报错的详细地址(每次打包时要把当前对应的.DSYM文件保存下来,为后期定位错误做准备)
进入到DSYM文件的文件地方,
使用xcrun atos命令
atos -o YourApp.app.dSYM/Contents/Resources/DWARF/YourApp 0x00062867
实例:

从友盟或者其它地方可以获得报错的编码,通过上面的命令就可以查看到错误地址;

 浙公网安备 33010602011771号