
Winform开发框架之客户关系管理系统(CRM)的报价单和销售单的处理
在前面介绍了很多CRM相关的界面和实现思路的随笔文章,本篇继续介绍一下系统中用到的一些经验和技巧片段。本篇随笔主要介绍客户关系管理系统(CRM)的报价单和销售单的处理界面效果,使用列表内置的选择代替弹出对话框选择产品的方式,实现报价单和销售单的产品列表快速选择。
1、功能界面效果展示
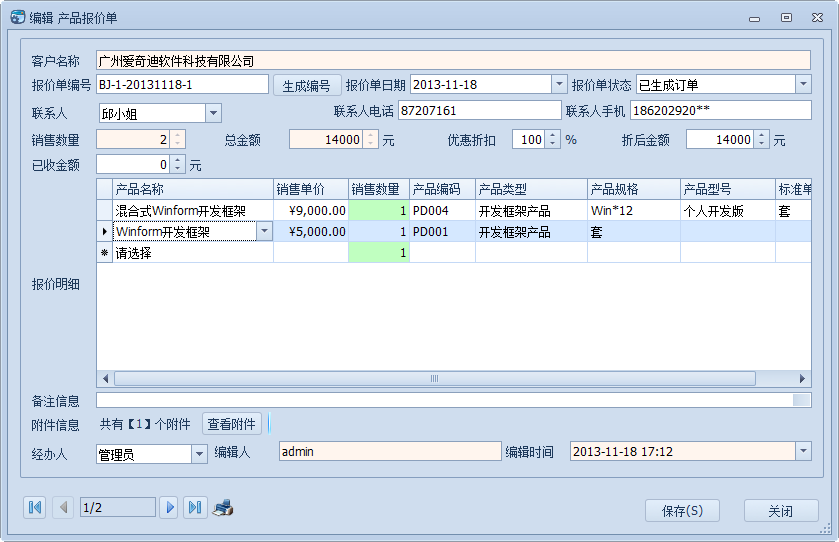
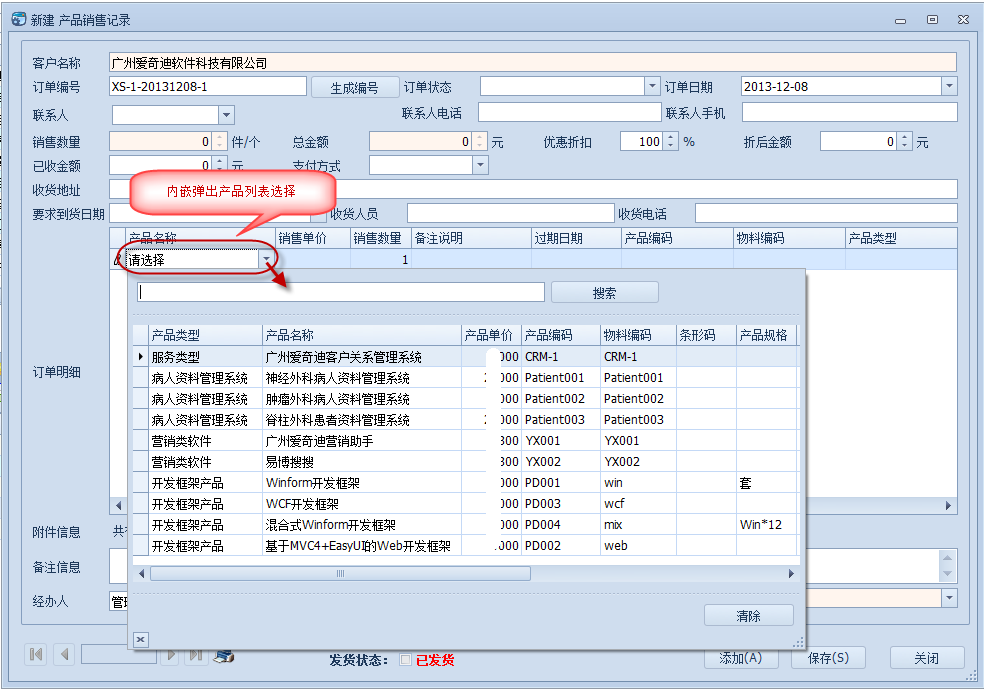
我们知道,在很多列表的内容输入中,很多都使用内置的列表选择方式代替弹出式对话框的选择方式,在我研究了解的很多个CRM系统中,报价单和销售单都基本上是采用这种内置的选择方式,为了适应业界的标准习惯,我在我的系统中也使用了这种方式,新建报价单界面如下所示。
新建销售订单界面如下所示。
报价单或者销售单,一般有状态的区分,为了方便展示各种状态,可以通过不同的背景色进行区分,并且单据通过分页控件进行分页展示,以达到更好的效率,如下所示。
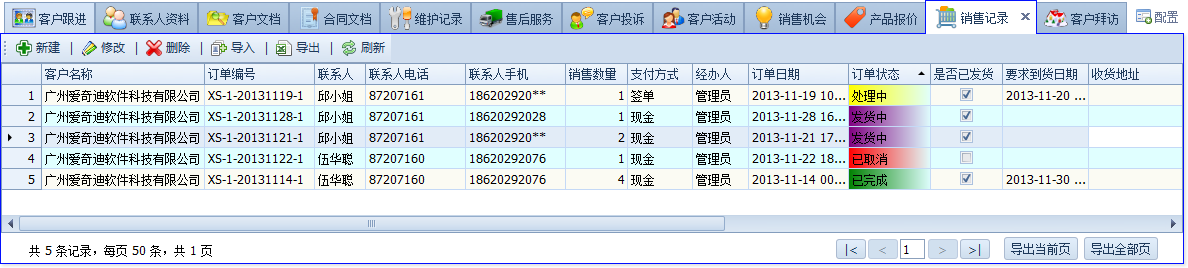
报价单列表界面如下所示。

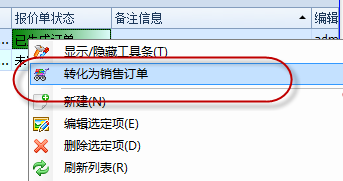
其中报价单可以直接生成销售订单,在报价单的列表上右键菜单弹出“转化为销售订单”即可实现该功能。
2、实现控件界面的设计步骤
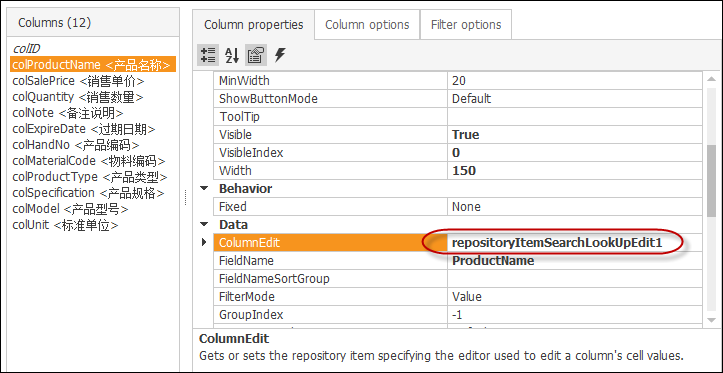
首先我们介绍内嵌式的GridControl,实现实现数据的快速录入和选择的操作。在这个GridControl控件的设计视图里面,需要增加一些在界面上绑定的列,并绑定相关的FieldName字段。另外,我们把产品名称设计为可以通过弹出列表选择的方式,因此需要修改它的ColumnEdit编辑控件为SeachLookupEdit控件,如下界面所示的控件。

调整后的GridControl的设计界面如下所示。
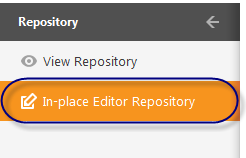
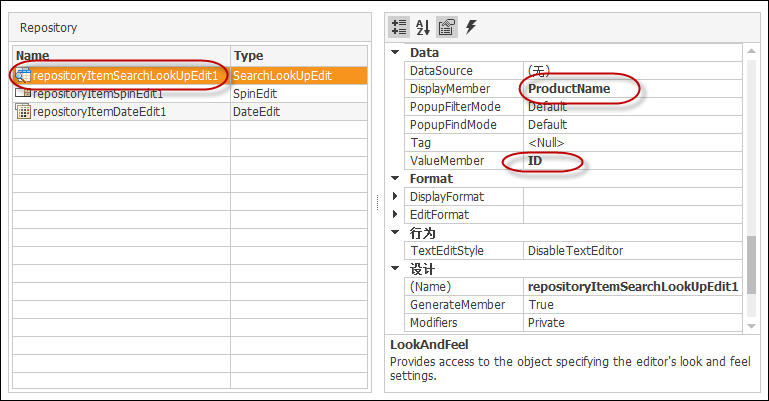
然后需要在设计窗口的Repository选项卡界面中的In-place Editor Repository的设计模块里面进行调整,如下所示。
通过设置控件的显示成员(DisplayMemeber)和值成员(ValueMember)即可实现数据的显示和绑定。
3、实现控件界面的代码处理
通过第二步的界面配置,我们指定了GridControl的列表展示效果,但是真正需要运行起来,还需要通过代码进行数据的动态绑定和处理,才能正常使用。
    public partial class FrmEditQuotation : BaseEditForm
    {
        private QuotationInfo tempInfo = new QuotationInfo();

        /// <summary>
        /// 所属客户ID
        /// </summary>
        public string CustomerID { get; set; }

        public FrmEditQuotation()
        {
            InitializeComponent();

            //绑定所有在用的产品信息
            this.repositoryItemSearchLookUpEdit1.DataSource = BLLFactory<Product>.Instance.GetAllInUsed();
            //对控件列编辑控件的预处理
            this.gridView1.ShowingEditor += new CancelEventHandler(gridView1_ShowingEditor);
            //控件列编辑控件的值变化的处理
            this.gridView1.CellValueChanged += new DevExpress.XtraGrid.Views.Base.CellValueChangedEventHandler(gridView1_CellValueChanged);
        }
另外,我们在绑定数据的时候,必须绑定GridControl的控件数据源,如下代码所示。
        /// <summary>
        /// 数据显示的函数
        /// </summary>
        public override void DisplayData()
        {
            InitDictItem();//数据字典加载(公用)

            if (!string.IsNullOrEmpty(ID))
            {
               ................................
            }
            else
            {
                ...............................
            }

            this.gridControl1.DataSource = GetDetailTable();//绑定订单详细列表

            SetAttachInfo(tempInfo);
        }
        /// <summary>
        /// 绑定明细信息
        /// </summary>
        /// <returns></returns>
        public DataTable GetDetailTable()
        {
            string columnString = "ID,ProductName,ProductNo,MaterialCode,ProductType,Specification,Model,Unit,SalePrice|decimal,Quantity|int,Note,ExpireDate|DateTime";
            DataTable dt = DataTableHelper.CreateTable(columnString);
            if (!string.IsNullOrEmpty(ID))
            {
                List<QuotationDetailInfo> list = BLLFactory<QuotationDetail>.Instance.FindByOrderNo(this.txtHandNo.Text);
                DataRow dr = null;
                foreach (QuotationDetailInfo info in list)
                {
                    dr = dt.NewRow();
                    dr["ID"] = info.ID;
                    dr["ProductName"] = info.Product_ID;
                    dr["ProductNo"] = info.ProductNo;
                    dr["MaterialCode"] = info.MaterialCode;
                    dr["ProductType"] = info.ProductType;
                    dr["Specification"] = info.Specification;
                    dr["Model"] = info.Model;
                    dr["Unit"] = info.Unit;
                    dr["SalePrice"] = info.SalePrice;
                    dr["Quantity"] = info.Quantity;
                    dr["Note"] = info.Note;
                    if (info.ExpireDate > Convert.ToDateTime("1900-1-1"))
                    {
                        dr["ExpireDate"] = info.ExpireDate;
                    }
                    dt.Rows.Add(dr);
                }
            }
            return dt;
        }
其中注意上面的红色的代码,在产品名称的列上绑定的值是产品ID,而非产品名称即可。
另外,上面代码提到的CellValueChanged事件是当列表选定后,在该行的其他列上显示数据的操作,如果没有选择,则清空相关的单元格内容,具体代码如下所示。
        private void gridView1_CellValueChanged(object sender, DevExpress.XtraGrid.Views.Base.CellValueChangedEventArgs e)
        {
            if (e.Column.FieldName == "ProductName")
            {
                ProductInfo info = BLLFactory<Product>.Instance.FindByID(e.Value.ToString());
                if (info != null)
                {
                    this.gridView1.SetRowCellValue(e.RowHandle, "ProductNo", info.HandNo);
                    this.gridView1.SetRowCellValue(e.RowHandle, "MaterialCode", info.MaterialCode);
                    this.gridView1.SetRowCellValue(e.RowHandle, "ProductType", info.ProductType);
                    this.gridView1.SetRowCellValue(e.RowHandle, "Specification", info.Specification);
                    this.gridView1.SetRowCellValue(e.RowHandle, "Model", info.Model);
                    this.gridView1.SetRowCellValue(e.RowHandle, "Unit", info.Unit);
                    this.gridView1.SetRowCellValue(e.RowHandle, "SalePrice", info.SalePrice);
                }
                else
                {
                    this.gridView1.SetRowCellValue(e.RowHandle, "ProductNo", DBNull.Value);
                    this.gridView1.SetRowCellValue(e.RowHandle, "MaterialCode", DBNull.Value);
                    this.gridView1.SetRowCellValue(e.RowHandle, "ProductType", DBNull.Value);
                    this.gridView1.SetRowCellValue(e.RowHandle, "Specification", DBNull.Value);
                    this.gridView1.SetRowCellValue(e.RowHandle, "Model", DBNull.Value);
                    this.gridView1.SetRowCellValue(e.RowHandle, "Unit", DBNull.Value);
                    this.gridView1.SetRowCellValue(e.RowHandle, "SalePrice", DBNull.Value);

                    this.gridView1.SetRowCellValue(e.RowHandle, "Quantity", DBNull.Value);
                    this.gridView1.SetRowCellValue(e.RowHandle, "Note", DBNull.Value);
                    this.gridView1.SetRowCellValue(e.RowHandle, "ExpireDate", DBNull.Value);
                }
            }
        }
最后就是在表单保存的时候,更新相关的主表数据后,接着保存相关的报价单明细或者订单明细即可,如下面的红色部分代码所示。
        /// <summary>
        /// 新增状态下的数据保存
        /// </summary>
        /// <returns></returns>
        public override bool SaveAddNew()
        {
            QuotationInfo info = tempInfo;
            SetInfo(info);
            info.Creator = LoginUserInfo.Name;
            info.CreateTime = DateTime.Now;

            try
            {
                #region 新增数据

                bool succeed = BLLFactory<Quotation>.Instance.Insert(info);
                if (succeed)
                {
                    //可添加其他关联操作
                    SaveDetail();

                    return true;
                }
                #endregion
            }
            catch (Exception ex)
            {
                LogTextHelper.Error(ex);
                MessageDxUtil.ShowError(ex.Message);
            }
            return false;
        }
4、列表单元格背景颜色变化的处理
刚才在1小节里面提到报价单或者销售单,一般有状态的区分,为了方便展示各种状态,可以通过不同的背景色进行区分,如下所示。
上面这种效果如何实现的呢,一般通过增加对RowCellStyle的处理即可,具体代码如下所示。
        void gridView1_RowCellStyle(object sender, DevExpress.XtraGrid.Views.Grid.RowCellStyleEventArgs e)
        {
            if (e.Column.FieldName == "OrderStatus" || e.Column.FieldName == "HandNo")
            {
                //待处理  处理中 已完成
                string status = this.winGridViewPager1.gridView1.GetRowCellValue(e.RowHandle, "OrderStatus").ToString();
                Color color = Color.White;
                if (status == "处理中")
                {
                    e.Appearance.BackColor = Color.Yellow;
                    e.Appearance.BackColor2 = Color.LightCyan;
                }
                if (status == "发货中")
                {
                    e.Appearance.BackColor = Color.Purple;
                    e.Appearance.BackColor2 = Color.LightCyan;
                }
                if (status == "已取消")
                {
                    e.Appearance.BackColor = Color.Red;
                    e.Appearance.BackColor2 = Color.LightCyan;
                }
                else if (status == "已完成")
                {
                    e.Appearance.BackColor = Color.Green;
                    e.Appearance.BackColor2 = Color.LightCyan;
                }
            }
        }
另外附上该系列的相关文章链接,需要可以详细了解相关的内容。
Winform开发框架之客户关系管理系统(CRM)的开发总结系列1-界面功能展示
Winform开发框架之客户关系管理系统(CRM)的开发总结系列2-基于框架的开发过程
Winform开发框架之客户关系管理系统(CRM)的开发总结系列3-客户分类和配置管理实现
Winform开发框架之客户关系管理系统(CRM)的开发总结系列4-Tab控件页面的动态加载
Winform开发框架之客户关系管理系统(CRM)的报价单和销售单的处理
以上就是CRM系统模块里面的一些经验和技巧,希望对大家构建更好的Winform界面有所帮助和启发。
 专注于代码生成工具、.Net/Python 框架架构及软件开发,以及各种Vue.js的前端技术应用。著有Winform开发框架/混合式开发框架、微信开发框架、Bootstrap开发框架、ABP开发框架、SqlSugar开发框架、Python开发框架等框架产品。
转载请注明出处:撰写人:伍华聪 http://www.iqidi.com


 浙公网安备 33010602011771号