

android之merge布局
<merge />标签闪亮登场了。当LayoutInflater遇到这个标签时,它会跳过它,并将<merge />内的元素添加到<merge />的父元素里。迷惑了吗?让我们用<merge />来替换FrameLayout,并重写之前的XML布局:
<merge xmlns:android="http://schemas.android.com/apk/res/android">
<ImageView
android:layout_width="fill_parent"
android:layout_height="fill_parent"
android:scaleType="center"
android:src="@drawable/golden_gate" />
<TextView
android:layout_width="wrap_content"
android:layout_height="wrap_content"
android:layout_marginBottom="20dip"
android:layout_gravity="center_horizontal|bottom"
android:padding="12dip"
android:background="#AA000000"
android:textColor="#ffffffff"
android:text="Golden Gate" />
</merge>
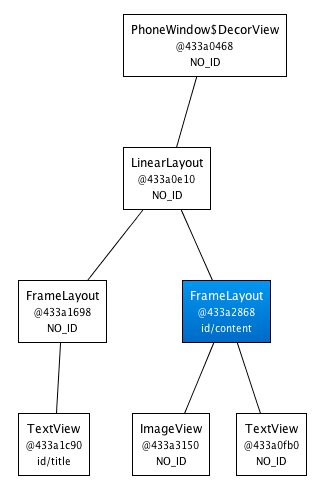
新的代码中,TextView和ImageView都直接添加到上一层的FrameLayout里。虽然视觉上看起来一样,但View的层次更加简单了:
很显然,在这个场合使用<merge />是因为Activity的ContentView的父元素始终是FrameLayout。如果你的布局使用LinearLayout作为它的根标签(举例),那么你就不能使用这个技巧。<merge />在其它的一些场合也很有用的。例如,它与<include />标签结合起来就能表现得很完美。你还可以在创建一个自定义的组合View时使用<merge />。让我们看一个使用<merge />创建一个新View的例子——OkCancelBar,包含两个按钮,并可以设置按钮标签。下面的XML用于在一个图片上显示自定义的View:
<merge
xmlns:android="http://schemas.android.com/apk/res/android" xmlns:okCancelBar="http://schemas.android.com/apk/res/com.example.android.merge">
<ImageView
android:layout_width="fill_parent"
android:layout_height="fill_parent"
android:scaleType="center"
android:src="@drawable/golden_gate" />
<com.example.android.merge.OkCancelBar
android:layout_width="fill_parent"
android:layout_height="wrap_content"
android:layout_gravity="bottom"
android:paddingTop="8dip"
android:gravity="center_horizontal"
android:background="#AA000000"
okCancelBar:okLabel="Save"
okCancelBar:cancelLabel="Don't save" />
</merge>
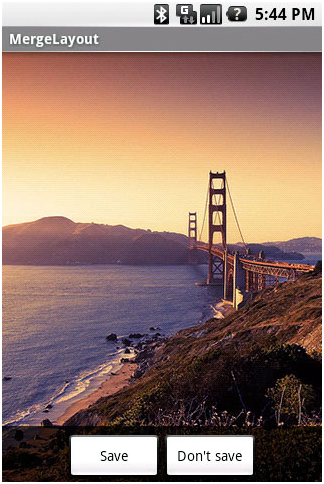
新的布局效果如下图所示:
OkCancelBar的代码很简单,因为这两个按钮在外部的XML文件中定义,通过LayoutInflate类导入。如下面的代码片段所示,R.layout.okcancelbar以OkCancelBar为父元素:
public class OkCancelBar extends LinearLayout {
public OkCancelBar(Context context, AttributeSet attrs) {
super(context, attrs);
setOrientation(HORIZONTAL);
setGravity(Gravity.CENTER);
setWeightSum(1.0f);
LayoutInflater.from(context).inflate(R.layout.okcancelbar, this, true);
TypedArray array = context.obtainStyledAttributes(attrs, R.styleable.OkCancelBar, 0, 0);
String text = array.getString(R.styleable.OkCancelBar_okLabel);
if (text == null) text = "Ok";
((Button) findViewById(R.id.okcancelbar_ok)).setText(text);
text = array.getString(R.styleable.OkCancelBar_cancelLabel);
if (text == null) text = "Cancel";
((Button) findViewById(R.id.okcancelbar_cancel)).setText(text);
array.recycle();
}
}
两个按钮的定义如下面的XML所示。正如你所看到的,我们使用<merge />标签直接添加两个按钮到OkCancelBar。每个按钮都是从外部相同的XML布局文件包含进来的,便于维护;我们只是简单地重写它们的id:
<merge xmlns:android="http://schemas.android.com/apk/res/android">
<include
layout="@layout/okcancelbar_button"
android:id="@+id/okcancelbar_ok" />
<include
layout="@layout/okcancelbar_button"
android:id="@+id/okcancelbar_cancel" />
</merge>
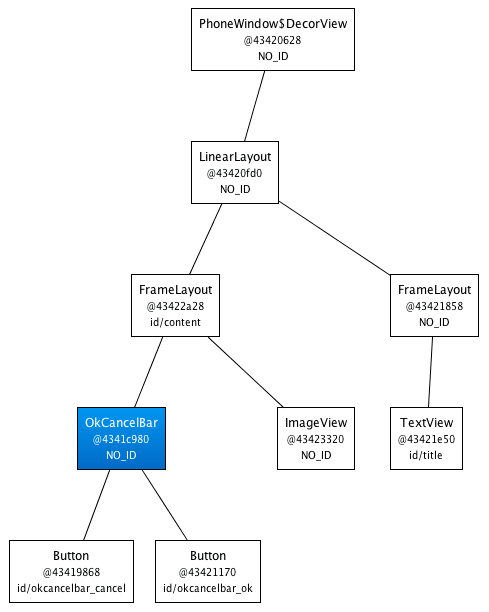
我们创建了一个灵活且易于维护的自定义View,它有着高效的View层次:
<merge />标签极其有用。然而它也有以下两个限制:
· <merge />只能作为XML布局的根标签使用
· 当Inflate以<merge />开头的布局文件时,必须指定一个父ViewGroup,并且必须设定attachToRoot为true(参看inflate(int, android.view.ViewGroup, Boolean)方法)。

 浙公网安备 33010602011771号