


《Windows Azure Platform 系列文章目录》
update 2017-12-21
我把Azure PowerShell升级到5.0.0版本,发现语句有些细微区别:
#这里Linux用户名和密码
$adminName = "用户名"
$adminPassword = "密码"

#设置DNS Name和机器名
$serviceName = "DNSName"
$vmName ="VMName"

#VM所在的数据中心
$location = "China East"

#VM大小
$vmSize ="A7"

#VNet,子网,和内网IP
$vNetName = 'My-VNet'
$subnetName='Subnet-1'
$privateIP='10.0.0.1'

#外挂Disk大小
$disksize=500
$disklabel= $vmName + "DataDisk"
$lun=0
$hcaching="None"


$imageList = Get-AzureVMImage ` | where {$_.ImageName -like "*CentOS-65*"}

$image=$imageList[0]


#创建VM
$vm1 = New-AzureVMConfig -Name $vmName -InstanceSize $vmSize -ImageName $image.ImageName

#这里不能指定TimeZone
$vm1 | Add-AzureProvisioningConfig  -Linux -LinuxUser $adminName -Password $adminPassword

$vm1 | Set-AzureSubnet -SubnetNames $subnetName

$vm1 | Set-AzureStaticVNetIP -IPAddress $privateIP

$vm1 | Add-AzureDataDisk -CreateNew -DiskSizeInGB $disksize -DiskLabel $disklabel -LUN $lun -HostCaching $hcaching

New-AzureVM -ServiceName $serviceName -VM $vm1 -VNetName $vNetName -Location 'China East'
本文介绍的是由世纪互联运维的Windows Azure China。
相比于Global Azure (http://www.windowsazure.com),国内由世纪互联运维的Windows Azure在PowerShell仅有细微的差别。
Azure Global的IP Rang信息,可以参考:http://www.microsoft.com/en-us/download/details.aspx?id=41653
国内由世纪互联运维的Azure China的IP Rang信息,可以参考:http://www.microsoft.com/en-us/download/details.aspx?id=42064
如果读者用的是百度查询IP地址,经常会发现Azure上海的IP地址经常会显示来自北京,这是由于百度的IP库比较老,请读者注意
在介绍本文之前,建议读者熟悉Azure PowerShell的基本命令,请参考笔者之前的文章:
Windows Azure Virtual Network (5) 设置Azure Virtual Machine固定Private IP
Windows Azure Virtual Network (6) 设置Azure Virtual Machine固定公网IP (Virtual IP Address, VIP) (1)
Windows Azure Virtual Network (7) 设置Azure Virtual Machine固定公网IP (Virtual IP Address, VIP) (2)
接下来,笔者会比较快速的介绍相关PowerShell命令:
如果你是第一次运行Azure PowerShell。我们要在本地创建证书文件。以便本地计算机和Azure建立可靠的安全连接。
1.以管理员身份,运行Azure PowerShell,下载publishsettings文件
Get-AzurePublishSettingsFile -Environment AzureChinaCloud
如果不想运行Azure PoweShell的话,
国外的Azure Global,请在浏览器中输入地址:http://go.microsoft.com/fwlink/?LinkID=301775
在登陆框中,输入你的用户名和密码
国内世纪互联运维的Azure China,请在浏览器中输入地址:http://go.microsoft.com/fwlink/?LinkID=301776
在登陆框中,输入你的OrgID和密码
2.将publishsettings下载到本地磁盘,然后执行上传publishsettings命令
Import-AzurePublishSettingsFile <PathToFile>
上面步骤1、2执行成功后,下次运行Azure PowerShell将不必再次运行上面的运行。接下来可以运行我们的命令了。
3.创建新的存储账号(步骤略),选择当前的订阅,并设置存储账号
Set-AzureSubscription -SubscriptionName '[SubscriptionName]' -CurrentStorageAccount '[StorageName]'
4.在上海数据中心(China East),获得固定的Public IPV4地址
$NginxReservedIP = New-AzureReservedIP -ReservedIPName 'NginxPublicIP' -Label 'NginxPublicIP' -Location 'China East'
查看这个IP地址
Get-AzureReservedIP -ReservedIPName 'NginxPublicIP'
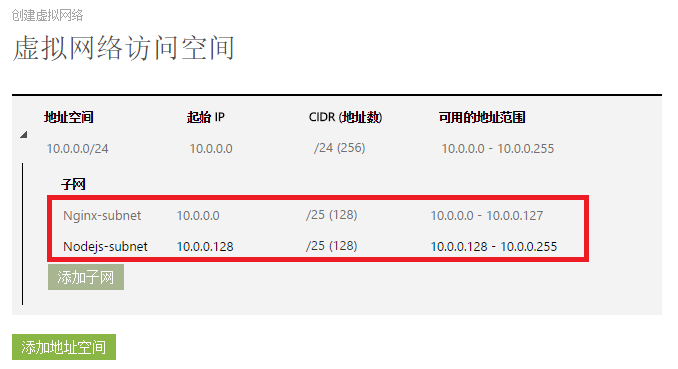
5.创建虚拟网络Virtual Network,命名为MyVNet (位置选择China East)。注意Virtual Network不能属于地缘组里。
- MyVNet IP Rang为10.0.0.0-10.0.0.255,
- 同时创建2个Subnet:Nginx-subnet和Nodejs-subnet
6.通过模糊查询,查询到CentOS 7.0镜像
$imageList = Get-AzureVMImage `
| where {$_.ImageName -like "*CentOS-70*"}

$image=$imageList[0]
7.创建3台虚拟机:
- DNS为MyNginx,并且绑定Public IP (NginxPublicIP)
- 机器名分别为Nginx01,Nginx02和Nginx03
- 三台机器加入虚拟机网络MyVNet。子网为Nginx-subnet (10.0.0.0-10.0.0.127),
设置内网IP分别为10.0.0.4,10.0.0.5和10.0.0.6
- 虚拟机大小为Large
- 管理员用户名为:adminuser。 密码为:MyVM@6789
- 高可用性集名称为:NginxAvbSet
- 并设置该虚拟机的时区为UTC+8时区(北京时间)
创建第1台虚拟机(Nginx01,内网IP是10.0.0.4)的命令如下:
New-AzureVMConfig -Name 'Nginx01' -InstanceSize 'Large' -ImageName $image.ImageName -AvailabilitySetName 'NginxAvbSet' ` | Add-AzureProvisioningConfig -Linux -LinuxUser 'adminuser' -Password 'MyVM@6789' -TimeZone 'China Standard Time' | Set-AzureSubnet -SubnetNames 'Nginx-subnet' | Set-AzureStaticVNetIP -IPAddress '10.0.0.4' | New-AzureVM -ServiceName 'MyNginx' -VNetName 'MyVNet' –ReservedIPName 'NginxPublicIP' -Location 'China East'
创建第2台虚拟机(Nginx02,内网IP是10.0.0.5)的命令如下:
New-AzureVMConfig -Name 'Nginx02' -InstanceSize 'Large' -ImageName $image.ImageName -AvailabilitySetName 'NginxAvbSet' ` | Add-AzureProvisioningConfig -Linux -LinuxUser 'adminuser' -Password 'MyVM@6789' -TimeZone 'China Standard Time' | Set-AzureSubnet -SubnetNames 'Nginx-subnet' | Set-AzureStaticVNetIP -IPAddress '10.0.0.5' | New-AzureVM -ServiceName 'MyNginx' -VNetName 'MyVNet'
创建第3台虚拟机(Nginx03,内网IP是10.0.0.6)的命令如下:
New-AzureVMConfig -Name 'Nginx03' -InstanceSize 'Large' -ImageName $image.ImageName -AvailabilitySetName 'NginxAvbSet' ` | Add-AzureProvisioningConfig -Linux -LinuxUser 'adminuser' -Password 'MyVM@6789' -TimeZone 'China Standard Time' | Set-AzureSubnet -SubnetNames 'Nginx-subnet' | Set-AzureStaticVNetIP -IPAddress '10.0.0.6' | New-AzureVM -ServiceName 'MyNginx' -VNetName 'MyVNet'
==========================================分隔符=============================================
上面的内容,我们介绍的是创建Linux虚拟机,接下来笔者介绍一下如何使用PowerShell,创建Windows虚拟机。
我们直接从上面的步骤6开始,通过模糊查询,查询到Windows Server 2012虚拟机
$imageList = Get-AzureVMImage `
| where {$_.ImageName -like "*Windows-Server-2012-Datacenter*"}

$image=$imageList[0]
或者通过精确查询,查询到Windows Server 2008 R2 SP中文版OS
$imageList = Get-AzureVMImage `
| where {$_.ImageName -eq "55bc2b193643443bb879a78bda516fc8__Win2K8R2SP1-Datacenter-201503.01-zh.cn-127GB.vhd"}

$image=$imageList[0]
55bc2b193643443bb879a78bda516fc8__Windows-Server-2012-R2-201504.01-zh.cn-127GB.vhd
7.创建2台虚拟机。
- DNS为LeiVM,并且绑定Public IP (NginxPublicIP)
- 机器名分别为LeiVM01,LeiVM02
- 三台机器加入虚拟机网络MyVNet。子网为subnet-1 (10.0.0.0-10.0.0.127),
设置内网IP分别为10.0.0.4,10.0.0.5
- 虚拟机大小为Large
- 管理员用户名为:adminuser。 密码为:MyVM@6789
- 高可用性集名称为:LeiAvbSet
创建LeiVM01的PowerShell如下:
New-AzureVMConfig -Name 'LeiVM01' -InstanceSize Large -ImageName $image.ImageName -AvailabilitySetName 'LeiAvbSet' ` | Add-AzureProvisioningConfig -Windows -AdminUsername 'adminuser' -Password 'MyVM@6789' | Set-AzureSubnet -SubnetNames 'Subnet-1' | Set-AzureStaticVNetIP -IPAddress '10.0.0.4' | New-AzureVM -ServiceName 'LeiVM' -VNetName 'MyVNet' –ReservedIPName 'NginxPublicIP' -Location 'China East'
创建LeiVM02的PowerShell如下:
New-AzureVMConfig -Name 'LeiVM02' -InstanceSize Large -ImageName $image.ImageName -AvailabilitySetName 'LeiAvbSet' ` | Add-AzureProvisioningConfig -Windows -AdminUsername 'adminuser' -Password 'MyVM@6789' | Set-AzureSubnet -SubnetNames 'Subnet-1' | Set-AzureStaticVNetIP -IPAddress '10.0.0.4' | New-AzureVM -ServiceName 'LeiVM' -VNetName 'MyVNet'
==========================================分隔符=============================================
创建一台SQL Server 2012 SP1的 Azure Virtual Machine
并设置该虚拟机的时区为UTC+8时区(北京时间)
同时关闭该虚拟机的自动更新功能
$imageList = Get-AzureVMImage | where {$_.ImageName -eq "74bb2f0b8dcc47fbb2914b60ed940c35__SQL-Server-2012SP1-Enterprise-SQL11-SP1-CU3-11.0.3350.0-Win2012-ENU"}

$image=$imageList[0]

New-AzureVMConfig -Name 'LeiSQLVM01' -InstanceSize 'Medium' -ImageName $image.ImageName  -AvailabilitySetName 'LeiSQLAvbSet' ` | Add-AzureProvisioningConfig -Windows -AdminUsername 'azureadmin' -Password 'MyVM@6789' -TimeZone 'China Standard Time' -DisableAutomaticUpdates | Set-AzureSubnet -SubnetNames 'SQL-Subnet' | Set-AzureStaticVNetIP -IPAddress '10.0.0.132' | New-AzureVM -ServiceName 'LeiSQLCS' -VNetName 'LeiSQLAlwaysOnVNet' -Location 'China East'
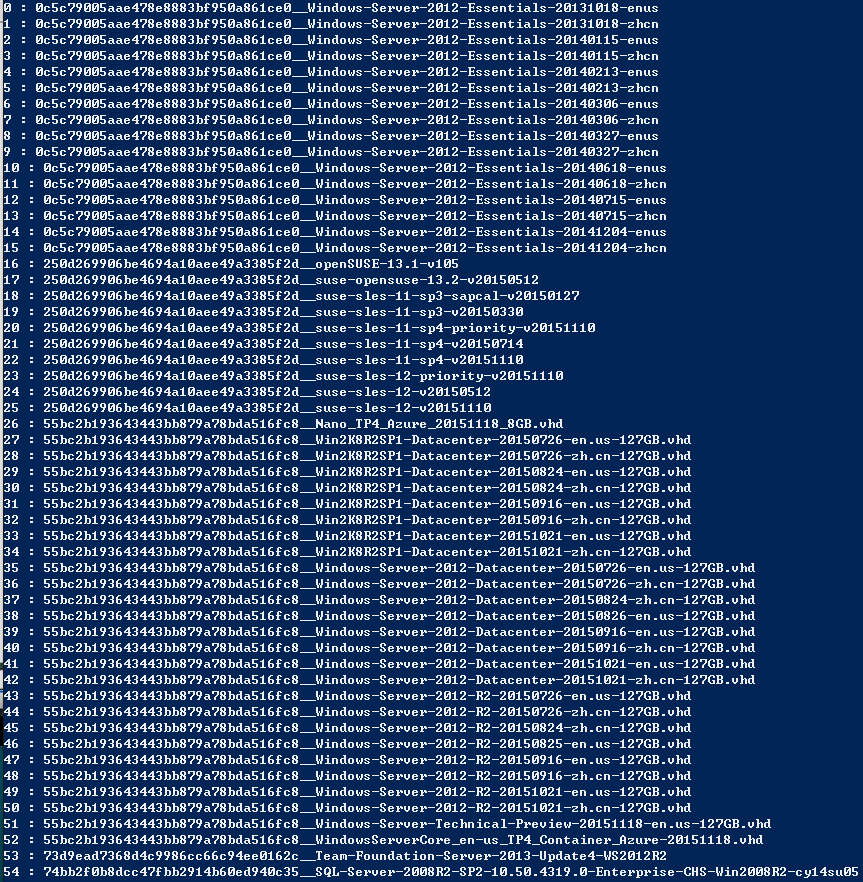
Update 2015-12-9,今天发现一个Azure PowerShell,可以导出所有的Azure VM Template Name,方便以后使用:
$images = Get-AzureVMImage
$count = $images.Count
for($i=0;$i -lt $count;$i++){ $i.ToString() + " : " + $images[$i].ImageName; }
部分截图信息如下:

 浙公网安备 33010602011771号