

常用模块
介绍
- time与datetime模块
- random模块
- os模块
- sys模块
- shutil模块
- json&pickle模块
- shelve模块
- xml模块
- configparser模块
- hashlib模块
- suprocess模块
- logging模块
- re模块
time与datetime时间模块
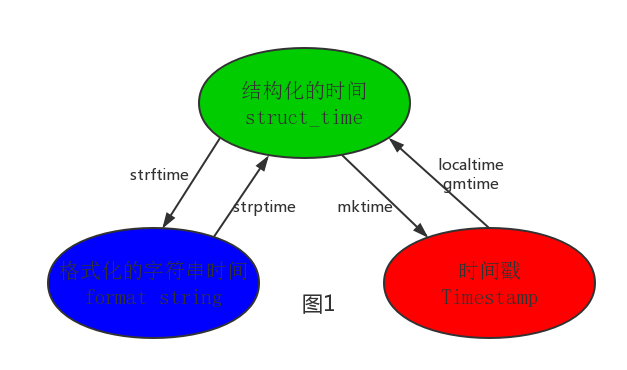
python 中时间表示方法有:时间戳,即从1975年1月1日00:00:00到现在的秒数;格式化后的时间字符串;时间struct_time 元组。
struct_time元组中元素主要包括tm_year(年)、tm_mon(月)、tm_mday(日)、tm_hour(时)、tm_min(分)、tm_sec(秒)、tm_wday(weekday0 - 6(0表示周日))、tm_yday(一年中的第几天1 - 366)、tm_isdst(是否是夏令时)
1.time
常用函数

time.time() 返回当前时间戳
import time
>>> time.time()
1465370844.096474
#time.ctime() 返回这种格式的时间字符'Wed Jun 8 15:27:48 2016',显示当前时间.同时也可以转换时间戳

>>> time.ctime()
Wed Jan 17 18:50:22 2018

>>> time.ctime(time.time()-86400)  #计算昨天的时间
Tue Jan 16 18:50:58 2018
#time.gmtime 将时间戳转换成struct_time格式,此显示的是格林威治0时区的时间
>>> time.gmtime()
time.struct_time(tm_year=2018, tm_mon=1, tm_mday=17, tm_hour=10, tm_min=53, tm_sec=7, tm_wday=2, tm_yday=17, tm_isdst=0)

>>> time.gmtime(time.time() - 86400)
time.struct_time(tm_year=2018, tm_mon=1, tm_mday=16, tm_hour=10, tm_min=52, tm_sec=22, tm_wday=1, tm_yday=16, tm_isdst=0)
#time.mktime 将struct_time格式转回成时间戳
now = time.localtime()
print(now)
print(time.mktime(time.localtime()))


time.struct_time(tm_year=2018, tm_mon=1, tm_mday=17, tm_hour=18, tm_min=55, tm_sec=18, tm_wday=2, tm_yday=17, tm_isdst=0)
1516186518.0
#time.strftime 将struct_time格式转成指定的字符串格式

# now = time.localtime()
# last = time.localtime(time.time() - 86400)
# print(time.strftime("%Y-%m-%d %H:%M:%S",last)) 格式化成昨天
# 2018-01-16 18:57:27
# print(time.strftime("%Y-%m-%d %H:%M:%S",now)) 格式化成今天的时间
# 2018-01-17 18:57:27


# print(time.localtime())
# ime.struct_time(tm_year=2018, tm_mon=1, tm_mday=17, tm_hour=18, tm_min=58, tm_sec=15, tm_wday=2, tm_yday=17, tm_isdst=0)
#time.strptime 将自定义时间格式的字符串转换为struct_time格式
>>> time.strptime("2016-06-08","%Y-%m-%d")
time.struct_time(tm_year=2016, tm_mon=6, tm_mday=8, tm_hour=0, tm_min=0, tm_sec=0, tm_wday=2, tm_yday=160, tm_isdst=-1)
>>> time.strptime("2016-06-08 15:50:44","%Y-%m-%d %H:%M:%S")
time.struct_time(tm_year=2016, tm_mon=6, tm_mday=8, tm_hour=15, tm_min=50, tm_sec=44, tm_wday=2, tm_yday=160, tm_isdst=-1)
- time.sleep 暂停时间,类似于shell的sleep()
- 时间格式

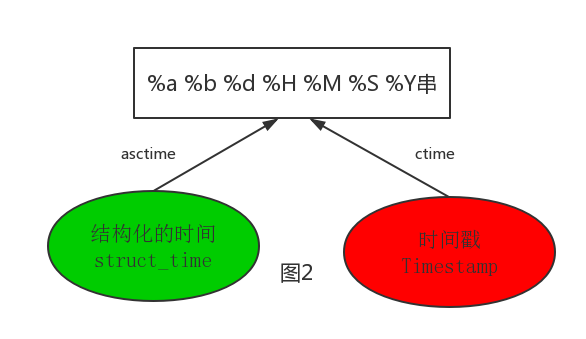
计算机认识的时间只能是'时间戳'格式,而程序员可处理的或者说人类能看懂的时间有: '格式化的时间字符串','结构化的时间' ,于是有了下图的转换关系
2.datetime


#datime是time的升级版,可以对date(日期)、time(时间)、datetime(日期时间)等三种单独管理。主要是由下面四个类组成
import datetime

# print(datetime.datetime.now()) #返回 2016-08-19 12:47:03.941925
#print(datetime.date.fromtimestamp(time.time()) )  # 时间戳直接转成日期格式 2016-08-19
# print(datetime.datetime.now() )
# print(datetime.datetime.now() + datetime.timedelta(3)) #当前时间+3天
# print(datetime.datetime.now() + datetime.timedelta(-3)) #当前时间-3天
# print(datetime.datetime.now() + datetime.timedelta(hours=3)) #当前时间+3小时
# print(datetime.datetime.now() + datetime.timedelta(minutes=30)) #当前时间+30分


#
# c_time  = datetime.datetime.now()
# print(c_time.replace(minute=3,hour=2)) #时间替换
Randon 模块
#random() 方法返回随机生成的一个实数,它在[0,1)范围内。
print(random.random())#(0,1)----float大于0且小于1之间的小数
print(random.randint(1,3))#[1,3]大于等于1且小于等于3之间的整数
print(random.randrange(1,3))#[1,3)大于等于1且小于3之间的整数
print(random.choice([1,'23',[4,5]]))#1或者23或者[4,5]
print(random.sample([1,'23',[4,5]],2))#列表元素任意2个组合
print(random.uniform(1,3))#大于1小于3的小数,如1.927109612082716
#实用random 生成一个验证码
def make_code(n):
    res=''
    for i in range(n):
        s1=str(random.randint(0,9))
        s2=chr(random.randint(65,90))  #生成的是二进制的a-z 的字符
        res+=random.choice([s1,s2])
    return res

print(make_code(8))
Os 模块
#os模块是与操作系统交互的一个接口
os.getcwd() 获取当前工作目录,即当前python脚本工作的目录路径
os.chdir("dirname")  改变当前脚本工作目录;相当于shell下cd
os.curdir  返回当前目录: ('.')
os.pardir  获取当前目录的父目录字符串名:('..')
os.makedirs('dirname1/dirname2')    可生成多层递归目录
os.removedirs('dirname1')    若目录为空,则删除,并递归到上一级目录,如若也为空,则删除,依此类推
os.mkdir('dirname')    生成单级目录;相当于shell中mkdir dirname
os.rmdir('dirname')    删除单级空目录,若目录不为空则无法删除,报错;相当于shell中rmdir dirname
os.listdir('dirname')    列出指定目录下的所有文件和子目录,包括隐藏文件,并以列表方式打印
os.remove()  删除一个文件
os.rename("oldname","newname")  重命名文件/目录
os.stat('path/filename')  获取文件/目录信息
os.sep    输出操作系统特定的路径分隔符,win下为"\\",Linux下为"/"
os.linesep    输出当前平台使用的行终止符,win下为"\t\n",Linux下为"\n"
os.pathsep    输出用于分割文件路径的字符串 win下为;,Linux下为:
os.name    输出字符串指示当前使用平台。win->'nt'; Linux->'posix'
os.system("bash command")  运行shell命令,直接显示
os.environ  获取系统环境变量
os.path.abspath(path)  返回path规范化的绝对路径
os.path.split(path)  将path分割成目录和文件名二元组返回
os.path.dirname(path)  返回path的目录。其实就是os.path.split(path)的第一个元素
os.path.basename(path)  返回path最后的文件名。如何path以/或\结尾,那么就会返回空值。即os.path.split(path)的第二个元素
os.path.exists(path)  如果path存在,返回True;如果path不存在,返回False
os.path.isabs(path)  如果path是绝对路径,返回True
os.path.isfile(path)  如果path是一个存在的文件,返回True。否则返回False
os.path.isdir(path)  如果path是一个存在的目录,则返回True。否则返回False
os.path.join(path1[, path2[, ...]])  将多个路径组合后返回,第一个绝对路径之前的参数将被忽略
os.path.getatime(path)  返回path所指向的文件或者目录的最后存取时间
os.path.getmtime(path)  返回path所指向的文件或者目录的最后修改时间
os.path.getsize(path) 返回path的大小
在Linux和Mac平台上,该函数会原样返回path,在windows平台上会将路径中所有字符转换为小写,并将所有斜杠转换为反斜杠。
>>> os.path.normcase('c:/windows\\system32\\')
'c:\\windows\\system32\\'


规范化路径,如..和/
>>> os.path.normpath('c://windows\\System32\\../Temp/')
'c:\\windows\\Temp'

>>> a='/Users/jieli/test1/\\\a1/\\\\aa.py/../..'
>>> print(os.path.normpath(a))
/Users/jieli/test1
os路径处理
#方式一:推荐使用
import os
#具体应用
import os,sys
possible_topdir = os.path.normpath(os.path.join(
    os.path.abspath(__file__),
    os.pardir, #上一级
    os.pardir,
    os.pardir
))
sys.path.insert(0,possible_topdir)
or(或)
BASE_DIR=os.path.normpath(os.path.join(
    os.path.abspath(__file__),
    '..',
    '..'
))
print(BASE_DIR)

#方式二:不推荐使用
os.path.dirname(os.path.dirname(os.path.dirname(os.path.abspath(__file__))))
SyS 模块
1 sys.argv           命令行参数List,第一个元素是程序本身路径
2 sys.exit(n)        退出程序,正常退出时exit(0)
3 sys.version        获取Python解释程序的版本信息
4 sys.maxint         最大的Int值
5 sys.path           返回模块的搜索路径,初始化时使用PYTHONPATH环境变量的值
6 sys.platform       返回操作系统平台名称
#=========知识储备==========
#进度条的效果
[#             ]
[##            ]
[###           ]
[####          ]

#指定宽度
print('[%-15s]' %'#')
print('[%-15s]' %'##')
print('[%-15s]' %'###')
print('[%-15s]' %'####')

#打印%
print('%s%%' %(100)) #第二个%号代表取消第一个%的特殊意义

#可传参来控制宽度
print('[%%-%ds]' %50) #[%-50s]
print(('[%%-%ds]' %50) %'#')
print(('[%%-%ds]' %50) %'##')
print(('[%%-%ds]' %50) %'###')


#=========实现打印进度条函数==========
import sys
import time

def progress(percent,width=50):
    if percent >= 1:
        percent=1
    show_str=('[%%-%ds]' %width) %(int(width*percent)*'#')
    print('\r%s %d%%' %(show_str,int(100*percent)),file=sys.stdout,flush=True,end='')


#=========应用==========
data_size=1025
recv_size=0
while recv_size < data_size:
    time.sleep(0.1) #模拟数据的传输延迟
    recv_size+=1024 #每次收1024

    percent=recv_size/data_size #接收的比例
    progress(percent,width=70) #进度条的宽度70
Shutil 模块
高级的 文件、文件夹、压缩包 处理模块
shutil.copyfileobj(fsrc, fdst[, length])
将文件内容拷贝到另一个文件中
1 import shutil
2
3 shutil.copyfileobj(open('old.xml','r'), open('new.xml', 'w'))
shutil.copyfile(src, dst)
拷贝文件

1 shutil.copyfile('f1.log', 'f2.log') #目标文件无需存在
shutil.copymode(src, dst)
仅拷贝权限。内容、组、用户均不变

1 shutil.copymode('f1.log', 'f2.log') #目标文件必须存在
shutil.copystat(src, dst)
仅拷贝状态的信息,包括:mode bits, atime, mtime, flags

1 shutil.copystat('f1.log', 'f2.log') #目标文件必须存在
shutil.copy(src, dst)
拷贝文件和权限

1 import shutil
2
3 shutil.copy('f1.log', 'f2.log')
shutil.copy2(src, dst)
拷贝文件和状态信息

1 import shutil
2
3 shutil.copy2('f1.log', 'f2.log')
shutil.ignore_patterns(*patterns)
shutil.copytree(src, dst, symlinks=False, ignore=None)
递归的去拷贝文件夹

1 import shutil
2
3 shutil.copytree('folder1', 'folder2', ignore=shutil.ignore_patterns('*.pyc', 'tmp*')) #目标目录不能存在,注意对folder2目录父级目录要有可写权限,
ignore的意思是排除
import shutil

shutil.copytree('f1', 'f2', symlinks=True, ignore=shutil.ignore_patterns('*.pyc', 'tmp*'))

'''
通常的拷贝都把软连接拷贝成硬链接,即对待软连接来说,创建新的文件
'''
shutil.rmtree(path[, ignore_errors[, onerror]])
递归的去删除文件

1 import shutil
2
3 shutil.rmtree('folder1')
shutil.move(src, dst)
递归的去移动文件,它类似mv命令,其实就是重命名。

1 import shutil
2
3 shutil.move('folder1', 'folder3')
shutil.make_archive(base_name, format,...)
创建压缩包并返回文件路径,例如:zip、tar
创建压缩包并返回文件路径,例如:zip、tar
- base_name: 压缩包的文件名,也可以是压缩包的路径。只是文件名时,则保存至当前目录,否则保存至指定路径,
如 data_bak =>保存至当前路径
如:/tmp/data_bak =>保存至/tmp/ - format: 压缩包种类,“zip”, “tar”, “bztar”,“gztar”
- root_dir: 要压缩的文件夹路径(默认当前目录)
- owner: 用户,默认当前用户
- group: 组,默认当前组
- logger: 用于记录日志,通常是logging.Logger对象
1 #将 /data 下的文件打包放置当前程序目录
2 import shutil
3 ret = shutil.make_archive("data_bak", 'gztar', root_dir='/data')
4
5
6 #将 /data下的文件打包放置 /tmp/目录
7 import shutil
8 ret = shutil.make_archive("/tmp/data_bak", 'gztar', root_dir='/data')
shutil 对压缩包的处理是调用 ZipFile 和 TarFile 两个模块来进行的,详细:
import zipfile

# 压缩
z = zipfile.ZipFile('laxi.zip', 'w')
z.write('a.log')
z.write('data.data')
z.close()

# 解压
z = zipfile.ZipFile('laxi.zip', 'r')
z.extractall(path='.')
z.close()
import tarfile

# 压缩
>>> t=tarfile.open('/tmp/egon.tar','w')
>>> t.add('/test1/a.py',arcname='a.bak')
>>> t.add('/test1/b.py',arcname='b.bak')
>>> t.close()


# 解压
>>> t=tarfile.open('/tmp/egon.tar','r')
>>> t.extractall('/egon')
>>> t.close()
Josn与Pickle模块
之前我们学习过用eval内置方法可以将一个字符串转成python对象,不过,eval方法是有局限性的,对于普通的数据类型,json.loads和eval都能用,但遇到特殊类型的时候,eval就不管用了,所以eval的重点还是通常用来执行一个字符串表达式,并返回表达式的值。
1 import json
2 x="[null,true,false,1]"
3 print(eval(x)) #报错,无法解析null类型,而json就可以
4 print(json.loads(x))
序列化:我们把对象(变量)从内存中变成可存储或传输的过程称之为序列化,在Python中叫pickling,在其他语言中也被称之为serialization,marshalling,flattening等等,都是一个意思。
为什么序列化:
- 持久保存状态
- 跨平台数据交互
为什么要序列化?

1:持久保存状态

需知一个软件/程序的执行就在处理一系列状态的变化,在编程语言中,'状态'会以各种各样有结构的数据类型(也可简单的理解为变量)的形式被保存在内存中。

内存是无法永久保存数据的,当程序运行了一段时间,我们断电或者重启程序,内存中关于这个程序的之前一段时间的数据(有结构)都被清空了。

在断电或重启程序之前将程序当前内存中所有的数据都保存下来(保存到文件中),以便于下次程序执行能够从文件中载入之前的数据,然后继续执行,这就是序列化。

具体的来说,你玩使命召唤闯到了第13关,你保存游戏状态,关机走人,下次再玩,还能从上次的位置开始继续闯关。或如,虚拟机状态的挂起等。

2:跨平台数据交互

序列化之后,不仅可以把序列化后的内容写入磁盘,还可以通过网络传输到别的机器上,如果收发的双方约定好实用一种序列化的格式,那么便打破了平台/语言差异化带来的限制,实现了跨平台数据交互。

反过来,把变量内容从序列化的对象重新读到内存里称之为反序列化,即unpickling。
josn
    如果我们要在不同的编程语言之间传递对象,就必须把对象序列化为标准格式,比如XML,但更好的方法是序列化为JSON,因为JSON表示出来就是一个字符串,可以被所有语言读取,
也可以方便地存储到磁盘或者通过网络传输。JSON不仅是标准格式,并且比XML更快,而且可以直接在Web页面中读取,非常方便。

JSON表示的对象就是标准的JavaScript语言的对象,JSON和Python内置的数据类型对应如下:
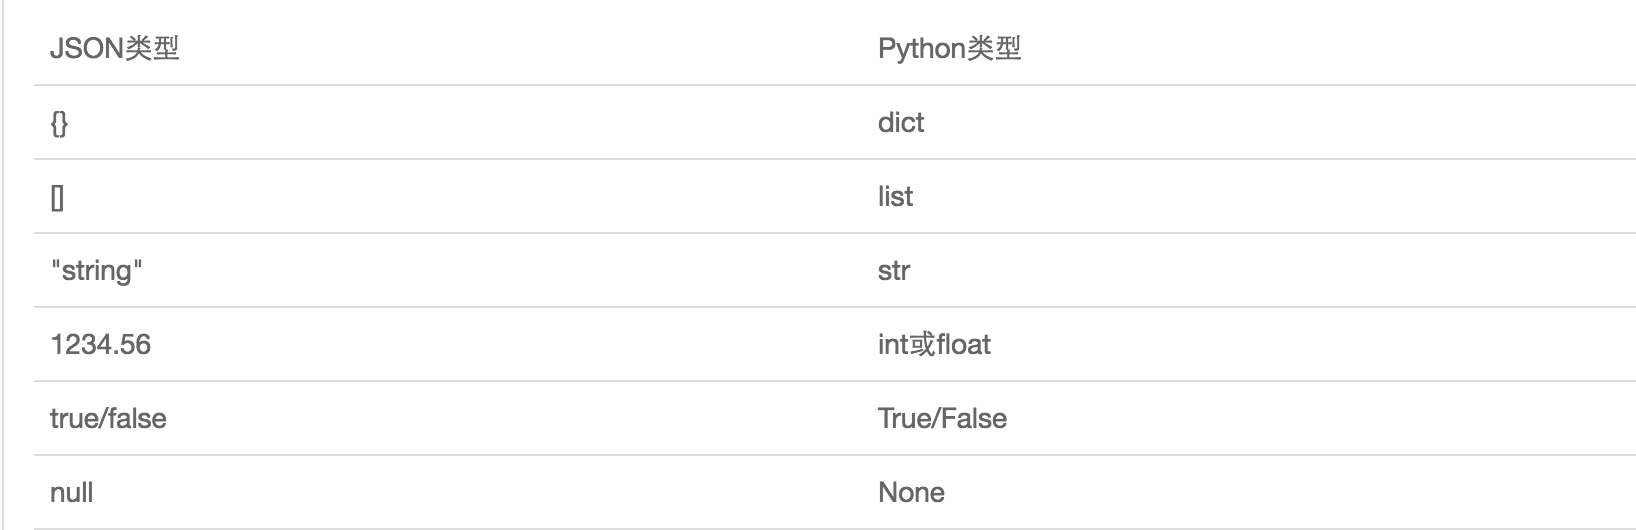

 1 import json
 2
 3 dic={'name':'alvin','age':23,'sex':'male'}
 4 print(type(dic))#<class 'dict'>
 5
 6 j=json.dumps(dic)
 7 print(type(j))#<class 'str'>
 8
 9
10 f=open('序列化对象','w')
11 f.write(j)  #-------------------等价于json.dump(dic,f)
12 f.close()
13 #-----------------------------反序列化<br>
14 import json
15 f=open('序列化对象')
16 data=json.loads(f.read())#  等价于data=json.load(f)
注意:
import json
#dct="{'1':111}"#json 不认单引号
#dct=str({"1":111})#报错,因为生成的数据还是单引号:{'one': 1}

dct='{"1":"111"}'
print(json.loads(dct))

#conclusion:
#        无论数据是怎样创建的,只要满足json格式,就可以json.loads出来,不一定非要dumps的数据才能loads
pickle(了解)
 1 import pickle
 2
 3 dic={'name':'alvin','age':23,'sex':'male'}
 4
 5 print(type(dic))#<class 'dict'>
 6
 7 j=pickle.dumps(dic)
 8 print(type(j))#<class 'bytes'>
 9
10
11 f=open('序列化对象_pickle','wb')#注意是w是写入str,wb是写入bytes,j是'bytes'
12 f.write(j)  #-------------------等价于pickle.dump(dic,f)
13
14 f.close()
15 #-------------------------反序列化
16 import pickle
17 f=open('序列化对象_pickle','rb')
18
19 data=pickle.loads(f.read())#  等价于data=pickle.load(f)
20
21
22 print(data['age'])

Pickle的问题和所有其他编程语言特有的序列化问题一样,就是它只能用于Python,并且可能不同版本的Python彼此都不兼容,因此,只能用Pickle保存那些不重要的数据,
不能成功地反序列化也没关系。
Shelve 模块
    shelve模块比pickle模块简单,只有一个open函数,返回类似字典的对象,可读可写;key必须为字符串,而值可以是python所支持的数据类型

复制代码
import shelve

f=shelve.open(r'sheve.txt')
# f['stu1_info']={'name':'egon','age':18,'hobby':['piao','smoking','drinking']}
# f['stu2_info']={'name':'gangdan','age':53}
# f['school_info']={'website':'http://www.pypy.org','city':'beijing'}

print(f['stu1_info']['hobby'])
f.close()
XML 模块
    xml是实现不同语言或程序之间进行数据交换的协议,跟json差不多,但json使用起来更简单,不过,古时候,在json还没诞生的黑暗年代,大家只能选择用xml呀,至今很多传统公司
如金融行业的很多系统的接口还主要是xml。

xml的格式如下,就是通过<>节点来区别数据结构的:
<?xml version="1.0"?>
<data>
    <country name="Liechtenstein">
        <rank updated="yes">2</rank>
        <year>2008</year>
        <gdppc>141100</gdppc>
        <neighbor name="Austria" direction="E"/>
        <neighbor name="Switzerland" direction="W"/>
    </country>
    <country name="Singapore">
        <rank updated="yes">5</rank>
        <year>2011</year>
        <gdppc>59900</gdppc>
        <neighbor name="Malaysia" direction="N"/>
    </country>
    <country name="Panama">
        <rank updated="yes">69</rank>
        <year>2011</year>
        <gdppc>13600</gdppc>
        <neighbor name="Costa Rica" direction="W"/>
        <neighbor name="Colombia" direction="E"/>
    </country>
</data>

xml数据
xml协议在各个语言里的都 是支持的,在python中可以用以下模块操作xml:

# print(root.iter('year')) #全文搜索
# print(root.find('country')) #在root的子节点找,只找一个
# print(root.findall('country')) #在root的子节点找,找所有
import xml.etree.ElementTree as ET

tree = ET.parse("xmltest.xml")
root = tree.getroot()
print(root.tag)

#遍历xml文档
for child in root:
    print('========>',child.tag,child.attrib,child.attrib['name'])
    for i in child:
        print(i.tag,i.attrib,i.text)

#只遍历year 节点
for node in root.iter('year'):
    print(node.tag,node.text)
#---------------------------------------

import xml.etree.ElementTree as ET

tree = ET.parse("xmltest.xml")
root = tree.getroot()

#修改
for node in root.iter('year'):
    new_year=int(node.text)+1
    node.text=str(new_year)
    node.set('updated','yes')
    node.set('version','1.0')
tree.write('test.xml')


#删除node
for country in root.findall('country'):
   rank = int(country.find('rank').text)
   if rank > 50:
     root.remove(country)

tree.write('output.xml')
复制代码
复制代码
#在country内添加(append)节点year2
import xml.etree.ElementTree as ET
tree = ET.parse("a.xml")
root=tree.getroot()
for country in root.findall('country'):
    for year in country.findall('year'):
        if int(year.text) > 2000:
            year2=ET.Element('year2')
            year2.text='新年'
            year2.attrib={'update':'yes'}
            country.append(year2) #往country节点下添加子节点

tree.write('a.xml.swap')
复制代码
Configparser 模块
配置文件如下
# 注释1
; 注释2

[section1]
k1 = v1
k2:v2
user=egon
age=18
is_admin=true
salary=31

[section2]
k1 = v1
读取

复制代码
import configparser

config=configparser.ConfigParser()
config.read('a.cfg')

#查看所有的标题
res=config.sections() #['section1', 'section2']
print(res)

#查看标题section1下所有key=value的key
options=config.options('section1')
print(options) #['k1', 'k2', 'user', 'age', 'is_admin', 'salary']

#查看标题section1下所有key=value的(key,value)格式
item_list=config.items('section1')
print(item_list) #[('k1', 'v1'), ('k2', 'v2'), ('user', 'egon'), ('age', '18'), ('is_admin', 'true'), ('salary', '31')]

#查看标题section1下user的值=>字符串格式
val=config.get('section1','user')
print(val) #egon

#查看标题section1下age的值=>整数格式
val1=config.getint('section1','age')
print(val1) #18

#查看标题section1下is_admin的值=>布尔值格式
val2=config.getboolean('section1','is_admin')
print(val2) #True

#查看标题section1下salary的值=>浮点型格式
val3=config.getfloat('section1','salary')
print(val3) #31.0
改写

复制代码
import configparser

config=configparser.ConfigParser()
config.read('a.cfg',encoding='utf-8')


#删除整个标题section2
config.remove_section('section2')

#删除标题section1下的某个k1和k2
config.remove_option('section1','k1')
config.remove_option('section1','k2')

#判断是否存在某个标题
print(config.has_section('section1'))

#判断标题section1下是否有user
print(config.has_option('section1',''))


#添加一个标题
config.add_section('egon')

#在标题egon下添加name=egon,age=18的配置
config.set('egon','name','egon')
config.set('egon','age',18) #报错,必须是字符串


#最后将修改的内容写入文件,完成最终的修改
config.write(open('a.cfg','w'))
import configparser

config = configparser.ConfigParser()
config["DEFAULT"] = {'ServerAliveInterval': '45',
                      'Compression': 'yes',
                     'CompressionLevel': '9'}

config['bitbucket.org'] = {}
config['bitbucket.org']['User'] = 'hg'
config['topsecret.server.com'] = {}
topsecret = config['topsecret.server.com']
topsecret['Host Port'] = '50022'     # mutates the parser
topsecret['ForwardX11'] = 'no'  # same here
config['DEFAULT']['ForwardX11'] = 'yes'
with open('example.ini', 'w') as configfile:
   config.write(configfile)
复制代码
Hashlib 模块
hash:一种算法 ,3.x里代替了md5模块和sha模块,主要提供 SHA1, SHA224, SHA256, SHA384, SHA512 ,MD5 算法
三个特点:
1.内容相同则hash运算结果相同,内容稍微改变则hash值则变
2.不可逆推
3.相同算法:无论校验多长的数据,得到的哈希值长度固定。
import hashlib
 2
 3 m=hashlib.md5()# m=hashlib.sha256()
 4
 5 m.update('hello'.encode('utf8'))
 6 print(m.hexdigest())  #5d41402abc4b2a76b9719d911017c592
 7
 8 m.update('alvin'.encode('utf8'))
 9
10 print(m.hexdigest())  #92a7e713c30abbb0319fa07da2a5c4af
11
12 m2=hashlib.md5()
13 m2.update('helloalvin'.encode('utf8'))
14 print(m2.hexdigest()) #92a7e713c30abbb0319fa07da2a5c4af
15
16 '''
17 注意:把一段很长的数据update多次,与一次update这段长数据,得到的结果一样
18 但是update多次为校验大文件提供了可能。
19 '''
以上加密算法虽然依然非常厉害,但时候存在缺陷,即:通过撞库可以反解。所以,有必要对加密算法中添加自定义key再来做加密。

复制代码
1 import hashlib
2
3 # ######## 256 ########
4
5 hash = hashlib.sha256('898oaFs09f'.encode('utf8'))
6 hash.update('alvin'.encode('utf8'))
7 print (hash.hexdigest())#e79e68f070cdedcfe63eaf1a2e92c83b4cfb1b5c6bc452d214c1b7e77cdfd1c7
import hashlib
passwds=[
    'alex3714',
    'alex1313',
    'alex94139413',
    'alex123456',
    '123456alex',
    'a123lex',
    ]
def make_passwd_dic(passwds):
    dic={}
    for passwd in passwds:
        m=hashlib.md5()
        m.update(passwd.encode('utf-8'))
        dic[passwd]=m.hexdigest()
    return dic

def break_code(cryptograph,passwd_dic):
    for k,v in passwd_dic.items():
        if v == cryptograph:
            print('密码是===>\033[46m%s\033[0m' %k)

cryptograph='aee949757a2e698417463d47acac93df'
break_code(cryptograph,make_passwd_dic(passwds))
python 还有一个 hmac 模块,它内部对我们创建 key 和 内容 进行进一步的处理然后再加密:

1 import hmac
2 h = hmac.new('alvin'.encode('utf8'))
3 h.update('hello'.encode('utf8'))
4 print (h.hexdigest())#320df9832eab4c038b6c1d7ed73a5940
#要想保证hmac最终结果一致,必须保证:
#1:hmac.new括号内指定的初始key一样
#2:无论update多少次,校验的内容累加到一起是一样的内容

import hmac

h1=hmac.new(b'egon')
h1.update(b'hello')
h1.update(b'world')
print(h1.hexdigest())

h2=hmac.new(b'egon')
h2.update(b'helloworld')
print(h2.hexdigest())

h3=hmac.new(b'egonhelloworld')
print(h3.hexdigest())

'''
f1bf38d054691688f89dcd34ac3c27f2
f1bf38d054691688f89dcd34ac3c27f2
bcca84edd9eeb86f30539922b28f3981
'''
Suprocess 模块
 1 import  subprocess
 2
 3 '''
 4 sh-3.2# ls /Users/egon/Desktop |grep txt$
 5 mysql.txt
 6 tt.txt
 7 事物.txt
 8 '''
 9
10 res1=subprocess.Popen('ls /Users/jieli/Desktop',shell=True,stdout=subprocess.PIPE)
11 res=subprocess.Popen('grep txt$',shell=True,stdin=res1.stdout,
12                  stdout=subprocess.PIPE)
13
14 print(res.stdout.read().decode('utf-8'))
15
16
17 #等同于上面,但是上面的优势在于,一个数据流可以和另外一个数据流交互,可以通过爬虫得到结果然后交给grep
18 res1=subprocess.Popen('ls /Users/jieli/Desktop |grep txt$',shell=True,stdout=subprocess.PIPE)
19 print(res1.stdout.read().decode('utf-8'))
20
21
22 #windows下:
23 # dir | findstr 'test*'
24 # dir | findstr 'txt$'
25 import subprocess
26 res1=subprocess.Popen(r'dir C:\Users\Administrator\PycharmProjects\test\函数备课',shell=True,stdout=subprocess.PIPE)
27 res=subprocess.Popen('findstr test*',shell=True,stdin=res1.stdout,
28                  stdout=subprocess.PIPE)
29
30 print(res.stdout.read().decode('gbk')) #subprocess使用当前系统默认编码,得到结果为bytes类型,在windows下需要用gbk解码
Logging 模块
日志级别
CRITICAL = 50 #FATAL = CRITICAL
ERROR = 40
WARNING = 30 #WARN = WARNING
INFO = 20
DEBUG = 10
NOTSET = 0 #不设置  等于关闭日志功能
默认级别为warning,默认打印到终端
import logging

logging.debug('调试debug')
logging.info('消息info')
logging.warning('警告warn')
logging.error('错误error')
logging.critical('严重critical')

'''
WARNING:root:警告warn
ERROR:root:错误error
CRITICAL:root:严重critical
为logging模块指定全局配置,针对所有logger有效,控制打印到文件中
可在logging.basicConfig()函数中通过具体参数来更改logging模块默认行为,可用参数有
filename:用指定的文件名创建FiledHandler(后边会具体讲解handler的概念),这样日志会被存储在指定的文件中。
filemode:文件打开方式,在指定了filename时使用这个参数,默认值为“a”还可指定为“w”。
format:指定handler使用的日志显示格式。
datefmt:指定日期时间格式。
level:设置rootlogger(后边会讲解具体概念)的日志级别
stream:用指定的stream创建StreamHandler。可以指定输出到sys.stderr,sys.stdout或者文件,默认为sys.stderr。若同时列出了filename和stream两个参数,则stream参数会被忽略。


#格式
%(name)s:Logger的名字,并非用户名,详细查看

%(levelno)s:数字形式的日志级别

%(levelname)s:文本形式的日志级别

%(pathname)s:调用日志输出函数的模块的完整路径名,可能没有

%(filename)s:调用日志输出函数的模块的文件名

%(module)s:调用日志输出函数的模块名

%(funcName)s:调用日志输出函数的函数名

%(lineno)d:调用日志输出函数的语句所在的代码行

%(created)f:当前时间,用UNIX标准的表示时间的浮 点数表示

%(relativeCreated)d:输出日志信息时的,自Logger创建以 来的毫秒数

%(asctime)s:字符串形式的当前时间。默认格式是 “2003-07-08 16:49:45,896”。逗号后面的是毫秒

%(thread)d:线程ID。可能没有

%(threadName)s:线程名。可能没有

%(process)d:进程ID。可能没有

%(message)s:用户输出的消息
#======介绍
可在logging.basicConfig()函数中可通过具体参数来更改logging模块默认行为,可用参数有
filename:用指定的文件名创建FiledHandler(后边会具体讲解handler的概念),这样日志会被存储在指定的文件中。
filemode:文件打开方式,在指定了filename时使用这个参数,默认值为“a”还可指定为“w”。
format:指定handler使用的日志显示格式。
datefmt:指定日期时间格式。
level:设置rootlogger(后边会讲解具体概念)的日志级别
stream:用指定的stream创建StreamHandler。可以指定输出到sys.stderr,sys.stdout或者文件,默认为sys.stderr。若同时列出了filename和stream两个参数,则stream参数会被忽略。


format参数中可能用到的格式化串:
%(name)s Logger的名字
%(levelno)s 数字形式的日志级别
%(levelname)s 文本形式的日志级别
%(pathname)s 调用日志输出函数的模块的完整路径名,可能没有
%(filename)s 调用日志输出函数的模块的文件名
%(module)s 调用日志输出函数的模块名
%(funcName)s 调用日志输出函数的函数名
%(lineno)d 调用日志输出函数的语句所在的代码行
%(created)f 当前时间,用UNIX标准的表示时间的浮 点数表示
%(relativeCreated)d 输出日志信息时的,自Logger创建以 来的毫秒数
%(asctime)s 字符串形式的当前时间。默认格式是 “2003-07-08 16:49:45,896”。逗号后面的是毫秒
%(thread)d 线程ID。可能没有
%(threadName)s 线程名。可能没有
%(process)d 进程ID。可能没有
%(message)s用户输出的消息


#========使用
import logging
logging.basicConfig(filename='access.log',
                    format='%(asctime)s - %(name)s - %(levelname)s -%(module)s:  %(message)s',
                    datefmt='%Y-%m-%d %H:%M:%S %p',
                    level=10)

logging.debug('调试debug')
logging.info('消息info')
logging.warning('警告warn')
logging.error('错误error')
logging.critical('严重critical')


#========结果
access.log内容:
2017-07-28 20:32:17 PM - root - DEBUG -test:  调试debug
2017-07-28 20:32:17 PM - root - INFO -test:  消息info
2017-07-28 20:32:17 PM - root - WARNING -test:  警告warn
2017-07-28 20:32:17 PM - root - ERROR -test:  错误error
2017-07-28 20:32:17 PM - root - CRITICAL -test:  严重critical

part2: 可以为logging模块指定模块级的配置,即所有logger的配置
logging模块的Formatter,Handler,Logger,Filter对象
#logger:产生日志的对象

#Filter:过滤日志的对象

#Handler:接收日志然后控制打印到不同的地方,FileHandler用来打印到文件中,StreamHandler用来打印到终端

#Formatter对象:可以定制不同的日志格式对象,然后绑定给不同的Handler对象使用,以此来控制不同的Handler的日志格式
'''
critical=50
error =40
warning =30
info = 20
debug =10
'''


import logging

#1、logger对象:负责产生日志,然后交给Filter过滤,然后交给不同的Handler输出
logger=logging.getLogger(__file__)

#2、Filter对象:不常用,略

#3、Handler对象:接收logger传来的日志,然后控制输出
h1=logging.FileHandler('t1.log') #打印到文件
h2=logging.FileHandler('t2.log') #打印到文件
h3=logging.StreamHandler() #打印到终端

#4、Formatter对象:日志格式
formmater1=logging.Formatter('%(asctime)s - %(name)s - %(levelname)s -%(module)s:  %(message)s',
                    datefmt='%Y-%m-%d %H:%M:%S %p',)

formmater2=logging.Formatter('%(asctime)s :  %(message)s',
                    datefmt='%Y-%m-%d %H:%M:%S %p',)

formmater3=logging.Formatter('%(name)s %(message)s',)


#5、为Handler对象绑定格式
h1.setFormatter(formmater1)
h2.setFormatter(formmater2)
h3.setFormatter(formmater3)

#6、将Handler添加给logger并设置日志级别
logger.addHandler(h1)
logger.addHandler(h2)
logger.addHandler(h3)
logger.setLevel(10)

#7、测试
logger.debug('debug')
logger.info('info')
logger.warning('warning')
logger.error('error')
logger.critical('critical')
注意:
Logger与Handler的级别:
logger是第一级过滤,然后才能到handler,我们可以给logger和handler同时设置level,但是需要注意的是logger的级别一定要比handler的底。
应用
"""
logging配置
"""

import os
import logging.config

# 定义三种日志输出格式 开始

standard_format = '[%(asctime)s][%(threadName)s:%(thread)d][task_id:%(name)s][%(filename)s:%(lineno)d]' \
                  '[%(levelname)s][%(message)s]' #其中name为getlogger指定的名字

simple_format = '[%(levelname)s][%(asctime)s][%(filename)s:%(lineno)d]%(message)s'

id_simple_format = '[%(levelname)s][%(asctime)s] %(message)s'

# 定义日志输出格式 结束

logfile_dir = os.path.dirname(os.path.abspath(__file__))  # log文件的目录

logfile_name = 'all2.log'  # log文件名

# 如果不存在定义的日志目录就创建一个
if not os.path.isdir(logfile_dir):
    os.mkdir(logfile_dir)

# log文件的全路径
logfile_path = os.path.join(logfile_dir, logfile_name)

# log配置字典
LOGGING_DIC = {
    'version': 1,
    'disable_existing_loggers': False,
    'formatters': {
        'standard': {
            'format': standard_format
        },
        'simple': {
            'format': simple_format
        },
    },
    'filters': {},
    'handlers': {
        #打印到终端的日志
        'console': {
            'level': 'DEBUG',
            'class': 'logging.StreamHandler',  # 打印到屏幕
            'formatter': 'simple'
        },
        #打印到文件的日志,收集info及以上的日志
        'default': {
            'level': 'DEBUG',
            'class': 'logging.handlers.RotatingFileHandler',  # 保存到文件
            'formatter': 'standard',
            'filename': logfile_path,  # 日志文件
            'maxBytes': 1024*1024*5,  # 日志大小 5M
            'backupCount': 5,
            'encoding': 'utf-8',  # 日志文件的编码,再也不用担心中文log乱码了
        },
    },
    'loggers': {
        #logging.getLogger(__name__)拿到的logger配置
        '': {
            'handlers': ['default', 'console'],  # 这里把上面定义的两个handler都加上,即log数据既写入文件又打印到屏幕
            'level': 'DEBUG',
            'propagate': True,  # 向上(更高level的logger)传递
        },
    },
}


def load_my_logging_cfg():
    logging.config.dictConfig(LOGGING_DIC)  # 导入上面定义的logging配置
    logger = logging.getLogger(__name__)  # 生成一个log实例
    logger.info('It works!')  # 记录该文件的运行状态

if __name__ == '__main__':
    load_my_logging_cfg()
"""
MyLogging Test
"""

import time
import logging
import my_logging  # 导入自定义的logging配置

logger = logging.getLogger(__name__)  # 生成logger实例


def demo():
    logger.debug("start range... time:{}".format(time.time()))
    logger.info("中文测试开始。。。")
    for i in range(10):
        logger.debug("i:{}".format(i))
        time.sleep(0.2)
    else:
        logger.debug("over range... time:{}".format(time.time()))
    logger.info("中文测试结束。。。")

if __name__ == "__main__":
    my_logging.load_my_logging_cfg()  # 在你程序文件的入口加载自定义logging配置
    demo()
Re 模块
正则表达式模块,主要用于匹配一些字符等。
常用匹配模式(元字符):
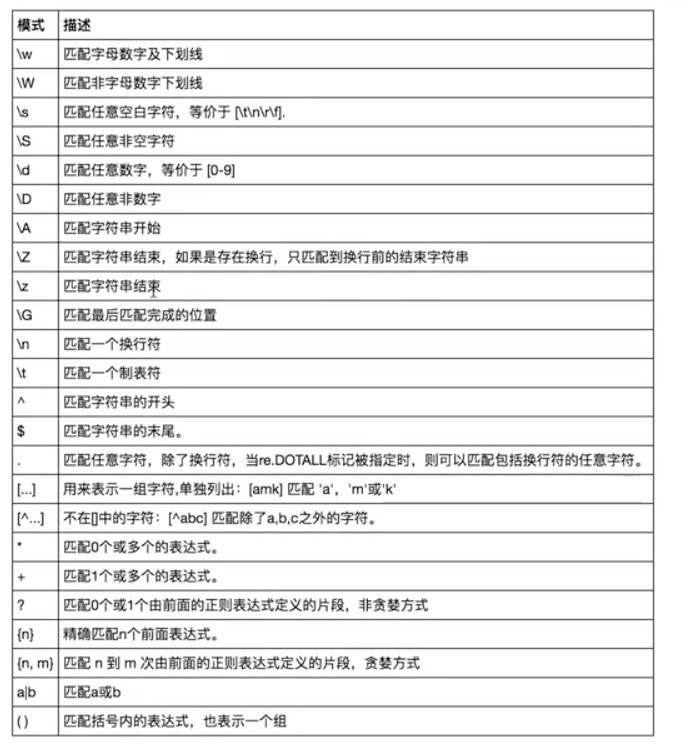
# =================================匹配模式=================================
#一对一的匹配
# 'hello'.replace(old,new)
# 'hello'.find('pattern')

#正则匹配
import re
#\w与\W
print(re.findall('\w','hello egon 123')) #['h', 'e', 'l', 'l', 'o', 'e', 'g', 'o', 'n', '1', '2', '3']
print(re.findall('\W','hello egon 123')) #[' ', ' ']

#\s与\S
print(re.findall('\s','hello  egon  123')) #[' ', ' ', ' ', ' ']
print(re.findall('\S','hello  egon  123')) #['h', 'e', 'l', 'l', 'o', 'e', 'g', 'o', 'n', '1', '2', '3']

#\n \t都是空,都可以被\s匹配
print(re.findall('\s','hello \n egon \t 123')) #[' ', '\n', ' ', ' ', '\t', ' ']

#\n与\t
print(re.findall(r'\n','hello egon \n123')) #['\n']
print(re.findall(r'\t','hello egon\t123')) #['\n']

#\d与\D
print(re.findall('\d','hello egon 123')) #['1', '2', '3']
print(re.findall('\D','hello egon 123')) #['h', 'e', 'l', 'l', 'o', ' ', 'e', 'g', 'o', 'n', ' ']

#\A与\Z
print(re.findall('\Ahe','hello egon 123')) #['he'],\A==>^
print(re.findall('123\Z','hello egon 123')) #['he'],\Z==>$

#^与$
print(re.findall('^h','hello egon 123')) #['h']
print(re.findall('3$','hello egon 123')) #['3']

# 重复匹配:| . | * | ? | .* | .*? | + | {n,m} |
#.
print(re.findall('a.b','a1b')) #['a1b']
print(re.findall('a.b','a1b a*b a b aaab')) #['a1b', 'a*b', 'a b', 'aab']
print(re.findall('a.b','a\nb')) #[]
print(re.findall('a.b','a\nb',re.S)) #['a\nb']
print(re.findall('a.b','a\nb',re.DOTALL)) #['a\nb']同上一条意思一样

#*
print(re.findall('ab*','bbbbbbb')) #[]
print(re.findall('ab*','a')) #['a']
print(re.findall('ab*','abbbb')) #['abbbb']

#?
print(re.findall('ab?','a')) #['a']
print(re.findall('ab?','abbb')) #['ab']
#匹配所有包含小数在内的数字
print(re.findall('\d+\.?\d*',"asdfasdf123as1.13dfa12adsf1asdf3")) #['123', '1.13', '12', '1', '3']

#.*默认为贪婪匹配
print(re.findall('a.*b','a1b22222222b')) #['a1b22222222b']

#.*?为非贪婪匹配:推荐使用
print(re.findall('a.*?b','a1b22222222b')) #['a1b']

#+
print(re.findall('ab+','a')) #[]
print(re.findall('ab+','abbb')) #['abbb']

#{n,m}
print(re.findall('ab{2}','abbb')) #['abb']
print(re.findall('ab{2,4}','abbb')) #['abb']
print(re.findall('ab{1,}','abbb')) #'ab{1,}' ===> 'ab+'
print(re.findall('ab{0,}','abbb')) #'ab{0,}' ===> 'ab*'

#[]
print(re.findall('a[1*-]b','a1b a*b a-b')) #[]内的都为普通字符了,且如果-没有被转意的话,应该放到[]的开头或结尾
print(re.findall('a[^1*-]b','a1b a*b a-b a=b')) #[]内的^代表的意思是取反,所以结果为['a=b']
print(re.findall('a[0-9]b','a1b a*b a-b a=b')) #[]内的^代表的意思是取反,所以结果为['a=b']
print(re.findall('a[a-z]b','a1b a*b a-b a=b aeb')) #[]内的^代表的意思是取反,所以结果为['a=b']
print(re.findall('a[a-zA-Z]b','a1b a*b a-b a=b aeb aEb')) #[]内的^代表的意思是取反,所以结果为['a=b']

#\# print(re.findall('a\\c','a\c')) #对于正则来说a\\c确实可以匹配到a\c,但是在python解释器读取a\\c时,会发生转义,然后交给re去执行,所以抛出异常
print(re.findall(r'a\\c','a\c')) #r代表告诉解释器使用rawstring,即原生字符串,把我们正则内的所有符号都当普通字符处理,不要转义
print(re.findall('a\\\\c','a\c')) #同上面的意思一样,和上面的结果一样都是['a\\c']

#():分组
print(re.findall('ab+','ababab123')) #['ab', 'ab', 'ab']
print(re.findall('(ab)+123','ababab123')) #['ab'],匹配到末尾的ab123中的ab
print(re.findall('(?:ab)+123','ababab123')) #findall的结果不是匹配的全部内容,而是组内的内容,?:可以让结果为匹配的全部内容
print(re.findall('href="(.*?)"','<a href="http://www.baidu.com">点击</a>'))#['http://www.baidu.com']
print(re.findall('href="(?:.*?)"','<a href="http://www.baidu.com">点击</a>'))#['href="http://www.baidu.com"']

#|
print(re.findall('compan(?:y|ies)','Too many companies have gone bankrupt, and the next one is my company'))
复制代码
# ===========================re模块提供的方法介绍===========================
import re
#1
print(re.findall('e','alex make love') )   #['e', 'e', 'e'],返回所有满足匹配条件的结果,放在列表里
#2
print(re.search('e','alex make love').group()) #e,只到找到第一个匹配然后返回一个包含匹配信息的对象,该对象可以通过调用group()方法得到匹配的字符串,如果字符串没有匹配,则返回None。

#3
print(re.match('e','alex make love'))    #None,同search,不过在字符串开始处进行匹配,完全可以用search+^代替match

#4
print(re.split('[ab]','abcd'))     #['', '', 'cd'],先按'a'分割得到''和'bcd',再对''和'bcd'分别按'b'分割

#5
print('===>',re.sub('a','A','alex make love')) #===> Alex mAke love,不指定n,默认替换所有
print('===>',re.sub('a','A','alex make love',1)) #===> Alex make love
print('===>',re.sub('a','A','alex make love',2)) #===> Alex mAke love
print('===>',re.sub('^(\w+)(.*?\s)(\w+)(.*?\s)(\w+)(.*?)$',r'\5\2\3\4\1','alex make love')) #===> love make alex

print('===>',re.subn('a','A','alex make love')) #===> ('Alex mAke love', 2),结果带有总共替换的个数


#6
obj=re.compile('\d{2}')

print(obj.search('abc123eeee').group()) #12
print(obj.findall('abc123eeee')) #['12'],重用了obj
复制代码
基于递归和正则表达式实现的计算器,源码如下:
#!/usr/bin/env python
# -*- coding:utf-8 -*-
"""
该计算器思路:
    1、递归寻找表达式中只含有 数字和运算符的表达式,并计算结果
    2、由于整数计算会忽略小数,所有的数字都认为是浮点型操作,以此来保留小数
使用技术:
    1、正则表达式
    2、递归

执行流程如下:
******************** 请计算表达式: 1 - 2 * ( (60-30 +(-40.0/5) * (9-2*5/3 + 7 /3*99/4*2998 +10 * 568/14 )) - (-4*3)/ (16-3*2) ) ********************
before: ['1-2*((60-30+(-40.0/5)*(9-2*5/3+7/3*99/4*2998+10*568/14))-(-4*3)/(16-3*2))']
-40.0/5=-8.0
after: ['1-2*((60-30+-8.0*(9-2*5/3+7/3*99/4*2998+10*568/14))-(-4*3)/(16-3*2))']
========== 上一次计算结束 ==========
before: ['1-2*((60-30+-8.0*(9-2*5/3+7/3*99/4*2998+10*568/14))-(-4*3)/(16-3*2))']
9-2*5/3+7/3*99/4*2998+10*568/14=173545.880953
after: ['1-2*((60-30+-8.0*173545.880953)-(-4*3)/(16-3*2))']
========== 上一次计算结束 ==========
before: ['1-2*((60-30+-8.0*173545.880953)-(-4*3)/(16-3*2))']
60-30+-8.0*173545.880953=-1388337.04762
after: ['1-2*(-1388337.04762-(-4*3)/(16-3*2))']
========== 上一次计算结束 ==========
before: ['1-2*(-1388337.04762-(-4*3)/(16-3*2))']
-4*3=-12.0
after: ['1-2*(-1388337.04762--12.0/(16-3*2))']
========== 上一次计算结束 ==========
before: ['1-2*(-1388337.04762--12.0/(16-3*2))']
16-3*2=10.0
after: ['1-2*(-1388337.04762--12.0/10.0)']
========== 上一次计算结束 ==========
before: ['1-2*(-1388337.04762--12.0/10.0)']
-1388337.04762--12.0/10.0=-1388335.84762
after: ['1-2*-1388335.84762']
========== 上一次计算结束 ==========
我的计算结果: 2776672.69524
"""


import re


def compute_mul_div(arg):
    """ 操作乘除
    :param expression:表达式
    :return:计算结果
    """

    val = arg[0]
    mch = re.search('\d+\.*\d*[\*\/]+[\+\-]?\d+\.*\d*', val)
    if not mch:
        return
    content = re.search('\d+\.*\d*[\*\/]+[\+\-]?\d+\.*\d*', val).group()

    if len(content.split('*'))>1:
        n1, n2 = content.split('*')
        value = float(n1) * float(n2)
    else:
        n1, n2 = content.split('/')
        value = float(n1) / float(n2)

    before, after = re.split('\d+\.*\d*[\*\/]+[\+\-]?\d+\.*\d*', val, 1)
    new_str = "%s%s%s" % (before,value,after)
    arg[0] = new_str
    compute_mul_div(arg)


def compute_add_sub(arg):
    """ 操作加减
    :param expression:表达式
    :return:计算结果
    """
    while True:
        if arg[0].__contains__('+-') or arg[0].__contains__("++") or arg[0].__contains__('-+') or arg[0].__contains__("--"):
            arg[0] = arg[0].replace('+-','-')
            arg[0] = arg[0].replace('++','+')
            arg[0] = arg[0].replace('-+','-')
            arg[0] = arg[0].replace('--','+')
        else:
            break

    if arg[0].startswith('-'):
        arg[1] += 1
        arg[0] = arg[0].replace('-','&')
        arg[0] = arg[0].replace('+','-')
        arg[0] = arg[0].replace('&','+')
        arg[0] = arg[0][1:]
    val = arg[0]
    mch = re.search('\d+\.*\d*[\+\-]{1}\d+\.*\d*', val)
    if not mch:
        return
    content = re.search('\d+\.*\d*[\+\-]{1}\d+\.*\d*', val).group()
    if len(content.split('+'))>1:
        n1, n2 = content.split('+')
        value = float(n1) + float(n2)
    else:
        n1, n2 = content.split('-')
        value = float(n1) - float(n2)

    before, after = re.split('\d+\.*\d*[\+\-]{1}\d+\.*\d*', val, 1)
    new_str = "%s%s%s" % (before,value,after)
    arg[0] = new_str
    compute_add_sub(arg)


def compute(expression):
    """ 操作加减乘除
    :param expression:表达式
    :return:计算结果
    """
    inp = [expression,0]

    # 处理表达式中的乘除
    compute_mul_div(inp)

    # 处理
    compute_add_sub(inp)
    if divmod(inp[1],2)[1] == 1:
        result = float(inp[0])
        result = result * -1
    else:
        result = float(inp[0])
    return result


def exec_bracket(expression):
    """ 递归处理括号,并计算
    :param expression: 表达式
    :return:最终计算结果
    """
    # 如果表达式中已经没有括号,则直接调用负责计算的函数,将表达式结果返回,如:2*1-82+444
    if not re.search('\(([\+\-\*\/]*\d+\.*\d*){2,}\)', expression):
        final = compute(expression)
        return final
    # 获取 第一个 只含有 数字/小数 和 操作符 的括号
    # 如:
    #    ['1-2*((60-30+(-40.0/5)*(9-2*5/3+7/3*99/4*2998+10*568/14))-(-4*3)/(16-3*2))']
    #    找出:(-40.0/5)
    content = re.search('\(([\+\-\*\/]*\d+\.*\d*){2,}\)', expression).group()

    # 分割表达式,即:
    # 将['1-2*((60-30+(-40.0/5)*(9-2*5/3+7/3*99/4*2998+10*568/14))-(-4*3)/(16-3*2))']
    # 分割更三部分:['1-2*((60-30+(    (-40.0/5)      *(9-2*5/3+7/3*99/4*2998+10*568/14))-(-4*3)/(16-3*2))']
    before, nothing, after = re.split('\(([\+\-\*\/]*\d+\.*\d*){2,}\)', expression, 1)

    print 'before:',expression
    content = content[1:len(content)-1]

    # 计算,提取的表示 (-40.0/5),并活的结果,即:-40.0/5=-8.0
    ret = compute(content)

    print '%s=%s' %( content, ret)

    # 将执行结果拼接,['1-2*((60-30+(      -8.0     *(9-2*5/3+7/3*99/4*2998+10*568/14))-(-4*3)/(16-3*2))']
    expression = "%s%s%s" %(before, ret, after)
    print 'after:',expression
    print "="*10,'上一次计算结束',"="*10

    # 循环继续下次括号处理操作,本次携带者的是已被处理后的表达式,即:
    # ['1-2*((60-30+   -8.0  *(9-2*5/3+7/3*99/4*2998+10*568/14))-(-4*3)/(16-3*2))']

    # 如此周而复始的操作,直到表达式中不再含有括号
    return exec_bracket(expression)


# 使用 __name__ 的目的:
#   只有执行 python index.py 时,以下代码才执行
#   如果其他人导入该模块,以下代码不执行
if __name__ == "__main__":
    #print '*'*20,"请计算表达式:", "1 - 2 * ( (60-30 +(-40.0/5) * (9-2*5/3 + 7 /3*99/4*2998 +10 * 568/14 )) - (-4*3)/ (16-3*2) )" ,'*'*20
    #inpp = '1 - 2 * ( (60-30 +(-40.0/5) * (9-2*5/3 + 7 /3*99/4*2998 +10 * 568/14 )) - (-4*3)/ (16-3*2) ) '
    inpp = "1-2*-30/-12*(-20+200*-3/-200*-300-100)"
    #inpp = "1-5*980.0"
    inpp = re.sub('\s*','',inpp)
    # 表达式保存在列表中
    result = exec_bracket(inpp)
    print result

 浙公网安备 33010602011771号