

Netruon 理解(11):使用 NAT 将 Linux network namespace 连接外网
学习 Neutron 系列文章:
(2)Neutron OpenvSwitch + VLAN 虚拟网络
(3)Neutron OpenvSwitch + GRE/VxLAN 虚拟网络
(4)Neutron OVS OpenFlow 流表 和 L2 Population
(9)Neutron FWaas 和 Nova Security Group
(10)Neutron VPNaas
(11)Neutron DVR
(12)Neutron VRRP
(14)使用 NAT 将 Linux network namespace 连接外网
(15)使用 Linux bridge 将 Linux network namespace 连接外网
Linux network namespace 连接外网从大类上来讲主要有两种方法:网络地址转换(NAT) 和 桥接(bridging),而桥接根据使用的网桥又可以分为使用 linux bridge 和 Open vSwitch 网络等。本文将说明 NAT 具体配置过程以及原理。
1. 环境及配置
我们可以把一个 linux network namespace 看作另一个计算机,这样看起来会更加直观:
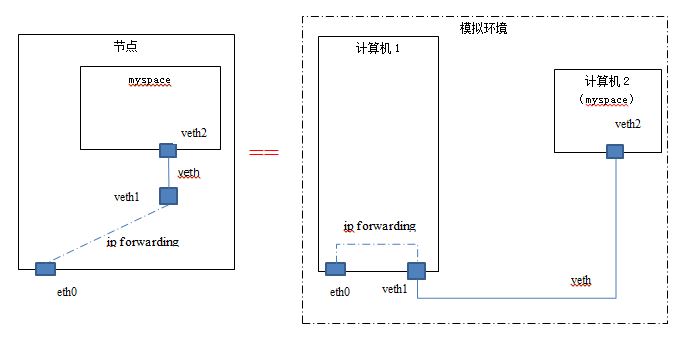
节点 host1 的 IP 地址为 192.168.1.32. 实验使用的另一个机器 host2 的 IP 为 192.168.1.15.
为了能从在 host1 上的 netns myspace 上能 ping 通 host2 ,你需要做的配置及说明:
| 步骤# | 命令 | 说明 |
| 1 | ip netns add myspace | 创建名称为 ‘myspace’ 的 linux network namespace |
| 2 | ip link add veth1 type veth peer name veth2 | 创建一个 veth 设备,一头为 veth1,另一头为 veth2 |
| 3 | ip link set veth2 netns myspace | 将 veth2 加入 myspace 作为其一个 network interface |
| 4 | ifconfig veth1 192.168.45.2 netmask 255.255.255.0 up | 配置 veth1 的 IP 地址 |
| 5 | ip netns exec myspace ifconfig veth2 192.168.45.3 netmask 255.255.255.0 up | 配置 veth2 的 IP 地址,它和 veth1 需要在同一个网段上 |
| 6 | ip netns exec myspace route add default gw 192.168.45.2 | 将 myspace 的默认路由设为 veth1 的 IP 地址 |
| 7 | echo 1 > /proc/sys/net/ipv4/ip_forward | 开启 linux kernel ip forwarding |
| 8 | iptables -t nat -A POSTROUTING -s 192.168.45.0/24 -o eth0 -j MASQUERADE | 配置 SNAT,将从 myspace 发出的网络包的 soruce IP address 替换为 eth0 的 IP 地址 |
| 9 |
iptables -t filter -A FORWARD -i eth0 -o veth1 -j ACCEPT iptables -t filter -A FORWARD -o eth0 -i veth1 -j ACCEPT |
在默认 FORWARD 规则为 DROP 时显式地允许 veth1 和 eth0 之间的 forwarding |
这些配置之后,host 上的 route 表中自动添加了一条路由规则:
root@compute2:/home/s1# route -n
Kernel IP routing table
Destination     Gateway         Genmask         Flags Metric Ref    Use Iface
0.0.0.0         192.168.1.1     0.0.0.0         UG    0      0        0 eth0
192.168.1.0     0.0.0.0         255.255.255.0   U     0      0        0 eth0
192.168.45.0    0.0.0.0         255.255.255.0   U     0      0        0 veth1
myspace 的路由表:
root@compute2:/home/s1# ip netns exec myspace route -n
Kernel IP routing table
Destination     Gateway         Genmask         Flags Metric Ref    Use Iface
0.0.0.0         192.168.45.2    0.0.0.0         UG    0      0        0 veth2
192.168.45.0    0.0.0.0         255.255.255.0   U     0      0        0 veth2
其中第一条是显式地被创建的,第二条是自动被创建的。
现在你就可以从 myspace 中 ping 外网的地址了。
2 原理
2.1 关于第八条 SNAT
如果没有设置第八条 SNAT,那么 ICMP Request 能够到达对方计算机,但是 echo reply 消息回不来,因为其目的地址为一个内部地址。
root@compute1:/home/s1# tcpdump -eni bridge1 -p icmp -v
tcpdump: listening on bridge1, link-type EN10MB (Ethernet), capture size 65535 bytes
07:40:03.827852 08:00:27:4f:56:17 > 08:00:27:c7:cf:ca, ethertype IPv4 (0x0800), length 98: (tos 0x0, ttl 63, id 54069, offset 0, flags [DF], proto ICMP (1), length 84)
    192.168.45.3 > 192.168.1.15: ICMP echo request, id 26569, seq 1, length 64
07:40:04.829779 08:00:27:4f:56:17 > 08:00:27:c7:cf:ca, ethertype IPv4 (0x0800), length 98: (tos 0x0, ttl 63, id 54194, offset 0, flags [DF], proto ICMP (1), length 84)
加上第八条之后,ping 能成功,也就是 ICMP echo request 能发出,echo reply 能返回。
在 host2 的网卡 eth0 上,能看到 ICMP echo request 网络包的源 IP 为 host1 的 IP:
07:44:19.360519 08:00:27:c7:cf:ca > 08:00:27:4f:56:17, ethertype IPv4 (0x0800), length 98: (tos 0x0, ttl 64, id 54265, offset 0, flags [none], proto ICMP (1), length 84)
    192.168.1.15 > 192.168.1.32: ICMP echo reply, id 28534, seq 7, length 64
07:44:20.358360 08:00:27:4f:56:17 > 08:00:27:c7:cf:ca, ethertype IPv4 (0x0800), length 98: (tos 0x0, ttl 63, id 21278, offset 0, flags [DF], proto ICMP (1), length 84)
    192.168.1.32 > 192.168.1.15: ICMP echo request, id 28534, seq 8, length 64
在 host1 的网卡 eth0 上,能看到来回网络包使用的是 host1 和 host2 的 IP 地址:
root@compute2:/home/s1# tcpdump -envi eth0 -p icmp -v
tcpdump: listening on eth0, link-type EN10MB (Ethernet), capture size 65535 bytes
06:31:27.285150 08:00:27:4f:56:17 > 08:00:27:c7:cf:ca, ethertype IPv4 (0x0800), length 98: (tos 0x0, ttl 63, id 58781, offset 0, flags [DF], proto ICMP (1), length 84)
    192.168.1.32 > 192.168.1.15: ICMP echo request, id 29610, seq 158, length 64
06:31:27.285777 08:00:27:c7:cf:ca > 08:00:27:4f:56:17, ethertype IPv4 (0x0800), length 98: (tos 0x0, ttl 64, id 23662, offset 0, flags [none], proto ICMP (1), length 84)
    192.168.1.15 > 192.168.1.32: ICMP echo reply, id 29610, seq 158, length 64
在 host1 的 veth1 上,能看到发出的网络包的源 IP 和收到的网络包的目的 IP 皆为内部网段的 IP 地址:
root@compute2:/home/s1# tcpdump -envi veth1 -p icmp -v
tcpdump: listening on veth1, link-type EN10MB (Ethernet), capture size 65535 bytes
06:33:13.355956 b2:52:7e:b6:e9:4e > ee:53:ae:dd:6f:7f, ethertype IPv4 (0x0800), length 98: (tos 0x0, ttl 64, id 6989, offset 0, flags [DF], proto ICMP (1), length 84)
    192.168.45.3 > 192.168.1.15: ICMP echo request, id 29610, seq 264, length 64
06:33:13.356391 ee:53:ae:dd:6f:7f > b2:52:7e:b6:e9:4e, ethertype IPv4 (0x0800), length 98: (tos 0x0, ttl 63, id 36067, offset 0, flags [none], proto ICMP (1), length 84)
    192.168.1.15 > 192.168.45.3: ICMP echo reply, id 29610, seq 264, length 64
那为什么在 forwarding 发生之前,在 iptables nat 表中并没有显式做 DNAT 的情况下 veth1 和 eth0 之间有了 DNAT 呢?
原因是 ICMP 使用了 Query ID,而 NAT 会自动根据 ICMP Query ID 对 ICMP echo reply 做 DNAT。根据 https://tools.ietf.org/html/rfc5508 的 3.1. ICMP Query Mapping 章节,当内部的 host1 发一个 ICMP Query 给外部 host2 时,linux 内核的 NAT 模块会针对 NAT 的外部地址分配一个匹配的 query ID(上面例子中的 id 29610);然后当收到 ICMP echo reply 时,NAT模块会根据 ICMP Query ID 以及 ICMP header checksum 将外部 IP 转化为内部 IP,然后再做 forwarding。也可以看出,ICMP Query ID 类似于 TCP 和 UDP 使用的端口号(port number),两者的区别在于 NAT 为 ICMP 自动做了 DNAT,而 TCP 和 UDP 则需要显式添加 DNAT 规则。
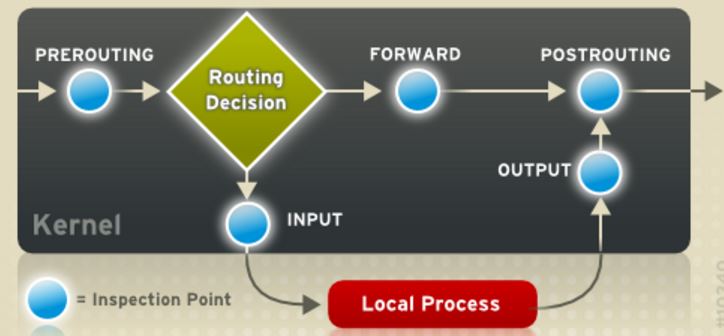
2.2 关于 IP forwarding
 (图片来源)
Linux 内核在从 veth1 上收到 myspace 发过来的 ICMP 包以后,
- 执行 PREROTING 规则,本例不需要此配置此规则。
- 执行 Routing decision。它会检查网络包的目的IP地址,发现它不在本机上,说明需要进行 routing (FORWARD)。因为 Linux 上默认的 IP forwarding 是关闭的,因此需要执行第七条命令来开启它;然后再检查 iptable 规则中的这种 forwarding (ICMP 包从veth1 出再进入 eth0)。通常为了安全起见,管理员会将 FORWARD 的默认规则设置为 DROP,此时则需要执行第九条命令显式地允许(ACCEPT)所需要的 forwarding。
- 执行 ip forwarding。查找 host1 上的路由表,网络包会被路由到 eth0。
- 执行 POSTROUTING 规则。因为此时的网络包的源 IP 地址仍然为内部地址,为了避免 ICMP 网络包有去无回,需要通过 SNAT 将内部地址转换为外部地址。这就是第八条的作用。
- 从 eth0 发出
(3)关于 myspace 的默认路由
因为 myspace 只有一根网线(veth)连接到 veth1,因此,必须将默认的路由器地址设置为 veth1 的 IP 地址。
2.3 DNAT
上面的配置只是为了能从 myspace 中访问外网。要使得外面网络能访问 myspace 中的应用的话,则需要在 host1 上添加 DNAT 规则,比如将 8080 端口受到的 TCP 转到内部 IP 上的 80 端口;同时还需要配置 forward 规则,允许从 eth0 出到 veth1 进。基本过程为:
对方计算机使用 host1 的 IP 地址和特定端口访问 mysapce 中的 TCP 应用 (192.168.1.32:8080),
- Linux 内核在从 eth0 上收到发过来的TCP包(IP 为 192.168.1.32,端口为 8080)
- 执行 PREROTING 规则,将目的 IP 及端口修改为 192.168.45.3 和 80
- 执行 Routing decision。它会检查网络包的目的IP地址,发现它不在本机上,说明需要进行 routing (FORWARD)。检查 Linux 的 IP forwarding 是否打开;然后再检查 iptable 规则中的这种 forwarding (TCP 包从 eth0 出再进入 veth1)。通常为了安全起见,管理员会将 FORWARD 的默认规则设置为 DROP,此时则需要执行类似第九条命令显式地允许(ACCEPT)所需要的 forwarding。
- 执行 ip forwarding。查找 host1 上的路由表,网络包会被路由到 veth1。
- 执行 POSTROUTING 规则。尽管有第八条规则,但是它要求源地址在内部网段,因此不会执行。
- 从 veth1 发出的包通过 veth 设备进入 myspace 的 veth0 网卡。
- 被 80 端口上的应用接收到。

 浙公网安备 33010602011771号