

RabbitMQ入门:路由(Routing)
在上一篇博客《RabbitMQ入门:发布/订阅(Publish/Subscribe)》中,我们认识了fanout类型的exchange,它是一种通过广播方式发送消息的路由器,所有和exchange建立的绑定关系的队列都会接收到消息。但是有一些场景只需要订阅到一部分消息,这个时候就不能使用fanout 类型的exchange了,这个就引出来今天的“猪脚”--Direct Exchange,通过Routing Key来决定需要将消息发送到哪个或者哪些队列中。
接下来请收看详细内容:
- Direct Exchange(直接路由器)
- 多重绑定
- 代码实例
一、Direct Exchange(直接路由器)
在上文中介绍exchange的时候,对direct exchange进行了简单介绍,它是一种完全按照routing key(路由关键字)进行投递的:当消息中的routing key和队列中的binding key完全匹配时,才进行会将消息投递到该队列中。这里提到了一个routing key和binding key(绑定关键字),是什么东东?
- routing key:
在发送消息的时候,basicPublish的第二个参数就是routing key,由于上次是fanout 类型的exchange 进行广播方式投递,这个字段不会影响投递结果,因此我们这里就传入了“”,但是在direct 类型的exchange中我们就不能传入""了,需要指定具体的关键字。

- binding key:
我们在前文中建立绑定关系的时候,queueBind的第三个参数就是绑定关键字

我们声明direact exchange的时候使用:

二、多重绑定
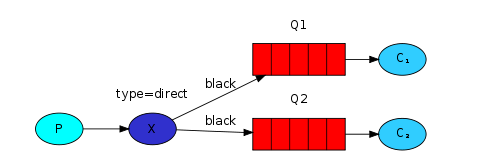
多个队列以相同的绑定键绑定到同一个路由器的情况,我们称之为多重绑定。
工作模型为(P代表生产者,X代表路由器,红色的Q代表队列,C代表消费者):
三、代码实例
预备知识了解完了,现在来写个程序感受下。
- 生产者
public class LogDirectSender {
    // exchange名字
    public static String EXCHANGE_NAME = "directExchange";

    public static void main(String[] args) {
        ConnectionFactory factory = new ConnectionFactory();
        factory.setHost("localhost");
        Connection connection = null;
        Channel channel = null;
        try {
            // 1.创建连接和通道
            connection = factory.newConnection();
            channel = connection.createChannel();

            // 2.为通道声明direct类型的exchange
            channel.exchangeDeclare(EXCHANGE_NAME, BuiltinExchangeType.DIRECT);


            // 3.发送消息到指定的exchange,队列指定为空,由exchange根据情况判断需要发送到哪些队列
            String routingKey = "debug";
            String msg = " hello rabbitmq, I am " + routingKey;
            channel.basicPublish(EXCHANGE_NAME, routingKey, null, msg.getBytes());
            System.out.println("product send a msg: " + msg);
        } catch (IOException e) {
            e.printStackTrace();
        } catch (TimeoutException e) {
            e.printStackTrace();
        } finally {
            // 4.关闭连接
            if (channel != null) {
                try {
                    channel.close();
                } catch (IOException e) {
                    e.printStackTrace();
                } catch (TimeoutException e) {
                    e.printStackTrace();
                }
            }

            if (connection != null) {
                try {
                    connection.close();
                } catch (IOException e) {
                    e.printStackTrace();
                }
            }
        }

    }
}
和上次博客中生产者的区别就是黑字粗体部分:1.路由器类型改为direct 2.消息发布的时候指定了routing key
- 消费者
public class LogDirectReciver {

    public static void main(String[] args) {
        ConnectionFactory factory = new ConnectionFactory();
        factory.setHost("localhost");
        Connection connection = null;
        Channel channel = null;
        try {
            // 1.创建连接和通道
            connection = factory.newConnection();
            channel = connection.createChannel();

            // 2.为通道声明direct类型的exchange
            channel.exchangeDeclare(LogDirectSender.EXCHANGE_NAME, BuiltinExchangeType.DIRECT);
            // 3.创建随机名字的队列
            String queueName = channel.queueDeclare().getQueue();

            // 4.建立exchange和队列的绑定关系
             String[] bindingKeys = { "error", "info", "debug" };
//            String[] bindingKeys = { "error" };
            for (int i = 0; i < bindingKeys.length; i++) {
                channel.queueBind(queueName, LogDirectSender.EXCHANGE_NAME, bindingKeys[i]);
                System.out.println(" **** LogDirectReciver keep alive ,waiting for " + bindingKeys[i]);
            }

            // 5.通过回调生成消费者并进行监听
            Consumer consumer = new DefaultConsumer(channel) {
                @Override
                public void handleDelivery(String consumerTag, Envelope envelope,
                        com.rabbitmq.client.AMQP.BasicProperties properties, byte[] body) throws IOException {

                    // 获取消息内容然后处理
                    String msg = new String(body, "UTF-8");
                    System.out.println("*********** LogDirectReciver" + " get message :[" + msg + "]");
                }
            };
            // 6.消费消息
            channel.basicConsume(queueName, true, consumer);

        } catch (IOException e) {
            e.printStackTrace();
        } catch (TimeoutException e) {
            e.printStackTrace();
        }
    }

}
和上次博客中消费者的区别就是黑字粗体部分:1.路由器类型改为direct 2.建立绑定关系的时候指定了binding key
- 执行消费者,控制台log打印如下:
 **** LogDirectReciver keep alive ,waiting for error
 **** LogDirectReciver keep alive ,waiting for info
 **** LogDirectReciver keep alive ,waiting for debug
这个消费者我们视为消费者1,它会接收error,info,debug三个关键字的消息。
- 将String[] bindingKeys = { "error", "info", "debug" };改为String[] bindingKeys = { "error" };,然后再运行一次消费者。控制台log打印如下:
**** LogDirectReciver keep alive ,waiting for error这个消费者我们视为消费者2,它只会接收error 关键字的消息。
- 执行生产者,然后将String routingKey = "debug";的值分别改为“info"和"error",然后分别执行,这样一共执行了三次生产者
第一次执行: product send a msg: hello rabbitmq, I am debug 第二次执行: product send a msg: hello rabbitmq, I am info 第三次执行: product send a msg: hello rabbitmq, I am error - 再次查看两个消费者的控制台log:
消费者1:
 **** LogDirectReciver keep alive ,waiting for error
 **** LogDirectReciver keep alive ,waiting for info
 **** LogDirectReciver keep alive ,waiting for debug
*********** LogDirectReciver get message :[ hello rabbitmq, I am debug]
*********** LogDirectReciver get message :[ hello rabbitmq, I am info]
*********** LogDirectReciver get message :[ hello rabbitmq, I am error]

消费者2:
 **** LogDirectReciver keep alive ,waiting for error
*********** LogDirectReciver get message :[ hello rabbitmq, I am error]
- 查看RabbitMQ管理页面
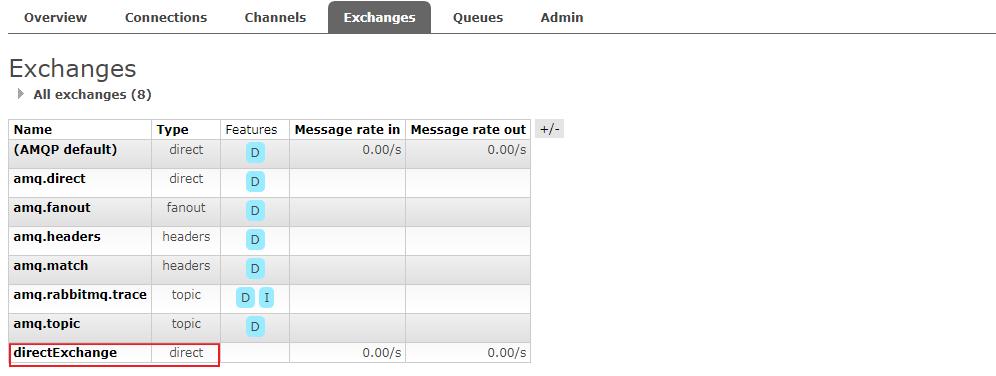
exchanges标签页里面多了个direct类型的路由器。进入详细页面:
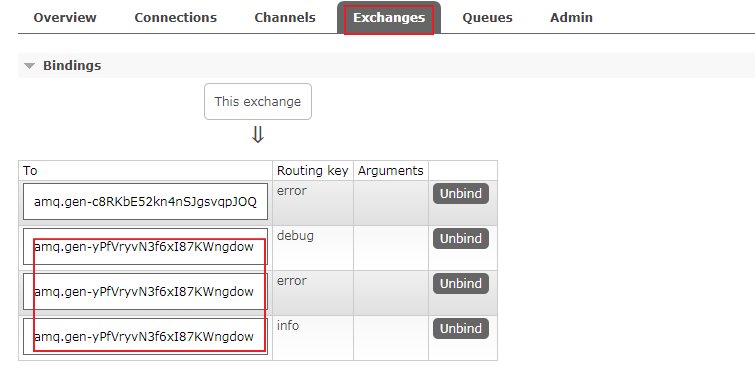
有4个绑定关系,其中三个的队列是同一个。切换到Queues标签页:

有两个临时队列。
-
如果关掉消费者1和消费者2,会发现队列自动删除了,绑定关系也不存在了。
本文来自博客园,作者:JAVA开发老菜鸟,转载请注明原文链接:https://www.cnblogs.com/sam-uncle/p/9209666.html

 浙公网安备 33010602011771号