
Android OpenGL ES 开发(五): OpenGL ES 使用投影和相机视图
OpenGL ES环境允许你以更接近于你眼睛看到的物理对象的方式来显示你绘制的对象。物理查看的模拟是通过对你所绘制的对象的坐标进行数学变换完成的:
- Projection — 这个变换是基于他们所显示的GLSurfaceView的宽和高来调整绘制对象的坐标的。没有这个计算变换,通过OpenGL绘制的形状会在不同显示窗口变形。这个投影变化通常只会在OpenGL view的比例被确定或者在你渲染器的onSurfaceChanged()方法中被计算。想要了解更多的关于投影和坐标映射的相关信息,请看绘制对象的坐标映射。
- Camera View — 这个换是基于虚拟的相机的位置来调整绘制对象坐标的。需要着重注意的是,OpenGL ES并没有定义一个真实的相机对象,而是提供一个实用方法,通过变换绘制对象的显示来模拟一个相机。相机视图变换可能只会在你的GLSurfaceView被确定时被计算,或者基于用户操作或你应用程序的功能来动态改变。
本课程描述怎样创建投影和相机视图并将其应用的到你的GLSurfaceView的绘制对象上。
定义投影
投影变化的数据是在你GLSurfaceView.Renderer类的onSurfaceChanged()方法中被计算的。下面的示例代码是获取GLSurfaceView的高和宽,并通过Matrix.frustumM()方法用它们填充到投影变换矩阵中。
// mMVPMatrix is an abbreviation for "Model View Projection Matrix"
private final float[] mMVPMatrix = new float[16];
private final float[] mProjectionMatrix = new float[16];
private final float[] mViewMatrix = new float[16];

@Override
public void onSurfaceChanged(GL10 unused, int width, int height) {
    GLES20.glViewport(0, 0, width, height);

    float ratio = (float) width / height;

    // this projection matrix is applied to object coordinates
    // in the onDrawFrame() method
    Matrix.frustumM(mProjectionMatrix, 0, -ratio, ratio, -1, 1, 3, 7);
}
上面的代码填充有一个投影矩阵mProjectionMatrix,mProjectionMatrix可以在onFrameDraw()方法中与下一部分的相机视图结合在一起。
注意:如果仅仅只把投影矩阵应用的到你绘制的对象中,通常你只会得到一个非常空的显示。一般情况下,你还必须为你要在屏幕上显示的任何内容应用相机视图。
定义相机视图
通过在你的渲染器中添加相机视图变换作为你绘制过程的一部分来完成你的绘制图像的变换过程。在下面的代码中,通过Matrix.setLookAtM()方法计算相机视图变换,然后将其与之前计算出的投影矩阵结合到一起。合并后的矩阵接下来会传递给绘制的图形。
@Override
public void onDrawFrame(GL10 unused) {
    ...
    // Set the camera position (View matrix)
    Matrix.setLookAtM(mViewMatrix, 0, 0, 0, -3, 0f, 0f, 0f, 0f, 1.0f, 0.0f);

    // Calculate the projection and view transformation
    Matrix.multiplyMM(mMVPMatrix, 0, mProjectionMatrix, 0, mViewMatrix, 0);

    // Draw shape
    mTriangle.draw(mMVPMatrix);
}
应用投影和相机变换
为了使用在上一部分内容中展示的投影和相机视图变换的合并矩阵,首先要在之前Triangle类中定义的定点着色器代码中添加一个矩阵变量:
public class Triangle {

    private final String vertexShaderCode =
        // This matrix member variable provides a hook to manipulate
        // the coordinates of the objects that use this vertex shader
        "uniform mat4 uMVPMatrix;" +
        "attribute vec4 vPosition;" +
        "void main() {" +
        // the matrix must be included as a modifier of gl_Position
        // Note that the uMVPMatrix factor *must be first* in order
        // for the matrix multiplication product to be correct.
        "  gl_Position = uMVPMatrix * vPosition;" +
        "}";

    // Use to access and set the view transformation
    private int mMVPMatrixHandle;

    ...
}
下一步,修改你的图形对象的draw()方法来接收联合变换矩阵,并将它们应用到图形中:
public void draw(float[] mvpMatrix) { // pass in the calculated transformation matrix
    ...

    // get handle to shape's transformation matrix
    mMVPMatrixHandle = GLES20.glGetUniformLocation(mProgram, "uMVPMatrix");

    // Pass the projection and view transformation to the shader
    GLES20.glUniformMatrix4fv(mMVPMatrixHandle, 1, false, mvpMatrix, 0);

    // Draw the triangle
    GLES20.glDrawArrays(GLES20.GL_TRIANGLES, 0, vertexCount);

    // Disable vertex array
    GLES20.glDisableVertexAttribArray(mPositionHandle);
}
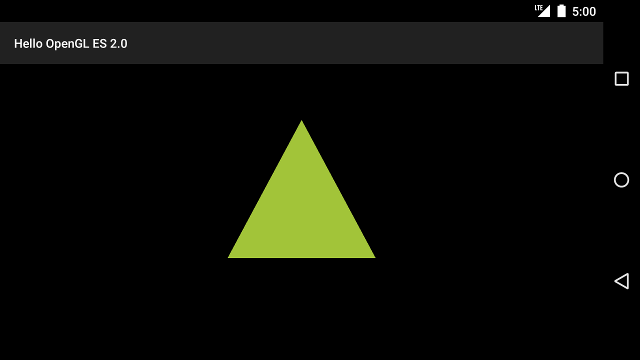
一旦你正确的计算并应用投影和相机视图变换,你的绘图对象将会以正确的比例绘制,它看起来应该像下面这样:
现在你已经有一个可以以正确比例显示图形的应用了。后面的章节,我们可以了解如何为你的图形添加运动了。

 浙公网安备 33010602011771号