
【译】TetroGL: An OpenGL Game Tutorial in C++ for Win32 Platforms - Part 1
这个系列专注于使用C++和OpenGL在windows平台上开发2D游戏,项目目标是在系列结束后能开发出一个类似俄罗斯方块的游戏。本系列分为3篇文章:
第一部分:涉及win32消息循环,窗口创建和OpenGL的搭建,并且你将会学习如何绘制一些简单的图形。
第二部分:涉及资源处理和简单动画的显示
第三部分:将前面的内容包含进来,并且讨论游戏逻辑。
项目设置
作者做了两项设置:
1) LinkeràInput中,在” Addition Dependencies”中加入”opengl32.lib”,
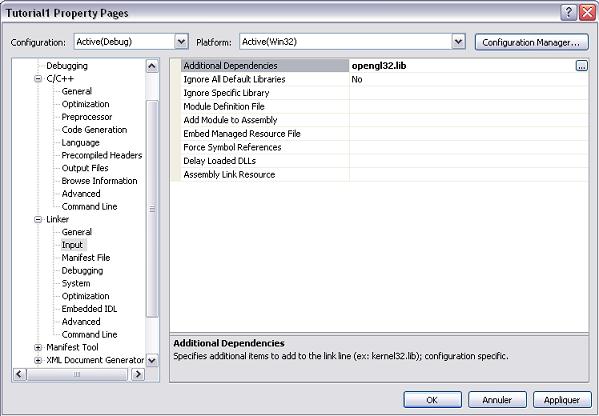
2) 禁掉UNICODE,“c/c++”à” Preprocessor”,在Preprocessor Definitions中将"Inherit from parent or project defaults"不选中。

消息循环
Windows系统为每个应用程序创建一个消息队列,当指定应用程序的窗口上发生一个事件时,系统会把消息推入到这个队列中。你的应用程序应当检索并处理这些消息。这就是所谓的“消息循环“,是win32应用程序的核心。
一个典型的消息循环如下:
 MSG Message; Message.message = (~WM_QUIT); // Loop until a WM_QUIT message is received while (Message.message != WM_QUIT)
 {
{
 if (PeekMessage(&Message, NULL, 0, 0, PM_REMOVE))
 {
{ // If a message was waiting in the message queue, process it TranslateMessage(&Message); DispatchMessage(&Message);
 } else {//空闲时 // Do processing stuff here
 }
} }
} TranslateMessage函数的目的是为了将虚键消息(WM_KEYDOWN和WM_KEYUP)为字符消息(WM_CHAR).最后DispatchMessage会将消息定向到正确的窗口处理程序。
// The application class, which simply wraps the message queue and process// the command line.class CApplication{public: CApplication(){} CApplication(HINSTANCE hInstance); ~CApplication(); // Parses the command line to see if the application // should be in fullscreen mode. void ParseCmdLine(LPSTR lpCmdLine); // Creates the main window and start the message loop. void Run(); void SetHInst(HINSTANCE hInstance);private: HINSTANCE m_hInstance; // Specifies if the application has to be started in fullscreen // mode. This option is supplied through the command line // ("-fullscreen" option). bool m_bFullScreen;};ParseCmdLine函数功能非常直观:仅仅简单地检查命令行中是否有参数"-fullscreen",如果有,则设置m_bFullScreen为true,表示窗口模式为全屏模式。
void CApplication::Run(){ // Create the main window first CMainWindow mainWindow(800,600,m_bFullScreen); MSG Message; Message.message = ~WM_QUIT; DWORD dwNextDeadLine = GetTickCount() + 30; DWORD dwSleep = 30; bool bUpdate = false; // Loop until a WM_QUIT message is received while (Message.message != WM_QUIT) { // Wait until a message comes in or until the timeout expires. The // timeout is recalculated so that this function will return at // least every 30 msec. DWORD dwResult = MsgWaitForMultipleObjectsEx(0,NULL,dwSleep,QS_ALLEVENTS,0); if (dwResult != WAIT_TIMEOUT) { // If the function returned with no timeout, it means that a // message has been received, so process it. if (PeekMessage(&Message, NULL, 0, 0, PM_REMOVE)) { // If a message was waiting in the message queue, process it TranslateMessage(&Message); DispatchMessage(&Message); } // If the current time is close (or past) to the // deadline, the application should be processed. if (GetTickCount() >= dwNextDeadLine-1) bUpdate = true; } else // On a timeout, the application should be processed. bUpdate = true; // Check if the application should be processed if (bUpdate) { DWORD dwCurrentTime = GetTickCount(); // Update the main window mainWindow.Update(dwCurrentTime); // Draw the main window mainWindow.Draw(); dwNextDeadLine = dwNextDeadLine + 30; dwSleep = 30; } else dwSleep = dwNextDeadLine - GetCurrentTime(); }}函数第一行创建主窗口。和常见的消息循环不同,由于在2D游戏中并不需要很快地刷新屏幕,以固定地速率(这里是30毫秒)刷新,对于绘制动画和其他处理已经足够了。
作者在这里使用的技巧就是出于这个目的,他使用了MsgWaitForMultipleObjectsEx函数来等待任何事件的发生,再判断是30毫秒的时限已到,还是有事件要处理,若是后者,则先处理事件,在处理完后,若此时也已经接近30毫秒的时限的话,就重绘界面,若是超时发生了,则说明30毫秒时限已到,需要去刷新界面了。若这两种情况都没有的话,这个函数不会消耗 CPU周期,线程只是被挂起,不参与调度。
主窗口
创建窗口
CMainWindow::CMainWindow(int iWidth, int iHeight, bool bFullScreen) : m_hWindow(NULL), m_hDeviceContext(NULL), m_hGLContext(NULL), m_bFullScreen(bFullScreen){ RegisterWindowClass(); RECT WindowRect; WindowRect.top = WindowRect.left = 0; WindowRect.right = iWidth; WindowRect.bottom = iHeight; // Window Extended Style DWORD dwExStyle = 0; // Windows Style DWORD dwStyle = 0; if (m_bFullScreen) { DEVMODE dmScreenSettings; memset(&dmScreenSettings,0,sizeof(dmScreenSettings)); dmScreenSettings.dmSize = sizeof(dmScreenSettings); dmScreenSettings.dmPelsWidth = iWidth; dmScreenSettings.dmPelsHeight = iHeight; dmScreenSettings.dmBitsPerPel = 32; dmScreenSettings.dmFields = DM_PELSWIDTH | DM_PELSHEIGHT | DM_BITSPERPEL; // Change the display settings to fullscreen. On error, throw // an exception. if (ChangeDisplaySettings(&dmScreenSettings,CDS_FULLSCREEN) != DISP_CHANGE_SUCCESSFUL) { throw CException("Unable to swith to fullscreen mode"); } dwExStyle = WS_EX_APPWINDOW; dwStyle = WS_POPUP; // In fullscreen mode, we hide the cursor. ShowCursor(FALSE); } else { dwExStyle = WS_EX_APPWINDOW | WS_EX_WINDOWEDGE; dwStyle = WS_OVERLAPPEDWINDOW; } // Adjust the window to the true requested size AdjustWindowRectEx(&WindowRect, dwStyle, FALSE, dwExStyle); // Now create the main window m_hWindow = CreateWindowEx(dwExStyle,TEXT(WINDOW_CLASSNAME), TEXT("Tutorial1"), WS_CLIPSIBLINGS | WS_CLIPCHILDREN | dwStyle, 0, 0, WindowRect.right-WindowRect.left, WindowRect.bottom-WindowRect.top, NULL, NULL, GetModuleHandle(NULL), this); if (m_hWindow==NULL) throw CException("Cannot create the main window"); CreateContext(); InitGL(); ShowWindow(m_hWindow,SW_SHOW); // Call OnSize manually because in fullscreen mode it will be // called only when the window is created (which is too early // because OpenGL is not initialized yet). OnSize(iWidth,iHeight);} 在构造函数中,检查完是否需要进入全屏模式后,通过调用ChangeDisplaySettings来切换到全屏模式,然后调用AdjustWindowRectEx来调整矩形的大小,但这个函数在全屏模式下没什么作用,最后CreateContext和InitGL对OpenGL进行初始化。
LRESULT CMainWindow::OnEvent(HWND Handle, UINT Message, WPARAM wParam, LPARAM lParam){ if (Message == WM_CREATE) { // Get the creation parameters. CREATESTRUCT* pCreateStruct = reinterpret_cast<CREATESTRUCT*>(lParam); // Set as the "user data" parameter of the window SetWindowLongPtr(Handle, GWLP_USERDATA, reinterpret_cast<long>(pCreateStruct->lpCreateParams)); } // Get the CMainWindow instance corresponding to the window handle CMainWindow* pWindow = reinterpret_cast<CMainWindow*> (GetWindowLongPtr(Handle, GWLP_USERDATA)); if (pWindow) pWindow->ProcessEvent(Message,wParam,lParam); return DefWindowProc(Handle, Message, wParam, lParam);}由于OnEvent函数是静态的,因此就没法访问非静态成员,为了解决这个问题,在调用CreateWindowEx创建窗口时最后一个参数传的是this指针。传给窗口处理过程的第一个消息是WM_CREATE,当接收到这个消息时,wParam参数中包含一个CREATESTRUCT指针,它里面包含了额外的数据,在这里是指向CMainWindow的指针。但遗憾的是,不是每个消息都有这个结构,所以要保存起来供后面使用。因此调用SetWindowLongPtr,它的目的是为一个特定的窗口保存一些用户数据(GWLP_USERDATA)。在这里,作者保存了到类实例的指针。当接收到其他消息时,我们只是简单地通过GetWindowLongPtr来取回这个指针,然后访问非静态函数ProcessEvent,而这个函数负责具体的消息处理。
void CMainWindow::ProcessEvent(UINT Message, WPARAM wParam, LPARAM lParam){ switch (Message) { // Quit when we close the main window case WM_CLOSE : PostQuitMessage(0); break; case WM_SIZE: OnSize(LOWORD(lParam),HIWORD(lParam)); break; case WM_KEYDOWN : break; case WM_KEYUP : break; }} 异常处理
class CException : public std::exception{public: const char* what() const { return m_strMessage.c_str(); } CException(const std::string& strMessage="") : m_strMessage(strMessage) { } virtual ~CException() { } std::string m_strMessage;};使用的实例:
CApplication theApp;int WINAPI WinMain(HINSTANCE Instance, HINSTANCE hPrevInstance, LPSTR lpCmdLine, INT){ try { // Create the application class, // parse the command line and // start the app. theApp.SetHInst(Instance); theApp.ParseCmdLine(lpCmdLine); theApp.Run(); } catch(CException& e) { MessageBox(NULL,e.what(),"Error",MB_OK|MB_ICONEXCLAMATION); } return 0;}初始化OpenGL
CreateContext用来初始化绘制上下文,使得OpenGL基本元素可以在窗口上绘制:
void CMainWindow::CreateContext(){ // Describes the pixel format of the drawing surface PIXELFORMATDESCRIPTOR pfd; memset(&pfd, 0, sizeof(PIXELFORMATDESCRIPTOR)); pfd.nSize = sizeof(PIXELFORMATDESCRIPTOR); pfd.nVersion = 1; // Version Number pfd.dwFlags = PFD_DRAW_TO_WINDOW | // Draws to a window PFD_SUPPORT_OPENGL | // The format must support OpenGL PFD_DOUBLEBUFFER; // Support for double buffering pfd.iPixelType = PFD_TYPE_RGBA; // Uses an RGBA pixel format pfd.cColorBits = 32; // 32 bits colors if (!(m_hDeviceContext=GetDC(m_hWindow))) throw CException("Unable to create rendering context"); int PixelFormat; // Do Windows find a matching pixel format ? if (!(PixelFormat=ChoosePixelFormat(m_hDeviceContext,&pfd))) throw CException("Unable to create rendering context"); // Set the new pixel format if(!SetPixelFormat(m_hDeviceContext,PixelFormat,&pfd)) throw CException("Unable to create rendering context"); // Create the OpenGL rendering context if (!(m_hGLContext=wglCreateContext(m_hDeviceContext))) throw CException("Unable to create rendering context"); // Activate the rendering context if(!wglMakeCurrent(m_hDeviceContext,m_hGLContext)) throw CException("Unable to create rendering context"); }函数的第一部分填充PIXELFORMATDESCRIPTOR结构体:缓冲区用来绘制到窗口上,支持OpenGL,使用双缓存(为了避免闪烁)。然后调用ChoosePixelFormat来检查像素格式是否支持,这个函数返回一个像素格式索引(若没有找到匹配的,则返回0)。一旦存在这样的像素格式索引,则通过SetPixelFormat来设置新像素格式。然后调用wglCreateContext创建OpenGL绘制上下文,最后,调用wglMakeCurrent,这指明线程接下来的OpenGL调用会绘制在这个设备上下文上。
InitGL函数很简单:
void CMainWindow::InitGL(){ // Enable 2D texturing glEnable(GL_TEXTURE_2D); // Choose a smooth shading model glShadeModel(GL_SMOOTH); // Set the clear color to black glClearColor(0.0, 0.0, 0.0, 0.0);}再看OnSize函数
void CMainWindow::OnSize(GLsizei width, GLsizei height){ // Sets the size of the OpenGL viewport glViewport(0,0,width,height); // Select the projection stack and apply // an orthographic projection glMatrixMode(GL_PROJECTION); glLoadIdentity(); glOrtho(0.0,width,height,0.0,-1.0,1.0); glMatrixMode(GL_MODELVIEW);}正交投影
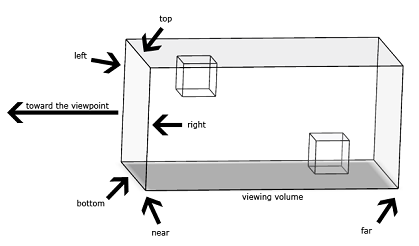
透视投影

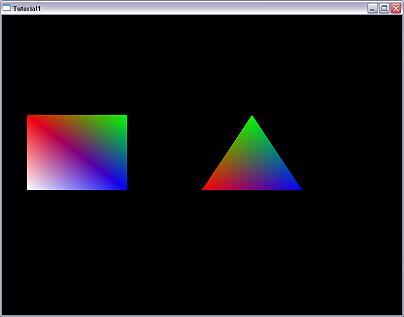
绘制简单图形
void CMainWindow::Draw(){ // Clear the buffer glClear(GL_COLOR_BUFFER_BIT); // Here goes the drawing code glBegin(GL_QUADS); glColor3f(1.0,0.0,0.0); glVertex3i(50,200,0); glColor3f(0.0,1.0,0.0); glVertex3i(250,200,0); glColor3f(0.0,0.0,1.0); glVertex3i(250,350,0); glColor3f(1.0,1.0,1.0); glVertex3i(50,350,0); glEnd(); glBegin(GL_TRIANGLES); glColor3f(1.0,0.0,0.0); glVertex3i(400,350,0); glColor3f(0.0,1.0,0.0); glVertex3i(500,200,0); glColor3f(0.0,0.0,1.0); glVertex3i(600,350,0); glEnd(); SwapBuffers(m_hDeviceContext);}作者:洞庭散人
出处:http://phinecos.cnblogs.com/
posted on 2008-06-26 21:01 Phinecos(洞庭散人) 阅读(3885) 评论(9) 收藏 举报

 浙公网安备 33010602011771号