
【译】光线跟踪:理论与实现(一) 简介
光线跟踪的目的是为了模拟自然现象:你能见到各种颜色是因为太阳发射出来的光线,经过各种自然物体的反射或折射后,最终进入你的眼睛。若我们暂时不去计较其他因素,所有的这些光线都应该是直线。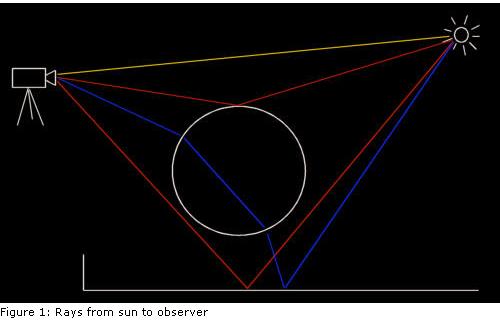
如图所示,黄色的光直接从太阳射入照相机中;红色的光线在跟场景发生发射后到达照相机,而蓝色的光线被玻璃球折射后命中照相机。图中没有画出的是那些无法到达观察者的光线,这些光线也是我们不从光源往照相机进行跟踪的原因,而是采用想反的路径。上图标识的是一种理想情形,因为光线的方向没有影响。
从上面我们得到一个启示:与其等待光源发射一条光线穿过一个目前颜色还是黑色的像素,不如我们自己从照相机发射光线去穿过平面的每个像素,去观察这些光线能击中几何体上的哪些像素。
 // -----------------------------------------------------------// Ray class definition// -----------------------------------------------------------class Ray
 {
{

 public:
 Ray() : m_Origin( vector3( 0, 0, 0 ) ), m_Direction( vector3( 0, 0, 0 ) ) {};
 Ray() : m_Origin( vector3( Ray( vector3& a_Origin, vector3& a_Dir ); void SetOrigin( vector3& a_Origin ) { m_Origin = a_Origin; } void SetDirection( vector3& a_Direction ) { m_Direction = a_Direction; } vector3& GetOrigin() { return m_Origin; } vector3& GetDirection() { return m_Direction; }private: vector3 m_Origin;//光线的起点 vector3 m_Direction;//光线的方向
 };
};一条光线有它的起点和方向。当从照相机发射光线时,起点一般是一个固定点,并且光线会穿过屏幕表面的像素。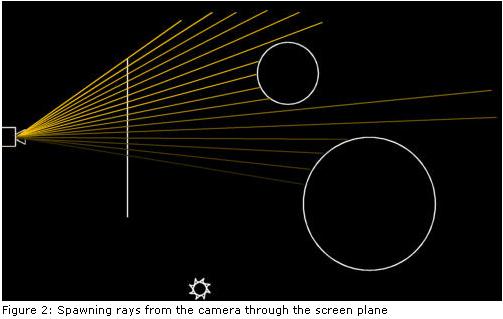
// -----------------------------------------------------------// Fires rays in the scene one scanline at a time, from left// to right// -----------------------------------------------------------bool Engine::Render(){ // render scene vector3 o( 0, 0, -5 ); // initialize timer int msecs = GetTickCount(); // reset last found primitive pointer Primitive* lastprim = 0; // render remaining lines for ( int y = m_CurrLine; y < (m_Height - 20); y++ ) { //逐条扫描线处理 m_SX = m_WX1; // render pixels for current line for ( int x = 0; x < m_Width; x++ ) {//对当前扫描线上的所有像素点处理 // fire primary ray Color acc( 0, 0, 0 ); vector3 dir = vector3( m_SX, m_SY, 0 ) - o; //发射出的光线的方向 NORMALIZE( dir ); Ray r( o, dir ); float dist; Primitive* prim = Raytrace( r, acc, 1, 1.0f, dist ); int red = (int)(acc.r * 256); int green = (int)(acc.g * 256); int blue = (int)(acc.b * 256); if (red > 255) red = 255; if (green > 255) green = 255; if (blue > 255) blue = 255; m_Dest[m_PPos++] = (red << 16) + (green << 8) + blue; m_SX += m_DX; } m_SY += m_DY; // see if we've been working to long already if ((GetTickCount() - msecs) > 100) { // return control to windows so the screen gets updated m_CurrLine = y + 1; return false; } } // all done return true;}
注意这段代码:
vector3 o( 0, 0, -5 );vector3 dir = vector3( m_SX, m_SY, 0 ) - o;NORMALIZE( dir );Ray r( o, dir ); 一条光线起始点在’o’,方向朝向屏幕平面上的一个位置,并且方向进行了单位化处理,从而建立了这条光线。
屏幕平面指的是一个漂浮在虚拟世界的一个矩形,用来表示屏幕。代码中它以原点为中心,宽为8个单位,高为6个单位,这对于800*600的分辨率是合适的。你可以对这个平面做各种处理:若你将它移开照相机,则光线的宽度就变窄,从而物体会在屏幕上变大。若你旋转这个平面(且照相机以它为中心),你会得到虚拟世界的另一种视图。
接下来,我们需要一个场景来进行光线跟踪。一个场景中包含各种元素:如球体和平面等几何物体。你也可以使用三角面片,并且用这些三角面片来构造其他各种元素。
元素Sphere和PlanePrim是从Primitive继承下来的,每个元素都有一个Material,并且都实现了方法Intersect和GetNormal.
// -----------------------------------------------------------// Scene class definition// -----------------------------------------------------------class Scene{public: Scene() : m_Primitives( 0 ), m_Primitive( 0 ) {}; ~Scene(); void InitScene(); int GetNrPrimitives() { return m_Primitives; } Primitive* GetPrimitive( int a_Idx ) { return m_Primitive[a_Idx]; }private: int m_Primitives; Primitive** m_Primitive;//保存的是指向各种元素的指针};void Scene::InitScene(){ m_Primitive = new Primitive*[100];//最多100个立体元素 // ground plane m_Primitive[0] = new PlanePrim( vector3( 0, 1, 0 ), 4.4f ); m_Primitive[0]->SetName( "plane" ); m_Primitive[0]->GetMaterial()->SetReflection( 0 ); m_Primitive[0]->GetMaterial()->SetDiffuse( 1.0f ); m_Primitive[0]->GetMaterial()->SetColor( Color( 0.4f, 0.3f, 0.3f ) ); // big sphere m_Primitive[1] = new Sphere( vector3( 1, -0.8f, 3 ), 2.5f ); m_Primitive[1]->SetName( "big sphere" ); m_Primitive[1]->GetMaterial()->SetReflection( 0.6f ); m_Primitive[1]->GetMaterial()->SetColor( Color( 0.7f, 0.7f, 0.7f ) ); // small sphere m_Primitive[2] = new Sphere( vector3( -5.5f, -0.5, 7 ), 2 ); m_Primitive[2]->SetName( "small sphere" ); m_Primitive[2]->GetMaterial()->SetReflection( 1.0f ); m_Primitive[2]->GetMaterial()->SetDiffuse( 0.1f ); m_Primitive[2]->GetMaterial()->SetColor( Color( 0.7f, 0.7f, 1.0f ) ); // light source 1 m_Primitive[3] = new Sphere( vector3( 0, 5, 5 ), 0.1f ); m_Primitive[3]->Light( true ); m_Primitive[3]->GetMaterial()->SetColor( Color( 0.6f, 0.6f, 0.6f ) ); // light source 2 m_Primitive[4] = new Sphere( vector3( 2, 5, 1 ), 0.1f ); m_Primitive[4]->Light( true ); m_Primitive[4]->GetMaterial()->SetColor( Color( 0.7f, 0.7f, 0.9f ) ); // set number of primitives m_Primitives = 5;}这个方法中我们加入了一个地表平面,两个球体以及2个光源。
现在就开始跟踪光线了,首先来看下处理的伪代码:
For each pixel{ Construct ray from camera through pixel Find first primitive hit by ray Determine color at intersection point Draw color} 为了确定光线命中的最近的一个元素,我们必须对其所有可能的交点做测试。
// -----------------------------------------------------------// Naive ray tracing: Intersects the ray with every primitive// in the scene to determine the closest intersection// -----------------------------------------------------------Primitive* Engine::Raytrace( Ray& a_Ray, Color& a_Acc, int a_Depth, float a_RIndex, float& a_Dist ){ if (a_Depth > TRACEDEPTH) return 0; // trace primary ray a_Dist = 1000000.0f; vector3 pi; Primitive* prim = 0; int result; // find the nearest intersection for ( int s = 0; s < m_Scene->GetNrPrimitives(); s++ ) { Primitive* pr = m_Scene->GetPrimitive( s ); int res; if (res = pr->Intersect( a_Ray, a_Dist )) { prim = pr; result = res; // 0 = miss, 1 = hit, -1 = hit from inside primitive } } // no hit, terminate ray if (!prim) return 0; // handle intersection if (prim->IsLight()) { // we hit a light, stop tracing a_Acc = Color( 1, 1, 1 ); } else { // determine color at point of intersection pi = a_Ray.GetOrigin() + a_Ray.GetDirection() * a_Dist; // trace lights for ( int l = 0; l < m_Scene->GetNrPrimitives(); l++ ) { Primitive* p = m_Scene->GetPrimitive( l ); if (p->IsLight()) { Primitive* light = p; // calculate diffuse shading vector3 L = ((Sphere*)light)->GetCentre() - pi; NORMALIZE( L ); vector3 N = prim->GetNormal( pi ); if (prim->GetMaterial()->GetDiffuse() > 0) { float dot = DOT( N, L ); if (dot > 0) { float diff = dot * prim->GetMaterial()->GetDiffuse(); // add diffuse component to ray color a_Acc += diff * prim->GetMaterial()->GetColor() * light->GetMaterial()->GetColor(); } } } } } // return pointer to primitive hit by primary ray return prim;}其中这段代码:
// find the nearest intersection for ( int s = 0; s < m_Scene->GetNrPrimitives(); s++ ) {//对所有的元素做测试 Primitive* pr = m_Scene->GetPrimitive( s ); int res; if (res = pr->Intersect( a_Ray, a_Dist )) {//找到第一个命中的元素 prim = pr; result = res; // 0 = miss, 1 = hit, -1 = hit from inside primitive } }对场景中的所以元素做循环处理,为每个元素调用其Intersect方法,这个方法以一条光线为参数,返回一个整数表明是命中还是没有命中,以及相交的距离是在体内还是体外。除此以外还会记录下最近相交的记录。
一旦我们知道光线命中的是那个元素,那么就可以来计算光线的颜色了。若只是简单地使用元素的材质颜色就太简单了,并且结果颜色也很枯燥。因此,我们使用两个点光源来计算散射阴影。
// determine color at point of intersection pi = a_Ray.GetOrigin() + a_Ray.GetDirection() * a_Dist; // trace lights for ( int l = 0; l < m_Scene->GetNrPrimitives(); l++ ) { Primitive* p = m_Scene->GetPrimitive( l ); if (p->IsLight()) { Primitive* light = p; // calculate diffuse shading vector3 L = ((Sphere*)light)->GetCentre() - pi; NORMALIZE( L ); vector3 N = prim->GetNormal( pi ); if (prim->GetMaterial()->GetDiffuse() > 0) { float dot = DOT( N, L );//点积 if (dot > 0) { float diff = dot * prim->GetMaterial()->GetDiffuse(); // add diffuse component to ray color a_Acc += diff * prim->GetMaterial()->GetColor() * light->GetMaterial()->GetColor(); } } } 这段代码计算从相交点(pi)到光源(L)的向量,并用这个向量和相交点的单位向量的叉积来计算出光源的亮度。这个计算出的亮度是元素朝向光源的那一点被光源照亮,而其他点就是阴暗的了。叉积大于0为了防止面与光源反向。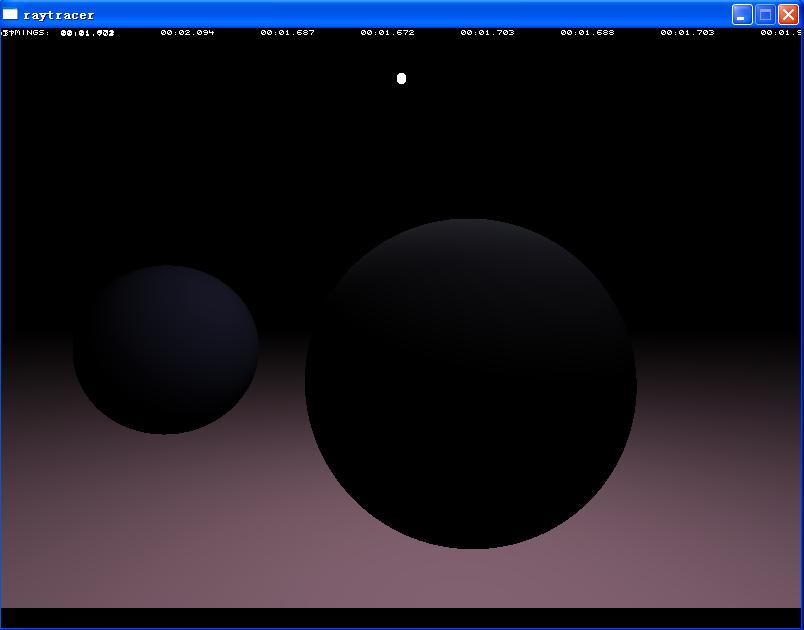
好了,这一篇就到这里了,没有反射,没有折射,更没有加入阴影,这些东东在后续的文章中会慢慢加入的,而这只是最简单的一个光线跟踪而已
作者:洞庭散人
出处:http://phinecos.cnblogs.com/
posted on 2008-04-09 16:24 Phinecos(洞庭散人) 阅读(7989) 评论(8) 收藏 举报

 浙公网安备 33010602011771号