
HBase 实战(1)--HBase的数据导入方式
前言:
作为Hadoop生态系统中重要的一员, HBase作为分布式列式存储, 在线实时处理的特性, 备受瞩目, 将来能在很多应用场景, 取代传统关系型数据库的江湖地位. 本篇博文重点讲解HBase的数据导入, 描述三种方式, Client API, Bulkload, 以及Hive Over HBase.
*). Client API实现
借助HBase的Client API来导入, 是最简易学的方式.
Configuration config = HBaseConfiguration.create();
// 配置hbase.zookeeper.quorum: 后接zookeeper集群的机器列表
config.set("hbase.zookeeper.quorum", "tw-node109,tw-node110,tw-node111");
// 配置hbase.zookeeper.property.clientPort: zookeeper集群的服务端口
config.set("hbase.zookeeper.property.clientPort", "2181");

HTable htable = null;
try {
  // 配置hbase的具体表名
  htable = new HTable(config, "hbase_table");
  // 设置rowkey的值
  Put put = new Put(Bytes.toBytes("rowkey:1001"));
  // 设置family:qualifier:value
  put.add(Bytes.toBytes("family"), Bytes.toBytes("qualifier"), Bytes.toBytes("value"));
  // 使用put类, 写入hbase对应的表中
  htable.put(put);
} catch (Exception e) {
  e.printStackTrace();
} finally {
  if (htable != null) {
    try {
      htable.close();
    } catch (IOException e) {
      e.printStackTrace();
    }
  }
}
评: HBase的client api编程, 相对还是简单的. 唯一需要注意的是, 若在本地编写测试用列, 需要在本地配置hbase集群相关的域名, 使得域名和ip地址能对应上, 切记.
至于hbase client的读写优化, 我们放到下面的博文进行讲解.
*). 批量导入Bulkload
HBase的bulkload数据导入, 分两个阶段:
#). 阶段一: 借助使用HFileOutputFormat的MapReduce, 直接生成HBase的内部数据存储格式HFile.
其原理: HFileOutputFormat借助configureIncrementalLoad函数, 基于当前table的各个region边界自动匹配MapReduce的分区类TotalOrderPartitioner, 这样生成的HFile都对应一个具体的region, 此时效率最高效.
#). 阶段二: 借助completebulkload工具, 将生成的HFile文件热载入hbase集群.
1. importtsv数据导入演示
hbase自带了importtsv工具, 其对tsv格式的数据文件提供了默认的支持.
数据文件data.tsv(以'\t'分割数据文件)
1001	lilei	17	13800001111
1002	lily	16	13800001112
1003	lucy	16	13800001113
1004	meimei	16	13800001114
上传至hdfs目录 /test/hbase/tsv/input
sudo -u hdfs hdfs dfs -mkdir -p /test/hbase/tsv/input
sudo -u hdfs hdfs dfs -put data.tsv /test/hbase/tsv/input/
尝试构建的HBase表student
hbase shell
hbase> create 'student', {NAME => 'info'}
执行importtsv
sudo -u hdfs hadoop jar /usr/lib/hbase/hbase-<version>.jar importtsv -Dimporttsv.columns=HBASE_ROW_KEY,info:name,info:age,info:phone -Dimporttsv.bulk.output=/test/hbase/tsv/output/ student /test/hbase/tsv/input
没有指定-Dimporttsv.bulk.output, importtsv默认行为是才有client api的put来导入数据于hbase, 指定-Dimporttsv.bulk.output, 则需要下一步
sudo -u hdfs hadoop jar /usr/lib/hbase/hbase-<version>.jar completebulkload /test/hbase/tsv/output/ student
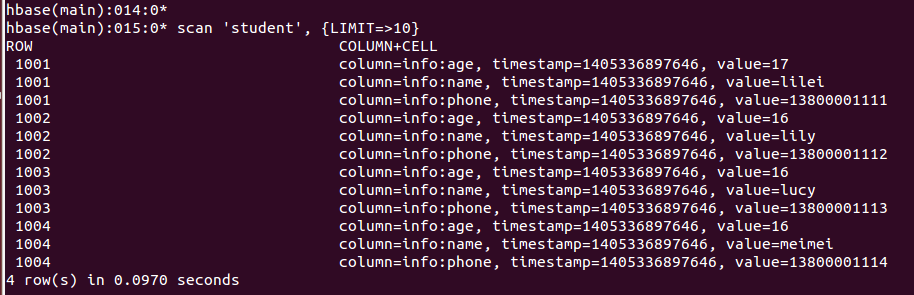
数据验证:
scan 'student', {LIMIT => 10}
2. 自定义bulkload数据导入演示
数据文件准备, 以之前data.tsv文件为准
构建HBase表student_new
hbase> create 'student_new', {NAME => 'info'}
编写MapReduce代码, 如下所示:
public class MyBulkload {

	public static class MyBulkMapper extends
			Mapper<LongWritable, Text, ImmutableBytesWritable, KeyValue> {

		@Override
		protected void setup(Context context) throws IOException,
				InterruptedException {
			super.setup(context);
		}

		@Override
		protected void map(LongWritable key, Text value, Context context)
				throws IOException, InterruptedException {
			// 数据按\t切分组织, 也可以自定义的方式来解析, 比如复杂的json/xml文本行
			String line = value.toString();
			String[] terms = line.split("\t");
			if ( terms.length == 4 ) {
				byte[] rowkey = terms[0].getBytes();
				ImmutableBytesWritable imrowkey = new ImmutableBytesWritable(rowkey);
				// 写入context中, rowkey => keyvalue, 列族:列名  info:name, info:age, info:phone
				context.write(imrowkey, new KeyValue(rowkey, Bytes.toBytes("info"), Bytes.toBytes("name"), Bytes.toBytes(terms[1])));
				context.write(imrowkey, new KeyValue(rowkey, Bytes.toBytes("info"), Bytes.toBytes("age"), Bytes.toBytes(terms[2])));
				context.write(imrowkey, new KeyValue(rowkey, Bytes.toBytes("info"), Bytes.toBytes("phone"), Bytes.toBytes(terms[3])));
			}
		}
	}

	public static void main(String[] args) throws Exception {

		if ( args.length != 3 ) {
			System.err.println("Usage: MyBulkload <table_name> <data_input_path> <hfile_output_path>");
			System.exit(2);
		}
		String tableName = args[0];
		String inputPath = args[1];
		String outputPath= args[2];

		// 创建的HTable实例用于, 用于获取导入表的元信息, 包括region的key范围划分
		Configuration conf = HBaseConfiguration.create();
		HTable table = new HTable(conf, tableName);

		Job job = Job.getInstance(conf, "MyBulkload");

		job.setMapperClass(MyBulkMapper.class);

		job.setJarByClass(MyBulkload.class);
		job.setInputFormatClass(TextInputFormat.class);

		// 最重要的配置代码, 需要重点分析
		HFileOutputFormat.configureIncrementalLoad(job, table);

		FileInputFormat.addInputPath(job, new Path(inputPath));
		FileOutputFormat.setOutputPath(job, new Path(outputPath));

		System.exit(job.waitForCompletion(true) ? 0 : 1);

	}

}
注: 借助maven的assembly插件, 生成胖jar包(就是把依赖的zookeeper和hbase jar包都打到该MapReduce包中), 否则的话, 就需要用户静态配置, 在Hadoop的class中添加zookeeper和hbase的配置文件和相关jar包.
最终的jar包为 mybulk.jar, 主类名为com.m8zmyp.mmxf.MyBulkload, 生成HFile, 增量热载入hbase
sudo -u hdfs hadoop jar <xxoo>.jar <MainClass> <table_name> <data_input_path> <hfile_output_path>
hbase org.apache.hadoop.hbase.mapreduce.LoadIncrementalHFiles <hfile_output_path> <table_name>
sudo -u hdfs hadoop jar mybulk.jar com.m8zmyp.mmxf.MyBulkload student_new /test/hbase/tsv/input /test/hbase/tsv/new_output
hbase org.apache.hadoop.hbase.mapreduce.LoadIncrementalHFiles /test/hbase/tsv/new_output student_new
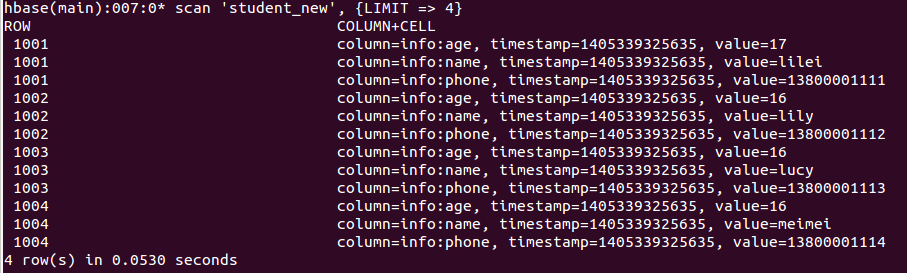
数据验证:
scan 'student_new', {LIMIT => 10}
*). 借助Hive Over Hbase
构建Hbase表hbase_student
hbase> create 'hbase_student', 'info'
构建hive外表hive_student, 并对应hbase_student表
CREATE EXTERNAL TABLE hive_student (rowkey string, name string, age int, phone string)
STORED BY 'org.apache.hadoop.hive.hbase.HBaseStorageHandler'
WITH SERDEPROPERTIES ("hbase.columns.mapping" = ":key,info:name,info:age,info:phone")
TBLPROPERTIES("hbase.table.name" = "hbase_student");
数据导入验证:
1. 创建数据外表
CREATE EXTERNAL TABLE data_student (rowkey string, name string, age int, phone string)
ROW FORMAT DELIMITED FIELDS TERMINATED BY '\t'
LOCATION '/test/hbase/tsv/input/';
2. 数据通过hive_student导入到hbase_student表中
SET hive.hbase.bulk=true;
INSERT OVERWRITE TABLE hive_student SELECT rowkey, name, age, phone FROM data_student;
备注: 若遇到java.lang.IllegalArgumentException: Property value must not be null异常, 需要hive-0.13.0及以上版本支持
详见: https://issues.apache.org/jira/browse/HIVE-5515
posted on 2014-07-14 13:02 mumuxinfei 阅读(9587) 评论(3) 收藏 举报


 浙公网安备 33010602011771号