
Tesseract 3 语言数据的训练方法
OCR,光学字符识别
光学字符识别(OCR,Optical Character Recognition)是指对文本资料进行扫描,然后对图像文件进行分析处理,获取文字及版面信息的过程。OCR技术非常专业,一般多是印刷、打印行业的从业人员使用,可以快速的将纸质资料转换为电子资料。关于中文OCR,目前国内水平较高的有清华文通、汉王、尚书,其产品各有千秋,价格不菲。国外OCR发展较早,像一些大公司,如IBM、微软、HP等,即使没有推出单独的OCR产品,但是他们的研发团队早已掌握核心技术,将OCR功能植入了自身的软件系统。对于我们程序员来说,一般用不到那么高级的,主要在开发中能够集成基本的OCR功能就可以了。这两天我查找了很多免费OCR软件、类库,特地整理一下,今天首先来谈谈Tesseract,下一次将讨论下Onenote 2010中的OCR API实现。可以在这里查看OCR技术的发展简史。
1、Tesseract概述
Tesseract的OCR引擎最先由HP实验室于1985年开始研发,至1995年时已经成为OCR业内最准确的三款识别引擎之一。然而,HP不久便决定放弃OCR业务,Tesseract也从此尘封。
数年以后,HP意识到,与其将Tesseract束之高阁,不如贡献给开源软件业,让其重焕新生--2005年,Tesseract由美国内华达州信息技术研究所获得,并求诸于Google对Tesseract进行改进、消除Bug、优化工作。
Tesseract目前已作为开源项目发布在Google Project,其项目主页在这里查看,其最新版本3.0已经支持中文OCR,并提供了一个命令行工具。本次我们来测试一下Tesseract 3.0,由于命令行对最终用户不太友好,我用WPF简单封装了一下,就可以方便的进行中文OCR了。
1.准备:
- 安装Tesseract , 我这里用的是 tesseract 3.02.02
- 下载图片,保存到本地,
- 下载工具jTessBoxEditor. http://sourceforge.net/projects/vietocr/files/jTessBoxEditor/,这个工具是用来训练样本用的,由于该工具 是用JAVA开发的,需要安装JAVA虚拟机才能运行。
2.合并样本图像
运行jTessBoxEditor工具,在点击菜单栏中Tools--->Merge TIFF。在弹出的对话框中选择样本图像(按Shift选择多张),合并成total.tif文件。
3.Make Box Files。
在total.tif所在的目录下打开一个命令行,产生相应的Box文件(*.box)
输入:
tesseract mjoren.normal.exp0.tif mjoren.normal.exp0 batch.nochop makebox
来生成一个box文件,该文件记录了tesseract识别出来的每一个字和其位置坐标。
屏幕输出如下
E:\data\Users\Administrator\Desktop\ocrBuider2>tesseract mjoren.normal.exp0.tif
mjoren.normal.exp0   batch.nochop makebox
Tesseract Open Source OCR Engine v3.02 with Leptonica
Page 1 of 3
Page 2 of 3
Empty page!!
Empty page!!
Page 3 of 3
Empty page!!
Empty page!!
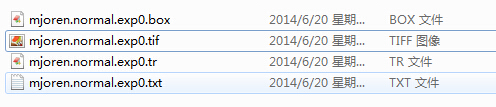
这时目录多出了一个 mjoren.normal.exp0.box和mjoren.normal.exp0.txt 文件
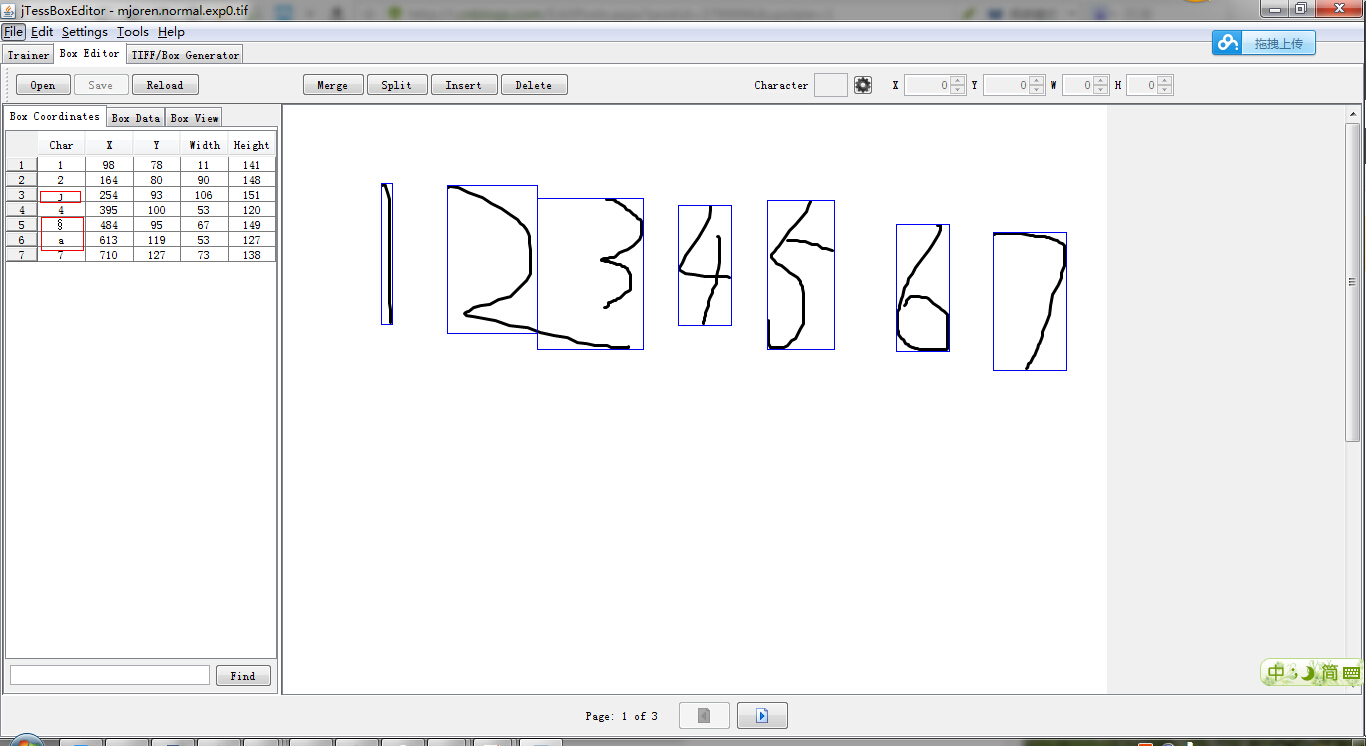
4.使用jTessBoxEditor打开total.tif文件,
需要记住的是第2步生成的mjoren.normal.exp0.box要和这个mjoren.normal.exp0.tif文件同在一个目录下。逐个校正文字,后保存。
4.Run Tesseract for Training。输入命令:
产生字符特征文件(*.tr)
tesseract mjoren.normal.exp0.tif mjoren.normal.exp0 nobatch box.train
屏幕输出如下:
E:\data\Users\Administrator\Desktop\ocrBuider2>tesseract mjoren.normal.exp0.tif
mjoren.normal.exp0 nobatch box.train
Tesseract Open Source OCR Engine v3.02 with Leptonica
Page 1 of 3
APPLY_BOXES:
   Boxes read from boxfile:       7
   Found 7 good blobs.
TRAINING ... Font name = normal
Generated training data for 1 words
Page 2 of 3
Empty page!!
Empty page!!
Page 3 of 3
Empty page!!
Empty page!!
这时目录会多出2个文件: mjoren.normal.exp0.tr
5.Compute the Character Set。输入命令:
产生计算字符集(unicharset)
unicharset_extractor mjoren.normal.exp0.box
执行结果:
E:\data\Users\Administrator\Desktop\ocrBuider2>unicharset_extractor  mjoren.norm
al.exp0.box
Extracting unicharset from mjoren.normal.exp0.box
Wrote unicharset file ./unicharset.
6.定义字体特征文件并聚集字符特征
新建文件“font_properties”。那么需要在目录下新建一个名字为“font_properties”的文件,并且输入文本 :
注意:这里 normal 必须与训练名中的名称保持一致,填入下面内容 ,这里全取值为0,表示字体不是粗体、斜体等等。
normal 0 0 0 0 0
聚集字符特征(inttemp、pffmtable、normproto)
执行命令:
mftraining -F font_properties -U unicharset mjoren.normal.exp0.tr
执行结果
E:\data\Users\Administrator\Desktop\ocrBuider2>mftraining  -F font_properties  -U unicharset  mjoren.normal.exp0.tr
Warning: No shape table file present: shapetable
Reading mjoren.normal.exp0.tr ...
Flat shape table summary: Number of shapes = 7 max unichars = 1 number with mult
iple unichars = 0
Warning: no protos/configs for j in CreateIntTemplates()
Warning: no protos/configs for 搂 in CreateIntTemplates()
Warning: no protos/configs for a in CreateIntTemplates()
Done!
font_properties不含有BOM头,文件内容格式如下:
<fontname> <italic> <bold> <fixed> <serif> <fraktur>
其中fontname为字体名称,必须与[lang].[fontname].exp[num].box中的名称保持一致。<italic> 、<bold> 、<fixed> 、<serif>、 <fraktur>的取值为1或0,表示字体是否具有这些属性。
7.Clustering。产生字符形状正常化特征文件normproto
输入命令:
cntraining mjoren.normal.exp0.tr
执行结果:
E:\data\Users\Administrator\Desktop\ocrBuider2>cntraining  mjoren.normal.exp0.tr

Reading mjoren.normal.exp0.tr ...
Clustering ...

Writing normproto ...
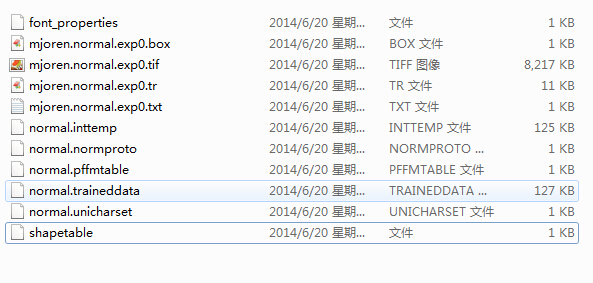
8.此时,在目录下应该生成若干个文件了,把unicharset, inttemp, normproto, pffmtable这四个文件加上前缀“normal.”。然后 合并训练文件
输入命令:
combine_tessdata normal.
执行结果如下:
E:\data\Users\Administrator\Desktop\ocrBuider2>combine_tessdata normal.
Combining tessdata files
TessdataManager combined tesseract data files.
Offset for type 0 is -1
Offset for type 1 is 140
Offset for type 2 is -1
Offset for type 3 is 792
Offset for type 4 is 128180
Offset for type 5 is 128262
Offset for type 6 is -1
Offset for type 7 is -1
Offset for type 8 is -1
Offset for type 9 is -1
Offset for type 10 is -1
Offset for type 11 is -1
Offset for type 12 is -1
Offset for type 13 is -1
Offset for type 14 is -1
Offset for type 15 is -1
Offset for type 16 is -1
必须确定的是第2、4、5、6行的数据不是-1,那么一个新的字典就算生成了。
此时目录下“normal.traineddata”的文件拷贝到tesseract程序目录下的“tessdata”目录。
以后就可以使用该该字典来识别了,例如:
tesseract mjoren.normal.exp0.tif result -l normal
通过训练出来的新语言,识别率提高了不少。
E:\data\Users\Administrator\Desktop\ocrBuider2>tesseract mjoren.normal.exp0.tif
result  -l normal
Tesseract Open Source OCR Engine v3.02 with Leptonica
Page 1 of 3
Page 2 of 3
Empty page!!
Empty page!!
Page 3 of 3
Empty page!!
Empty page!!
纠正出来的结果
1234567
特别说明:
在训练的过程中,初次接触的人容易犯一些小错误,这些错误虽然小,但很可能让你陷入困惑和痛苦中。那位师妹就是因为小问题困惑不已才找我帮忙的。下面简单的罗列一下几点需要注意的地方:
- 前面提到的normal可以被你想要的任何字符串代替,主要是为了给你训练的库取个名字。
- 第二步产生的Box文件,需要手动修改,一定要以Unicode模式保存。修改的时候要注意方法和含义,详细的说明Google原文中有说明。
- 第五步程序自动产生的文件是只有扩展名的,需要你自己手动将名字改成前缀一致。后面产生的可选文件也依照此法操作。
- 所有的这些文件都准备好了之后,需要放到同一目录下,执行combine_tessdata进行合并的时候,注意要切换到文件所在的目录执行,否则将会报错,提示找不到文件。
- 合并成功之后,要记得将训练好的文件(normal.traineddata)放到程序的tessdata子目录下,否则测试就会提示找不到语言库文件。
好了,到这里,基本上所有的问题都能解决了。

 浙公网安备 33010602011771号