


Android学习笔记31:使用惰性控件ViewStub实现布局动态加载
在Android开发中,经常会遇到这样的情况,在程序运行过程中动态的根据当前条件来决定是否显示某个控件或布局,这时就可以使用惰性控件ViewStub来方便的完成这一功能。
惰性控件ViewStub是一个轻量级的View,可以实现动态布局加载。ViewStub对象是一个看不见的,零大小的视图,并在程序运行时根据需要进行动态加载。只有当ViewStub对象被设置为可见,或是调用了ViewStub.inflate()方法时,ViewStub对象所指向的布局才会被实例化,并加载到指向的父布局中。这样,便通过惰性控件ViewStub实现了动态加载某个控件或布局。
在本篇博文中,我们将通过一个实例来演示如何使用惰性控件ViewStub完成动态加载布局操作。完成后的程序运行效果如图1所示。

图1 主界面显示效果
在如图1所示的主界面中,点击“展开宝贝详细描述”按钮,将通过惰性控件ViewStub加载动态布局的方式,引入一段对商品的文字描述信息,如图2所示。

图2 动态加载布局效果
从图2可以看出,通过使用惰性控件ViewStub,我们在原布局中动态的加入了一段有关商品的描述信息。当点击“隐藏宝贝详细描述”按钮时,这段商品描述信息将被隐藏,主界面将重新变为图1所示的显示效果。
下面就来说说该实例的具体实现方法。
1.静态加载布局
在讲解使用惰性控件ViewStub动态加载布局之前,有必要先说说静态加载布局。
在Android开发中,有时一个UI界面是及其复杂的,其中包含了众多布局模块和控件,如果将其写在一个xml布局文件中,不仅代码冗余,而且代码可读性也很差,不易进行后期代码维护。
这时,我们可以将一个复杂的UI界面分解成几个独立的子模块,并为每一个子模块编写单独的xml布局文件。在父布局中,使用<include></include>标签将各个子模块布局文件加载进来即可。
这样便实现了UI界面的静态加载布局。
在该实例中,我们便将主界面上方的商品图片和宝贝评价定义在了一个单独的xml文件“includelayout.xml”中,然后在主界面布局文件中通过<include>标签将其静态的加载进来,具体实现方法如下:
 1   <LinearLayout xmlns:android="http://schemas.android.com/apk/res/android"
 2       xmlns:tools="http://schemas.android.com/tools"
 3       android:orientation="vertical"
 4       android:layout_width="match_parent"
 5       android:layout_height="match_parent" >
 6
 7       <!-- 静态加载 -->
 8       <include
 9           android:layout_width="wrap_content"
10           android:layout_height="wrap_content"
11           layout="@layout/includelayout"    >
12       </include>
13
14       <ViewStub
15           android:id="@+id/viewstub"
16           android:layout_width="wrap_content"
17           android:layout_height="wrap_content"
18           android:layout_marginLeft="2dp"
19           android:layout="@+layout/viewstublayout"    >
20       </ViewStub>
21
22       <!-- 按钮 -->
23       <LinearLayout
24           android:orientation="horizontal"
25           android:layout_width="match_parent"
26           android:layout_height="wrap_content"    >
27               <Button
28                   android:id="@+id/button_extend"
29                   android:layout_weight="1"
30                   android:layout_width="wrap_content"
31                   android:layout_height="wrap_content"
32                   android:text="展开宝贝详细描述"    />
33               <Button
34                   android:id="@+id/button_hide"
35                   android:layout_weight="1"
36                   android:layout_width="wrap_content"
37                   android:layout_height="wrap_content"
38                   android:text="隐藏宝贝详细描述"    />
39       </LinearLayout>
40
41   </LinearLayout>
如上,我们使用语句layout="@layout/includelayout"在<include>标签中静态的加载了“includelayout.xml”布局文件中。在“includelayout.xml”布局文件中,我们实现了商品图片、宝贝评价以及宝贝评分控件的布局设计。
2.惰性控件ViewStub
通过以上的代码不难看出,在主布局文件中,我们在Button按钮控件的上面设置了一个惰性控件ViewStub。在惰性控件ViewStub中,我们通过语句android:layout="@+layout/viewstublayout"指定了惰性控件ViewStub所要动态加载的布局是“viewstublayout.xml”文件。在“viewstublayout.xml”文件中我们通过TextView控件来显示商品的详细描述信息。具体实现方法如下:
 1   <?xml version="1.0" encoding="utf-8"?>
 2   <LinearLayout xmlns:android="http://schemas.android.com/apk/res/android"
 3       android:layout_width="match_parent"
 4       android:layout_height="match_parent"
 5       android:orientation="vertical" >
 6
 7       <TextView
 8           android:layout_width="match_parent"
 9           android:layout_height="wrap_content"
10           android:text="品牌:卡马 KEPMA"    />
11       <TextView
12           android:layout_width="match_parent"
13           android:layout_height="wrap_content"
14           android:text="型号:D1C"    />
15       <TextView
16           android:layout_width="match_parent"
17           android:layout_height="wrap_content"
18           android:text="规格:41寸"    />
19       <TextView
20           android:layout_width="match_parent"
21           android:layout_height="wrap_content"
22           android:text="面板:云杉木"    />
23       <TextView
24           android:layout_width="match_parent"
25           android:layout_height="wrap_content"
26           android:text="底侧:南洋木"    />
27       <TextView
28           android:layout_width="match_parent"
29           android:layout_height="wrap_content"
30           android:text="弦钮:镀黑镍打钢印全封闭弦钮"    />
31       <TextView
32           android:layout_width="match_parent"
33           android:layout_height="wrap_content"
34           android:text="包边:珍珠条镶嵌"    />
35       <TextView
36           android:layout_width="match_parent"
37           android:layout_height="wrap_content"
38           android:text="品味:21品"    />
39
40   </LinearLayout>
3.惰性控件ViewStub的加载
至此,我们已经定义好了惰性控件ViewStub,并指定了惰性控件ViewStub所要动态加载的具体内容。那么如何在程序运行过程中加载惰性控件ViewStub呢?
先来了解一下惰性控件ViewStub的常用方法,如图3所示。
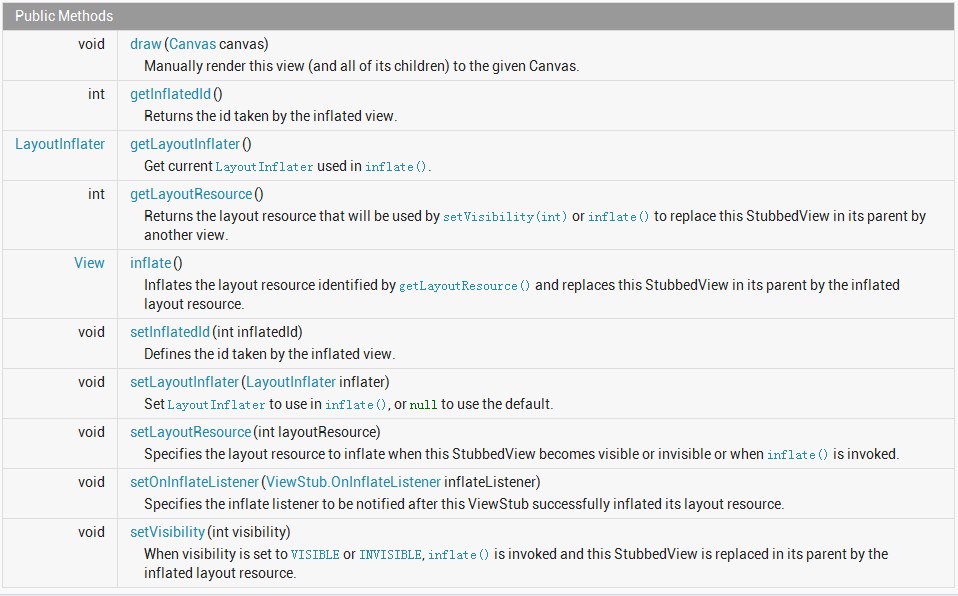
图3 惰性控件ViewStub的常用方法
其中,方法inflate()用于加载getLayoutResource()方法标识的布局资源,并通过加载布局资源替换父容器中它自己。方法setVisibility (int visibility),当可见性设置为VISIBLE或INVISIBLE时,inflate()都将被调用,并且加载视图资源在父容器中替换ViewStub。参数visibility可以设置的值有VISIBLE(显示),INVISIBLE(隐藏),GONE(完全隐藏,不占用布局位置)。
由此,我们可以为该实例中的两个Button按钮添加事件监听器OnClickListener,并实现该接口中的方法onClick()如下:
 1   /*
 2      * Function   :    事件监听处理
 3      * Author     :    博客园-依旧淡然
 4      */
 5     public void onClick(View v) {
 6         switch (v.getId()) {
 7         case R.id.button_extend:            //点击“展开”按钮时显示ViewStub控件内容
 8             View view = mViewStub.inflate();
 9             LinearLayout linearLayout = (LinearLayout)view;
10             break;
11         case R.id.button_hide:                //点击“隐藏”按钮时隐藏ViewStub控件内容
12             mViewStub.setVisibility(View.GONE);
13             break;
14         }
15     }
4.两点注意
在使用惰性控件ViewStub时有两点需要特别注意:
(1)ViewStub对象只可以Inflate一次,之后ViewStub对象会被置为空。按句话说,某个被ViewStub对象指定的布局被Inflate一次之后,就不可以再次通过ViewStub对象来控制它了。
(2)ViewStub控件只能用来Inflate一个布局文件,而不能Inflate某个具体的View。

 浙公网安备 33010602011771号