

iOS开发之表视图爱上CoreData
在接触到CoreData时,感觉就是苹果封装的一个ORM。CoreData负责在Model的实体和sqllite建立关联,数据模型的实体类就相当于Java中的JavaBean, 而CoreData的功能和JavaEE中的Hibernate的功能类似,最基本是两者都有通过对实体的操作来实现对数据库的CURD操作。CoreData中的上下文(managedObjectContext)就相当于Hibernate中的session对象, CoreData中的save操作就和Hibernate中的commit,还有一些相似之处,在这就不一一列举了。(上面是笔者自己为了更好的理解CoreData而做的简单类比,如果学过PHP的ThinkPHP框架的小伙伴们也可以和TP中的ORM类比)。
那么TableView为什么会爱上CoreData呢?下面会通个代码给出他们相爱的原因。就举一个IOS开发中的经典的demo:通讯录来说明问题。
1.在TableView没遇到CoreData的时候我们怎么通过动态表视图来显示我们的通讯录的内容呢?也就是说我们通讯录的数据结构该如何组织呢?
为了在TableView中显示我们的信息我们这样设计我们的数据结构:
1.整个TableView是一个可变的数组tableArray;
2.tableArray中的每个元素又是一个存放分组的字典sectionDictionary;
3.在sectionDictionary中我们存放着两个键值对 header和items, header中存放的时section中的名字,items中存放的时每个section中的用户信息
4.items中又是一个数组rowsArray, rowsArray中存放的又是一个字典userInfoDictionary, 在userInfoDictionary中存放着我们要显示的信息
千字不如一图,看到上面对我们要设计的数据结构的描述会有点迷糊,下面来张图吧:

2.数据结构我们设计好了,那么如何用代码生成我们的测试数据(数据的组织形式如上图所示),下面的代码就是生成我们要在tableView中显示的数据,生成的数组存储在tableArray中,代码如下:
|
1
2
3
4
5
6
7
8
9
10
11
12
13
14
15
16
17
18
19
20
21
22
23
24
25
26
27
28
29
30
31
32
33
34
35
36
37
38
39
40
41
42
43
44
45
46
|
/* *手动创建我们在动态表视图上显示的数据格式 *整个数据存储在一个数组中 *数组中每一个元素是一个自动,字典的key是sectionHeader的值,value是该section中以数组形式存的数据 *section中的每一行对应着一个数组元素,数组元素中又存储着一个字典,字典中存储着用户的具体数据。 *///为我们的数组分配存储空间, 代表着有20个sectionself.telBook = [NSMutableArray arrayWithCapacity:26];//为我们的section设置不同的headerchar header = 'A';//计数static int number = 0;for (int i = 0; i < 26; i ++) { //新建字典来存储我们每个section中的数据, 假设每个section中有1个数组 NSMutableDictionary *sectionDic = [NSMutableDictionary dictionaryWithCapacity:1]; //创建字典中的数组,数组中以键值对的形式来储存用户的信息 NSMutableArray *rowArray = [NSMutableArray arrayWithCapacity:3]; for (int j = 0; j < 3; j ++) { //创建存储用户信息的字典 NSMutableDictionary *user = [NSMutableDictionary dictionaryWithCapacity:2]; //生成测试数据 NSString *name = [NSString stringWithFormat:@"User%03d", number]; NSString *tel = [NSString stringWithFormat:@"12345%03d", number++]; //加入字典中 [user setObject:name forKey:@"name"]; [user setObject:tel forKey:@"tel"]; //把字典加入数组 [rowArray addObject:user]; } //把rowArray添加到section字典中 NSString *key = [NSString stringWithFormat:@"%c",(header+i)]; [sectionDic setObject:key forKey:@"header"]; [sectionDic setObject:rowArray forKey:@"items"]; //把section添加到总的数组中 [self.telBook addObject:sectionDic];} |
3.把我们用代码创建的模拟数据在我们的TableView中进行显示,在相应的函数中根据我们生成的数据返回相应的值显示在TableView中,显示代码如下:
|
1
2
3
4
5
6
7
8
9
10
11
12
13
14
15
16
17
18
19
20
21
22
23
24
25
26
27
28
29
30
31
32
33
34
35
36
37
38
39
40
41
|
#pragma mark - Table view data source//返回Section的个数,即我们telBook数组元素的个数- (NSInteger)numberOfSectionsInTableView:(UITableView *)tableView{ return self.telBook.count;} //返回每个section中的行数,即section中的数组元素的个数- (NSInteger)tableView:(UITableView *)tableView numberOfRowsInSection:(NSInteger)section{ NSArray *rowArray = self.telBook[section][@"items"]; return rowArray.count;}//给每个分组设置header-(NSString *)tableView:(UITableView *)tableView titleForHeaderInSection:(NSInteger)section{ //获取每个section中的header NSString *title = self.telBook[section][@"header"]; return title;}//获取cell并添加完数据发挥- (UITableViewCell *)tableView:(UITableView *)tableView cellForRowAtIndexPath:(NSIndexPath *)indexPath{ UITableViewCell *cell = [tableView dequeueReusableCellWithIdentifier:@"Cell" forIndexPath:indexPath]; //获取secion中的数据数组 NSArray *items = self.telBook[indexPath.section][@"items"]; //获取数组中的每一项的一个字典 NSString *name = items[indexPath.row][@"name"]; NSString *tel = items[indexPath.row][@"tel"]; //给sel设置值 cell.textLabel.text = name; cell.detailTextLabel.text = tel; return cell;} |
4.上面给出的时关键代码,至于怎么配置TableView的Cell模板或者如何把TableViewController和Storyboard中的ViewController绑定,在前面的博客中都有介绍,在这小编就不做赘述。运行结果和上面的图片是一样的。
上面的东西只是这篇博文的引子,为了显示上面的数据结构我们这样做是不是太麻烦了,而且上面的数据是不能被持久化存储的。如果给我们的数据都要转换成上面的数据组织形式,想必由于所给数据结构的不确定,所以转换起来是相当的复杂的。TableView之所以会爱上CoreData,是因为我们的CoreData会简化我们对数据的操作,并且会持久化到sqlite中。CoreData相当于TableView和sqllite的纽带,说的专业一些就是映射,那么我们CoreData如何使用才会简化我们的操作呢?下面将要介绍的才是这篇博客中的重点:我们如何使用CoreData才会让TableView爱上它呢?
1.新建一个Empty Application, 在新建工程的时候,不要忘了把Use Core Data给选中,选中Use Core Data会自动引入Core Data框架库和在AppDelegate.h和AppDelegate.m中进行相应的配置,并且同时还自动生成一个以本应用名命名的Data Model文件,我们可以在Data Model文件中添加我们的数据模型, 添加好的数据模型我们会在生成数据实体类时使用(和JavaBean类似)
(1)AppDelegata.m中多出的部分代码如下,从多出的部分代码就可以看出,CoreData会把我们的数据实体和sqllite建立起一一对应的关系:
|
1
2
3
4
5
6
7
8
9
10
11
12
13
14
15
16
17
18
19
20
21
22
23
24
25
26
27
28
29
30
31
|
// Returns the managed object model for the application.// If the model doesn't already exist, it is created from the application's model.- (NSManagedObjectModel *)managedObjectModel{ if (_managedObjectModel != nil) { return _managedObjectModel; } NSURL *modelURL = [[NSBundle mainBundle] URLForResource:@"Demo083101" withExtension:@"momd"]; _managedObjectModel = [[NSManagedObjectModel alloc] initWithContentsOfURL:modelURL]; return _managedObjectModel;}// Returns the persistent store coordinator for the application.// If the coordinator doesn't already exist, it is created and the application's store added to it.- (NSPersistentStoreCoordinator *)persistentStoreCoordinator{ if (_persistentStoreCoordinator != nil) { return _persistentStoreCoordinator; } NSURL *storeURL = [[self applicationDocumentsDirectory] URLByAppendingPathComponent:@"Demo083101.sqlite"]; NSError *error = nil; _persistentStoreCoordinator = [[NSPersistentStoreCoordinator alloc] initWithManagedObjectModel:[self managedObjectModel]]; if (![_persistentStoreCoordinator addPersistentStoreWithType:NSSQLiteStoreType configuration:nil URL:storeURL options:nil error:&error]) { NSLog(@"Unresolved error %@, %@", error, [error userInfo]); abort(); } return _persistentStoreCoordinator;} |
(2)我们可以通过 projectName.xcdatamodeld中创建我们的数据实体模型,如下图所示

(3)通过创建好的数据实体模型来创建我们的实体类(和JavaBean类似的东西)创建过程如下图,点击下一步以后,选中创建的实体模型即可:

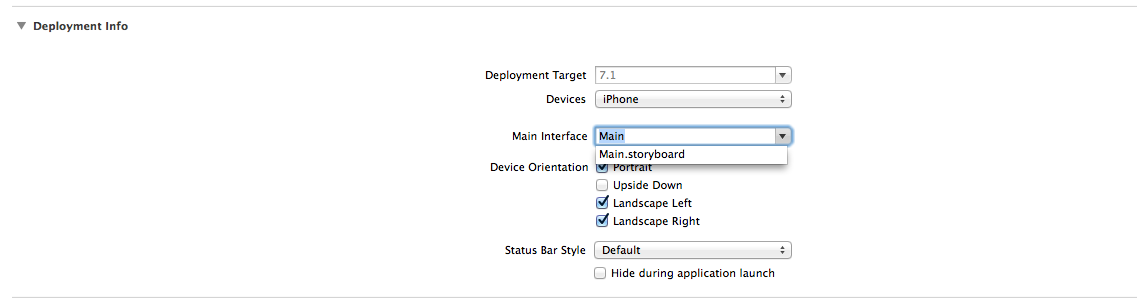
2.CoreData准备的差不多啦,该我们的TableView出场啦,在Empty Application中默认的时没有storyboard, 如果你又想通过storyboard来简化你的操作,得给应用创建一个storybaord才对,创建过程如下:
(1)第一步创建一个storyboard文件,命名为Main,如下图所示

(2)第二步:设置从storyboard来启动, 在Main InterFace中选中我们创建的storyboard即可
(3) 第三步修改AppDelegate.m中的函数如下所示,把初始化的工作交给我们创建的storyboard进行:
|
1
2
3
4
|
- (BOOL)application:(UIApplication *)application didFinishLaunchingWithOptions:(NSDictionary *)launchOptions{ return YES;} |
3.配置工作完成接下来就是TableView和CoreData相爱的过程啦,如何在storyboard中对TableView的cell进行配置在这儿就不赘述了,下面给出我们要通过TableView和CoreData来实现什么功能。
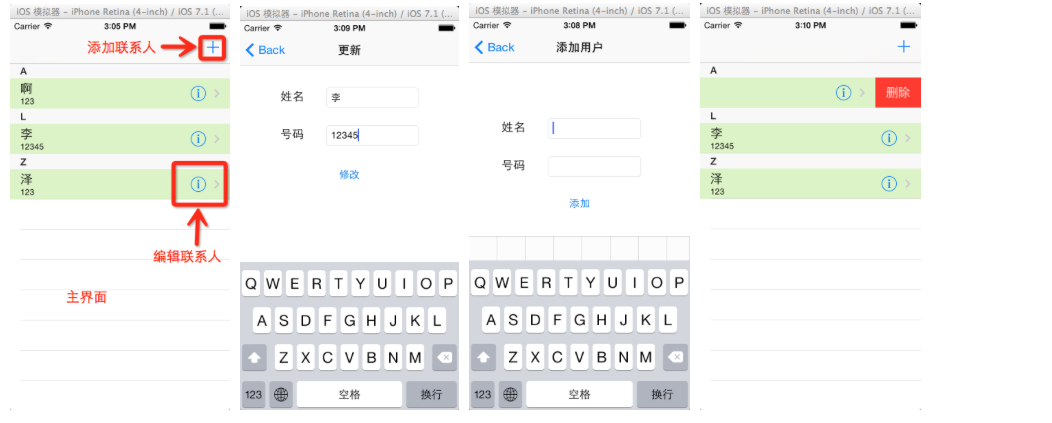
(1)我们要实现对通讯录的增删改查,主要需求入下图所示:
(2)实现添加功能,点击右上角的添加按钮时会跳转到添加页面,在添加页面中有两个TextField来接受用户的输入,点击添加按钮进行数据添加。AddViewController.m中的主要代码如下。
a.需要用到的属性如下, 用NSManagedObejectContext的对象来操作CoreData中的数据,和Hibernate中的session的对象相似
|
1
2
3
4
5
|
@property (strong, nonatomic) IBOutlet UITextField *nameTextField;@property (strong, nonatomic) IBOutlet UITextField *numberTextField;//声明CoreData的上下文@property (strong, nonatomic) NSManagedObjectContext *managedObjectContext; |
b.获取UIApplication的单例application, 然后再通过application获取delegate, 最后通过delegate来获取上下文,代码如下:
|
1
2
3
4
|
//通过application对象的代理对象获取上下文UIApplication *application = [UIApplication sharedApplication];id delegate = application.delegate;self.managedObjectContext = [delegate managedObjectContext]; |
c.编辑点击button要回调的方法,在点击添加按钮时首先得通过上下文获取我们的实体对象,获取完实体对象后再给实体对象的属性赋上相应的值,最后调用上下文的save方法来存储一下我们的实体对象。添加完以后还要通过navigationController来返回到上一层视图,代码如下
|
1
2
3
4
5
6
7
8
9
10
11
12
13
14
15
16
17
18
19
20
|
- (IBAction)tapAdd:(id)sender { //获取Person的实体对象 Person *person = [NSEntityDescription insertNewObjectForEntityForName:NSStringFromClass([Person class]) inManagedObjectContext:self.managedObjectContext]; //给person赋值 person.name = self.nameTextField.text; person.number = self.numberTextField.text; person.firstN = [NSString stringWithFormat:@"%c", pinyinFirstLetter([person.name characterAtIndex:0])-32]; //通过上下文存储实体对象 NSError *error; if (![self.managedObjectContext save:&error]) { NSLog(@"%@", [error localizedDescription]); } //返回上一层的view [self.navigationController popToRootViewControllerAnimated:YES]; } |
(3)实现上面的代码只是通过CoreData往sqlite中添加数据,要想在我们的TableView中显示还需要通过CoreData把我们的存储在sqlite中的数据来查询出来,再用CoreData给我们提供的方法把查询结果做一个转换,转换成适合TableView显示的数据,下面给出相应的获取数据的代码。
a.在TableViewController我们需要声明如下两个属性,一个用于获取上下文,一个用于存储返回结果
|
1
2
3
4
|
//声明通过CoreData读取数据要用到的变量@property (strong, nonatomic) NSManagedObjectContext *managedObjectContext;//用来存储查询并适合TableView来显示的数据@property (strong, nonatomic) NSFetchedResultsController *fetchedResultsController; |
b.在viewDidLoad中获取上下文
|
1
2
3
4
|
//通过application对象的代理对象获取上下文UIApplication *application = [UIApplication sharedApplication];id delegate = application.delegate;self.managedObjectContext = [delegate managedObjectContext]; |
c.在viewDidLoad中通过上下文来查询数据,并存储在fetchedResultsController中, 在获取数据的过程中我们需要定义UIFetchRequest 和排序规则,代码如下:
|
1
2
3
4
5
6
7
8
9
10
11
12
13
14
15
16
17
18
19
20
21
22
23
|
/********* 通过CoreData获取sqlite中的数据 *********///通过实体名获取请求NSFetchRequest *request = [[NSFetchRequest alloc] initWithEntityName:NSStringFromClass([Person class])];//定义分组和排序规则NSSortDescriptor *sortDescriptor = [[NSSortDescriptor alloc] initWithKey:@"firstN" ascending:YES];//把排序和分组规则添加到请求中[request setSortDescriptors:@[sortDescriptor]];//把请求的结果转换成适合tableView显示的数据self.fetchedResultsController = [[NSFetchedResultsController alloc] initWithFetchRequest:request managedObjectContext:self.managedObjectContext sectionNameKeyPath:@"firstN" cacheName:nil];//执行fetchedResultsControllerNSError *error;if ([self.fetchedResultsController performFetch:&error]) { NSLog(@"%@", [error localizedDescription]);} |
d.把查询到的数据显示在TableView中代码如下:
|
1
2
3
4
5
6
7
8
9
10
11
12
13
14
15
16
17
18
19
20
21
22
23
24
25
26
27
28
29
30
31
32
33
34
35
36
37
38
39
40
41
42
43
44
45
46
47
48
|
#pragma mark - Table view data source- (NSInteger)numberOfSectionsInTableView:(UITableView *)tableView{ //我们的数据中有多少个section, fetchedResultsController中的sections方法可以以数组的形式返回所有的section //sections数组中存的是每个section的数据信息 NSArray *sections = [self.fetchedResultsController sections]; return sections.count;}//通过获取section中的信息来获取header和每个secion中有多少数据-(NSString *)tableView:(UITableView *)tableView titleForHeaderInSection:(NSInteger)section{ NSArray *sections = [self.fetchedResultsController sections]; //获取对应section的sectionInfo id<NSFetchedResultsSectionInfo> sectionInfo = sections[section]; //返回header return [sectionInfo name];}- (NSInteger)tableView:(UITableView *)tableView numberOfRowsInSection:(NSInteger)section{ NSArray *sections = [self.fetchedResultsController sections]; id<NSFetchedResultsSectionInfo> sectionInfo = sections[section]; //返回每个section中的元素个数 return [sectionInfo numberOfObjects];}- (UITableViewCell *)tableView:(UITableView *)tableView cellForRowAtIndexPath:(NSIndexPath *)indexPath{ UITableViewCell *cell = [tableView dequeueReusableCellWithIdentifier:@"Cell" forIndexPath:indexPath]; //获取实体对象 Person *person = [self.fetchedResultsController objectAtIndexPath:indexPath]; cell.textLabel.text = person.name; cell.detailTextLabel.text = person.number; // Configure the cell... return cell;}
|
(4) 经上面的代码,我们就可以通过CoreData查询sqlite, 然后把查询测数据结果显示到TableView中,可是上面的代码有个问题,就是当通过CoreData来修改或着添加数据时,TableView上的内容是不跟着CoreData的变化而变化的,接下来要做的就是要绑定TableView和CoreData的关系。即通过CoreData修改数据的同时TableView也会跟着改变。
a.要想实现TableView和CoreData的同步,我们需要让TableView对应的Controller实现协议NSFetchedResultsControllerDelegate, 然后再ViewDidLoad中进行注册,在添加上相应的回调代码即可。实现协议的代码如下:
|
1
2
3
4
5
|
#import <UIKit/UIKit.h>@interface MyTableViewController : UITableViewController<NSFetchedResultsControllerDelegate>@end |
b.进行委托回调的注册,在viewDidLoad中添加
|
1
2
|
//注册回调,使同步生效self.fetchedResultsController.delegate = self; |
c.添加相应的委托回调的方法,我们可以到Help中的API中去复制, 查询NSFetchedResultsControllerDelegate,找到相应的回调代码复制过来然后再做简单的修改即可, 实现回调的方法代码如下:
|
1
2
3
4
5
6
7
8
9
10
11
12
13
14
15
16
17
18
19
20
21
22
23
24
25
26
27
28
29
30
31
32
33
34
35
36
37
38
39
40
41
42
43
44
45
46
47
48
49
50
51
52
53
54
55
56
57
58
59
60
61
62
63
64
65
66
|
/* Assume self has a property 'tableView' -- as is the case for an instance of a UITableViewController subclass -- and a method configureCell:atIndexPath: which updates the contents of a given cell with information from a managed object at the given index path in the fetched results controller. *///当CoreData的数据正在发生改变是,FRC产生的回调- (void)controllerWillChangeContent:(NSFetchedResultsController *)controller { [self.tableView beginUpdates];}//分区改变状况- (void)controller:(NSFetchedResultsController *)controller didChangeSection:(id <NSFetchedResultsSectionInfo>)sectionInfo atIndex:(NSUInteger)sectionIndex forChangeType:(NSFetchedResultsChangeType)type { switch(type) { case NSFetchedResultsChangeInsert: [self.tableView insertSections:[NSIndexSet indexSetWithIndex:sectionIndex] withRowAnimation:UITableViewRowAnimationFade]; break; case NSFetchedResultsChangeDelete: [self.tableView deleteSections:[NSIndexSet indexSetWithIndex:sectionIndex] withRowAnimation:UITableViewRowAnimationFade]; break; }}//数据改变状况- (void)controller:(NSFetchedResultsController *)controller didChangeObject:(id)anObject atIndexPath:(NSIndexPath *)indexPath forChangeType:(NSFetchedResultsChangeType)type newIndexPath:(NSIndexPath *)newIndexPath { UITableView *tableView = self.tableView; switch(type) { case NSFetchedResultsChangeInsert: //让tableView在newIndexPath位置插入一个cell [tableView insertRowsAtIndexPaths:[NSArray arrayWithObject:newIndexPath] withRowAnimation:UITableViewRowAnimationFade]; break; case NSFetchedResultsChangeDelete: [tableView deleteRowsAtIndexPaths:[NSArray arrayWithObject:indexPath] withRowAnimation:UITableViewRowAnimationFade]; break; case NSFetchedResultsChangeUpdate: //让tableView刷新indexPath位置上的cell [tableView reloadRowsAtIndexPaths:@[indexPath] withRowAnimation:UITableViewRowAnimationFade]; break; case NSFetchedResultsChangeMove: [tableView deleteRowsAtIndexPaths:[NSArray arrayWithObject:indexPath] withRowAnimation:UITableViewRowAnimationFade]; [tableView insertRowsAtIndexPaths:[NSArray arrayWithObject:newIndexPath] withRowAnimation:UITableViewRowAnimationFade]; break; }}//当CoreData的数据完成改变是,FRC产生的回调- (void)controllerDidChangeContent:(NSFetchedResultsController *)controller { [self.tableView endUpdates];} |
(5)经过上面的代码就可以实现CoreData和TableView的同步啦,到此会感觉到TableView结合着CoreData是如此的顺手,虽然配置起来较为麻烦,但还是比较中规中矩的,只要按部就班的来,是不难实现的。因此TableView深爱着CoreData. 上面我们完成了通过CoreData来对数据的插入和查询并同步到TableView中,下面将会介绍到如何对我们的Cell进行删除。
a.想通过TableView来删除数据的话得开启我们的TableView的编辑功能
|
1
2
3
4
5
6
7
|
//开启编辑// Override to support conditional editing of the table view.- (BOOL)tableView:(UITableView *)tableView canEditRowAtIndexPath:(NSIndexPath *)indexPath{ // Return NO if you do not want the specified item to be editable. return YES;} |
b.开启编辑功能以后我们就可以在tableView的对应的方法中来实现删除功能啦,当点击删除时,我们需呀获取cell对应的索引在CoreData中的实体对象,然后通过上下文进行删除,在save一下即可。因为CoreData和TableView已经进行了同步,所以删除后TableView会自动更新,删除代码如下:
|
1
2
3
4
5
6
7
8
9
10
11
12
13
14
15
16
17
18
19
|
// Override to support editing the table view.- (void)tableView:(UITableView *)tableView commitEditingStyle:(UITableViewCellEditingStyle)editingStyle forRowAtIndexPath:(NSIndexPath *)indexPath{ if (editingStyle == UITableViewCellEditingStyleDelete) { //通过coreData删除对象 //通过indexPath获取我们要删除的实体 Person * person = [self.fetchedResultsController objectAtIndexPath:indexPath]; //通过上下文移除实体 [self.managedObjectContext deleteObject:person]; //保存 NSError *error; if ([self.managedObjectContext save:&error]) { NSLog(@"%@", [error localizedDescription]); } }} |
c.默认的删除按钮上显示的是Delete, 可以通过下面的方法进行修改,代码如下:
|
1
2
3
4
5
6
|
//设置删除的名字-(NSString *)tableView:(UITableView *)tableView titleForDeleteConfirmationButtonForRowAtIndexPath:(NSIndexPath *)indexPath{ return @"删除";} |
(6)到这一步删除功能算是完成了,还有最后一个功能点,就是更新我们的数据。更新数据通过点击相应的cell,把cell上的数据传到UpdateView的页面上,然后进行更新即可。
a.下面的代码是获取数据我们选中的数据并通过KVC把参数传到目的视图中
|
1
2
3
4
5
6
7
8
9
10
11
12
13
14
15
16
17
18
19
20
21
22
23
24
25
|
#pragma mark - Navigation//把对应的cell上的值传到修改的页面上// In a storyboard-based application, you will often want to do a little preparation before navigation- (void)prepareForSegue:(UIStoryboardSegue *)segue sender:(id)sender{ //参数sender是点击的对应的cell //判断sender是否为TableViewCell的对象 if ([sender isKindOfClass:[UITableViewCell class]]) { //做一个类型的转换 UITableViewCell *cell = (UITableViewCell *)sender; //通过tableView获取cell对应的索引,然后通过索引获取实体对象 NSIndexPath *indexPath = [self.tableView indexPathForCell:cell]; //用frc通过indexPath来获取Person Person *person = [self.fetchedResultsController objectAtIndexPath:indexPath]; //通过segue来获取我们目的视图控制器 UIViewController *nextView = [segue destinationViewController]; //通过KVC把参数传入目的控制器 [nextView setValue:person forKey:@"person"]; }} |
b.在UpdateViewController中把传过来的实体对象进行更新,再保存。更新部分的代码和添加部分的代码差不多,在这就不往上贴啦。
经过上面的艰苦的历程后我们的tableView就会深深的爱上CoreData, 可能上面的内容有些多,有疑问的可以留言交流。
上面所做的功能里我们的真正的通讯录还有些差距,看过上面的代码的小伙伴会有个疑问:添加的页面和更新的页面能不能使用同一个呢? 当然啦,为了遵循Don`t Repeat Yourself的原则,下面我们就把两个相似的页面合并在一起,同时给我们每条记录加上头像和给整个tableView加上索引。
1.把更新页面删掉,做如下修改,点击添加和修改都跳转到我们的编辑页面,同时添加一个自定义Button,点击Button时,我们会调用ImagePickerController来从手机相册获取图片:

2.为了把头像持久化存储,我们还得修改数据模型,从新生成Person类,添加一个存储image的选项,是通过二进制的形式存储的

3.在之前保存的ViewController中如果Person为空,说明是执行的添加记录的方法我们就生成一个新的person, 如果Person不为空则不新建Person对象,直接更新完保存。
(1)为了获取图片,我们需要添加ImagePickerController对象,并在viewDidLoad中做相应的配置,代码如下
|
1
2
|
//声明ImagePicker@property (strong, nonatomic) UIImagePickerController *picker; |
进行相关配置
|
1
2
3
4
5
6
|
//初始化并配置ImagePickerself.picker = [[UIImagePickerController alloc] init];//picker是否可以编辑self.picker.allowsEditing = YES;//注册回调self.picker.delegate = self; |
(2)点头像会跳转到我们定义好的ImagePickerController中,我们就可在图片库中选取相应的照片啦。
|
1
2
3
4
5
6
7
|
//点击图片按钮设置图片- (IBAction)tapImageButton:(id)sender { //跳转到ImagePickerView来获取按钮 [self presentViewController:self.picker animated:YES completion:^{}];} |
(3)在ImagePickerController中点击取消按钮触发的事件,跳转到原来编辑的界面
|
1
2
3
4
5
6
|
//回调图片选择取消-(void)imagePickerControllerDidCancel:(UIImagePickerController *)picker{ //在ImagePickerView中点击取消时回到原来的界面 [self dismissViewControllerAnimated:YES completion:^{}];} |
(4)选完图片把头像设置成用户选中的按钮,并dismiss到原来界面
|
1
2
3
4
5
6
7
8
9
10
11
12
13
14
|
//实现图片回调方法,从相册获取图片-(void) imagePickerController:(UIImagePickerController *)picker didFinishPickingMediaWithInfo:(NSDictionary *)info{ //获取到编辑好的图片 UIImage * image = info[UIImagePickerControllerEditedImage]; //把获取的图片设置成用户的头像 [self.imageButton setImage:image forState:UIControlStateNormal]; //返回到原来View [self dismissViewControllerAnimated:YES completion:^{}];} |
(5)把我们点击保存按钮回调的方法作如下修改,如果person为空,我们会新建一个新的person.
|
1
2
3
4
5
6
7
8
9
10
11
12
13
14
15
16
17
18
19
20
21
22
23
24
25
26
|
- (IBAction)tapSave:(id)sender{ //如果person为空则新建,如果已经存在则更新 if (self.person == nil) { self.person = [NSEntityDescription insertNewObjectForEntityForName:NSStringFromClass([Person class]) inManagedObjectContext:self.managedObjectContext]; } //赋值 self.person.name = self.nameTextField.text; self.person.tel = self.telTextField.text; self.person.firstN = [NSString stringWithFormat:@"%c", pinyinFirstLetter([self.person.name characterAtIndex:0])-32]; //把button上的图片存入对象 UIImage *buttonImage = [self.imageButton imageView].image; self.person.imageData = UIImagePNGRepresentation(buttonImage); //保存 NSError *error; if (![self.managedObjectContext save:&error]) { NSLog(@"%@", [error localizedDescription]); } //保存成功后POP到表视图 [self.navigationController popToRootViewControllerAnimated:YES]; } |
(6)因为是何更新页面公用的所以我们要在viewDidLoad对TextField和Button的背景进行初始化,如果person中的imageData有值我们有用传过来的图片,否则用默认的图片,添加数据初始化代码如下:
|
1
2
3
4
5
6
7
8
9
|
self.nameTextField.text = self.person.name;self.telTextField.text = self.person.tel;if (self.person.imageData != nil){ UIImage *image = [UIImage imageWithData:self.person.imageData]; [self.imageButton setImage:image forState:UIControlStateNormal];} |
4.上面的代码就可以插入头像了,我们需要在tableView中进行显示即可,在tableView中从person对象中获取相应的头像,然后显示即可,下面我们要加上索引。
(1)在cell中显示头像的代码如下:
|
1
2
3
4
|
if (person.imageData != nil) { UIImage *image = [UIImage imageWithData:person.imageData]; cell.imageView.image = image;} |
(2)实现添加索引回调的方法
|
1
2
3
4
5
6
7
8
9
10
11
12
13
14
15
16
17
18
19
|
//给我们的通讯录加上索引,下面的方法返回的时一个数组-(NSArray *) sectionIndexTitlesForTableView:(UITableView *)tableView{ //通过fetchedResultsController来获取section数组 NSArray *sectionArray = [self.fetchedResultsController sections]; //新建可变数组来返回索引数组,大小为sectionArray中元素的多少 NSMutableArray *index = [NSMutableArray arrayWithCapacity:sectionArray.count]; //通过循环获取每个section的header,存入addObject中 for (int i = 0; i < sectionArray.count; i ++) { id <NSFetchedResultsSectionInfo> info = sectionArray[i]; [index addObject:[info name]]; } //返回索引数组 return index;} |
经过上面的步骤,我们之前俩个页面可以共用,而且加上了头像和索引,运行效果如下:
上面的内容挺多的啦吧,别着急,我们的这个通讯录还没完呢,通讯录中的查询功能是少不了的,因为当存的用户多了,为了方便用户查询我们还需要添加一个控件。接下来是我们Search Bar and Search 出场的时候了。UISearchDisplayController自己有一个TableView用于显示查询出来的结果,需要在通讯录中添加一些代码我们的Seach Bar就可以使用了。
1.在storyboard中添加Search Bar and Search,然后把属性拖入我们对应的TableViewController中即可,新添加属性如下:
//添加Search Display Controller属性
@property (strong, nonatomic) IBOutlet UISearchDisplayController *displayC;
2.编辑SearchBar内容改变后调用的方法,我们会通过用户输入的内容进行一个模糊查询,把查询的内容添加到我们之前的fetchResultController中
 1 //当search中的文本变化时就执行下面的方法
 2 - (void)searchBar:(UISearchBar *)searchBar textDidChange:(NSString *)searchText
 3 {
 4     //新建查询语句
 5     NSFetchRequest * request = [[NSFetchRequest alloc]initWithEntityName:NSStringFromClass([Person class])];
 6
 7     //排序规则
 8     NSSortDescriptor *sortDescriptor = [[NSSortDescriptor alloc] initWithKey:@"firstN" ascending:YES];
 9     [request setSortDescriptors:@[sortDescriptor]];
10
11     //添加谓词
12     NSPredicate * predicate = [NSPredicate predicateWithFormat:@"name contains %@",searchText];
13     [request setPredicate:predicate];
14
15     //把查询结果存入fetchedResultsController中
16     self.fetchedResultsController = [[NSFetchedResultsController alloc] initWithFetchRequest:request managedObjectContext:self.managedObjectContext sectionNameKeyPath:@"firstN" cacheName:nil];
17
18     NSError *error;
19     if (![self.fetchedResultsController performFetch:&error]) {
20         NSLog(@"%@", [error localizedDescription]);
21     }
22 }
3.因为UISearchDisplayController里的TableView和我们之前的tableView用的是一个FetchedReaultsController,所以在UISearchDisplayController取消的时候要重载一下我们之前的TableView,或去通讯录中的FetchedResultsController, 代码如下:
//当在searchView中点击取消按钮时我们重新刷新一下通讯录
-(void)searchBarCancelButtonClicked:(UISearchBar *)searchBar
{
   [self viewDidLoad];
}
4.因为通过search查询的结果集会显示在UISearchDisplayController自己的tableView中,所以加载cell时要进行相应的选择,search中的cell是我们自定义的cell, 选择代码如下:
 1     //根据不同的tableView来设置不同的cell模板
 2     if ([tableView isEqual:self.tableView])
 3     {
 4
 5         cell = [tableView dequeueReusableCellWithIdentifier:@"Cell" forIndexPath:indexPath];
 6
 7     }
 8     else
 9     {
10         cell = [tableView dequeueReusableCellWithIdentifier:@"SearchCell" forIndexPath:indexPath];
11
12     }
5.在我们的查询后的列表中,如果还想点击cell以后跳转到编辑页面,我们该如何做呢? 添加下面的回调方法,用代码进行跳转,代码如下:
 1 -(void)tableView:(UITableView *)tableView didSelectRowAtIndexPath:(NSIndexPath *)indexPath
 2 {
 3     if ([tableView isEqual:self.displayC.searchResultsTableView])
 4     {
 5          Person *person = [self.fetchedResultsController objectAtIndexPath:indexPath];
 6         UIStoryboard * s = [UIStoryboard storyboardWithName:@"Main" bundle:[NSBundle mainBundle]];
 7
 8         //获取要目标视图
 9         UIViewController *destination = [s instantiateViewControllerWithIdentifier:@"EditViewController"];
10
11         //键值编码传值
12         [destination setValue:person forKeyPath:@"person"];
13
14         [self.navigationController pushViewController:destination animated:YES];
15     }
16 }
经过上面的步骤,我们的查询功能就写好了,下面是最终的运行结果:

经上面这么曲折的过程,我们的通讯录的基本功能就差不多了。
github分享地址:https://github.com/lizelu/TellBook
作者:青玉伏案
出处:http://www.cnblogs.com/ludashi/
本文版权归作者和共博客园共有,欢迎转载,但未经作者同意必须保留此段声明,且在文章页面明显位置给出原文连接,否则保留追究法律责任的权利。
如果文中有什么错误,欢迎指出。以免更多的人被误导。
收简历:坐标美团(北京总部),长期招聘FE/iOS/Android靠谱工程师,入职后,可内部联系楼主,有小礼品赠送,有意者可邮箱投递简历:zeluli@foxmail.com

 浙公网安备 33010602011771号