安卓开发笔记——Fragment+FragmentTabHost组件(实现新浪微博底部菜单)
记得之前写过2篇关于底部菜单的实现,由于使用的是过时的TabHost类,虽然一样可以实现我们想要的效果,但作为学习,还是需要来了解下这个新引入类FragmentTabHost
之前2篇文章的链接:
安卓开发复习笔记——TabHost组件(一)(实现底部菜单导航)
安卓开发复习笔记——TabHost组件(二)(实现底部菜单导航)
关于Fragment类在之前的安卓开发复习笔记——Fragment+ViewPager组件(高仿微信界面)也介绍过,这里就不再重复阐述了。
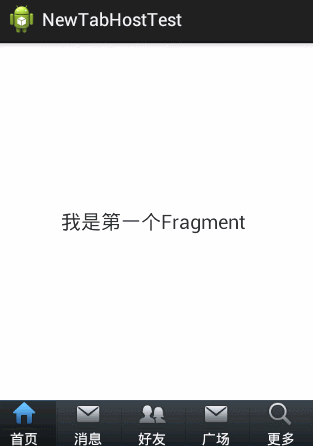
国际惯例,先来张效果图:
下面直接上代码了,注释很全,看过我前2篇文章的朋友,肯定秒懂的,哈哈~
activity_main.xml(主布局文件)
 1 <LinearLayout xmlns:android="http://schemas.android.com/apk/res/android"
 2     xmlns:tools="http://schemas.android.com/tools"
 3     android:layout_width="fill_parent"
 4     android:layout_height="fill_parent"
 5     android:orientation="vertical" >
 6
 7     <!-- 存放主要页面内容 -->
 8
 9     <FrameLayout
10         android:id="@+id/maincontent"
11         android:layout_width="fill_parent"
12         android:layout_height="0dp"
13         android:layout_weight="1" >
14     </FrameLayout>
15
16     <!-- 底层菜单 -->
17
18     <android.support.v4.app.FragmentTabHost
19         android:id="@android:id/tabhost"
20         android:layout_width="fill_parent"
21         android:layout_height="wrap_content"
22         android:background="@drawable/maintab_toolbar_bg" >
23
24         <FrameLayout
25             android:id="@android:id/tabcontent"
26             android:layout_width="0dp"
27             android:layout_height="0dp"
28             android:layout_weight="0" >
29         </FrameLayout>
30     </android.support.v4.app.FragmentTabHost>
31
32 </LinearLayout>
fragment.xml(由于只有文字不同,这里只给出一个)
 1 <RelativeLayout xmlns:android="http://schemas.android.com/apk/res/android"
 2     xmlns:tools="http://schemas.android.com/tools"
 3     android:layout_width="fill_parent"
 4     android:layout_height="fill_parent"
 5  >
 6
 7
 8     <TextView
 9         android:id="@+id/text"
10         android:layout_width="wrap_content"
11         android:layout_height="wrap_content"
12         android:layout_centerInParent="true"
13         android:text="我是第一个Fragment"
14         android:textSize="20dp"
15         />
16
17
18 </RelativeLayout>
tabcontent.xml(具体底部菜单详细布局)
 1 <LinearLayout xmlns:android="http://schemas.android.com/apk/res/android"
 2     xmlns:tools="http://schemas.android.com/tools"
 3     android:layout_width="wrap_content"
 4     android:layout_height="wrap_content"
 5     android:gravity="center_horizontal"
 6     android:orientation="vertical" >
 7
 8     <ImageView
 9         android:id="@+id/image"
10         android:layout_height="wrap_content"
11         android:layout_width="wrap_content"
12         />
13     <TextView
14         android:id="@+id/text"
15         android:padding="2dp"
16         android:layout_width="wrap_content"
17         android:layout_height="wrap_content"
18         android:textColor="@android:color/white"
19         />
20
21
22 </LinearLayout>
bt_selector.xml(底部菜单点击背景)
1 <?xml version="1.0" encoding="utf-8"?>
2 <selector xmlns:android="http://schemas.android.com/apk/res/android">
3
4     <item android:drawable="@drawable/home_btn_bg" android:state_pressed="true"></item>
5     <item android:drawable="@drawable/home_btn_bg" android:state_selected="true"></item>
6
7 </selector>
bt_home_selector.xml(底部菜单按钮效果)
1 <?xml version="1.0" encoding="utf-8"?>
2 <selector xmlns:android="http://schemas.android.com/apk/res/android">
3
4     <item android:drawable="@drawable/icon_home_sel" android:state_selected="true"></item>
5     <item android:drawable="@drawable/icon_home_nor"></item>
6
7 </selector>
FragmentPage1-FragmentPage5.java
 1 package com.example.newtabhosttest;
 2
 3 import android.os.Bundle;
 4 import android.support.annotation.Nullable;
 5 import android.support.v4.app.Fragment;
 6 import android.view.LayoutInflater;
 7 import android.view.View;
 8 import android.view.ViewGroup;
 9
10 public class FragmentPage1 extends Fragment{
11         @Override
12         public View onCreateView(LayoutInflater inflater,
13                 @Nullable ViewGroup container, @Nullable Bundle savedInstanceState) {
14             return inflater.inflate(R.layout.fragment1, null);
15         }
16
17 }
MainActivity.java(主代码)
 1 package com.example.newtabhosttest;
 2
 3 import android.os.Bundle;
 4 import android.support.v4.app.FragmentActivity;
 5 import android.support.v4.app.FragmentTabHost;
 6 import android.view.View;
 7 import android.widget.ImageView;
 8 import android.widget.TabHost.TabSpec;
 9 import android.widget.TextView;
10
11 public class MainActivity extends FragmentActivity {
12
13     private FragmentTabHost fragmentTabHost;
14     private String texts[] = { "首页", "消息", "好友", "广场", "更多" };
15     private int imageButton[] = { R.drawable.bt_home_selector,
16             R.drawable.bt_message_selector, R.drawable.bt_selfinfo_selector,R.drawable.bt_square_selector ,R.drawable.bt_more_selector};
17      private Class fragmentArray[] = {FragmentPage1.class,FragmentPage2.class,FragmentPage3.class,FragmentPage4.class,FragmentPage5.class};
18
19     @Override
20     protected void onCreate(Bundle savedInstanceState) {
21         super.onCreate(savedInstanceState);
22         setContentView(R.layout.activity_main);
23
24         // 实例化tabhost
25         fragmentTabHost = (FragmentTabHost) findViewById(android.R.id.tabhost);
26         fragmentTabHost.setup(this, getSupportFragmentManager(),
27                 R.id.maincontent);
28
29         for (int i = 0; i < texts.length; i++) {
30             TabSpec spec=fragmentTabHost.newTabSpec(texts[i]).setIndicator(getView(i));
31
32             fragmentTabHost.addTab(spec, fragmentArray[i], null);
33
34             //设置背景(必须在addTab之后,由于需要子节点(底部菜单按钮)否则会出现空指针异常)
35             fragmentTabHost.getTabWidget().getChildAt(i).setBackgroundResource(R.drawable.bt_selector);
36         }
37
38     }
39
40     private View getView(int i) {
41         //取得布局实例
42         View view=View.inflate(MainActivity.this, R.layout.tabcontent, null);
43
44         //取得布局对象
45         ImageView imageView=(ImageView) view.findViewById(R.id.image);
46         TextView textView=(TextView) view.findViewById(R.id.text);
47
48         //设置图标
49         imageView.setImageResource(imageButton[i]);
50         //设置标题
51         textView.setText(texts[i]);
52         return view;
53     }
54
55 }
到这里代码就结束了,要是有哪里疑惑的朋友可以给我留言,如果觉得文章对您有用的话,请给个赞,谢谢支持!^_^

 浙公网安备 33010602011771号