

从属性赋值到MVVM模式详解
这两天学习了一下MVVM模式,和大家分享一下,也作为自己的学习笔记.这里不定义MVVM的概念,不用苍白的文字说它的好处,而是从简单的赋值讲起,一步步建立一个MVVM模式的Simple.通过前后对比留给读者自己去思考.我也不知道理解是否正确,有不对的地方,希望指出.
赋值VS绑定
要理解MVVM模式,最重要的是理解绑定的概念.做B/S或者对C/S理解不够的程序员可能不了解"绑定",它与赋值类似,但又"高级"一点.
一个简单的类:
public class MyClass
{
    public MyClass() {
        this._Time = DateTime.Now.ToString();
    }

    private string _Time;
    public string Time {
        get {
            return this._Time;
        }
        set {
            this._Time = value;
        }
    }
}
赋值
private void UpdateTime_Click(object sender, RoutedEventArgs e) {
    _MyClass.Time = DateTime.Now.ToString();
    this.lable1.Content = _MyClass.Time;
}

private void Grid_Loaded(object sender, RoutedEventArgs e) {
    this.lable1.Content = _MyClass.Time;
}
很简单的对lable1的Content属性的赋值.总结一下这种模式的流程图:

这种模式很简单,很容易理解.缺点也是很明显,View跟CodeBehind紧紧耦合在一起了(事件方法里面需要知道lable1),还有到处都是this.lable1.Content = _MyClass.Time; 这样的赋值代码,这样可维护性是很低的.于是就有了绑定.
属性绑定
绑定就是把把东西关联在一起,例如人的手脚是和整个身体绑定在一起的,手指受伤了,人会感到疼痛.属性绑定通常是把一个Model属性绑定给一个控件的属性,于是它们就有了联系,Model的属性变化了,控件的属性也会变化.
wpf的绑定.
首先把View的DataContext设为MyClass.
<Window.DataContext>
    <local:MyClass />
</Window.DataContext>
这样我们就可以把MyClass的属性绑定给lable1的Content.
<Label Grid.Column="1" Grid.Row="1" Content="{Binding Time}" />
WinForm也能绑定:
public Form1() {
    InitializeComponent();
    this.label2.DataBindings.Add("Text", _MyClass, "Time", true);
}
运行程序:

点击Update Time按钮,比较遗憾,绑定那一行的时间并没有更新.看来需要做更多的工作.(见源码Example1)
INotifyPropertyChanged接口
原来对于上面的那个poco类,它的属性Time发生变化时,紧紧靠<Label Grid.Column="1" Grid.Row="1" Content="{Binding Time}" />或者this.label2.DataBindings.Add("Text", _MyClass, "Time", true); 是不够的,lable不能"智能"地知道MyClass的Time变化了,需要MyClass主动去通知lable:我的Time属性变化了.INotifyPropertyChanged接口就是这样的功能.
INotifyPropertyChanged的源码:
// 摘要:向客户端发出某一属性值已更改的通知。
public interface INotifyPropertyChanged
{
    // 摘要:在更改属性值时发生。
    event PropertyChangedEventHandler PropertyChanged;
}
PropertyChangedEventHandler里的事件参数源码:
// 摘要:为 System.ComponentModel.INotifyPropertyChanged.PropertyChanged 事件提供数据。
 public class PropertyChangedEventArgs : EventArgs
 {
     // 摘要:初始化 System.ComponentModel.PropertyChangedEventArgs 类的新实例。
     // 参数:propertyName:已更改的属性名
     [TargetedPatchingOptOut("Performance critical to inline this type of method across NGen image boundaries")]
     public PropertyChangedEventArgs(string propertyName);

     // 摘要:获取已更改的属性名。
     // 返回结果:已更改的属性名。
     public virtual string PropertyName { get; }
 }
接口非常简单,就一个PropertyChanged事件,而事件委托的参数也很简单,一个字符串属性名.Model继承INotifyPropertyChanged后,在这个事件中是通知者的角色(执行事件),而<Label Grid.Column="1" Grid.Row="1" Content="{Binding Time}" />和this.label2.DataBindings.Add("Text", _MyClass, "Time", true); 这里可以理解为事件的订阅.
继承INotifyPropertyChanged后的MyClass:
public class MyClass : INotifyPropertyChanged
{
    public MyClass() {
        this._Time = DateTime.Now.ToString();
    }

    private string _Time;
    public string Time {
        get {
            return this._Time;
        }
        set {
            if (this._Time != value) {
                this._Time = value;
                if (PropertyChanged != null) {
                    PropertyChanged(this, new PropertyChangedEventArgs("Time"));
                }
            }
        }
    }

    public event PropertyChangedEventHandler PropertyChanged;
}
重点是Set值时执行事件,运行程序发现,lable终于知道MyClass的属性变化了,它们绑定了.而且可以发现绑定是双向的,即控件的值更新,model的属性值也会更新,添加一个按钮显示model的属性值:
private void Show_Click(object sender, RoutedEventArgs e) {
    MessageBox.Show(_MyClass.Time);
}

这里做到了把Model的属性绑定给View的控件的属性中,下面看看集合的绑定.
集合绑定
跟上面一样,普通的集合控件们是不认的,要用特殊的集合,它就是ObservableCollection<T>,它继承了INotifyCollectionChanged和INotifyPropertyChanged.部分源码:
 [Serializable]
 public class ObservableCollection<T> : Collection<T>, INotifyCollectionChanged, INotifyPropertyChanged
一个简单的类:
public class Employe
{
    public ObservableCollection<string> Employees { get; set; }

    public Employe() {
        Employees = new ObservableCollection<string>()
        {
            "肥猫", "大牛", "猪头"
        };
    }
}
把它绑定到一个ComboBox中:
<ComboBox Grid.Column="2" Grid.Row="0" ItemsSource="{Binding Employees}" Width="50px"/>另外做一个按钮添加来Employees
private void AddDepartment_Click(object sender, RoutedEventArgs e) {
    _MyClass.Employees.Add(this.textBox1.Text);
}
运行程序,添加一个Employee,发现ComboBox也更新了(见源码Example3).

命令绑定
还有一个绑定就是命令绑定.实际解决的是要把View完全解耦,不用再写控件事件,因为AddDepartment_Click这样的写法就会把View和CodeBehind的耦合在一起,跟上面属性赋值类似.
ICommand
// 摘要:定义一个命令
[TypeConverter("System.Windows.Input.CommandConverter, PresentationFramework, Version=4.0.0.0, Culture=neutral, PublicKeyToken=31bf3856ad364e35, Custom=null")]
[ValueSerializer("System.Windows.Input.CommandValueSerializer, PresentationFramework, Version=4.0.0.0, Culture=neutral, PublicKeyToken=31bf3856ad364e35, Custom=null")]
public interface ICommand
{
    // 摘要: 当出现影响是否应执行该命令的更改时发生。
    event EventHandler CanExecuteChanged;

    // 摘要:定义用于确定此命令是否可以在其当前状态下执行的方法。
    // 参数:parameter:此命令使用的数据。如果此命令不需要传递数据,则该对象可以设置为null。
    // 返回结果:如果可以执行此命令,则为true;否则为false。
    bool CanExecute(object parameter);
    //
    // 摘要:定义在调用此命令时调用的方法。
    // 参数:parameter:此命令使用的数据。如果此命令不需要传递数据,则该对象可以设置为 null。
    void Execute(object parameter);
}
最主要需要实现的是Execute方法.即事件发生时要执行的方法.下面把Add Department的按钮事件去掉,改为绑定一个命令.实现这个命令首先要得到的是textbox上的值.要在命令里得到View控件的值,可以在model里新建一个属性值与这个控件绑定,因为绑定是双向的,所以属性值就是控件的值.根据上面的Employe类添加如下代码:
private string _NewEmployee;
public string NewEmployee {
    get {
        return this._NewEmployee;
    }
    set {
        if (this._NewEmployee != value) {
            this._NewEmployee = value;
            if (PropertyChanged != null)
                PropertyChanged(this, new PropertyChangedEventArgs("NewEmployee"));
        }
    }
}
每个命令要实现为一个单独的类,继承ICommand,这里用一个委托把添加部门的逻辑转移到Employe中:
public class AddEmployeeCommand : ICommand
{
    Action<object> _Execute;
    public AddEmployeeCommand(Action<object> execute) {
        _Execute = execute;
    }

    public bool CanExecute(object parameter) {
        return true;
    }

    public event EventHandler CanExecuteChanged {
        add { CommandManager.RequerySuggested += value; }
        remove { CommandManager.RequerySuggested -= value; }
    }

    public void Execute(object parameter) {
        _Execute(parameter);
    }
}
Employe类再添加一个ICommand用作绑定:
private ICommand _AddEmployee;
public ICommand AddEmployee {
    get {
        if (_AddEmployee == null) {
            _AddEmployee = new AddEmployeeCommand((p) =>
            {
                Employees.Add(NewEmployee);
            });
        }
        return _AddEmployee;
    }
}
有了AddEmployee 我们就可以绑定到按钮中:
<Button Grid.Column="0" Grid.Row="0" Content="Add Department" Command="{Binding AddEmployee}" />
到这里,我们可以得到跟上面一样的功能,但成功把按钮事件改为了命令绑定.(见源码Example4)
完成上面所有工作,我们解决了一个问题,即View"后面"的模块(Code Behind也好,Model也好)完全没了view的影子,"后面"的模块不用管textbox还是Label来显示一个Name,只管把Name赋值就好了,也不用关心一个button还是一个picturebutton来点击,只管实现逻辑.但细心观察,代码还是有不少问题.
其中最主要的是为了实现上面的功能,污染了Employe这个类.Employe应该是常见的Model层中的一个类,它应该是一个poco类,职责是定义领域模型和模型的领域(业务)逻辑.为了实现绑定,添加了各种接口和与领域(业务)无关的属性,这就是对Model的污染.所以,当想实现绑定,而又不想污染model,就得引入新的一层--ViewModel,这样就走向了MVVM模式.
MVVM模式
VM是MVVM的核心.主要作用有两个.
1.提供属性和命令供View绑定
2.还要承担MVC模式中C(Controller)的职责,作为View和业务层的中间人.
模式实践.
把上面的代码稍为修改即可以改为MVVM模式.
Model,Employee回归Poco:
public class Employee
{
    public string Name { get; set; }
    public string Email { get; set; }
    public string Phone { get; set; }

    public void Add() {
        DataBase.AllEmployees.Add(this);
    }
}
ViewModel提供绑定的属性和命令:
public class EmployeeViewModel : INotifyPropertyChanged
   {
       public event PropertyChangedEventHandler PropertyChanged;

       /// <summary>
       /// 供?ComboBox绑ó定¨
       /// </summary>
       public ObservableCollection<Employee> Employees { get; set; }

       public EmployeeViewModel() {
           Employees = new ObservableCollection<Employee>(DataBase.AllEmployees);
       }

       #region 供?textbox 绑ó定¨
       private string _NewEmployeeName;
       public string NewEmployeeName {
           get {
               return this._NewEmployeeName;
           }
           set {
               if (this._NewEmployeeName != value) {
                   this._NewEmployeeName = value;
                   if (this.PropertyChanged != null) {
                       PropertyChanged(this, new PropertyChangedEventArgs("NewEmployeeName"));
                   }
               }
           }
       }

       private string _NewEmployeeEmail;
       public string NewEmployeeEmail {
           get {
               return this._NewEmployeeEmail;
           }
           set {
               if (this._NewEmployeeEmail != value) {
                   this._NewEmployeeEmail = value;
                   if (this.PropertyChanged != null) {
                       PropertyChanged(this, new PropertyChangedEventArgs("NewEmployeeEmail"));
                   }
               }
           }
       }

       private string _NewEmployeePhone;
       public string NewEmployeePhone {
           get {
               return this._NewEmployeePhone;
           }
           set {
               if (this._NewEmployeePhone != value) {
                   this._NewEmployeePhone = value;
                   if (this.PropertyChanged != null) {
                       PropertyChanged(this, new PropertyChangedEventArgs("NewEmployeePhone"));
                   }
               }
           }
       }
       #endregion

       public ICommand AddEmployee {
           get {
               return new RelayCommand(new Action(() =>
                           {
                               if (string.IsNullOrEmpty(NewEmployeeName)) {
                                   MessageBox.Show("姓名不能为空!");
                                   return;
                               }
                               var newEmployee = new Employee { Name = _NewEmployeeName, Email = _NewEmployeeEmail, Phone = _NewEmployeePhone };
                               newEmployee.Add();
                               Employees.Add(newEmployee);
                           }));
           }
       }
   }
代码的职责非常明确,提供5个属性(1个命令,4个普通属性)供View绑定.虽然简单,但却产生了一大堆代码,可能这就是MVVM框架出现的原因.不管怎样,一个简单的MVVM模式的Simple就完成了(参考代码Example5).
MVVM: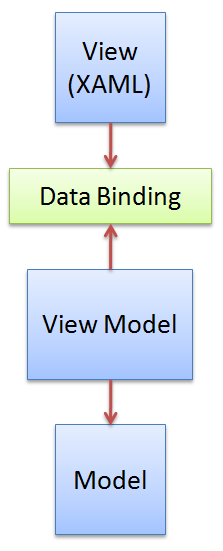
参考:链接

 浙公网安备 33010602011771号