
[译]Spring构建微服务
此文为译文,原文地址
介绍
本文通过一个使用Spring、Spring Boot和Spring Cloud的小例子来说明如何构建微服务系统。
我们可以通过数个微服务组合成一个大型系统。
我们可以想象下有这么一个网上商城,它由用户、目录、购物车、订单等多个独立的为服务组成。

这里难免需要安装和配置不少组件才能构建这样一个系统。为了让它们更好的合作,你需要熟悉Spring Boot、Spring Cloud。
本文的目标很明确,就是一步一步构建一个最简单的系统。因此,这里只会实现系统中的一小部分-用户微服务。
Web应用可以通过请求restful api访问用户微服务。这里也会包含发现服务-让其他服务可以知道彼此。

其他资源
本文只是讨论了一个最简单的系统,更多的内容,你可以阅读Josh Long的博客
服务注册
当你有多个服务协同工作时,它们需要互相彼此知道。如果你之前了解java RMI机制,你可能还记得,它依赖于一个注册中心,从而使RMI服务能够找到对方。微服务也有同样的需求。
Netflix的开发人员设计并开源了一套服务注册系统,叫做Eureka。目前这套系统已被合并进了Spring Cloud,我们可以很容易的运行一个Eureka服务。例如:
@SpringBootApplication
@EnableEurekaServer
public class ServiceRegistrationServer {

  public static void main(String[] args) {
    //  配置文件 registration-server.yml
    System.setProperty("spring.config.name", "registration-server");
    SpringApplication.run(ServiceRegistrationServer.class, args);
  }
}
就是这么简单。
POM中的核心内容如下:
    <parent>
        <groupId>org.springframework.cloud</groupId>
        <artifactId>spring-cloud-starter-parent</artifactId>
        <version>Angel.SR3</version>  <!-- Name of release train -->
    </parent>
    <dependencies>
        <dependency>
            <!-- Setup Spring Boot -->
            <groupId>org.springframework.boot</groupId>
            <artifactId>spring-boot-starter</artifactId>
        </dependency>

        <dependency>
            <!-- Setup Spring MVC & REST, use Embedded Tomcat -->
            <groupId>org.springframework.boot</groupId>
            <artifactId>spring-boot-starter-web</artifactId>
        </dependency>

        <dependency>
            <!-- Spring Cloud starter -->
            <groupId>org.springframework.cloud</groupId>
            <artifactId>spring-cloud-starter</artifactId>
        </dependency>

        <dependency>
            <!-- Eureka for service registration -->
            <groupId>org.springframework.cloud</groupId>
            <artifactId>spring-cloud-starter-eureka-server</artifactId>
        </dependency>
    </dependencies>
Spring Boot的默认配置可以查看application.properties或者application.yml文件。当你有多个Spring Boot应用的时候,你可以配置spring.config.name属性来让Spring Boot查找不同的配置文件。
此应用还需配置registration-server.properties或registration-server.yml文件。以下是registration-server.yml中的相关配置:
# Configure this Discovery Server
eureka:
  instance:
    hostname: localhost
  client:  # 只注册服务端
    registerWithEureka: false
    fetchRegistry: false

server:
  port: 1111   # HTTP (Tomcat) port
Eureka默认运行在8761端口,这里我们把它修改为1111端口。配置中制定了这里是服务端,并且阻止注册自身服务。
现在运行我们的注册服务,你可以通过 http://localhost:1111来访问Eureka的主界面。
创建微服务:用户服务
微服务是一个用来处理一个明确需求的独立组件。
我们总是在强调要构建高内聚,低耦合的架构,这已经是老生常谈了。但是,这里我们不是在组件(Spring Beans)级别实现,而是在接口之间实现。
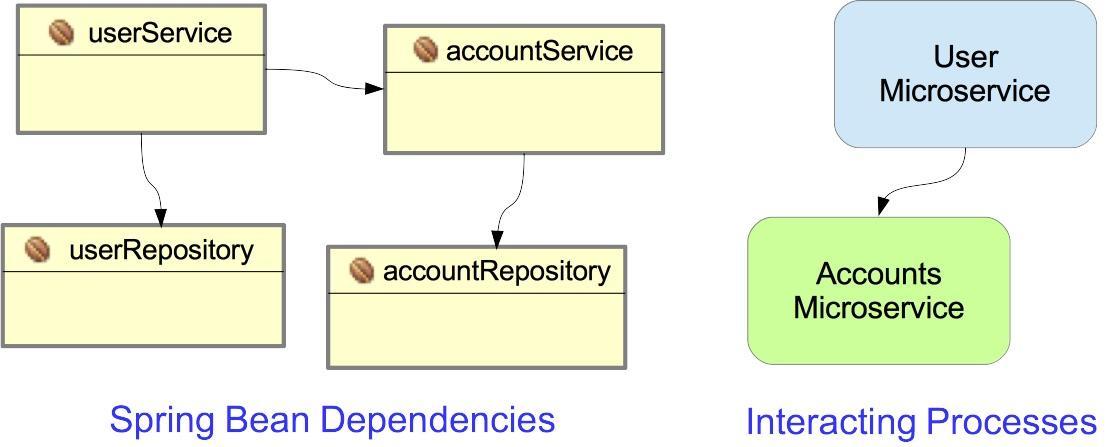
例如,我有一个账户管理的微服务需要使用Spring Data AccountRepository来实现一个JPA,还需要使用Spring REST来提供RESTful接口显示账户信息。这正好就是实现了一个简单的spring boot应用。
我们如何让它被注册到注册服务中:
@EnableAutoConfiguration
@EnableDiscoveryClient
@Import(AccountsWebApplication.class)
public class AccountsServer {

    @Autowired
    AccountRepository accountRepository;

    public static void main(String[] args) {
        // 配置文件 accounts-server.yml
        System.setProperty("spring.config.name", "accounts-server");

        SpringApplication.run(AccountsServer.class, args);
    }
}
答案是注解:
@EnableAutoConfiguration- 定义了这是一个Spring Boot应用@EnableDiscoveryClient- 运行服务被注册到注册服务中@Import(AccountsWebApplication.class)引入配置类
此外,YML配置文件内容如下:
# Spring properties
spring:
  application:
     name: accounts-service

# Discovery Server Access
eureka:
  client:
    serviceUrl:
      defaultZone: http://localhost:1111/eureka/

# HTTP Server
server:
  port: 2222   # HTTP (Tomcat) port
说明:
1.设置应用名为accounts-service,注册和访问都使用这个名字
2.服务发布在2222端口
3.配置Eureka 服务URL
现在运行服务然后刷新http://localhost:1111 ,你会看到ACCOUNTS-SERVICE显示在应用列表中。
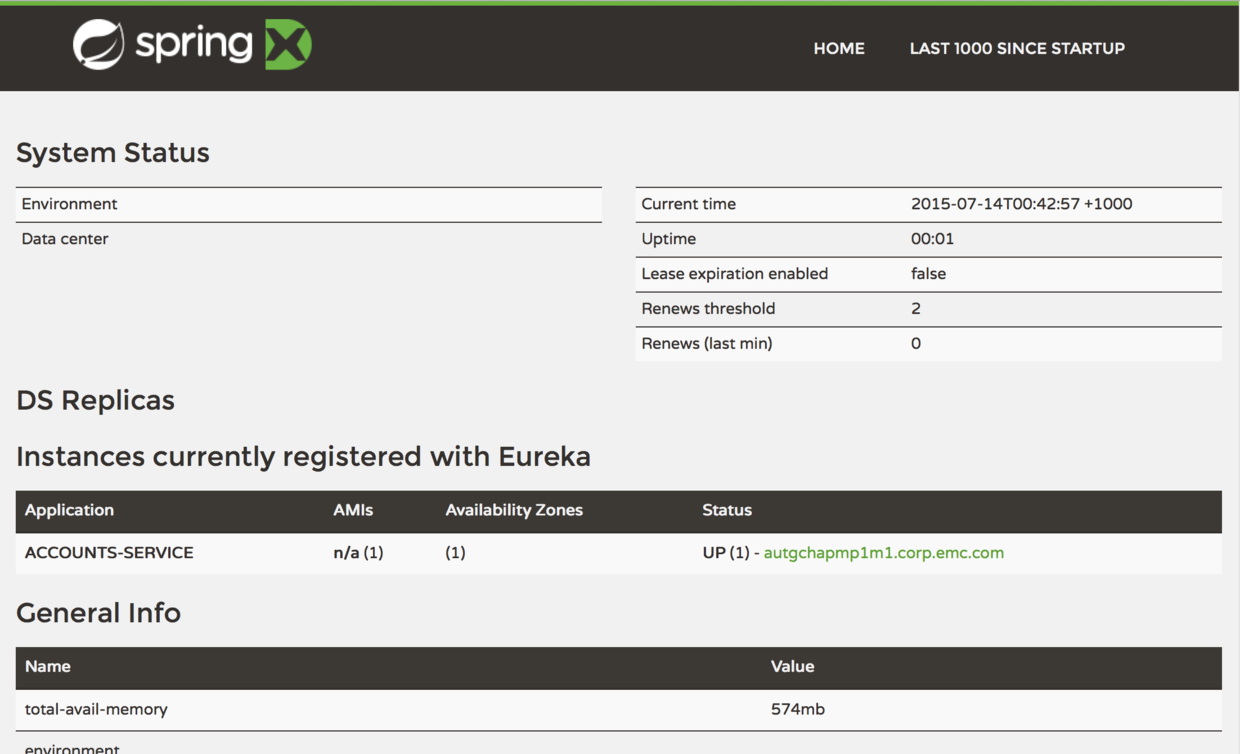
有时候,注册服务需要用10到20秒时间。你可以访问http://localhost:1111/eureka/apps/来查询更多的信息:
<applications>
    <versions__delta>1</versions__delta>
    <apps__hashcode>UP_1_</apps__hashcode>
    <application>
        <name>ACCOUNTS-SERVICE</name>
        <instance>
            <hostName>autgchapmp1m1.corp.emc.com</hostName>
            <app>ACCOUNTS-SERVICE</app>
            <ipAddr>172.16.84.1</ipAddr><status>UP</status>
            <overriddenstatus>UNKNOWN</overriddenstatus>
            <port enabled="true">3344</port>
            <securePort enabled="false">443</securePort>
            ...
        </instance>
    </application>
</applications>
访问微服务
Spring提供了RestTemplate类来访问RESTful类。它可以让你发送HTTP请求至RESTful服务并且接收和处理不同类型的响应数据-包括JSON和XML。
封装微服务调用
在客户端应用里有一个WebAccountService类:
@Service
public class WebAccountsService {

    @Autowired        //  Spring Cloud 自动注入
    @LoadBalanced
    protected RestTemplate restTemplate;

    protected String serviceUrl;

    public WebAccountsService(String serviceUrl) {
        this.serviceUrl = serviceUrl.startsWith("http") ?
               serviceUrl : "http://" + serviceUrl;
    }

    public Account getByNumber(String accountNumber) {
        Account account = restTemplate.getForObject(serviceUrl
                + "/accounts/{number}", Account.class, accountNumber);

        if (account == null)
            throw new AccountNotFoundException(accountNumber);
        else
            return account;
    }
    ...
}
WebAccountService使用RestTemplate从微服务中获取数据
访问微服务
在WebAccountController设置serviceUrl:
@SpringBootApplication
@EnableDiscoveryClient
@ComponentScan(useDefaultFilters=false)
public class WebServer {

    public static void main(String[] args) {
        // Will configure using web-server.yml
        System.setProperty("spring.config.name", "web-server");
        SpringApplication.run(WebServer.class, args);
    }

    @Bean
    public WebAccountsController accountsController() {
         // 1. 不应该写死 ,这里只是示例
         // 2. 大小写不敏感,也可以是http://accounts-service
         return new WebAccountsController
                       ("http://ACCOUNTS-SERVICE");  // serviceUrl
    }
}
以下几点需要注意:
-
WebController是一个典型的Spring MVC控制器,此应用使用thymeleaf作为视图引擎。 -
Spring Boot会默认扫描注解了
@Component的类,在本例中,我们自己创建了WebAccountController,所以我取消了自动扫描@ComponentScan(useDefaultFilters=false)。 -
service-url 需要与
spring.application.name中一致,而不是真实的访问地址。如account-service.yml中的accounts-service。
RestTemplate 负载均衡
Spring Cloud会自动配置RestTemplate使用Netflix的 Ribbon来实现HTTP客户端。
当你的某个服务存在多个实例是,Ribbon会使用自动选择其中的一个。
如果你查看RibbonClientHttpRequestFactory的源码,你会发现:
String serviceId = originalUri.getHost();
ServiceInstance instance =
            loadBalancer.choose(serviceId);  // 负载均衡
... if instance non-null (service exists) ...
URI uri = loadBalancer.reconstructURI(instance, originalUri);
RestTemplate实例是线程安全的,它可以访问任意数量的应用程序中的不同服务。
配置
现在我们配置web-server.yml:
# Spring Properties
spring:
  application:
     name: web-service

# Discovery Server Access
eureka:
  client:
    serviceUrl:
      defaultZone: http://localhost:1111/eureka/

# HTTP Server
server:
  port: 3333   # HTTP (Tomcat) port
AccountsWebApplication 配置
@SpringBootApplication
@EntityScan("io.pivotal.microservices.accounts")
@EnableJpaRepositories("io.pivotal.microservices.accounts")
@PropertySource("classpath:db-config.properties")
public class AccountsWebApplication {
...
}
这是账户服务的配置类,其中注解的含义如下:
-
@SpringBootApplication - 定义了这是一个Sping Boot应用。这个注解等同于@EnableAutoConfiguration
, @Configuration和 @ComponentScan(默认情况Spring会扫描当前包和子包中的所有可能的beans,如AccountController
和AccountRepository) -
@EntityScan("io.pivotal.microservices.accounts") - 这里用了JPA,所有我需要用到@Entity类。
-
@EnableJpaRepositories("io.pivotal.microservices.accounts") - 搜索Repository接口并使用JPA自动实现。(Spring Data JPA)
-
@PropertySource("classpath:db-config.properties")- 配置数据源属性
至此,我们已经实现了一个简单的微服务示例,如果什么地方没说明白的的,请下载并阅读源代码~~
各位看官,请打赏。

 浙公网安备 33010602011771号