
让SpringMVC支持可版本管理的Restful接口
需求
移动互联网时代的到来,软件开发的模式也在变化。记得以前做B/S的后台开发,基本上没有Http接口一说,全部是通过渲染模板技术(jsp,freemark)把最终html展示给最终用户。现在完全变了,基于后台接口提供方,我们从来不是针对只是浏览器展示的后台输出,而是各种终端,比如android,ios。所以设计接口的时候一定要小心,一旦放出去的接口可能就永远都难以变动(除非你强制客户端用户升级)。我们知道,Restful API已经成为接口设计的一个业务准则。如果你还不是很清楚什么是Restful,推荐你看一下这篇文章: RESTful API 设计指南 。其实,我们就是设计一套基于http协议的业务接口,但是随着时间变迁,业务的变化,或者我们协议本身的优化,都有可能要改变之前存在的接口。这时候给所有接口进行版本管理就显得很重要了,比如某个添加用户的接口,由于业务发展很大,接口的字段属性变化很大,只能重新定义一个新的接口,由 /v1/user/add 变成了 /v2/user/add,这样我们就要维护两套接口的逻辑,映射到代码里,就是要维护两个不同的业务方法。所以这篇文章主要讲的是基于SpringMVC开发的应用,怎么通过扩展开发来方便我们在代码层级管理各不同的版本接口。
SpringMVC原理概述
SpringMVC核心思想就是通过一个servlet(DispatchServlet)把请求转发到各个执行方法上(Controller的method),截张官方的图如下:
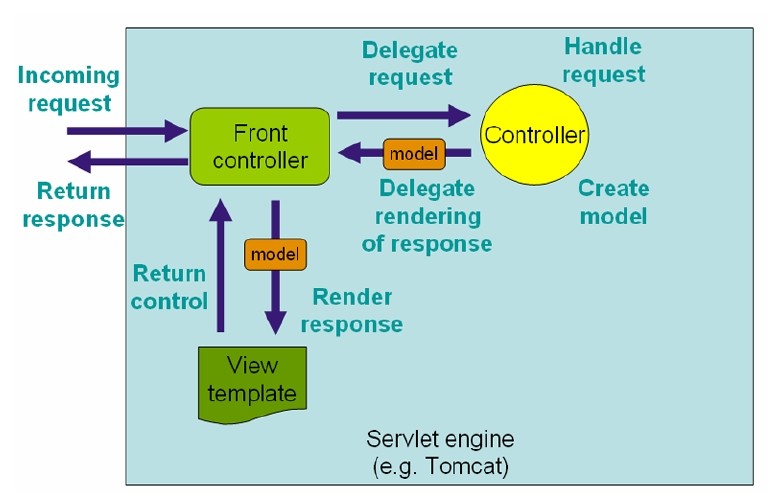
就是把某个形式的URL(当然,url不是唯一的决定条件,还有比如请求方法,get还是post,请求头中的信息)映射到某个类的具体方法上,这个核心的组件在SpringMVC中叫做: HandlerMapping。我们一般在spring的config文件中做如下配置时会自动初始化加载一个HanlderMapping的实现类:RequestMappingHandlerMapping:
<mvc:annotation-driven/>
至于这个一行的配置干了什么,可以从org.springframework.web.servlet.config.MvcNamespaceHandler这个类开始看进去。我们现在来定义一个Controller,如下:
@Controller
public class HelloController {
    @RequestMapping("hello/")
    @ResponseBody
    public String hello(HttpServletRequest request){
        System.out.println("haha1..........");
        return "hello";
    }
}
这样我们通过 /hello/ 就可以调用了。现在假如我们针对这个接口的业务出现了很大的变化(涉及到字段,报文的改变,和之前的不能兼容),但是老的接口又不能废弃,因为你不能保证放出去的接口没有人调用。所以我们只能把代码改成如下支持多个版本接口:
@Controller
public class HelloController {
    @RequestMapping("v1/hello/")
    @ResponseBody
    public String hello1(HttpServletRequest request){
        System.out.println("haha1..........");

        return "hello";
    }

    @RequestMapping("v2/hello/")
    @ResponseBody
    public String hello2(HttpServletRequest request){
        System.out.println("haha2.........");

        return "hello";
    }
}
现在我们就可以通过 /v1/hello, /v2/hello 来分别访问v1和v2两个版本对应的接口了。这看起来好像可以解决问题,因为我们每次某个接口有变动,只要新写一个对应该版本的方法就可以了。但是相应的问题也就来了:
- 我们一般发布出去的接口,都是以http://api.custom.com/v1,http://api.custom.com/v2发布出去的,从v1到v2,往往我们只会变动其中一小部分接口,但是客户端必需统一版本号调用 。
- 不能智能向上兼容接口。如果现在我们某个接口最高版本是v2,如 /v2/hello, 现在通过 /v3/hello 要能够自动适配到 /v2/hello上。
所以我们通过Spring强大的扩展机制增加几个扩展类来完成这个工作。先看下SringMVC中HandlerMapping加载初始化和动态根据url到handler的流程:
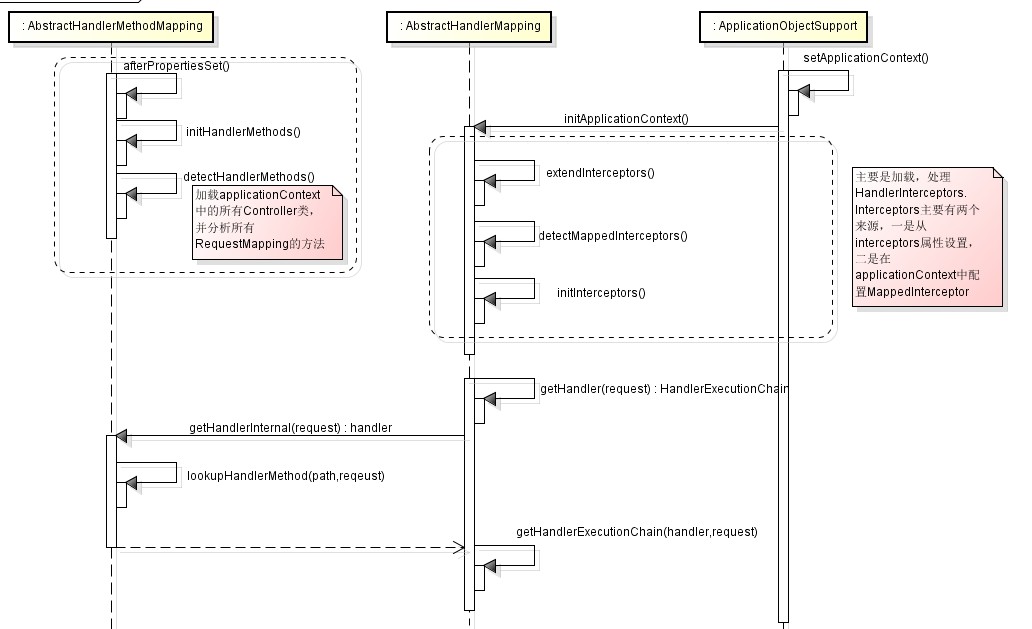
可以看到,HandlerMapping就是通过继承InitializingBean接口在完成实例后,扫描所有的Controller和标识RequestMapping的方法,缓存这个映射对应关系。然后在应用运行的时候,根据请求的request来找到相应的handler来处理这个请求。所以,我们添加扩展类:
- ApiVersion
- ApiVesrsionCondition
- CustomRequestMappingHandlerMapping
- WebConfig
现分别来看下这个类,首先看下ApiVersion这个注解:
@Target({ElementType.METHOD, ElementType.TYPE})
@Retention(RetentionPolicy.RUNTIME)
@Documented
@Mapping
public @interface ApiVersion {
    /**
     * 版本号
     * @return
     */
    int value();
}
这个注解用来标识某个类或者方法要处理的对应版本号,使用如下:
@Controller
@RequestMapping("/{version}/")
public class HelloController {

    @RequestMapping("hello/")
    @ApiVersion(1)
    @ResponseBody
    public String hello(HttpServletRequest request){
        System.out.println("haha1..........");

        return "hello";
    }

    @RequestMapping("hello/")
    @ApiVersion(2)
    @ResponseBody
    public String hello2(HttpServletRequest request){
        System.out.println("haha2.........");

        return "hello";
    }

    @RequestMapping("hello/")
    @ApiVersion(5)
    @ResponseBody
    public String hello5(HttpServletRequest request){
        System.out.println("haha5.........");

        return "hello";
    }
}
现在我们就可以通过 /v1/hello/, /v2/hello/, /v5/hello来分别调用版本1,2,5的管理。当然我们也要解决刚才说的两点问题,如果用户通过 /v4/hello/来访问接口,则要自动适配到 /v2/hello/,因为 v2是比v4低的版本中最新的版本。
再来看下 ApiVersionCondition 这个类。这个类就是我们自定义一个条件筛选器,让SpringMVC在原有逻辑的基本上添加一个版本号匹配的规则:
public class ApiVesrsionCondition implements RequestCondition<ApiVesrsionCondition> {

    // 路径中版本的前缀, 这里用 /v[1-9]/的形式
    private final static Pattern VERSION_PREFIX_PATTERN = Pattern.compile("v(\\d+)/");

    private int apiVersion;

    public ApiVesrsionCondition(int apiVersion){
        this.apiVersion = apiVersion;
    }

    public ApiVesrsionCondition combine(ApiVesrsionCondition other) {
        // 采用最后定义优先原则,则方法上的定义覆盖类上面的定义
        return new ApiVesrsionCondition(other.getApiVersion());
    }

    public ApiVesrsionCondition getMatchingCondition(HttpServletRequest request) {
        Matcher m = VERSION_PREFIX_PATTERN.matcher(request.getPathInfo());
        if(m.find()){
            Integer version = Integer.valueOf(m.group(1));
            if(version >= this.apiVersion) // 如果请求的版本号大于配置版本号, 则满足
                return this;
        }
        return null;
    }

    public int compareTo(ApiVesrsionCondition other, HttpServletRequest request) {
        // 优先匹配最新的版本号
        return other.getApiVersion() - this.apiVersion;
    }

    public int getApiVersion() {
        return apiVersion;
    }

}
要把这个筛选规则生效的话,要扩展原胡的HandlerMapping,把这个规则设置进去生效,看下CustomRequestMappingHandlerMapping的代码:
public class CustomRequestMappingHandlerMapping extends RequestMappingHandlerMapping {

    @Override
    protected RequestCondition<ApiVesrsionCondition> getCustomTypeCondition(Class<?> handlerType) {
        ApiVersion apiVersion = AnnotationUtils.findAnnotation(handlerType, ApiVersion.class);
        return createCondition(apiVersion);
    }

    @Override
    protected RequestCondition<ApiVesrsionCondition> getCustomMethodCondition(Method method) {
        ApiVersion apiVersion = AnnotationUtils.findAnnotation(method, ApiVersion.class);
        return createCondition(apiVersion);
    }

    private RequestCondition<ApiVesrsionCondition> createCondition(ApiVersion apiVersion) {
        return apiVersion == null ? null : new ApiVesrsionCondition(apiVersion.value());
    }
}
最后,得让SpringMVC加载我们定义的CustomRequestMappingHandlerMapping以覆盖原先的RequestMappingHandlerMapping, 所以要去掉前面说的<mvc:annotation-driven/>这个配置,我们通过JavaConfig的方式注入:
@Configuration
public class WebConfig extends WebMvcConfigurationSupport{

    @Override
    @Bean
    public RequestMappingHandlerMapping requestMappingHandlerMapping() {
        RequestMappingHandlerMapping handlerMapping = new CustomRequestMappingHandlerMapping();
        handlerMapping.setOrder(0);
        handlerMapping.setInterceptors(getInterceptors());
        return handlerMapping;
    }
}
Over!
详细代码: https://github.com/hongfuli/study_notes/tree/master/spring/samples
参考:
https://jira.spring.io/browse/SPR-9344

 浙公网安备 33010602011771号