

本章内容在第三章《Java框架整合--企业中的项目架构以及多环境分配》的代码上做修改,链接如下:
http://www.cnblogs.com/java-zhao/p/5115136.html
1、实现方式
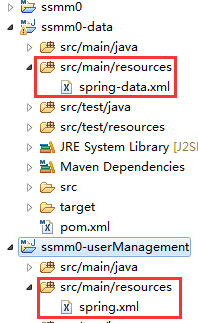
将之前ssmm0-userManagement中类路径(src/main/resources)下的spring.xml切分成spring.xml和spring-data.xml两个文件,其中spring.xml依旧留在ssmm0-userManagement中类路径下,而spring-data.xml放到ssmm0-data的类路径下,切分后的位置如下图所示:
切分前的spring.xml如下:


<?xml version="1.0" encoding="UTF-8"?>
<beans xmlns="http://www.springframework.org/schema/beans"
    xmlns:xsi="http://www.w3.org/2001/XMLSchema-instance" xmlns:context="http://www.springframework.org/schema/context"
    xmlns:mvc="http://www.springframework.org/schema/mvc"
    xsi:schemaLocation="http://www.springframework.org/schema/beans
                           http://www.springframework.org/schema/beans/spring-beans-3.2.xsd
                           http://www.springframework.org/schema/context
                           http://www.springframework.org/schema/context/spring-context-3.2.xsd
                           http://www.springframework.org/schema/mvc http://www.springframework.org/schema/mvc/spring-mvc-3.2.xsd">

    <!-- 注解扫描 -->
    <context:component-scan base-package="com.xxx" />

    <!-- 配置fastjson转换器 -->
    <mvc:annotation-driven>
        <mvc:message-converters register-defaults="true">
            <bean class="com.alibaba.fastjson.support.spring.FastJsonHttpMessageConverter"></bean>
        </mvc:message-converters>
    </mvc:annotation-driven>

    <!-- 引入数据源,这里变量的读取都是从ssmm0的pom.xml中读取的 -->
    <bean id="xxxDataSource" class="org.apache.tomcat.jdbc.pool.DataSource" destroy-method="close">
        <property name="driverClassName" value="${jdbc.driverClassName}" />
        <property name="url" value="${jdbc.url}" />
        <property name="username" value="${jdbc.username}" />
        <property name="password" value="${jdbc.password}" />
    </bean>

    <!-- 引入mybatis -->
    <bean id="xxxSqlSessionFactory" class="org.mybatis.spring.SqlSessionFactoryBean">
        <property name="dataSource" ref="xxxDataSource" />
    </bean>
    <bean id="xxxMapperScannerConfigurer" class="org.mybatis.spring.mapper.MapperScannerConfigurer">
        <!--
            这里就是包名为什么就做com.xxx.mapper.user而非com.xxx.user.mapper,
            这样的话,比如说有两个项目com.xxx.mapper.user和com.xxx.mapper.hotel,value只需写作com.xxx.mapper即可
            否则,value就要写作com.xxx.user.mapper,com.xxx.hotel.mapper
         -->
        <property name="basePackage" value="com.xxx.mapper" />
        <property name="sqlSessionFactoryBeanName" value="xxxSqlSessionFactory" />
    </bean>

    <!-- 配置velocity -->
    <bean id="velocityConfigurer" class="org.springframework.web.servlet.view.velocity.VelocityConfigurer">
        <property name="resourceLoaderPath">
            <value>WEB-INF/templates/</value>
        </property>
        <property name="velocityProperties">
            <props>
                <prop key="input.encoding">UTF-8</prop>
                <prop key="output.encoding">UTF-8</prop>
            </props>
        </property>
    </bean>
    <bean id="viewResolver" class="org.springframework.web.servlet.view.velocity.VelocityViewResolver">
        <property name="suffix" value=".vm" />
        <property name="contentType" value="text/html;charset=utf-8" />
        <property name="dateToolAttribute" value="date"/>
        <property name="numberToolAttribute" value="number"/>
    </bean>
</beans>
切分后的spring.xml与spring-data.xml如下:
spring.xml
<?xml version="1.0" encoding="UTF-8"?>
<beans xmlns="http://www.springframework.org/schema/beans"
    xmlns:xsi="http://www.w3.org/2001/XMLSchema-instance" xmlns:context="http://www.springframework.org/schema/context"
    xmlns:mvc="http://www.springframework.org/schema/mvc"
    xsi:schemaLocation="http://www.springframework.org/schema/beans
                           http://www.springframework.org/schema/beans/spring-beans-3.2.xsd
                           http://www.springframework.org/schema/context
                           http://www.springframework.org/schema/context/spring-context-3.2.xsd
                           http://www.springframework.org/schema/mvc http://www.springframework.org/schema/mvc/spring-mvc-3.2.xsd">

    <!-- 注解扫描 -->
    <context:component-scan base-package="com.xxx.web" /><!-- 只扫描web就可以 -->

    <!-- 这里需要引入ssmm0-data项目中配置的spring-data.xml(之前不引也可以成功,忘记怎么配置的了) -->
    <import resource="classpath:spring-data.xml"/>

    <!-- 配置fastjson转换器 -->
    <mvc:annotation-driven>
        <mvc:message-converters register-defaults="true">
            <bean class="com.alibaba.fastjson.support.spring.FastJsonHttpMessageConverter"></bean>
        </mvc:message-converters>
    </mvc:annotation-driven>

    <!-- 配置velocity -->
    <bean id="velocityConfigurer" class="org.springframework.web.servlet.view.velocity.VelocityConfigurer">
        <property name="resourceLoaderPath">
            <value>WEB-INF/templates/</value>
        </property>
        <property name="velocityProperties">
            <props>
                <prop key="input.encoding">UTF-8</prop>
                <prop key="output.encoding">UTF-8</prop>
            </props>
        </property>
    </bean>
    <bean id="viewResolver" class="org.springframework.web.servlet.view.velocity.VelocityViewResolver">
        <property name="suffix" value=".vm" />
        <property name="contentType" value="text/html;charset=utf-8" />
        <property name="dateToolAttribute" value="date"/>
        <property name="numberToolAttribute" value="number"/>
    </bean>
</beans>
spring-data.xml
<?xml version="1.0" encoding="UTF-8"?>
<beans xmlns="http://www.springframework.org/schema/beans"
    xmlns:xsi="http://www.w3.org/2001/XMLSchema-instance" xmlns:context="http://www.springframework.org/schema/context"
    xsi:schemaLocation="http://www.springframework.org/schema/beans
                           http://www.springframework.org/schema/beans/spring-beans-3.2.xsd
                           http://www.springframework.org/schema/context
                           http://www.springframework.org/schema/context/spring-context-3.2.xsd">

    <!-- 注解扫描 -->
    <context:component-scan base-package="com.xxx" />

    <!-- 引入数据源,这里变量的读取都是从ssmm0的pom.xml中读取的 -->
    <bean id="xxxDataSource" class="org.apache.tomcat.jdbc.pool.DataSource" destroy-method="close">
        <property name="driverClassName" value="${jdbc.driverClassName}" />
        <property name="url" value="${jdbc.url}" />
        <property name="username" value="${jdbc.username}" />
        <property name="password" value="${jdbc.password}" />
    </bean>

    <!-- 引入mybatis -->
    <bean id="xxxSqlSessionFactory" class="org.mybatis.spring.SqlSessionFactoryBean">
        <property name="dataSource" ref="xxxDataSource" />
    </bean>
    <bean id="xxxMapperScannerConfigurer" class="org.mybatis.spring.mapper.MapperScannerConfigurer">
        <!--
            这里就是包名为什么就做com.xxx.mapper.user而非com.xxx.user.mapper,
            这样的话,比如说有两个项目com.xxx.mapper.user和com.xxx.mapper.hotel,value只需写作com.xxx.mapper即可
            否则,value就要写作com.xxx.user.mapper,com.xxx.hotel.mapper
         -->
        <property name="basePackage" value="com.xxx.mapper" />
        <property name="sqlSessionFactoryBeanName" value="xxxSqlSessionFactory" />
    </bean>

</beans>
说明:
- 将与controller层不直接相关的数据源与mybatis相关的配置文件分在了spring-data.xml文件中,并放置在ssmm0-data的类路径下
- 将与controller层直接相关的fastjson转换器和velocity的配置放在了spring.xml文件中
注意:
- spring.xml部分的注解扫描只需要扫描ssmm0-userManagement即可,而spring-data.xml处的注解扫描只需要扫描ssmm0-data中的包即可。
- spring.xml部分需要引入spring-data.xml(但是在这之前配置的时候,并不需要引入,这一块儿有懂的朋友给哥们儿我指点一下)
2、意义
- 将spring-data.xml放置在ssmm0-data项目中,便于我们在ssmm0-data项目中对service、dao、mapper等进行测试
- 将来若修改数据源或者mybatis的配置,只需要修改spring-data.xml即可,而不需要修改其他每个业务模块的spring.xml,这就是将各个业务模块的spring.xml中的公共配置代码集中到一起的最大意义
- 减少了每个业务模块中的spring.xml的重复配置代码
3、切分原则
- 与自己模块相关的配置信息就放在自己模块下(即与ssmm0-data相关的配置就配置在ssmm0-data项目中,与ssmm-userManagement相关的配置就配置在ssmm0-userManagement中)
- 公共的配置代码抽取出来集中在一起
注意:以第一点为重!!!
测试:
对于以上配置文件切分后的项目进行测试的话,要注意,先把ssmm0项目编译一下"clean compile"(见第一章),然后将ssmm0-data的项目的env改成dev(见第三章),否则使用默认的配置prod,将导致数据库连接失败,之后运行项目ssmm0-userManagement就可以了。

 浙公网安备 33010602011771号