


PS网页设计教程IV——如何在Photoshop中创建一个专业博客网站布局
向Talk-Mania网站致敬。一年前,在该网站上看过许多不错的网页设计教程。一年后,再回头想看看有没有什么新的教程的时候,蓦然发现该网站已经打不开了。也许是关闭了,也许是改了网站名了。幸好,去年本人还是下载保存了几个教程,本教程就是其中之一。也希望能看到更多的PS网页设计教程的网站,以及更多优秀的设计。
约定:
1、本文的软件是Photoshop CS5版本
2、原教程的截图是英文的,本人在重新制作的基础上,重新截了中文版的图
3、原文中有些操作没有给出参数。本人在反复测试的情况下测定了一些参数,以红色的文字显示。有些错误的参数,直接以红色文字显示正确的参数
例如:(90,22,231,77),表示矩形的左上角的坐标是(90,22),宽231,高77
例如:(90,22),表示矩形的左上角的坐标是(90,22),矩形的其他两个参数教程里已经指定
In this tutorial I will show you how to create a professional blog web layout in Photoshop.
在本教程里,我将展示如何在Photoshop中创建一个专业博客网站布局。
We will use the 960 Grid System to create the web layout. Download the archive file from the site, unzip it and open the "960_grid_12_col 2.psd" file from the "photoshop" folder.
我将用960 Grid System创建网站布局,从站点上下载该文件,解压后从photoshop文件夹打开960_grid_12_col 2.psd。
由于Talk-Mania网站已经无法访问,再加上该PSD实际上是一个定位辅助文件,故本译文就没有用该文件。
Step 1
Increase the size of your document by going to Image > Canvas Size. Use the settings from the following image. Then select the Paint Bucket Tool (G) and fill the background with the color #f6f0e2.
步骤1
从菜单:图像 > 画布大小,在增加你的文档的大小。使用如下的图中的配置,然后选择油漆桶工具,给文档添加背景颜色: #f6f0e2
由于没有打开PSD,因此本步骤就变成新建一个文档,尺寸:1200*1500px。用油漆桶工具给文档添加背景颜色: #f6f0e2

结果如下:

Step 2
Select the Rectangle Tool (U) and create a white rectangle with the width 940px from the top of your document to the bottom. Leave a distance of 30px from the bottom edge of your document. Name this layer "content bg", double-click on it to open the Layer Style window and add a 1px stroke using the color #ded6c4.
步骤2
在你的文档,用矩形工具从顶部到底部创建一个宽940px的白色矩形(130,0,940,1470),距离底边20px。命名该图层为content bg,双击该图层打开图层样式对话框,对该矩形添加一个描边的样式,宽度1px,颜色: #ded6c4


Step 3 - Creating the header
Click on the 'Create a new group' button from the bottom of the Layers panel to create a new group and name it "header".
Select the Rectangle Tool (U) and create a rectangle with the height 10px at the top of your document using the color #aa915c. Name this layer "top bar".
步骤3-创建头部
在图层面板的底部单击‘创建新组’按钮,创建一个新组,命名为header。
用矩形工具在文档的顶部创建10px高的矩形(0,0,1200,10),颜色: #aa915c,命名为top bar。
![]()
Step 4
Select the Line Tool (U), set the weight to 1px and create a horizontal line at the bottom of the rectangle you created at the previous step using the color #968051. Name this layer "1px line".
Hit Ctrl/Cmd + J to duplicate this layer. Change the color of the new line to #c3a76a. Then select the Move Tool (V) and hit the up arrow once to move this layer one pixel up.
步骤4
用直线工具在刚才创建的矩形的底部画一条宽度1px的水平直线,颜色: #968051。命名为1px line
Ctrl+J复制该图层,对新的直线更改颜色为 #c3a76a。然后选中移动工具,按上方向键一次,使得该直线上移一个像素。

Step 5
Select the Rectangle Tool (U) and create a rectangle with the height 100px and the color #e8c271 underneath the first rectangle. Name this layer "header bg".
在上面的矩形的下面,用矩形工具创建一个高100px的矩形,颜色: #e8c271。命名为header bg

Step 6
Ctrl/Cmd-click on the vector mask of the "header bg" layer to select it. Then go to Layer > New Fill Layer > Gradient. The selection that you made has now been transformed into a mask and the gradient will be visible only over the header.
Use the settings from the following image for the Gradient Fill layer and move the gradient in the left side of the header (to move the gradient, click on the image and drag the cursor white the Gradient Fill window is opened). Set the blend mode of this layer to Overlay 20%.
步骤6
Ctrl+click单击header bg图层去选中它。然后点击,图层 > 新建填充图层 > 渐变。选择的区域就像转换成了一个蒙板,这样线性渐变只能在头部区域可见。
渐变填充的参数参考下面的图像,然后移动渐变图层到头部区域的左边(移动渐变图层的时候,单击该图层,拖动的时候要注意出现白色的光标),设置图层的不透明度20%


Step 7
Select the Line Tool (U) and create two lines with the weight 1px at the bottom of the header. Use the color #f4d48f for the first line and #c6a661 for the second one.
步骤7
用直线工具在头部区域的底部创建2条宽度1px的水平直线。第一条直线的颜色: #f4d48f;第二条直线的颜色: #c6a661

Step 8
Select the Type Tool (T) and write the name of your web layout in the left side of the header using the color #f6eedd and the font Myriad Pro Bold Italic.
Activate the guides to help you position this text layer correctly.
Double-click on this layer to open the Layer Style window and use the settings from the following image. I used the color #8e7849 for Drop Shadow.
步骤8
在你的网站布局的头部区域的左边用文字工具书写你网站的名字,颜色: #f6eedd,字体:Myriad Pro,粗斜体
激活你的辅助线,帮助你正确定位你的文字图层。
双击你的文字图层,打开图层样式对话框,然后按照下图设置参数,投影的颜色设置为 #8e7849


Step 9 - Creating the navigation bar
Create a new group and name it "navigation". Select the Rounded Rectangle Tool (U) and create a rounded rectangle with the dimensions 550px by 50px and the color #e9d09b. Name this layer "navbar" and use the Move Tool (V) to move it in the right side of your layout at 10px underneath the header. I used the color #cdbd9b for Drop Shadow.
步骤9 - 创建导航栏
创建一个新组,命名为navigation。用圆角矩形工具创建一个圆角矩形(500,70),尺寸:550px*50px,颜色: #e9d09b,命名为navbar,用移动工具移到文档的右侧,下边沿在头部区域的下方10px。如图添加样式,投影的颜色: #cdbd9b


Step 10
Select the Type Tool (T) and write the name for your navigation menu items using the color #fffcf4. Add a shadow to your text layers using the settings from the following image.
步骤10
用文字工具添加导航栏的菜单,颜色: #fffcf4。对文字添加投影,设置如下图所示:


Step 11 - Creating the featured area
Create a new group and name it "featured". Then select the Rounded Rectangle Tool (U) and create a rectangle with the dimensions 900px by 280px and the color #d9cdb2. Name this layer "featured bg" and move it at a distance of 30px from the bottom edge of the header.
步骤11 - 创建特色区域
创建新组,命名为featured。然后用圆角矩形工具创建一个圆角矩形(150,140),尺寸:900px*280px,颜色: #d9cdb2。命名此图层为featured bg,移动到距头部区域底边30px的位置。

Step 12
Select the Rectangle Tool (U) and create a rectangle inside the big rounded rectangle with the dimensions 600px by 260px and the color #f9f5ed.
Activate the guides to help you create this shape. Then name this layer "image holder".
Open an image in Photoshop and move it into your web layout document using the Move Tool (V). Name this layer "image" and put this image over the "image holder" layer. Right-click on the "image" layer and select Create Clipping Mask.
步骤12
用矩形工具在刚才的大圆角矩形中创建一个矩形(160,150),尺寸:600px*260px,颜色: #f9f5ed
激活辅助线以帮助你创建刚才的矩形,命名此图层为image holder
在PS中打开一个图片,用移动工具移动到你的网页布局上。命名此图层为image,并且移动此图层到图层image holder的上方。在image图层上右键鼠标并选择创建剪贴蒙板

Step 13
Now we will create two arrows for the featured area. Select the Rounded Rectangle Tool (U) and create a small rounded rectangle with the color #d9cdb2. Double-click on this layer to open the Layer Style window and use the settings from the following image. For the Stroke I used the color #aaa18c. Name this layer "rounded rectangle".
步骤13
现在我们要在特色区域创建2个箭头。选择圆角矩形工具创建一个小的圆角矩形工具(710,260,60,40),颜色: #d9cdb2。双击此图层,打开图层样式窗口按下图设置参数,描边的颜色: #aaa18c。命名此图层rounded rectangle


Step 14
Select the Custom Shape Tool (U) and create an arrow shape inside the rounded rectangle using the color #e8e0c8. Duplicate this arrow and move the new one to the left.
Select the "rounded rectangle" layer and the two arrow layers and hit Ctrl/Cmd + G to put them inside a group. Name the group "right arrow".
步骤14
选择自定形状工具创建一个箭头形状在刚才的圆角矩形中,颜色: #e8e0c8。复制该箭头并移动到左边一点
选择rounded rectangle图层和两个箭头图层,Ctrl+G把他们归并到一个组。命名该组为right arrow。


Step 15
Use the Rectangular Marquee Tool (M) to select the right side of the small rounded rectangle. Make sure that the "right arrow" group is selected, then go to Layer > Layer Mask > Hide Selection.
步骤15
用矩形选择工具选择小的圆角矩形的右边。确保right arrow组被选中,然后点击菜单:图层 > 图层蒙版 > 隐藏选区


Step 16
Right-click on the "right arrow" layer and select Convert to Smart Object. Duplicate this layer (Ctrl/Cmd + J). Then go to Edit > Transform > Flip Horizontal. Name the new layer "left arrow" and move it in the left side of the featured area.
步骤16
鼠标右键right arrow图层,选择转换为智能对象。复制该图层(Ctrl+J)。然后点击菜单:编辑 > 变换 > 水平翻转。命名新图层为left arrow并移动到特色区域的左边

Step 17
Select the Rectangle Tool (U) and create a rectangle with the size 280px by 260px and the color #f4ecd8. Put the rectangle next to the featured image and name this layer "text bg". Double-click on this layer to open the Layer Style and add a 1px stroke using the color #f8f4ea.
步骤17
用矩形工具创建一个矩形(760,150),尺寸:280px*260px,颜色: #f4ecd8。矩形紧贴到特色区域的图片的右边,命名为text bg。双击该图层打开图层样式,添加1px的描边,描边颜色: #f8f4ea


Step 18
Ctrl/Cmd-click on the vector mask of the "text bg" layer to select the rectangle. Then go to Layer > New Fill Layer > Gradient and use the settings from the following image. I used a #362D1A-to-transparent gradient. While the Gradient Fill window is opened, click on the image and move the gradient in the left side of the rectangle. Then set the opacity of this layer to 10%.
步骤18
Ctrl+click点击text bg图层去选择矩形。然后点击菜单:图层 > 新建填充图层 > 渐变,然后按照下图设置参数。在线性渐变中,设置颜色为#362D1A到透明,当渐变填充窗口打开的时候,单击渐变移动到矩形的左边。然后设置不透明度为10%。


Step 19
Create two vertical lines in the left side of the rectangle. Use the color #c7bca0 for the first line and #fffdf7 for the second one.
步骤19
创建两条竖直的直线在矩形的左边,第一条直线的颜色: #c7bca0,第二条直线的颜色: #fffdf7

Step 20
Select the Type Tool (T) and add some text for the featured area using the color #6e6758 and the font Helvetica.
步骤20
在特色区域用文字工具添加一些文字,颜色: #6e6758,字体:Helvetica(本译文用Verdana字体代替)

Step 21
Select the Line Tool (U) and create a horizontal line underneath the featured area using the color #e7e1d5.
步骤21
用直线工具创建一条水平线(150,445,900,1)在特色区域的下方,颜色:# e7e1d5

Step 22 - Creating the content area
Create a new group and name it "content". Then select the Rectangle Tool (U), hold down the Shift key and create a square with the size 200px by 200px and the color #d9cdb2. Name this layer "image holder", double-click on it and use the settings from the following image to create a double stroke effect. I used the color #f4ecd8 for Inner Glow and #ada48f for Stroke.
Select the Type Tool (T) and add some text next to the square.
步骤22 - 创建内容区域
创建新组命名为content。用矩形工具,按住Shift键创建一个正方形(150,470),尺寸:200px*200px,颜色: #d9cdb2。命名此图层为image holder,双击该图层按下图设置创建双色描边效果,内发光的颜色: #f4ecd8;描边的颜色: #ada48f。
用文字工具添加一些文本在正方形的右边


Step 23
Duplicate the layers that you created at the previous step a couple of times. Use the Move Tool (V) to move the new layers underneath the original ones.
步骤23
复制刚才的几面几个步骤的图层几次,用移动工具移动新的图层到源图层的下方

Step 24 - Creating the sidebar
Create a new group and name it "sidebar". Select the Line Tool (U) and create a vertical line next to the blog posts using the color #e7e1d5.
Select the Rectangle Tool (U) and create a rectangle with the dimensions 270px by 30px and the color #fcf9f4. Add a 1px stroke to this rectangle layer using the color #e0dace. Name this layer "search bar". Then select the Type Tool (T) and add the content for your sidebar.
步骤24 - 创建侧边栏
创建新组,命名为sidebar。用直线工具在刚才区域的右边创建一条竖直的直线(760,470,1,675),颜色: #e7e1d5。
用矩形工具创建一个矩形(780,500),尺寸:270px*30px,颜色: #fcf9f4。添加1px的描边,颜色: #e0dace。命名此图层为search bar。然后用文字工具添加侧边栏的文字内容。

Step 25 - Creating the footer area
Create a new group and name it "footer". Then select the Rectangle Tool (U) and create a rectangle with the height 40px and the color #b3a078 at the bottom of your layout. Name this layer "bottom bar". Then select the Line Tool (U) and create a horizontal line at the top of this rectangle using the color #918161.
步骤25 - 创建底部区域
创建新组,命名为footer。然后选择矩形工具在文档的底部创建一个高40px的矩形(130,1430,940,40),颜色: #b3a078。命名为bottom bar。用直线工具在矩形的顶部创建一条水平线,颜色: #918161

Step 26
Create another rectangle with the height 250px and the color #d8c293. Put this rectangle at the top of the previous one. Name this layer "footer bg".
Select the Line Tool (U) and create two lines at the top of this rectangle. Use the color #ece4d1 for the first line and #ada28b for the second one.
步骤26
创建另一个高250px的矩形(130,1180,940,250),颜色:#d8c293。把这个矩形移到刚才的矩形的上方,命名为footer bg
用直线工具在这个矩形的顶部创建两条直线,第一条直线颜色: #ece4d1;第二条直线颜色: #ada28b

Step 27
Use the Line Tool (U) to create two separators, each containing two lines - one with the color #ece4d1 and the other one with the color #ada28b. Put these layers inside a group and name the group "separators".
步骤27
用直线工具创建两个分割线,每个分割线包括两条直线,一条直线颜色: #ece4d1,另一条直线颜色: #ada28b。把这些图层归并到一个组,该组命名为separators
从左至右四条直线分别为
(440,1200,1,210),#ece4d1
(441,1200,1,210),#ada28b
(760,1200,1,210),#ece4d1
(761,1200,1,210),#ada28b 
Step 28
Add a mask to the "separators" group by going to Layer > Layer Mask > Reveal All. Then select the Gradient Tool (G) and drag two black to transparent gradients - one at the top of the separators and one at the bottom.
步骤28
对separators组添加蒙版,点击菜单:图层 > 图层蒙版 > 显示全部。选择渐变工具,拖动两个黑到透明的渐变——一个是在分割线的顶部,一个在分割线的底部
感觉没必要拖动两次渐变工具,直接设置好一次渐变工具,如下图所示,然后拖动一次就可以了


Step 29
Select the Type Tool (T) and add some content in the footer of your web layout.
步骤29
用文字工具添加一些底部区域的内容。

Step 30
Select the Type Tool (T) and add a copyright statement at the bottom of your layout using the color #867859.
步骤30
用文字工具在你的布局的底部添加版权信息,颜色: #867859

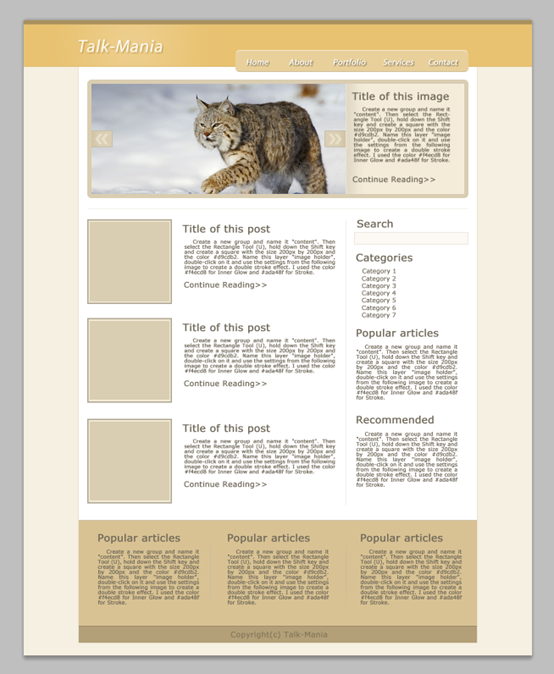
最终的成品如下:

心得:
本篇教程的特色有2个:一个是蒙版用的比较多,一个就是双描边效果(用内发光和描边模拟双描边效果)
向Talk-Mania致敬,但愿还能看到类似高质量的PS教程网站

 浙公网安备 33010602011771号