
分布式icinga2安装与使用
目标
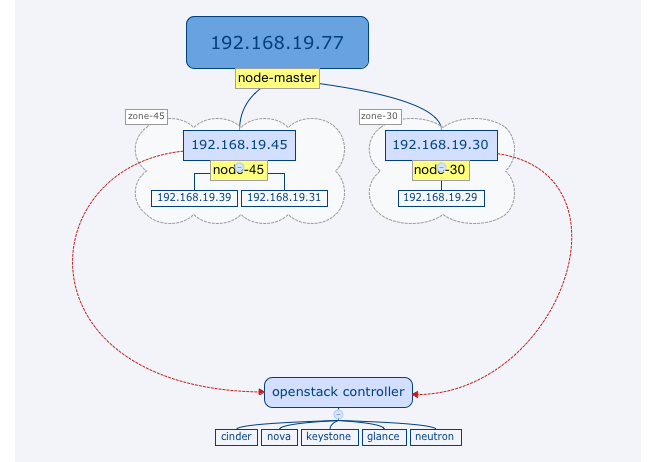
配置分布式的icinga2监控系统。分布式监控适用于服务器遍布在多个区域,且需要一个master做统一管理。
搭建环境
服务器
系统: ubuntu 15.04/ubuntu 14.04
icinga2主节点: 192.168.19.77 负责分发配置,统一展示监控结果。
icinga2子节点1: 192.168.19.45 负责监控openstack RegionOne区域的所有服务器
icinga2子节点2: 192.168.19.30 负责将空openstack RegionTwo区域的所有服务器
为了充分利用现有的nagios插件,使用nrpe监控服务器。
拓扑图
安装配置icinga2
注意: 如果特别说明,所有操作均在192.168.19.77,45,30执行。
设置包源
# add-apt-repository ppa:formorer/icinga
# apt-get update
安装icinga2
# apt-get install icinga2
安装classicui界面
在192.168.77上执行
apt-get install icinga2-classicui -y
配置分布式监控
设置ssl
在192.168.77上执行
生成ca证书
#icinga2 pki new-ca
生成各个节点需要用的key,crt
设置节点名
key与crt的名字需要与节点名吻合,默认使用hostname。如果要自定义节点名需要编辑/etc/icinga2/constants.conf,修改如下配置
const NodeName = "node-master"
node-master是新的节点名
生成key,crt
# cd /tmp
##192.168.19.77
# icinga2 pki new-cert --cn node-master --key node-master.key --csr node-master.csr
# icinga2 pki sign-csr --csr node-master.csr --cert node-master.crt

##192.168.19.45
# icinga2 pki new-cert --cn node-45 --key node-45.key --csr node-45.csr
# icinga2 pki sign-csr --csr node-45.csr --cert node-45.crt

##192.168.19.30
# icinga2 pki new-cert --cn node-30 --key node-30.key --csr node-30.csr
# icinga2 pki sign-csr --csr node-30.csr --cert node-30.crt
分布复制ca.crt,/etc/icinga2/pki/目录。下面显示的是192.168.19.77的pki目录
# ll /etc/icinga2/pki/
total 20
drwxr-xr-x 2 root   root   4096 May 11 17:19 ./
drwxr-x--- 9 nagios nagios 4096 May 13 12:09 ../
-rw-rw-rw- 1 root   root   1688 May 11 15:25 ca.crt
-rw-rw-rw- 1 root   root   1663 May 11 15:28 node-master.crt
-rw-rw-rw- 1 root   root   3243 May 11 15:26 node-master.key
启用api功能
# icinga2 feature enable api
添加accept_config = true, accept_commands = true参数
# vim /etc/icinga2/features-enabled/api.conf

/**
 * The API listener is used for distributed monitoring setups.
 */

object ApiListener "api" {
  cert_path = SysconfDir + "/icinga2/pki/" + NodeName + ".crt"
  key_path = SysconfDir + "/icinga2/pki/" + NodeName + ".key"
  ca_path = SysconfDir + "/icinga2/pki/ca.crt"

  ticket_salt = TicketSalt
  accept_config = true
  accept_commands = true
}
# service icinga2 restart
配置endopoint,zone
EndPoint 需要与NodeName一致。
# vim /etc/icinga2/zones.conf

object Endpoint "node-master" {
  host = "192.168.19.77"
}

object Endpoint "node-45" {
  host = "192.168.19.45"
}

object Endpoint "node-30" {
  host = "192.168.19.30"
}

object Zone "zone-master" {
  endpoints = [ "node-master" ]
}

object Zone "zone-45" {
  parent = "zone-master"
  endpoints = [ "node-45" ]
}

object Zone "zone-30" {
  parent = "zone-master"
  endpoints = [ "node-30" ]
}

object Zone "global-templates" {
  global = true
}
这里配置了4个区域,分别是zone-master,zone-45,zone-30,global-templates。global-templates区域中的配置会分发到所有的区域。
配置文件管理
创建配置目录,目录名要与区域名一致。
在192.168.77上执行
# mkdir /etc/icinga2/zones.d/global-templates/
# mkdir /etc/icinga2/zones.d/zone-30/
# mkdir /etc/icinga2/zones.d/zone-45/
# mkdir /etc/icinga2/zones.d/zone-master/
将/etc/icinga2/conf.d中的文件复制到/etc/icinga2/zones.d/global-templates/
# cp -rf /etc/icinga2/conf.d/* /etc/icinga2/zones.d/global-templates/
注释掉3台服务器上conf.d目录
# vim /etc/icinga2/icinga2.conf

#include_recursive "conf.d"
配置master监控两个子节点
object Host NodeName {
  import "generic-host"

  address = "127.0.0.1"
  vars.os = "Linux"

  vars.disks["disk"] = {
  }

  vars.notification["mail"] = {
    groups = [ "icingaadmins" ]
  }

  /*NIC dell2950 */
  vars.interfaces["eth0"]={
    interface_speed = 100
  }
}

object Host "node-45" {
  import "generic-host"

  address = "192.168.19.45"
  vars.os = "Linux"

  vars.disks["disk"] = {
  }

  vars.notification["mail"] = {
    groups = [ "icingaadmins" ]
  }

  /*NIC*/
  vars.interfaces["em1"]={
    interface_speed = 1000
  }

  /* openstack */
  vars.openstack_controller_listen="192.168.19.45"
  vars.openstack["keystone"]="controller"
  vars.openstack["cinder"]="controller"
  vars.openstack["glance"]="controller"
  vars.openstack["heat"]="controller"
  vars.openstack["nova"]="controller"
}

object Host "node-30" {
  import "generic-host"

  address = "192.168.19.30"
  vars.os = "Linux"

  vars.disks["disk"] = {
  }

  vars.notification["mail"] = {
    groups = [ "icingaadmins" ]
  }

  /*NIC*/
  vars.interfaces["em1"]={
    interface_speed = 1000
  }
}
清空缓存
# rm -rf /var/lib/icinga2/api/zones/*
重启icinga2,查看结果
# service icinga2 restart
打开http://192.168.19.77/icinga2-classicui/
配置正确的话,应该可以看到77,45,39服务器的监控信息
使用SNMP监控网络
在icinga2服务端安装监控插件
-
安装依赖
apt-get install snmpd sudo perl libconfig-general-perl libdata-dumper-simple-perl libsort-naturally-perl libexception-class-perl libencode-perl文档里漏掉下面几个包:
apt-get install libdata-dumper-simple-perl libsys-statistics-linux-perl libnet-snmp-perl -
编译安装snmp网络检测程序
从
http://www.tontonitch.com/tiki/tiki-index.php?page=Nagios+plugins+-+interfacetable_v3t下载最新的包,解压进入目录后:./configure make fullinstall -
测试
/usr/local/nagios/libexec/check_interface_table_v3t.pl -V -
启用icinga2监控脚本
cp /usr/share/icinga2/include/plugins-contrib.d/network-components.conf /etc/icinga2/zones.d/global-templates/注意:
修改其中的
command为正确脚本路径.修改
-C为正确的值,默认是public. -
应用检测命令到主机上
# vim services.conf

apply Service "network"{
  import "generic-service"

  display_name = "check network"
  check_command = "interfacetable"
  assign where host.vars.os == "Linux"
}
被监控端安装配置SNMP服务
-
apt-get install snmpd snmp -
修改监听地址,连接串,且只允许icinga2服务端连接
# vim /etc/snmp/snmpd.conf agentAddress udp:10.33.10.66:161 rocommunity NmQwZmVmZT 10.33.10.84 #注释掉这行 #rocommunity public default -V systemonly #注释这行,它会监听一个随机端口 #trapsink localhost public -
重启snmpd服务
service snmpd restart
使用nrpe监控服务器
源码安装
不用apt的原因是apt安装的nrpe不接受监控命令传参。
创建nagios用户
useradd nagios -M -s /bin/false
编译安装
apt-get install build-essential libssl-dev libssl0.9.8 unzip make -y
cd /usr/local/src
wget http://sourceforge.net/projects/nagios/files/nrpe-2.x/nrpe-2.15/nrpe-2.15.tar.gz/download -O nrpe-2.15.tar.gz
tar -xf nrpe-2.15.tar.gz
cd nrpe-2.15
./configure --enable-command-args --with-ssl=/usr/bin/openssl --with-ssl-lib=/usr/lib/x86_64-linux-gnu
make all
make install-daemon
安装通用插件
apt-get install nagios-plugins -y
添加配置文件
mkdir /etc/nagios
vim /etc/nagios/nrpe.cfg

log_facility=daemon
pid_file=/var/run/nrpe.pid
server_address=172.16.240.30
server_port=5666
nrpe_user=nagios
nrpe_group=nagios
allowed_hosts=127.0.0.1,172.16.240.30
dont_blame_nrpe=1
debug=0
command_timeout=60
connection_timeout=300

command[check_load]=/usr/lib/nagios/libexec/check_load -w 20,15,10 -c 50,40,30
command[check_disk]=/usr/lib/nagios/libexec/check_disk -w 10% -c 5% -W 10% -K 5% -A
command[check_mem]=/usr/lib/nagios/libexec/check_mem -u -C -w 85 -c 90
command[check_proc_num]=/usr/lib/nagios/libexec/check_procs -m PROCS -w 1500:1000 -c 300000:1500
command[check_zombie_procs]=/usr/lib/nagios/libexec/check_procs -w 5 -c 10 -s Z
command[check_swap]=/usr/lib/nagios/libexec/check_swap -a -w 30% -c 15%
command[check_local_port]=/usr/lib/nagios/libexec/check_tcp -H localhost -p $ARG1$ -w 2 -c 5
command[check_linux_raid]=/usr/lib/nagios/libexec/check_linux_raid
command[check_md_raid]=/usr/lib/nagios/libexec/check_md_raid
command[check_icmp]=/usr/lib/nagios/libexec/check_icmp $ARG1$
command[check_lvs]=/usr/lib/nagios/libexec/check_ipvsadm
command[check_backup]=/usr/lib/nagios/libexec/check_backup
command[check_dns]=/usr/lib/nagios/libexec/check_dns -H www.baidu.com
command[check_http]=/usr/lib/nagios/libexec/check_http
command[check_rsyncd]=/usr/lib/nagios/libexec/check_rsyncd
command[check_monitorwebbackup]=/usr/lib/nagios/libexec/check_monitorwebbackup
command[check_monitormysqlbackup]=/usr/lib/nagios/libexec/check_monitormysqlbackup
command[check_diskhealth]=/usr/lib/nagios/libexec/check_openmanage --check storage -b ctrl_fw=all/ctrl_driver=all/ctrl_stdr=all/bat_charge=all/encl=all/ps=all -t 30
command[check_safe]=/usr/lib/nagios/libexec/check_safe $ARG1$
command[check_tcptraffic]=/usr/lib/nagios/plugins/contrib/check_tcptraffic -w $ARG1$ -c $ARG2$ -s $ARG3$ -i $ARG4$
command[check_iostat_io]=/usr/lib/nagios/libexec/check_iostat -d $ARG1$ -i -p
command[check_iostat_waittime]=/usr/lib/nagios/libexec/check_iostat -d $ARG1$ -W -p
command[check_keystone_api]=/usr/lib/nagios/libexec/check_keystone --auth_url "http://$ARG1$:35357/v2.0" --username $ARG2$ --tenant $ARG3$ --password $ARG4$
command[check_keystone_proc]=/usr/lib/nagios/plugins/check_procs -c 1: -u keystone
command[check_cinder_api_proc]=/usr/lib/nagios/libexec/check_service.sh -o linux -s cinder-api
command[check_cinder_scheduler_proc]=/usr/lib/nagios/libexec/check_service.sh -o linux -s cinder-scheduler
command[check_cinder_api]=/usr/lib/nagios/libexec/check_cinder_api --auth_url "http://$ARG1$:35357/v2.0" --username $ARG2$ --tenant $ARG3$ --password $ARG4$
command[check_cinder_scheduler_connectivity]=/usr/lib/nagios/libexec/check_cinder-scheduler.sh
在rc.local加入启动命令
# vim /etc/rc.local

/usr/local/nagios/bin/nrpe -c /etc/nagios/nrpe.cfg -d
从其他服务器拷贝libexec文件夹
例如: 221.228.84.84(无锡三线)
文件夹位置:/usr/lib/nagios/libexec
注意: 需要将check_icmp插件设置为root用户,然后设置setuid,不然没权限执行命令:
chown root.root /usr/lib/nagios/libexec/check_icmp
chmod u+s /usr/lib/nagios/libexec/check_icmp
chmod g+s /usr/lib/nagios/libexec/check_icmp
安装check_tcptraffic插件
apt-get install libnagios-plugin-perl libreadonly-xs-perl -y
-
在mac上解压后用zip重新打包上传到ubuntu,不然解压会出错
-
进入源码目录执行下面命令
perl Makefile.PL make make install -
测试
/usr/lib/nagios/plugins/contrib/check_tcptraffic -w 10485760 -c 10485760 -s 1000 -i em1
/usr/lib/nagios/plugins/check_nrpe -H 127.0.0.1 -c check_tcptraffic -p 5666 -a 10485760 20971520 1000 em1
安装dell磁盘监控
-
设置软件源
echo 'deb http://linux.dell.com/repo/community/ubuntu trusty openmanage' | sudo tee -a /etc/apt/sources.list.d/linux.dell.com.sources.list gpg --keyserver pool.sks-keyservers.net --recv-key 1285491434D8786F gpg -a --export 1285491434D8786F | sudo apt-key add - -
安装
apt-get update apt-get install srvadmin-all -
启动服务
service dataeng start
安装iostat监控
-
安装iostat
apt-get install sysstat -
(如果已有
check_iostat脚本则忽略) 下载监控脚本 到/usr/lib/nagios/libexec/check_iostat,添加执行权限,所属用户和组改为nagios注意:要下载评论里的脚本,原始脚本有问题。
-
记得在icinga2的host里配置里加入:
#check disk io and waittime
vars.disk_device = "sdb"
修改
sdb为需要监控的硬盘
启动nrpe
# /usr/local/nagios/bin/nrpe -c /etc/nagios/nrpe.cfg -d
在icinga2中启用nrpe
配置LibxecDir常量
根据系统取消选择相应的注释:
# vim /etc/icinga2/constants.conf

//ubuntu
//const LibexecDir = "/usr/lib/nagios/libexec"

//youfu centos
//const LibexecDir = "/usr/local/nagios/libexec"
配置checkcommand模板
# vim /etc/icinga2/zones.d/global-templates/nrpe_base.conf

template CheckCommand "nrpe-common" {
    import "plugin-check-command"

    command = [ LibexecDir + "/check_nrpe" ]

    arguments = {
        "-H" = "$nrpe_address$"
        "-t" = "$nrpe_timeout$"
        "-p" = "$nrpe_port$"
        "-c" = "$nrpe_command$"
        "-a" = {
            value = "$nrpe_args$"
            repeat_key = false
            order = 1
        }
    }

    vars.nrpe_address = "$address$"
    vars.nrpe_port = 5666
    vars.nrpe_timeout = 60
}
配置常用linux检测命令
# vim /etc/icinga2/zones.d/global-templates/nrpe_linux.conf

object CheckCommand "nrpe-disk" {
    import "nrpe-common"

    #vars.nrpe_args = [ "$disk_wfree$%", "$disk_cfree$%"]

    vars.nrpe_command = "check_disk"

    #vars.disk_wfree = 20
    #vars.disk_cfree = 10
}

object CheckCommand "nrpe-diskhealth" {
    import "nrpe-common"

    vars.nrpe_command = "check_diskhealth"
}

object CheckCommand "nrpe-tcptraffic" {
    import "nrpe-common"

    vars.nrpe_args = [ "$tcptraffic_wbytes$", "$tcptraffic_cbytes$","$interface_speed$","$interface_name$"]

    vars.nrpe_command = "check_tcptraffic"

    vars.tcptraffic_wbytes = 10485760 /*10M=10*1024*1024*/
    vars.tcptraffic_cbytes = 20971520 /*20M=20*1024*1024*/
    #vars.tcptraffic_wbytes = 1 /*10M=10*1024*1024*/
    #vars.tcptraffic_cbytes = 2 /*20M=20*1024*1024*/
}

object CheckCommand "nrpe-load" {
    import "nrpe-common"

    vars.nrpe_command = "check_load"
}

object CheckCommand "nrpe-mem" {
    import "nrpe-common"

    vars.nrpe_command = "check_mem"
}

object CheckCommand "nrpe-proc_num" {
    import "nrpe-common"

    vars.nrpe_command = "check_proc_num"
}

object CheckCommand "nrpe-zombie_procs" {
    import "nrpe-common"

    vars.nrpe_command = "check_zombie_procs"
}

object CheckCommand "nrpe-swap" {
    import "nrpe-common"

    vars.nrpe_command = "check_swap"
}

object CheckCommand "nrpe-dns" {
    import "nrpe-common"

    vars.nrpe_command = "check_dns"
}

object CheckCommand "nrpe-safe" {
    import "nrpe-common"

    vars.nrpe_command = "check_safe"
}

object CheckCommand "nrpe-iostat_io" {
    import "nrpe-common"

    vars.nrpe_command = "check_iostat_io"
    vars.nrpe_args = [ "$disk_device$" ]
}

object CheckCommand "nrpe-iostat_waittime" {
    import "nrpe-common"

    vars.nrpe_command = "check_iostat_waittime"
    vars.nrpe_args = [ "$disk_device$" ]
}

apply Service  "check_nrpe:" for (disk_nrpe_linux => config in host.vars.disks) {
  import "generic-service"

  display_name = "Check Nrpe:" + disk_nrpe_linux
  check_command = "nrpe-disk"

  vars += config
  assign where host.vars.os == "Linux"

}

#Storage Error! No controllers found on ubuntu15.04 dell r720
apply Service  "check_nrpe:diskhealth"{
  import "generic-service"

  display_name = "Check Nrpe: Diskhealth"
  check_command = "nrpe-diskhealth"
  assign where host.vars.os == "Linux"

}

apply Service  "check_nrpe:tcptraffic" for (interface_name =>interface_info in host.vars.interfaces){
  import "generic-service"

  display_name = "Check Nrpe: Tcptraffic "+ interface_name
  check_command = "nrpe-tcptraffic"

  vars.interface_name = interface_name
  vars+=interface_info

  assign where host.vars.interfaces && host.vars.os == "Linux"

}

apply Service  "check_nrpe:load"{
  import "generic-service"

  display_name = "Check Nrpe: Load"
  check_command = "nrpe-load"
  assign where host.vars.os == "Linux"

}

apply Service  "check_nrpe:mem"{
  import "generic-service"

  display_name = "Check Nrpe: Mem"
  check_command = "nrpe-mem"
  assign where host.vars.os == "Linux"

}

apply Service  "check_nrpe:proc_num"{
  import "generic-service"

  display_name = "Check Nrpe: proc_num"
  check_command = "nrpe-proc_num"
  assign where host.vars.os == "Linux"

}

apply Service  "check_nrpe:zombie_procs"{
  import "generic-service"

  display_name = "Check Nrpe: zombie_procs"
  check_command = "nrpe-zombie_procs"
  assign where host.vars.os == "Linux"

}

apply Service  "check_nrpe:swap"{
  import "generic-service"

  display_name = "Check Nrpe: swap"
  check_command = "nrpe-swap"
  assign where host.vars.os == "Linux"

}

apply Service  "check_nrpe:dns"{
  import "generic-service"

  display_name = "Check Nrpe: dns"
  check_command = "nrpe-dns"
  assign where host.vars.os == "Linux"

}

apply Service  "check_nrpe:safe"{
  import "generic-service"

  display_name = "Check Nrpe: safe"
  check_command = "nrpe-safe"
  assign where host.vars.os == "Linux"

}

apply Service  "check_nrpe:iostat_io"{
  import "generic-service"

  display_name = "Check Nrpe: iostat_io"
  check_command = "nrpe-iostat_io"
  vars.disk_device = host.vars.disk_device

  assign where host.vars.os == "Linux"

}

apply Service  "check_nrpe:iostat_waittime"{
  import "generic-service"

  display_name = "Check Nrpe: iostat_waittime"
  check_command = "nrpe-iostat_waittime"
  vars.disk_device = host.vars.disk_device

  assign where host.vars.os == "Linux"

}
配置常用window检测命令
# vim /etc/icinga2/zones.d/global-templates/nrpe_windows.conf

object CheckCommand "windows-nrpe-cpu" {
    import "nrpe-common"

    vars.nrpe_args = []

    vars.nrpe_command = "alias_cpu"
}

object CheckCommand "windows-nrpe-disk" {
    import "nrpe-common"

    vars.nrpe_args = []

    vars.nrpe_command = "alias_disk"
}

object CheckCommand "windows-nrpe-uptime" {
    import "nrpe-common"

    vars.nrpe_args = []

    vars.nrpe_command = "uptime"
}

object CheckCommand "windows-nrpe-mem" {
    import "nrpe-common"

    vars.nrpe_args = []

    vars.nrpe_command = "alias_mem"
}

apply Service  "windows_check_nrpe:cpu"{
  import "generic-service"

  display_name = "Windows-Check Nrpe: CPU"
  check_command = "windows-nrpe-cpu"
  assign where host.vars.os == "Windows"

}

apply Service  "windows_check_nrpe:disk"{
  import "generic-service"

  display_name = "Windows-Check Nrpe: Disk"
  check_command = "windows-nrpe-disk"
  assign where host.vars.os == "Windows"

}

apply Service  "windows_check_nrpe:uptime"{
  import "generic-service"

  display_name = "Windows-Check Nrpe: Uptime"
  check_command = "windows-nrpe-uptime"
  assign where host.vars.os == "Windows"

}

apply Service  "windows_check_nrpe:Mem"{
  import "generic-service"

  display_name = "Windows-Check Nrpe: Mem"
  check_command = "windows-nrpe-mem"
  assign where host.vars.os == "Windows"

}
重载icinga2
在reload后,master会自动分发配置给两个子节点,从而做到统一配置,统一分发。
# service icinga2 reload
url: /icinga2-classicui/
默认用户: icingaadmin
排错
-
如果配置分布式节点后发现无法监控,或者global-templates配置没有生效,可以删除
/var/lib/icinga2/api/zones下的文件,然后重启icinga2. -
CHECK_NRPE: Error - Could not complete SSL handshake.: 查看·nrpe.cfg·的
allowed_hosts配置项是否正确 -
check_iostat_*没有数据:OK - I/O stats: Transfers/Sec= Read Requests/Sec= Write Requests/Sec= KBytes Read/Sec= KBytes_Written/Sec=,sysstat包没有安装。
