SharePoint 2013 APP 开发示例 (三)使用远程的web资源
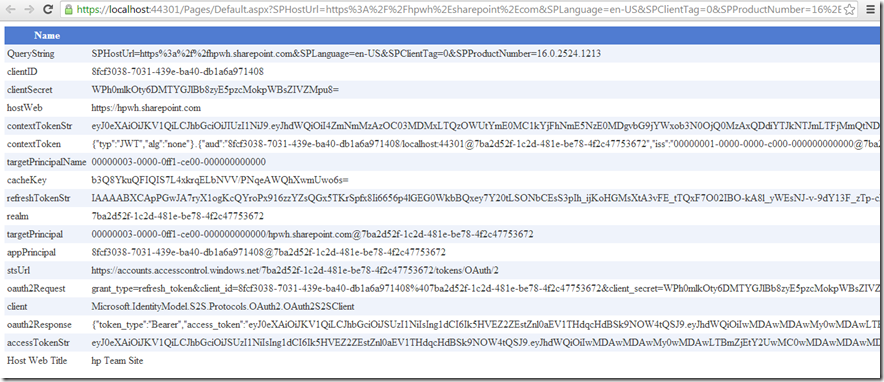
在这个示例里我们将详细介绍 TokenHelper 类, 我们将看到它是怎么简单地从远程web站点访问SharePoint的。我们还将取到它的一些值。这将帮助我们理解连接是怎么被构造的,同时也方便我们的以一的调试。我们将创建一个简单的 auto-hosted app,用TokenHelper类从相关的SharePoint服务器读取数据,并显示在页面上。我们还将取出一些token的值以方便看到它们的内容。
1. 打开Visual Studio 2012.
2. 创建一个新的 C# SharePoint app 项目:RemoteWebApp。
3. 选择 Autohosted (它是缺省项).
这将生成二个projects. 第一个是 SharePoint app web, 第二个是远程web站点。当debug时,远程的web app 将运行在本地的IIS Express上。当通过
remote web site. When debugging, the remote web app will run on a local copy of IIS Express. When deployed
Office Store 或一个 App 目录,远程的web将被发布到 Azure 云。
4. 按F5运行app
这个页面将查询host web 站咪的title,并显示在页面上。它只用了几行就做到了,因为它使用了TokenHelper 这个类。我们下面将详细介绍它的使用。
5. 停止调试
6. 打开Default.aspx.cs
7. 注释Page_Load() 里已有的代码
8. 加入下面的引用:
using Microsoft.IdentityModel.S2S.Protocols.OAuth2;
using Microsoft.SharePoint.Client;
using System;
using System.Collections.Generic;
using System.Data;
using System.Globalization;
using System.Linq;
using System.Web;
using System.Web.Configuration;
using System.Web.UI;
using System.Web.UI.WebControls;
9. 加入下面的代码到Page_Load() :
// Get app info from web.config
            string clientID = string.IsNullOrEmpty(WebConfigurationManager.AppSettings.Get("ClientId"))
                                ? WebConfigurationManager.AppSettings.Get("HostedAppName")
                                : WebConfigurationManager.AppSettings.Get("ClientId");
            string clientSecret = string.IsNullOrEmpty(WebConfigurationManager.AppSettings.Get("ClientSecret"))
                                ? WebConfigurationManager.AppSettings.Get("HostedAppSigningKey")
                                : WebConfigurationManager.AppSettings.Get("ClientSecret");
client ID 和 secret 是从远程web的配置文件读取到的,ID 指向 app, secret 被用作获取 access tokens。
10. 加入下面的代码到Page_Load() :
// Get values from Page.Request
            string reqAuthority = Request.Url.Authority;
            string hostWeb = Page.Request["SPHostUrl"];
            string hostWebAuthority = (new Uri(hostWeb)).Authority;
11. 加入下面的代码到Page_Load() :
// Get Context Token
            string contextTokenStr = TokenHelper.GetContextTokenFromRequest(Request);
            SharePointContextToken contextToken =
                TokenHelper.ReadAndValidateContextToken(contextTokenStr, reqAuthority);

            // Read data from the Context Token
            string targetPrincipalName = contextToken.TargetPrincipalName;
            string cacheKey = contextToken.CacheKey;
            string refreshTokenStr = contextToken.RefreshToken;
            string realm = contextToken.Realm;
SharePoint 还将传递encode context token, ReadAndValidateContextToken() 方法把它转换成一个 SharePointContextToken 对象,这样就更容易访问它的内容, 验证这个token指的是验证它的地址是来自这个app。剩下的代码就是从token里取出一些值.
12. 把这下面这个方法加到 Default 页面.
private static string GetFormattedPrincipal(string principalName, string hostName, string realm)
        {
            if (!String.IsNullOrEmpty(hostName))
            {
                return String.Format(CultureInfo.InvariantCulture, "{0}/{1}@{2}", principalName, hostName, realm);
            }
            else
            {
                return String.Format(CultureInfo.InvariantCulture, "{0}@{1}", principalName, realm);
            }
        }
13. 加入下面的代码到Page_Load() :
// Create principal and client strings
            string targetPrincipal = GetFormattedPrincipal(targetPrincipalName, hostWebAuthority, realm);
            string appPrincipal = GetFormattedPrincipal(clientID, null, realm);
app principal 哪个app正在做请求; target principal 确认哪个application, host 和 realm 将收到请求。
14. 加入下面的代码到Page_Load() :
// Request an access token from ACS
            string stsUrl = TokenHelper.AcsMetadataParser.GetStsUrl(realm);
            OAuth2AccessTokenRequest oauth2Request =
                OAuth2MessageFactory.CreateAccessTokenRequestWithRefreshToken(
                    appPrincipal, clientSecret, refreshTokenStr, targetPrincipal);
            OAuth2S2SClient client = new OAuth2S2SClient();
            OAuth2AccessTokenResponse oauth2Response = client.Issue(stsUrl, oauth2Request) as OAuth2AccessTokenResponse;
            string accessTokenStr = oauth2Response.AccessToken;
这是连接回到host web的关键, 这段代码请求 OAuth access token 并把它送到 Access Control Service (ACS). ACS发布了 access token 并且把它返回到远程的。这里能用同步调用,因为在服务端而不是在sharepoint。
15. 加入下面的代码到Page_Load() :
// Build the CSOM context with the access token
            ClientContext clientContext = TokenHelper.GetClientContextWithAccessToken(hostWeb, accessTokenStr);
            clientContext.Load(clientContext.Web, web => web.Title);
            clientContext.ExecuteQuery();
这里我们用access token创建一个CSOM client context 去请求 sharepoint . 我们这里用同步的ExecuteQuery(),因为这是服务端的代码。
16. 加入下面的代码到Page_Load() 显示数据 :
// Dump values to the page
            DataTable dt = new DataTable();
            dt.Columns.Add("Name");
            dt.Columns.Add("Value");

            dt.Rows.Add("QueryString", Request.QueryString);
            dt.Rows.Add("clientID", clientID);
            dt.Rows.Add("clientSecret", clientSecret);
            dt.Rows.Add("hostWeb", hostWeb);
            dt.Rows.Add("contextTokenStr", contextTokenStr);
            dt.Rows.Add("contextToken", contextToken);
            dt.Rows.Add("targetPrincipalName", targetPrincipalName);
            dt.Rows.Add("cacheKey", cacheKey);
            dt.Rows.Add("refreshTokenStr", refreshTokenStr);
            dt.Rows.Add("realm", realm);
            dt.Rows.Add("targetPrincipal", targetPrincipal);
            dt.Rows.Add("appPrincipal", appPrincipal);
            dt.Rows.Add("stsUrl", stsUrl);
            dt.Rows.Add("oauth2Request", oauth2Request);
            dt.Rows.Add("client", client);
            dt.Rows.Add("oauth2Response", oauth2Response);
            dt.Rows.Add("accessTokenStr", accessTokenStr);
            dt.Rows.Add("Host Web Title", clientContext.Web.Title);

            grd.DataSource = dt;
            grd.DataBind();
17. 打开Default.aspx 页面.
18. 加入下面的GridView :
<asp:GridView ID="grd" runat="server" CellPadding="4" ForeColor="#333333" GridLines="None" AutoGenerateColumns="True" Width="100%">
            <AlternatingRowStyle BackColor="White" />
            <EditRowStyle BackColor="#2461BF" />
            <FooterStyle BackColor="#507CD1" Font-Bold="True" ForeColor="White" />
            <HeaderStyle BackColor="#507CD1" Font-Bold="True" ForeColor="White" />
            <PagerStyle BackColor="#2461BF" ForeColor="White" HorizontalAlign="Center" />
            <RowStyle BackColor="#EFF3FB" />
            <SelectedRowStyle BackColor="#D1DDF1" Font-Bold="True" ForeColor="#333333" />
            <SortedAscendingCellStyle BackColor="#F5F7FB" />
            <SortedAscendingHeaderStyle BackColor="#6D95E1" />
            <SortedDescendingCellStyle BackColor="#E9EBEF" />
            <SortedDescendingHeaderStyle BackColor="#4870BE" />
        </asp:GridView>
19. 按 F5 运行APP.
这个app显示了远程站点的 default 页面,显示了这个站点的token的值。这些值让我们更方便地调试我们的app。


 浙公网安备 33010602011771号