


spring AOP 之三:使用@AspectJ定义切入点
@AspectJ相关文章
《spring AOP 之二:@AspectJ注解的3种配置》
《spring AOP 之三:使用@AspectJ定义切入点》
《spring AOP 之四:@AspectJ切入点标识符语法详解》
使用注解来创建切面是AspectJ 5所引入的关键特性。AspectJ 5之前,编写AspectJ切面需要学 习一种Java语言的扩展,但是AspectJ面向注解的模型可以非常简便地通过少量注解把任意类 转变为切面。
AspectJ提供了五个注解来定义通知,如表4.2所示:

表4.2 Spring使用AspectJ注解来声明通知方法

示例1:Audience类:观看演出的切面
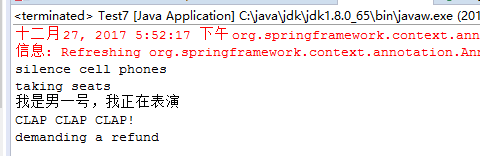
package com.dxz.aop.demo7;

import org.springframework.stereotype.Component;

@Component
public class Performance {

    public void perform(){
        System.out.println("我是男一号,我正在表演");
    }
}
package com.dxz.aop.demo7;

import org.aspectj.lang.annotation.AfterReturning;
import org.aspectj.lang.annotation.Aspect;
import org.aspectj.lang.annotation.Before;
import org.springframework.context.annotation.Configuration;

@Aspect
@Configuration
public class Audience {

    /**
     * 手机调至静音状态
     */
    @Before("execution(** com.dxz.aop.demo7.Performance.perform(..))")
    public void silenceCellPhones() {
        System.out.println("silence cell phones");
    }

    /**
     * 就坐
     */
    @Before("execution(** com.dxz.aop.demo7.Performance.perform(..))")
    public void takeSeats() {
        System.out.println("taking seats");
    }

    /**
     * 鼓掌喝彩
     */
    @AfterReturning("execution(** com.dxz.aop.demo7.Performance.perform(..))")
    public void applause() {
        System.out.println("CLAP CLAP CLAP!");
    }

    /**
     * 退款
     */
    @AfterReturning("execution(** com.dxz.aop.demo7.Performance.perform(..))")
    public void demandRefund() {
        System.out.println("demanding a refund");
    }
}
package com.dxz.aop.demo7;

import org.springframework.context.annotation.ComponentScan;
import org.springframework.context.annotation.Configuration;
import org.springframework.context.annotation.EnableAspectJAutoProxy;
import org.springframework.context.annotation.Import;

@Configuration
@ComponentScan
@EnableAspectJAutoProxy
@Import({Audience.class})/*@Aspect可以生效,相当于Configuration类作用,都是配置类*/
public class AppConfig {

}
启动类:
package com.dxz.aop.demo7;

import org.springframework.context.ApplicationContext;
import org.springframework.context.annotation.AnnotationConfigApplicationContext;

public class Test7 {

    public static void main(String[] args) {
        ApplicationContext context = new AnnotationConfigApplicationContext(AppConfig.class);
        Performance outPut = (Performance) context.getBean("performance");
        outPut.perform();
    }
}
结果:
你可能已经注意到了,所有的这些注解都给定了一个切点表达式作为它的值,同时,这四个方法的切点表达式都是相同的。其实,它们可以设置成不同的切点表达式,但是在这里,这个切点表达式就能满足所有通知方法的需求。这样的重复让人感觉有些不对劲。如果我们只定义这个切点一次,然后每次需要的时候引用它,那么这会是一个很好的方案。
幸好,我们完全可以这样做:@Pointcut注解能够在一个@AspectJ切面内定义可重用的切 点。接下来的程序清单4.2展现了新的Audience,现在它使用了@Pointcut。

示例2:@Pointcut注解声明频繁使用的切点表达式
package com.dxz.aop.demo7;

import org.aspectj.lang.annotation.AfterReturning;
import org.aspectj.lang.annotation.Aspect;
import org.aspectj.lang.annotation.Before;
import org.aspectj.lang.annotation.Pointcut;
import org.springframework.context.annotation.Configuration;

@Aspect
@Configuration
public class Audience2 {

    @Pointcut("execution(** com.dxz.aop.demo7.Performance.perform(..))")
    public void performance() {}

    /**
     * 手机调至静音状态
     */
    @Before("performance()")
    public void silenceCellPhones() {
        System.out.println("silence cell phones");
    }

    /**
     * 就坐
     */
    @Before("performance()")
    public void takeSeats() {
        System.out.println("taking seats");
    }

    /**
     * 鼓掌喝彩
     */
    @AfterReturning("performance()")
    public void applause() {
        System.out.println("CLAP CLAP CLAP!");
    }

    /**
     * 退款
     */
    @AfterReturning("performance()")
    public void demandRefund() {
        System.out.println("demanding a refund");
    }
}
package com.dxz.aop.demo7;

import org.springframework.context.annotation.ComponentScan;
import org.springframework.context.annotation.Configuration;
import org.springframework.context.annotation.EnableAspectJAutoProxy;
import org.springframework.context.annotation.Import;

@Configuration
@ComponentScan
@EnableAspectJAutoProxy
@Import({Audience2.class})/*@Aspect可以生效,相当于Configuration类作用,都是配置类*/
public class AppConfig {

}
结果和示例同等效果
 环绕通知(around advice)
示例3:我们使用一个环绕通知来代替之前多个 不同的前置通知和后置通知
package com.dxz.aop.demo7;

import org.aspectj.lang.ProceedingJoinPoint;
import org.aspectj.lang.annotation.AfterReturning;
import org.aspectj.lang.annotation.Around;
import org.aspectj.lang.annotation.Aspect;
import org.aspectj.lang.annotation.Before;
import org.aspectj.lang.annotation.Pointcut;
import org.springframework.context.annotation.Configuration;

@Aspect
@Configuration
public class Audience3 {

    @Pointcut("execution(** com.dxz.aop.demo7.Performance.perform(..))") //定义命名额切点
    public void performance() {
    }

    @Around("performance()") //环绕通知方法
    public void watchPerformance(ProceedingJoinPoint jp) {
        try {
            System.out.println("silence cell phones");
            System.out.println("taking seats");
            jp.proceed();
            System.out.println("CLAP CLAP CLAP!");
            System.out.println("demanding a refund");
        } catch (Throwable e) {
            e.printStackTrace();
        }
    }
}
package com.dxz.aop.demo7;

import org.springframework.context.annotation.ComponentScan;
import org.springframework.context.annotation.Configuration;
import org.springframework.context.annotation.EnableAspectJAutoProxy;
import org.springframework.context.annotation.Import;

@Configuration
@ComponentScan
@EnableAspectJAutoProxy
@Import({Audience3.class})/*@Aspect可以生效,相当于Configuration类作用,都是配置类*/
public class AppConfig {

}
其它不变,运行结果同上

对于Introduction这个词,个人认为理解成引入是最合适的,其目标是对于一个已有的类引入新的接口(有人可能会问:有什么用呢?简单的说,你可以把当前对象转型成另一个对象,那么很显然,你就可以调用另一个对象的方法了),看一个例子就全明白了。
假设已经有一个UserService类提供了保存User对象的服务,但是现在想增加对User进行验证的功能,只对通过验证的User提供保存服务,在不修改UserService类代码的前提下就可以通过Introduction来解决。
定义一个名为 Skill 的接口及它的实现类 SkillImpl。我们将要把 SkillImpl 的getSkill()方法添加到其他的类实例
package com.dxz.aop.demo8;

public interface Person {
    public void sayIdentification();
}
package com.dxz.aop.demo8;

import org.springframework.stereotype.Component;

@Component
public class Student implements Person {

    public void sayIdentification() {
        System.out.println("hello world!");

    }

}
附加的功能
package com.dxz.aop.demo8;

import org.springframework.stereotype.Component;

@Component
public interface Skill {
    void getSkill(String skill);
}

package com.dxz.aop.demo8;

import org.springframework.stereotype.Component;

@Component
public class SkillImpl implements Skill {

    public void getSkill(String skill) {
        System.out.println(skill);
    }

}
SpringAop 配置类
package com.dxz.aop.demo8;

import org.aspectj.lang.annotation.Aspect;
import org.aspectj.lang.annotation.DeclareParents;
import org.springframework.stereotype.Component;

@Component
@Aspect
public class AopConfig {

    // “...demo8.Perso”后面的 “+” 号,表示只要是Person及其子类都可以添加新的方法
    @DeclareParents(value = "com.dxz.aop.demo8.Person+", defaultImpl = SkillImpl.class)
    public Skill skill;
}
SpringConfig 配置类
package com.dxz.aop.demo8;

import org.springframework.context.annotation.ComponentScan;
import org.springframework.context.annotation.Configuration;
import org.springframework.context.annotation.EnableAspectJAutoProxy;

@ComponentScan
@Configuration
@EnableAspectJAutoProxy
public class SpringConfig {
}
Test
package com.dxz.aop.demo8;

import org.junit.Test;
import org.junit.runner.RunWith;
import org.springframework.beans.factory.annotation.Autowired;
import org.springframework.test.context.ContextConfiguration;
import org.springframework.test.context.junit4.SpringJUnit4ClassRunner;

@RunWith(SpringJUnit4ClassRunner.class)
@ContextConfiguration(classes = SpringConfig.class)
public class AopTest {

    @Autowired
    private Student student;

    @Test
    public void test(){
        Skill skill = (Skill)student; // 通过类型转换,student对象就拥有了SkillImp 类的方法
        skill.getSkill("我会英语");
        student.sayIdentification();
    }
}
结果:


 浙公网安备 33010602011771号