


(原)python使用ctypes调用C/C++接口
转载请注明出处:
http://www.cnblogs.com/darkknightzh/p/6135514.html
参考网址:
https://docs.python.org/2/library/ctypes.html——ctypes的官方文档
http://eli.thegreenplace.net/2008/08/31/ctypes-calling-cc-code-from-python/——提供了一个不涉及类的例子
http://stackoverflow.com/questions/145270/calling-c-c-from-python——建议使用ctypes,并提供了一个简单的例子
http://stackoverflow.com/questions/7142169/pils-image-frombuffer-expected-data-length-when-using-ctypes-array——提供了HYRY直接使用c_ubyte进行处理的例子
import Image
from ctypes import c_ubyte, cast, POINTER

buf = (c_ubyte * 400)()
pbuf = cast(buf, POINTER(c_ubyte))
pbuf2 = cast(pbuf, POINTER(c_ubyte*400))
buf is an ubyte array, pbuf is a pointer to ubyte, pbuf2 is a pointer to ubyte[400]. img1 is created from buf directly, img2 is created from pubf2.contents.
http://www.linuxidc.com/Linux/2011-10/44838.htm——传结构体的简单例子
一 传简单的指针:
具体步骤:
1. 新建mathBuf.cpp:
#include <iostream>
#include "subBuf.h"

extern "C"
{
    int addBuf(char* data, int num, char* outData);

    subBuf* subBuf_new(){ return new subBuf(); }
    int subBuf_sub(subBuf* subfuf, char* data, int num, char* outData){ subfuf->cursubBuf(data, num, outData); }
}

int addBuf(char* data, int num, char* outData)
{
    for (int i = 0; i < num; ++i)
    {
        outData[i] = data[i] + 3;
    }
    return num;
}
2. 新建subBuf.h:
#include <iostream>

class subBuf{
    public:
        subBuf(){}
        int cursubBuf(char* data, int num, char* outData)
        {
            for (int i = 0; i < num; ++i)
            {
                outData[i] = data[i] - 5;
            }
            return num;
        }
};
3. 终端中输入如下命令,生成libmathBuf.so:
g++ -std=c++11 -shared -fPIC -o libmathBuf.so mathBuf.cpp
4. 新建test.py:
from ctypes import * # cdll, c_int
lib = cdll.LoadLibrary('libmathBuf.so')

class callsubBuf(object):
    def __init__(self):
        self.obj = lib.subBuf_new()

    def callcursubBuf(self, data, num, outData):
        lib.subBuf_sub(self.obj, data, num, outData)

callAddBuf = lib.addBuf

num = 4
numbytes = c_int(num)

data_in = (c_byte * num)()
for i in range(num):
    data_in[i] = i

print("initial input data buf:")
for i in range(num):
    print(data_in[i])

#pdata_in = cast(data_in, POINTER(c_ubyte))
#pdata_in2 = cast(pdata_in, POINTER(c_ubyte*num))

data_out = (c_byte * num)()

ret = callAddBuf(data_in, numbytes, data_out)

print("after call addBuf with C, output buf:")
for i in range(num):
    print(data_out[i])

f = callsubBuf()
f.callcursubBuf(data_in, numbytes, data_out)

print("after call cursubBuf with  C++ class, output buf:")
for i in range(num):
    print(data_out[i])
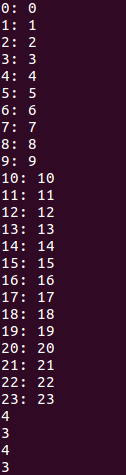
5. 运行test.py,输出如下:

说明:
1) test.py如果使用c_byte,则对应C中的unsigned char。
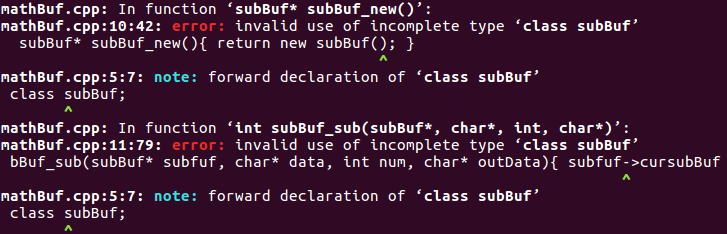
2) 程序使用了2个文件,subBuf.h和mathBuf.cpp。实际上可以使用一个文件,但是class要在extern "C"的上面,否则即便声明了class subBuf,也会提示invalid use of incomplete type ‘class subBuf’:
3) addSub函数的实现要在extern "C"的下面,否则会提示error: conflicting declaration of XXX with ‘C’ linkage:

4) ctypes中对应的c和python类型如下(具体参见ctypes的官方文档):
|
ctypes type |
C type |
Python type |
|
c_bool |
_Bool |
bool (*) |
|
c_char |
char |
1-character string |
|
c_wchar |
wchar_t |
1-character unicode string |
|
c_byte |
char |
int/long |
|
c_ubyte |
unsigned char |
int/long |
|
c_short |
short |
int/long |
|
c_ushort |
unsigned short |
int/long |
|
c_int |
int |
int/long |
|
c_uint |
unsigned int |
int/long |
|
c_long |
long |
int/long |
|
c_ulong |
unsigned long |
int/long |
|
c_longlong |
__int64 or long long |
int/long |
|
c_ulonglong |
unsigned __int64 or unsigned long long |
int/long |
|
c_float |
float |
float |
|
c_double |
double |
float |
|
c_longdouble |
long double |
float |
|
c_char_p |
char * (NUL terminated) |
string or None |
|
c_wchar_p |
wchar_t * (NUL terminated) |
unicode or None |
|
c_void_p |
void * |
int/long or None |
*. The constructor accepts any object with a truth value.
5) 除此之外:
http://blog.csdn.net/tobacco5648/article/details/41083369
提供了使用void*传递缓冲区的简单说明。
二 传结构体
1. 新建structPoint.cpp:
#include <stdio.h>
#include <stdlib.h>

struct structImg
{
    int width;
    int height;
    int channels;
    char* buf;
};

extern "C"
{
    void showStructureInfo(structImg p);
}

void showStructureInfo(structImg p)
{
    printf("%d %d %d\n", p.width, p.height, p.channels);
    for(int i=0;i< p.width*p.height*p.channels; ++i)
        printf("%d: %d\n", i, p.buf[i]);
}
2. 终端中将该文件编译成.so库:
g++ -std=c++11 -shared -fPIC -o libstructPoint.so structPoint.cpp
3. 新建test.py:
from ctypes import *
lib = cdll.LoadLibrary('libstructPoint.so')

class structImgTest(Structure):
    _fields_ =[('width', c_int),
               ('height', c_int),
               ('channels', c_int),
               ('buf', POINTER(c_ubyte))]


def getstructImg(width, height, channels):
    #cwidth = c_int(width)
    #cheight = c_int(height)
    #cchannels = c_int(channels)
    num = width * height * channels
    data_buf = (c_byte * num)()
    for i in range(num):
        data_buf[i] = i

    pbuf = cast(data_buf, POINTER(c_ubyte))

    st = structImgTest(width, height, channels, pbuf)
    return st


width = 4
height = 3
channels = 2
st = getstructImg(width, height, channels)

callTest = lib.showStructureInfo
callTest(st)

print st.width
print st.height

# if declaration of test is test(structImg* p), then use the following line
pst = pointer(st)  # not sure if "POINTER" points to ctypes type, while "pointer" points to a variable

print pst.contents.width
print pst.contents.height
4. 终端中运行test.py,结果如下:
可见输出的结果正确。
=========================================================================
190130更新:
下面两个网址有使用ctypes的比较详细的说明,也可以参考一下。
https://cvstuff.wordpress.com/2014/11/20/wraping-c-code-with-python-ctypes-the-python-side/
https://cvstuff.wordpress.com/2014/11/27/wraping-c-code-with-python-ctypes-memory-and-pointers/
190130更新结束
=========================================================================
posted on 2016-12-05 21:07 darkknightzh 阅读(24148) 评论(0) 收藏 举报


 浙公网安备 33010602011771号