
在线演示地址:Silverlight+WCF 新手实例 象棋 在线演示
一开始,还是截张小图过来吧,每次截图都要花很多时间上传的。

好了,我们现在知道,事件区其实就是几个按钮了,本节实现第一个按钮,“开始”游戏。别看就一个按钮,要做的事情可不少:
先总体说说这按钮要做什么事情:
1。双方进入座位时,要提示我可以点“开始”游戏;
2。我点开始“开始”,要WCF通讯,提示对方。
3。对方收到“开始游戏请求”,回复“同意/拒绝”;
4。我根据对方的回复,初始化一些状态。
OK,以上这按钮要做的事情,后面再说,现在还是说下布局,怎么把按钮弄到界面来实惠点:
布局还是旧逻辑:
1:新建一个用户控件:EventButton.xaml
2: 界面拖一个Border到Index.xaml,现在界面上有四个Border了,第四个chatBoard就是新添加进去的了。宽和高设置为522*52了。


<!--...省略前面几个... -->
<Border BorderBrush="Silver" BorderThickness="1" Height="52" HorizontalAlignment="Left" Margin="10,562,0,0" Name="eventButtonBoard" VerticalAlignment="Top" Width="522" />
</Grid>
3:后台动态加载控件了,后台代码就两行,为了以后方便控件消息传递,把控件定义为全局:
public Index()
{
//。。。省略。。。
eventButtonControl = new EventButton();//今天新加的
eventButtonBoard.Child = eventButtonControl;
//。。。省略。。。
}
OK,控件加载完了。接下来的任务就是要实现EventButton控件里的内容显示了:
接下来我们回到EventButton.xaml里,改一下总体宽和高为522*52:
<Grid x:Name="LayoutRoot" Background="White">
</Grid>
</UserControl>
跟着,我们往里放五个按钮,调整好位置:
<Button IsEnabled="False" Content="开始" Height="23" HorizontalAlignment="Left" Margin="12,12,0,0" Name="btnGameStart" VerticalAlignment="Top" Width="75" />
<Button IsEnabled="False" Content="认输" Height="23" HorizontalAlignment="Left" Margin="174,12,0,0" Name="btnGameLose" VerticalAlignment="Top" Width="75" />
<Button IsEnabled="False" Content="求和" Height="23" HorizontalAlignment="Left" Margin="93,12,0,0" Name="btnGameDeuce" VerticalAlignment="Top" Width="75" />
<Button Content="返回大厅" Height="23" HorizontalAlignment="Right" Margin="0,12,179,0" Name="btnBackRoom" VerticalAlignment="Top" Width="75" />
<Button Content="退出系统" Height="23" HorizontalAlignment="Left" Margin="359,12,0,0" Name="btnLogout" VerticalAlignment="Top" Width="75" />
</Grid>
目前布局就不截图了,和那个事件区的截图差不多一样了。
前台布局结束了,后台通讯就开始了:
我们回到WCF服务那,添加一个开始游戏的接口:
public interface IService
{
//...省略之前的接口代码...
[OperationContract(IsOneWay = true)]
void StartGame(Player player);//游戏开始
}
看到没有,我们的传递,总是传一个Player,这样代码通篇下来,看起来清爽点。
有了服务接口,同样的,需要一个回调接口,传递的还是一个Player:
{
//...省略之前的接口代码...
[OperationContract(IsOneWay = true)]
void NotifyStartGame(Player player);//通知对方开始游戏
}
接口写完了,就要实现了,回到Service.svc.cs,实现接口
一行代码,把收到的消息通知给对方就可以了:
{
Notify.Game(player, GameType.Start);
}
看到Notify.Game没,这方法哪来的?别急,和上一次样,下面就来实现:
还有还有,那GameType.Start是什么来的?这个啊,是定义的枚举:
我们回到Notify.cs里,Nofity类的下面添加一个枚举:
{
/// <summary>
/// 通知 by 路过秋天
/// </summary>
public class Notify
{
//...省略N行代码
}
/// <summary>
/// 游戏类型 by 路过秋天
/// </summary>
public enum GameType
{
Start,
Move,
End,
}
}
好了,知道游戏类型了吧,那我们实现方法了:
{
switch (type)
{
case GameType.Start://通知对方玩家开始游戏
foreach (KeyValuePair<Guid,Player> item in Service.playerList[player.RoomID])
{
if (item.Value.ColorValue + player.ColorValue == 3)
{
item.Value.CallBack.NotifyStartGame(player);
}
}
break;
case GameType.Move:
break;
case GameType.End:
break;
}
}
代码说明:
1:遍历房间内的用户,因为红色值+黑色值=3,所以用这个来判断是对方玩家。
2:Service.playerList,这个哪来的,是我们在Service定义的全局变量了,以前定义都是私有的,不能直接拿来用,都是在定义一个很长很长的参数来传递进来,今天就直接改一个修饰符,直接调用了,再也不用传的这么辛苦了:
看一下修改的Service.cs:
{
/// <summary>
/// 所有变化的房间列表
/// </summary>
internal static Dictionary<int, Room> roomList = new Dictionary<int, Room>();
/// <summary>
/// 玩家集合
/// </summary>
internal static Dictionary<int, Dictionary<Guid, Player>> playerList = new Dictionary<int, Dictionary<Guid, Player>>();
//...下面省略N行...[上面修改了原有的修饰符为internal]
}
既然开放了,大伙自觉点,以前的Notify类里几个方法都可以把长长的传参去掉了。[想保留也行,不做强制]
服务端代码就写完了,又要回到客户端调用了:
再说下:编绎,更新服务引用。[每次写完WCF代码我都忘了,所以这里再提示强调一下]
双击一下”开始“按钮,产生事件,接着往事件里写:
{
InitializeComponent();
App.client.StartGameCompleted += new EventHandler<System.ComponentModel.AsyncCompletedEventArgs>(client_StartGameCompleted);
}
void client_StartGameCompleted(object sender, System.ComponentModel.AsyncCompletedEventArgs e)
{
//发送完请求
MessageBox.Show("请求已发送,请等待对方回应!", "系统消息",MessageBoxButton.OK);
}
private void btnGameStart_Click(object sender, RoutedEventArgs e)
{
App.player.AttachInfo = "1";//请求标识位设为1
App.client.StartGameAsync(App.player, 1);
}
我们利用了一下AttachInfo属性,来传递我们的请求信息:
我们把请求完成的事件放到构造函数里,是为了防止多次点击生成重复事件。
写完了发送,我们来写接收:
{
InitializeComponent();
App.client.StartGameCompleted += new EventHandler<System.ComponentModel.AsyncCompletedEventArgs>(client_StartGameCompleted);
App.client.NotifyStartGameReceived += new EventHandler<GameService.NotifyStartGameReceivedEventArgs>(client_NotifyStartGameReceived);
}
void client_NotifyStartGameReceived(object sender, GameService.NotifyStartGameReceivedEventArgs e)
{
//收到消息了应该咋办
}
看看,我们收到消息是咋办的:
{
//收到消息了应该咋办
switch (e.player.AttachInfo)
{
case "1"://请求开始游戏
MessageBoxResult result=MessageBox.Show(e.player.NickName + " 请求开始游戏,是否同意开始", "游戏开始", MessageBoxButton.OKCancel);
App.player.AttachInfo = (result==MessageBoxResult.OK) ? "11" : "10";
App.client.StartGameAsync(App.player);
break;
case "10":
MessageBox.Show("对方拒绝开始游戏", "游戏通知", MessageBoxButton.OK);
break;
case "11":
MessageBox.Show("对方同意开始游戏,请开始下棋", "游戏通知", MessageBoxButton.OK);
btnGameStart.IsEnabled = false;
break;
}
}
如果收到1的请求,我们通过点确定还是取消,再发给服务端告知对方我们的答复情况。
在这来来回回的消息中,都在这switch中全解决了。
如果看真点,会发现我们的开始按钮默认是IsEnabled=false,根本就不能点,那啥时候能点呢?
我们等待服务器通知,让我们添加多一个Case 0命令来等:
{
//收到消息了应该咋办
switch (e.player.AttachInfo)
{
case "0"://通知可以开始游戏
MessageBox.Show(e.player.NickName + " 已进房间,请按开始按钮开始游戏", "游戏通知", MessageBoxButton.OK);
btnGameStart.IsEnabled = true;
break;
//...省略刚才的几个...
}
}
好了,我们是等待服务器通知了,可是服务器什么时候通知我们呢?
我们只要在进入房间的事件中,简单判断一下:
我们回到WCF的EnterRoom方法里添加两行代码,判断一下,红色和黑色都有人了,就可以通知开始了:
{
//...省略N行...
if (room.RedInChair && room.BlackInChair)
{
player.AttachInfo = "0";
Notify.Game(player, GameType.Start);
}
return true;
}
OK,到此通知事件就差不多结束了,我们F5看一下效果[-_-...又要截图了]:
1:下图先登陆一个A账号,然后新开浏览器B,准备登陆B

2:B登陆后,可以看房间1中已有人,是A在里面。

3:B点击进去,路过秋天A会收到消息,可以开始点按钮开始了。

4:A点击开始按钮,B收到A的请求

5:B点同意,A收到同意思消息:
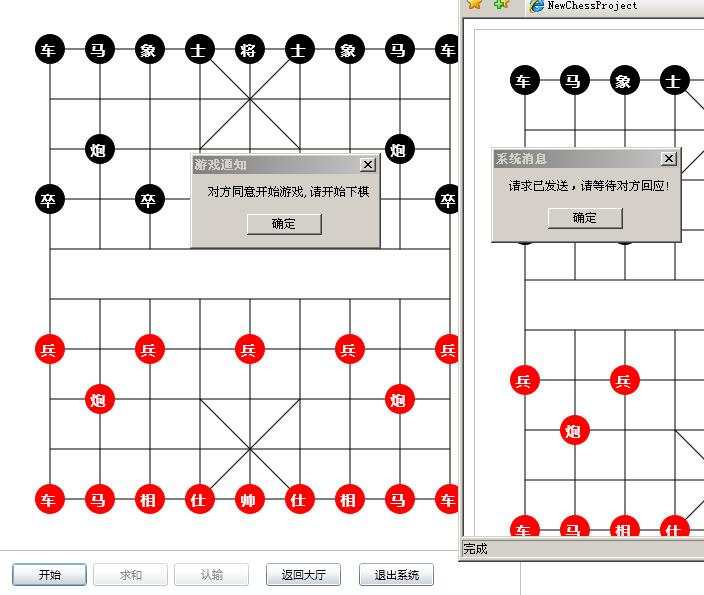
6:于是A开始下棋了:

OK,本小节就到此结束了,
下节我们来限制一下谁下谁不下[A下时B停,B下时A停]。
提供第五阶段源码:点击下载
| 版权声明:本文原创发表于 博客园,作者为 路过秋天 本文欢迎转载,但未经作者同意必须保留此段声明,且在文章页面明显位置给出原文连接,否则视为侵权。 |
个人微信公众号
|
Donation(扫码支持作者):支付宝:
|
Donation(扫码支持作者):微信:
|

|

 浙公网安备 33010602011771号