Ubuntu13.04配置:Vim+Syntastic+Vundle+YouCompleteMe
序言
使用Ubuntu和vim已经有一段时间了,对于Vim下的插件应用,我总是抱着一股狂热的态度。这次,又在网上闲逛着,发现了一个个人博客提到了Vim代码补全这回事,并提到了YouCompleteMe这个插件。顿时激起了我折腾的欲望。以前我都是使用Ctags+<C-n>或<C-p>来进行补全,然而其命中率却比较低,有时候根本就乱匹配。于是决定将YouCompleteMe这个插件安装好适用一下,同时,用Vundle也好让我将.vim文件夹下的文件清理一下.
一、准备
(1)相关链接
- PPA for vim 7.4. YouCompleteMe插件要求Vim 版本在7.3.584及以上,而Ubuntu13.04源中的Vim已经比较老了。所以,我们可以在源中添加PPA,或者编译源码手动更新VIM的版本。
- Vundle. 这是一个新生代vim插件管理器,使用git进行插件安装和更新。以前有一个pathogen。插件管理器的好处是:使用简单,自动化管理vim的插件。让你的.vim文件夹远离混乱不堪的窘境,从此一手.vimrc走天下。
- Clang+LLVM. LLVM+Clang是Apple公司资助的一个项目,YouCompleteMe精确的补全功能完全依赖于Clang的代码解析。我们需要安装好Clang 3.2+以便为YCM提供支持。
- SVN和Git。用于从代码库中检出源代码。在Ubuntu下这两个软件的安装都非常简单,使用apt-get命令即可安装完成。
- YouCompleteMe和Syntastic.这两个插件都是配合使用的。YCM不用再说,Syntastic用于源码的实时检查。具体效果如同Eclipse一样,在代码编写的过程中即可实时报告语法错误。
- Cmake.后面在编译过程中会使用到,安装命令:sudo apt-get install cmake.
(2)配置VIM
- 升级到7.3.584+。Ubuntu下需要手动添加PPA(Personal Package Archives),可以使用命令行add-apt-repository来进行添加,如:
$ sudo add-apt-repository ppa:nmi/vim-snapshots
$ sudo apt-get update
$ sudo apt-get install vim
某些PPA也提供了源地址,那么就可以直接打开/etc/apt/source.list进行添加。二者的本质是一样的。如从源码编译vim,可参考这里。
- 下载Vundle。Vundle托管在Github上,需要使用到git来检出源代码。
$ git clone https://github.com/gmarik/vundle.git ~/.vim/bundle/vundle
以上命令直接将源代码检出到了~/.vim/bundle/vundle这个目录下。
- 下载完了vundle后,需要配置好.vimrc文件。需要配置的模板如下(摘在github):
set nocompatible              " be iMproved
filetype off                  " required!

set rtp+=~/.vim/bundle/vundle/
call vundle#rc()

" let Vundle manage Vundle
" required!
Bundle 'gmarik/vundle'

" My bundles here:
"
" original repos on GitHub
Bundle 'tpope/vim-fugitive'
Bundle 'Lokaltog/vim-easymotion'
Bundle 'rstacruz/sparkup', {'rtp': 'vim/'}
Bundle 'tpope/vim-rails.git'
" vim-scripts repos
Bundle 'L9'
Bundle 'FuzzyFinder'
" non-GitHub repos
Bundle 'git://git.wincent.com/command-t.git'
" Git repos on your local machine (i.e. when working on your own plugin)
Bundle 'file:///Users/gmarik/path/to/plugin'
" ...

filetype plugin indent on     " required!
其中需要说明的是:filetype off这一条实际上并不需要。因为这条命令将导致语法着色失败。我的.vimrc里面并没配置这一条。当所需要的vim插件托管在Github上时,该插件的可写成“Bundle 'scrooloose/syntastic'”;当插件在www.vim.org上面时,我们只需要写明该插件的名称,还要加上.vim扩展名。否则vundle无法更新该插件。基本上这两种情况可以满足我们大部分人的需要了。
-
vundle的使用。先将~/.vim/下面原先安装的插件都"rm -rf"掉吧,由vundle来接手管理工作。打开一个vim窗口,执行命令:BundleInstall。接下来vundle会自动去网上将相关插件下载下来并安装好。在此过程中,vundle还会:helptags命令。因此,我们可以直接在vim中查看插件的帮助文档。要删除一个插件也很简单,先在~/.vimrc中移除该插件条目,然后进入vim执行命令:BundleClean。嘿嘿,vundle将自动清除掉插件的文件夹!狂拽炫酷吊炸天!
- 编译LLVM+Clang的源代码。在http://clang.llvm.org上面Clang 3.3并没有Ubuntu13.04 32bit的预编译的二进制程序,所以只好下载源码进行手工编译。命令如下:
//Checkout LLVM:
cd llvmsrc
svn co http://llvm.org/svn/llvm-project/llvm/trunk llvm
//Checkout Clang:
cd llvmsrc
cd llvm/tools
svn co http://llvm.org/svn/llvm-project/cfe/trunk clang
//Checkout Compiler-RT:
cd llvmsrc
cd llvm/projects
svn co http://llvm.org/svn/llvm-project/compiler-rt/trunk compiler-rt
//Get the Test Suite Source Code [Optional]
cd llvmsrc
cd llvm/projects
svn co http://llvm.org/svn/llvm-project/test-suite/trunk test-suite
//Configure and build LLVM and Clang:
cd llvmsrc
mkdir build (for building without polluting the source dir)
cd build
../llvm/configure --enable-optimized
以上步骤中唯一需要注意的是configure的时候,需要指定--enable-optimized参数。否则默认configure的将是Debug版本,问题多多。最后,我们使用make命令进行编译。编译过程比较长,耗时半个小时左右。这一步主要是为了下面编译YouCompleteMe插件做准备。
二、配置
(1)编译YouCompleteMe。没错,这个插件需要编译!在Github项目说明中有详细的安装和使用方法,不过呢,官方说明中的Full Installation并没有针对Ubuntu13.04 32bit的编译说明,而且,该说明中使用的是预编译Clang包。原先按照这个说明执行了一次,但是总是在libclang.so上面出错,要不就是版本不对,要不就是根本不生成libclang.so。最后在网上找到了一个帖子,再结合官方说明编译成功的。编译步骤如下:
- 下载源码。我们在前面使用vundle已经下载好了,因此这一步跳过。
- 执行命令:
$ cd ~
$ mkdir ~/ycm_build
$ cd ~/ycm_build
$ cmake -G "Unix Makefiles"  ~/.vim/bundle/YouCompleteMe/cpp -DEXTERNAL_LIBCLANG_PATH=~/ycm_temp/llvmsrc/lib/libclang.so
$ make ycm_core
这里要注意的是-DEXTERNAL_LIBCLANG_PATH这个参数,用于指定libclang.so的位置。如果不指定的话,YCM将无法正常工作,总是报:The YCM shut down, crash report...之类的错误。而这个libclang.so就是我们在编译Clang的时候生成的。因此,相关路径(也即~/ycm_temp/llvmsrc/lib/libclang.so)需要替换成自己对应的路径。
-
关于make。在官方文档中只使用了:make ycm_support_libs.而我在实际操作中却屡屡失败。实际上,首先要执行:make ycm_core。这样将在~/.vim/bundle/YouCompleteMe/python/目录下自动生成两个文件(libclang.so和ycm_core.so),如下图:
- 这还是不够的,还必须执行命令:make ycm_support_libs。 这条命令才会生成第三个文件ycm_client_support.so。因为,YouCompleteMe是C/S架构的,所以存在服务器和服务端的说 法。另外,在/tmp/ycm_temp/目录下还可以看到服务和请求日志,更加可以验证这一点。
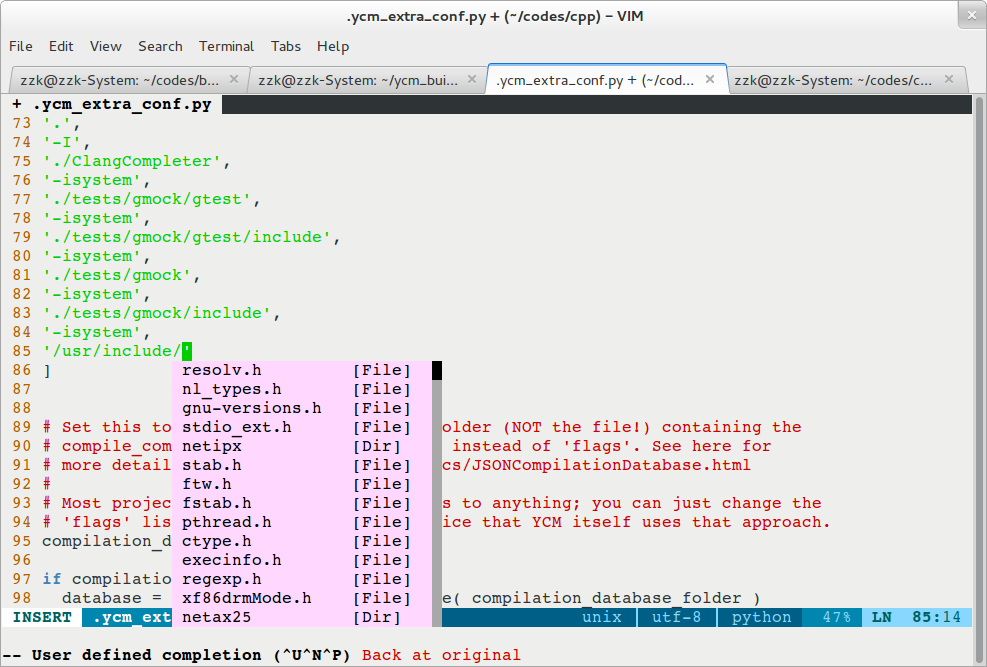
- 最后,为了能顺利的完成配置工作,我们还需要配置一下.ycm_extra_conf.py这个文件。项目说明中有个配置模板,我们需要做改动的就是flags部分。使用-isystem标志添加系统的头文件进行解析,而-I标志用于添加第三分的头文件进行解析。我的flags在最后增加如下:
'-isystem',
'/usr/include',
'-isystem',
'/usr/include/c++/',
'-isystem',
'/usr/include/i386-linux-gnu/c++'
此外,为了更好的提高补全效率,我们可以保留原先使用的用Ctags生成的tags文件,并在~/.vimrc中添加:let g:ycm_collect_identifiers_from_tag_files = 1.其中,在vim中使用 :echo tagfiles()可以查看当前使用的tags文件。至于生成tags文件的方法,可以看Ctags的帮助文件或者上网搜索。
- 至此,配置尚未结束。.ycm_extra_conf.py文件可以是针对工程而言,也可以设置全局的。对工程而言,放在工程的根目录即可。不过每次打开文件都会询问是否加载,这时可以在~/.vimrc中设置:let g:ycm_confirm_extra_conf=0来关闭提示。如果是针对全局的,那么可以在~/.vim/bundle/YouCompleteMe/cpp/ycm/.ycm_extra_conf.py中设置。如果没有问题,应该可以看到YouCompleteMe强大的一面了,效果在下面。
(2)Syntastic和Vundle的安装很简单,主要在于配置,所以就不花时间讲解安装,看看配置就可以了。而重点和难点在于YouCompleteMe和Clang的编译工作,这两个编译步骤都比较复杂,编译耗时较长。所以花了很大篇幅讲解。
三、附录
(1)效果图。这是补全C++的图,图中红色的小叉是Syntastic的效果。如果需要补全C,还得去.ycm_extra_conf.py中修改一下。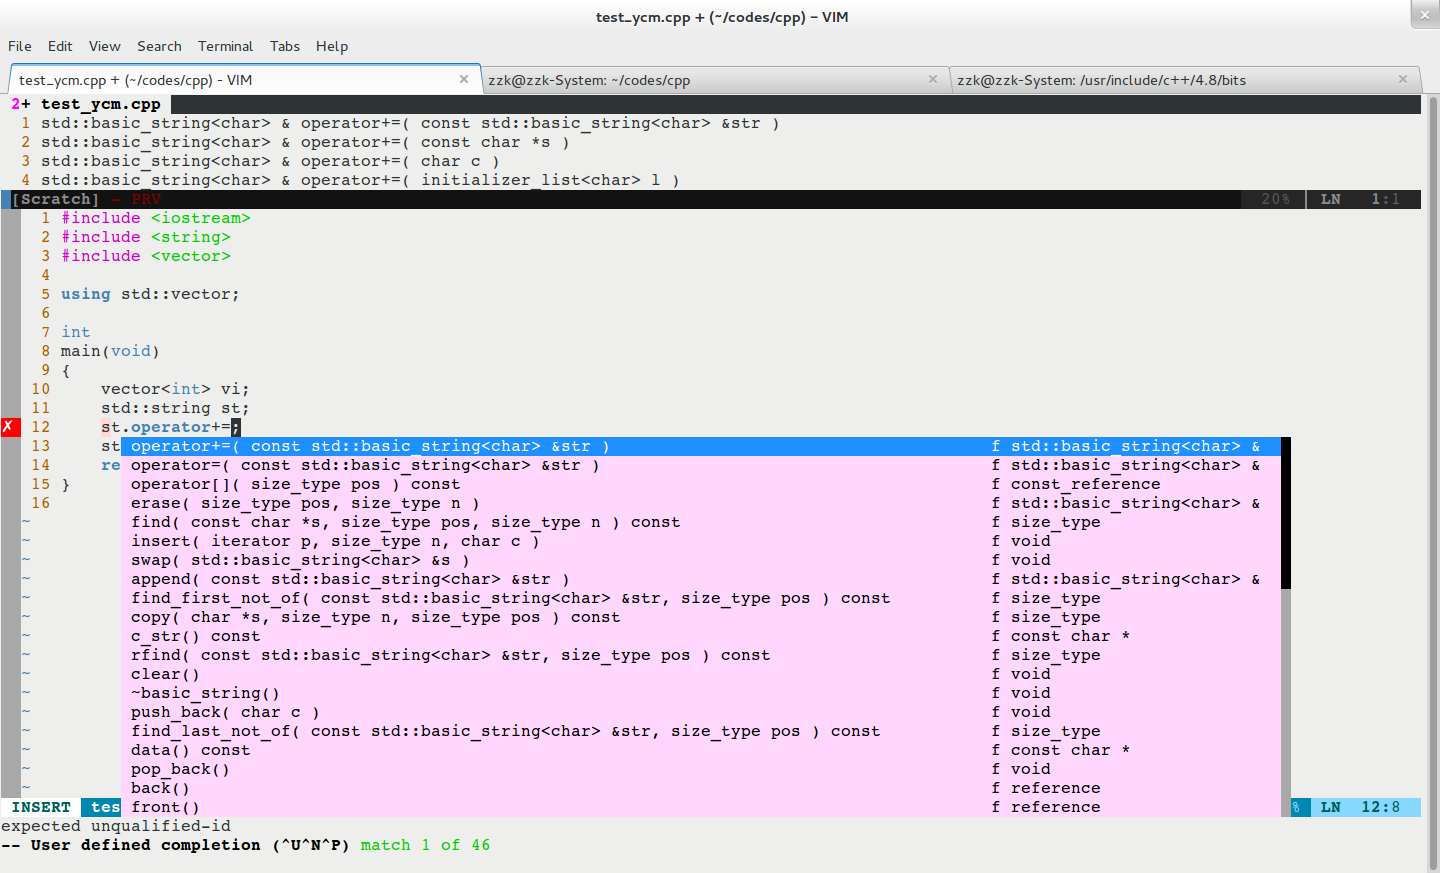
没有想到的是,YCM还能补全文件和目录。。。
下面是Syntastic的效果图,警告和错误标志可配置,光标在错误行时,vim的命令行会有相关错误信息:
(2)遇到的问题。
- libclang.so的版本一定要在3.2+,否则YCM无法正常工作。必须要通过上面的make ycm_core和make ycm_support_libs来生成上述的三个.so文件,不能手工拷贝。
- 如果出现bits/c++config.h文件无法找到的错误.那么可以考虑将系统中存在的c++config.h文件所在的文件夹中的所有文件,拷贝到/usr/include/c++/4.8/bits目录下,参考链接!


(3)相关说明。
- 编译vim源码的时候,需要打开python选项。
- vundle中的插件条目,如果托管在www.vim.org上,需要加.vim扩展名。
- 一个较为完善的.vimrc模板。
- 我的部分插件配置:
""""""""" Settings of taglist""""""""""""""
" increase the width of the taglist window
let Tlist_WinWidth=10
" automatically open the taglist window
let Tlist_Auto_Open=0
" exit wim when only the taglist window exist
let Tlist_Exit_OnlyWindow=1
" open tags with single click
let Tlist_Use_SingleClick=1
" close tag folds for inactive buffers
let Tlist_File_Fold_Auto_Close=1
" show the fold indicator column in the taglist window
let Tlist_Enable_Fold_Column=1
" Automatically update the taglist to include newly edited files
let Tlist_Auto_Update=1
"""""""""" NERDtree settings"""""""""""""""
let NERDTreeWinPos='right'
"""""""""" mini buffer navigator"""""""""""
let g:miniBUfExplMapWindowNavVim=1
let g:miniBufExplMapWindowNavArrows=1
let g:miniBufExplMapCTabSwitchBufs=1
let g:miniBufExplModSelTarget=1
let g:miniBufExplUseSingleClick=1

""""""""""""ctags settings"""""""""""""""""
set tags+=~/.vim/cpptags
set tags+=~/.vim/systags

"""""""""""color scheme""""""""""""""""""""
let g:molokai_original=1

""""""""""""vundle"""""""""""""""""""""""""
set nocompatible

set rtp+=~/.vim/bundle/vundle/
call vundle#rc()

" let Vundle manage Vundle
" required!
Bundle 'gmarik/vundle'

""""""""vim scripts""""""""""""""""""
Bundle 'taglist.vim'
Bundle 'c.vim'
Bundle 'minibufexpl.vim'
Bundle 'grep.vim'
Bundle 'mru.vim'
Bundle 'comments.vim'

""""""""git repo"""""""""""""""
Bundle 'scrooloose/nerdtree'
Bundle 'Valloric/YouCompleteMe'
Bundle 'vim-scripts/AutoClose'
Bundle 'scrooloose/syntastic'
Bundle 'Lokaltog/vim-powerline'

""""""""""syntastic""""""""""""
let g:syntastic_check_on_open = 1
let g:syntastic_cpp_include_dirs = ['/usr/include/']
let g:syntastic_cpp_remove_include_errors = 1
let g:syntastic_cpp_check_header = 1
let g:syntastic_cpp_compiler = 'clang++'
let g:syntastic_cpp_compiler_options = '-std=c++11 -stdlib=libstdc++'
"set error or warning signs
let g:syntastic_error_symbol = '✗'
let g:syntastic_warning_symbol = '⚠'
"whether to show balloons
let g:syntastic_enable_balloons = 1

""""""""""""YCM""""""""""""""""""""
let g:ycm_global_ycm_extra_conf = '~/.vim/bundle/YouCompleteMe/cpp/ycm/.ycm_extra_conf.py'
let g:ycm_collect_identifiers_from_tags_files = 1
let g:ycm_seed_identifiers_with_syntax = 1
let g:ycm_confirm_extra_conf = 0
- 推荐的较为好用的插件包括:
439 """"""""vim scripts""""""""""""""""""
440 Bundle 'taglist.vim'
441 Bundle 'c.vim'
442 Bundle 'minibufexpl.vim'
443 Bundle 'grep.vim'
444 Bundle 'mru.vim'
445 Bundle 'comments.vim'
446
447 """"""""git repo"""""""""""""""
448 Bundle 'scrooloose/nerdtree'
449 Bundle 'Valloric/YouCompleteMe'
450 Bundle 'vim-scripts/AutoClose'
451 Bundle 'scrooloose/syntastic'
452 Bundle 'Lokaltog/vim-powerline'
    Bundle 'kien/ctrlp.vim'
(4)参考链接:
- cold's world
- http://stackoverflow.com/questions/18028071/vim-c-ycm-and-syntastic-include-path-problems
- http://stackoverflow.com/questions/9201521/g-4-6-issue-no-bits-cconfig-h-file-as-required-by-the-header-cstring
- http://www.cplusplus.com/forum/unices/114261/
- http://blog.csdn.net/ywh147/article/details/13625905(价值较高)
- http://williamherry.com/blog/2012/08/25/master-vim-04-ctrlp/
- http://www.bestofvim.com/plugin/ctrl-p/
作者:24K纯开源
Email: zhangzhongke007@163.com
出处:http://www.cnblogs.com/csuftzzk/
本文版权归24K纯开源和博客园共同拥有,欢迎转载,但未经作者同意必须保留此声明,且在文章明显位置给出原文链接,否则保留追究法律责任的权利。

 浙公网安备 33010602011771号