
6.在MVC中使用泛型仓储模式和依赖注入实现增删查改
或者:http://www.codeproject.com/Articles/814768/CRUD-Operations-Using-the-Generic-Repository-Patte
系列目录:
- Relationship in Entity Framework Using Code First Approach With Fluent API【【使用EF Code-First方式和Fluent API来探讨EF中的关系】】
- Code First Migrations with Entity Framework【使用EF 做数据库迁移】
- CRUD Operations Using Entity Framework 5.0 Code First Approach in MVC【在MVC中使用EF 5.0做增删查改】
- CRUD Operations Using the Repository Pattern in MVC【在MVC中使用仓储模式,来做增删查改】
- CRUD Operations Using the Generic Repository Pattern and Unit of Work in MVC【在MVC中使用泛型仓储模式和工作单元来做增删查改】
- CRUD Operations Using the Generic Repository Pattern and Dependency Injection in MVC【在MVC中使用泛型仓储模式和依赖注入,来做增删查改】
这篇文章,我将介绍如何在MVC项目中,使用泛型仓储模式和依赖注入实现增删查改。
源代码下载:https://github.com/caofangsheng93/IocSln
这篇文章的章节如下:
1.介绍【Introduction】
2.依赖倒置原则(DIP)【Dependency Inversion Principle】
a.真实的例子【Real-Life Example】
b.实际不使用依赖倒置(DIP)的例子【Practical Example without DIP】
c.实际使用依赖倒置(DIP)的例子【Practical Example with DIP】
3.控制反转(IOC)模式【Inversion of Control (IoC) Pattern】
4.依赖注入(Dependency Injection)【DI】
a.紧耦合【Tight Coupling】
b.松耦合【Loose Coupling】
5.依赖注入的容器【Dependency Injection (DI) Container】
6.程序增删查改的设计步骤【CRUD operations Application Design】
a.在程序中定义实体【Define Entities in Application】
b.定义数据上下文【Define Context Class】
c.定义映射实体类【Define Mapping of Entities】
d.创建泛型仓储【Create Generic Repository】
e.创建服务来对用户表进行操作【Create Service for User Operations】
7.在MVC程序中使用IOC和DI【An MVC Application Using the IoC and DI】
a.引入Ninject依赖注入容器【Ninject Dependency Injection Container】
b.用于增删查改的Model和控制器【 CRUD Operations Model and Controller】
c.create/Edit视图【reate / Edit User View】
d.User List视图【User List View】
e.User Detail视图【User Detail View】
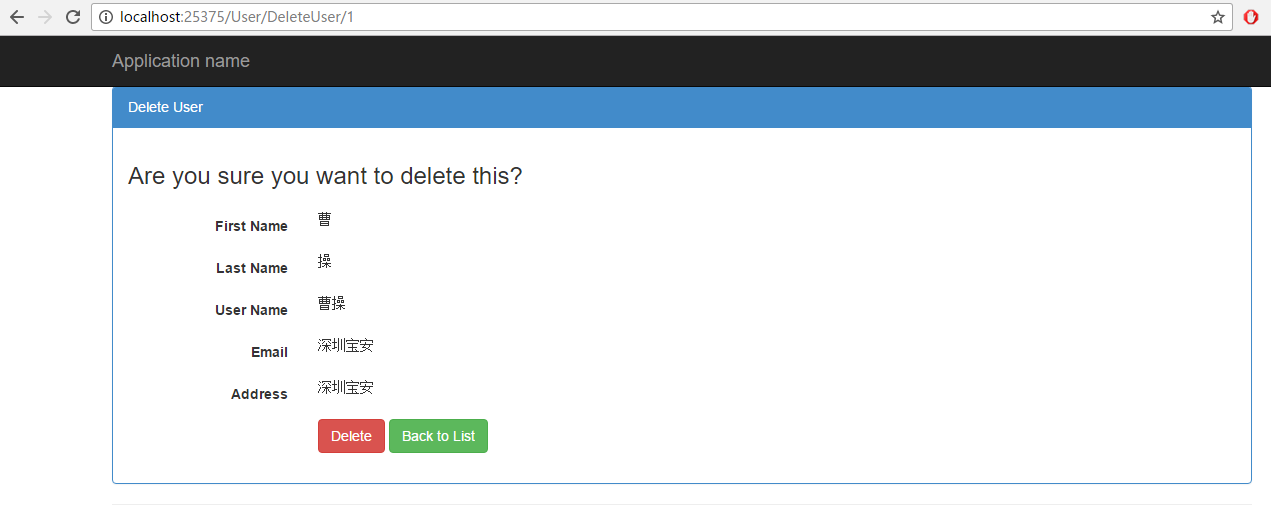
f.Delete User视图【Delete User】
8.总结【Conclusion】
9.下载【Download】
介绍
A software developer writes a lot of code that is tightly coupled and when complexity grows the code will eventually deteriorate into spaghetti code, in other words application design being a bad design. A bad design that has one of the following causes.
deteriorate [ 英 [dɪ'tɪərɪəreɪt] 美 [dɪ'tɪrɪəret] vi. 恶化,变坏 vt. 恶化]
spaghetti 【 英 [spə'getɪ] 美 [spə'ɡɛti] n. 意大利式细面条】
翻译:一个软件开发者写出了很多紧耦合的代码,然而当代码变的很复杂的时候,他写的代码就会恶化成意大利面条(不堪一击),换句话说程序就变成了一个不好的设计,一个不好的设计是由下面几种因素导致的:
1.Rigid: A design is rigid if it cannot be easily changed. A single change is heavily dependent on another module so this change causes a cascade of changes that couldn't be predicted, the impact of change could not be estimated.
2.Fragile: A simple change to one part of the application leads to failures in another part of it that appears completely unrelated. Fixing those problems leads to even more problems.
3.Immobile: When the desirable parts of the design are highly dependent upon other details that are not desired and that is why one part of the application could not be used in another application.
Rigid 【 英 ['rɪdʒɪd] 美 ['rɪdʒɪd] adj. 严格的;僵硬的,死板的;坚硬的;精确的】
Fragile 【 英 ['frædʒaɪl] 美 ['frædʒəl] adj. 脆的;易碎的】
Immobile 【 英 [ɪ'məʊbaɪl] 美 [ɪ'mobl] adj. 固定的;稳定的;不变的】
翻译:
1.死板的:如果设计是死板的,那么想要改变就很难了。一个小小的改变就会牵制很多其他的模块,所以这样的改变就会导致一连串不能预期的改变,并且这个改变所带来的影响是不能预估的。
2.易碎的:程序中一个简单的改变,就会导致其他不想关的部分完全瘫痪。修复这些问题甚至会导致更多的问题。
3.固定的:当程序设计中的比较好的部分组件紧紧耦合,其他我们不想提取出来的组件的时候,这个时候这个设计比较好的组件就很难重用到其他的项目中了。

The Dependency Inversion Principle is a solution for all these causes, that's why in this article I explain it. This article basically focuses on DIP, IoC, DI and DI containers so before diving into these, I just want to provide a small introduction in this section.
翻译:依赖注入原则就是解决上面这些问题的一个很好的解决方案。这也是我为什么要在这篇文章中详细解释的原因。这篇文章基础性了讲解依赖倒置原则,控制反转容器和依赖注入,所以在讲解这些之前,我打算先来一个简单的介绍。
The Dependency Inversion Principle (DIP) is a software design principle that is the last principle of SOLID while Inversion of Control (IoC) is a software design pattern. Here I used two terms, one is a principle and the other is a pattern. So what is the basic difference between these?
翻译: 依赖倒置原则是设计原则中最后一个。然后控制反转是软件的设计模式。这里我使用这两个术语,一个是设计原则另外一个是设计模式。那么他们之间基本的区别是什么呢?
1. Software Design Principle: Software Design Principles represent a set of guidelines that help us to avoid having a bad design. These are less about specific languages or paradigms and more generally "Don't Repeat Yourself" (DRY); the DRY principle is true for all programming.
翻译:软件设计原则:软件设计原则也就是一系列帮助我们避免不好的软件设计方针。设计原则,很少是关联到具体的编程语言或者编程范式的,更多的是关系到“不要重复你自己”,软件设计原则对所有的语言编程都是同样有效的。
2. Software Design Pattern: Software Design Patterns are a general reusable solution to a commonly occurring problem within a given context in software design. These are common solutions for object-oriented programming problems. Like the Singleton Pattern and Factory Pattern.
翻译:软件设计模式:软件设计模式:软件设计模式通常是给出,在既定的环境中普遍存在的问题的,一个可以重用的解决方案。软件设计模式是解决在面向对象编程过程中出现的问题的一个很通用的解决方案,例如:单例模式和工厂模式。
依赖倒置原则
It is the fifth principle of SOLID where “D” stands for Dependency Inversion Principle. Its main goal is decoupling software modules, in other words software design should be loosely coupled instead of tightly coupled.
翻译:依赖倒置原则是设计原则中的第五个,D代表依赖倒置原则。它的主要目标是去除软件设计模块之间的耦合性,换句话说软件设计,应该是松耦合的而不是紧耦合的。
The principle states:【依赖倒置原则的特征】
1.High-level modules should not depend upon low-level modules. Both should depend upon abstractions.【高层次的模块不应该依赖于低层次的模块,两者都应该依赖于抽象层。】
2.Abstractions should not depend upon details. Details should depend upon abstractions.【抽象层不应该依赖于具像层,具像层应该依赖于抽象层。】
In short the higher-level module defines an interface and lower-level module implements that interface. To explain this sentence we use a real-life example.【换句话说,高层次的模块定义了一个接口,然后低层次的模块实现了这个接口,为了解释这个场景我使用了一个真实的例子。】
真实的例子
Suppose you are sitting on your desk. Your desk has some gadgets, like your development machine (LCD Monitor or Laptop) and mobile phone. The LCD Monitor has a cable that connects from the electric port (power cable) and the same as the mobile phone that also has a charging cable that also connects to an electric port. You could see that both devices connect from the electric port so the question occurs of who defined the port, your device or the cable? You will say that the devices define the port, in other words we don't purchase devices depending on port while the port is designed dependent on devices and the cable is just an interface that connects both devices and the port so you could say that a high-level module doesn't depend on the low-level module but both should be dependent on abstraction.
gadgets 【 美 [gæ,dʒɪts] n. 小配件;小工具(gadget的复数)】
翻译:假想你正坐在办公桌上,你的桌上有一些零件,例如你的开发机器(液晶显示器或者笔记本电脑)和手机。液晶显示器有一个电缆连接到了插板上,并且手机有一根充电线同样连接到了插板上。你可以看到现在两个设备都连到了这个插板的端口上,那么问题出来了,谁定义了这个端口呢,你的设备还是这个电缆线呢?你可能会说,是这些设备定义了这个端口,换句话说,我们不根据端口买这些设备,并且端口的设计是独立于设备的。并且电缆线仅仅是一个连接设备和端口的接口,所以你可以说一个高层次的模块不能依赖于低层次的模块,但是高层次模块和低层次模块都应该依赖于抽象模块。
实际不使用依赖倒置(DIP)的例子
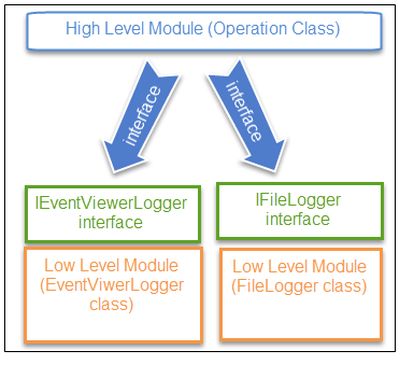
To understand DIP, we use an example that explains how an error log can manage an application. There are two types of log management, the first one is via text file and the other is by using the event viewer. We create a high-level Operation class for error log entry. We create two interfaces, one is IEventViewerLogger and the other is IFileLogger interface. The IEventViewerLogger interface is implemented by the EventViewerLogger class while the IFileLogger interface is implemented by the FileLogger class.
翻译:为了理解依赖倒置,我们使用了一个例子来解释:程序中错误日志怎么管理程序。这里有两种类型的日志系统,第一个是通过文本文件记录,另外一个是使用事件查看器。我们为错误日志实体创建一个高层次的操作类,然后创建两个接口,一个是IEventViewerLogger,另外一个是IFileLogger,EventViewerLogger类实现IEventViewerLogger接口,FileLogger类实现IFileLogger接口。
The preceding Figure 1.2 shows that a high-level Operation class depends on the interface. We create an instance of each interface in this class and assign an appropriate object to each instance and use the operation accordingly. This means that a high-level module Operation class depends on the low-level module such as interfaces. Now suppose we want to add a new logger, such as a Database logger. Then we need to add a new interface and that's why the Operation class needs to care for all the interfaces and that's a violation of the Dependency Inversion Principle.
violation 【英 [vaɪə'leɪʃn] 美 [,vaɪə'leʃən] n. 违反;妨碍,侵害;违背;强奸】
翻译:下图中,显示了一个高层次的操作类依赖于接口ILogger,我们在这个高层次的操作类中创建了接口了每个接口的实例【实例接口中定义的成员】,并且根据操作分配合适的对象给每个实例,这样就意味着高层次的模块操作类依赖于低层次模块,例如接口。现在假设,我们想要添加一个新的Logger,例如一个Database Logger,这个时候,我们就需要添加一个新接口,这也是为什么,这个操作类需要考虑到所有的接口,并且这样违背了依赖倒置的原则。
实际使用依赖倒置(DIP)的例子【Practical Example with DIP】
DIP states that a high-level module should not depend on a low-level module, both should be dependent on abstraction. To implement this principle we create an ILogger interface that is defined by a high-level module, in other words by an operation class and implemented by low-level modules, both EventViewerLogger and FileLogger classes. So when we add a new Logger, such as a database logger, then we don't need to update the Operation class.
翻译:依赖倒置原则声明:一个高级模块不应该依赖于一个低级模块,而是高级模块和低级模块都应该依赖于一个抽象层。为了实现这个依赖倒置原则,我们创建一个高级模块定义的ILogger接口,换句话说,这个Ilogger接口被一个操作类定义,被低级模块(EventViewerLogger和FileLogger类)实现。所以,当我们添加一个新的Logger的时候,例如database Logger,这个时候,我们就不用去更新这个操作类了。

It's a basic introduction to the Dependency Inversion Principle. If you are looking for code for this example then you can visit: Constructor Dependency Injection Pattern Implementation in C#. As I mention in this article that the software design principle is a guideline, in other words DIP doesn't tell us how to solve the preceding problem. If we want to understand how to solve the preceding problem then we need to follow a software design pattern and move onto Inversion of Control.
翻译:这是一个基本的介绍依赖倒置原则的文章,如果你想这个例子的话,你可以访问:Constructor Dependency Injection Pattern Implementation in C#.正如我在这篇文章说到的,软件设计原则是一个指导方针,换句话说,依赖倒置原则并不会告诉我们怎么去解决前面提到的问题。如果我们想要理解,怎么去解决前面遇到的问题,我们需要去看下软件设计模式,顺便看看控制反转。
控制反转(IOC)模式【Inversion of Control (IoC) Pattern】
DIP is a software design principle that defines a guideline to solve a problem while IoC is a software design pattern that defines how to solve the problem. In other words the IoC is the pattern by which we can practically implement DIP in software development. Let's see an example.
翻译:依赖倒置原则是软件设计的原则,它定义了一个指导方针,帮助我们去解决问题。然而IOC是软件设计模式,IOC帮助我们怎么去解决问题。换句话说,IOC是模式,通过它我们能够在软件开发中实现依赖倒置原则。我们来看一个例子吧。
In the previous error logger example, we define interfaces and implement them in classes. DIP states that a High-level Module should not be depend on a low-level module, that means we define the interface according to a high-level module Operation Class and implemented on a low-level module classes. The IoC is inverting the control of something switching control. In other words an outside module or class is responsible for creating an object of the class instead of directly creating the object of the low-level module class in the high-level module class so we can say that an IoC is an abstraction on which both high-level and low-level modules depend and it inverts the control flow.
invert 【[ɪn'vɜːt] 美 ['ɪnvɝt] vt. 使…转化;使…颠倒;使…反转;使…前后倒置 n. 颠倒的事物;倒置物;倒悬者 adj. 转化的】
翻译:在前面的错误日志的例子中,我们定义了接口,并在类中实现了接口,依赖倒置原则声称:一个高层级的模块不应该依赖于低层级的模块,这也就是说,我们根据高层次的操作类来定义这个接口,然后在低层次的类中实现这个接口。IOC是控制反转的开关。换句话说一个外在的模块或者一个类是用来创建类的对象的,而不是直接在高层次的模块类中创建低层次的类的对象。所以我们可以说,IOC就是一个抽象层,不仅仅高级模块还有低级模块都依赖于它,IOC使控制发生了反转。
In short we can say that IoC is used to invert the control flow of the application and an application module interacts with another module via interface and application classes object are created from one class.
翻译:简而言之,我们可以说,IOC是用来反转程序的控制流,并且程序的模块和其他模块的交互是通过接口,和其他类中创建的类的对象来实现的。

Dependency Injection (DI)--依赖注入
Dependency Injection (DI) is a type of IoC, it is a pattern where objects are not responsible for creating their own dependencies. Dependency injection is a way to remove hard-coded dependencies among objects, making it easier to replace an object's dependencies, either for testing (using mock objects in unit test) or to change run-time behaviour.
翻译:依赖注入是控制反转的一种,它是一种设计模式:对象不负责创建自己的依赖。依赖注入是移除对象之间硬编码依赖的一种方式。使对象的依赖能够更容易的被替换,或者说为了更方便测试,或者改变对象运行的时候的行为。
Before understanding Dependency Injection, you should be familiar with the two concepts of Object Oriented Programming, one is tight coupling and another is loose coupling, so let's see each one by one.
理解依赖注入之前,你应该要很熟悉面向对象编程中的两个概念,一个是紧耦合,另外一个是松耦合,我们来一个一个的看吧:
Tight Coupling: When a class is dependent on a concrete dependency, it is said to be tightly coupled to that class. A tightly coupled object is dependent on another object; that means changing one object in a tightly coupled application often requires changes to a number of other objects. It is not difficult when an application is small but in an enterprise level application, it is too difficult to make the changes.
翻译:紧耦合:当一个类依赖于一个具体的依赖,也就是说这个类,是紧密耦合的类。一个紧耦合对象依赖于另外一个对象,这意味着改变紧耦合程序中的一个对象,通常需要改变很多其他对象的部分代码,当应用程序比较小的时候,还不是很难,但是如果应用程序是企业级很大的时候,这样就变得很难修改了。
Loose Coupling: It means two objects are independent and an object can use another object without being dependent on it. It is a design goal that seeks to reduce the inter-dependencies among components of a system with the goal of reducing the risk that changes in one component will require changes in any other component.
翻译:松耦合:这意味着两个对象是相互独立的,并且一个对象使用另外一个对象而不必依赖于它。松耦合是程序设计的目标,意在寻求减少系统组件之间的内在的相互依赖,并且当我们改变其中一个组件代码的时候,减少,需要去修改其他组件代码的风险。
Now in short, Dependency Injection is a pattern that makes objects loosely coupled instead of tightly coupled. Generally we create a concrete class object in the class we require the object and bind it in the dependent class but DI is a pattern where we create a concrete class object outside this high-level module or dependent class.
翻译:现在简而言之,就是依赖注入是一个设计模式,它能够使对象之间成为松耦合,代替原来对象之间的紧耦合。通常,我们在类中创建一个具体的类的对象的时候,我们需要这个对象,捆绑在这个类中,但是依赖注入设计模式下,我们创建一个类的具体对象,在这个高级模块或者这个类之外,而不必捆绑在这个类中。
There are three types of dependency injections:
- Constructor Dependency Injection
- Setter Dependency Injection
- Interface Dependency Injection
翻译:这里有三种类型的依赖注入:
1.构造函数的依赖注入
2.属性依赖注入
3.接口依赖注入
In this article we will use Constructor Dependency Injection. This is the most commonly used Dependency Injection Pattern in Object Oriented Programming. The Constructor Dependency Injection uses a parameter to inject dependencies so there is normally one parameterized constructor always. So in this constructor dependency, the object has no default constructor and you need to pass specified values at the time of creation to initiate the object. You can say that your design is loosely coupled with the use of constructor dependency injection.
翻译:在这篇文章中,我将会使用构造函数注入的方式,这是在面向对象编程中,使用的最多的依赖注入方式。构造函数依赖注入,通过使用一个参数来注入依赖,所以通常构造函数都会有一个参数,因此在构造函数依赖中,对象没有了默认的构造函数,你需要在初始化对象的时候,传递一个明确的值。这时候,你可以说,使用构造函数依赖的话,你的设计就是是松耦合的了。
Dependency Injection (DI) Container 【依赖注入容器】
The Dependency Injection Container is a framework to create dependencies and inject them automatically when required. It automatically creates objects based on requests and injects them when required. It helps us split our application into a collection of loosely-coupled, highly-cohesive pieces and then glue them back together in a flexible manner. By DI container, our code will become easier to write, reuse, test and modify. In this article we will use a Niject DI Container.
翻译:依赖注入容器是一个创建依赖的框架,当需要的时候,容器就会自动的注入依赖。它会基于请求,自动地创建对象,并且当需要依赖的时候,自动注入依赖。它会帮助我们,将程序拆分成松耦合,高内聚的零件,并以灵活的方式,将这些零件重新粘合在一起。通过依赖注入容器,我们的代码将会变得越来越容易写,越来越容易测试和修改。这篇文章中我将会使用Niject 依赖注入容器。
好了,到此为止,理论介绍完了,开始实践吧:
CRUD operations Application Design【增删查改的应用程序设计】
We create four projects in a solution to implement DIP with generic repository pattern. These are:
我们将会创建四个项目并使用泛型仓储模式,来实现依赖倒置原则,他们是:
- Ioc.Entities (class library)
- Ioc.Data (class library)
- Ioc.Service (class library)
- Ioc.Web (web application)
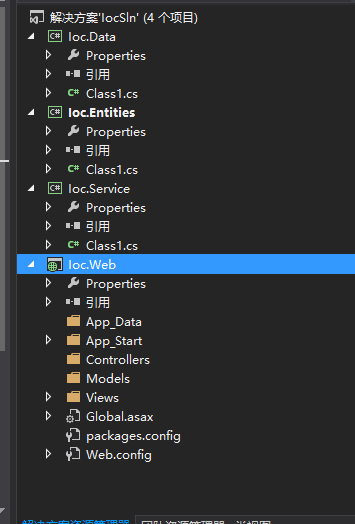
首先明确引用关系:Ioc.Data添加Ioc.Entiies引用,Ioc.Service添加Ioc.Entities引用和Ioc.Data引用,最后Ioc.Web添加Ioc.Service和Ioc.Entities引用。
这样我们就搭建好了基本的框架了。接下来就是开发我们的实体层了。
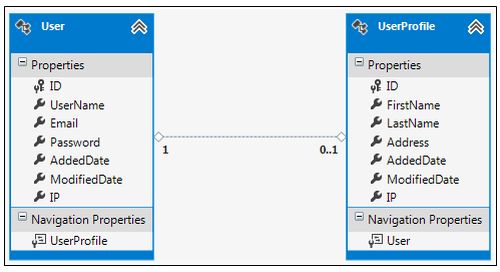
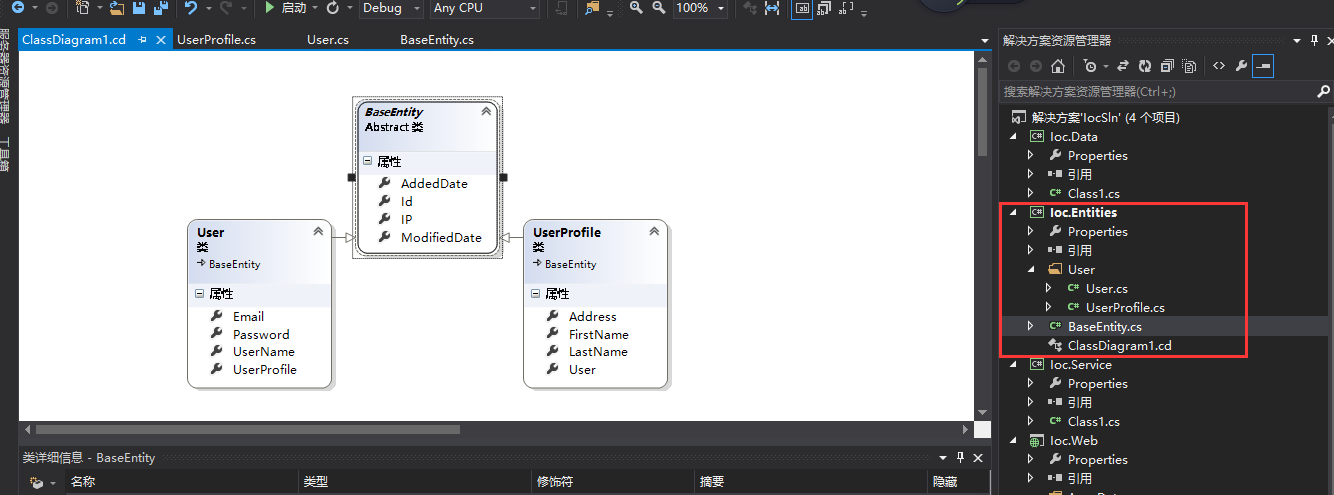
在这篇文章中,我将会使用EF Code-First方式,来开发引用程序。实体层【Ioc.Entities】中,我们将会创建三个实体,一个是BaseEntity,一个是User实体,另外一个是UserProfile实体,BaseEntity实体类中有一些公共的属性,另外两个实体将会继承BaseEntity实体类。下面实体层的代码:
BaseEntity实体类:


using System;
using System.Collections.Generic;
using System.Linq;
using System.Text;
using System.Threading.Tasks;

namespace Ioc.Entities
{
    public abstract class BaseEntity
    {

         /// <summary>
        /// Id编号
        /// </summary>
        public int Id { get; set; }

        /// <summary>
        /// 添加时间
        /// </summary>
        public DateTime AddedDate { get; set; }

        /// <summary>
        /// 修改时间
        /// </summary>
        public DateTime ModifiedDate { get; set; }

        /// <summary>
        /// IP地址
        /// </summary>
        public string IP { get; set; }
    }
}
User实体和UserProfile实体之间是一对一的关系,一个用户只有一个UserProfile
User实体:
using System;
using System.Collections.Generic;
using System.Linq;
using System.Text;
using System.Threading.Tasks;

namespace Ioc.Entities.User
{
   public class User:BaseEntity
    {
       /// <summary>
       /// 用户名
       /// </summary>
       public string UserName { get; set; }

       /// <summary>
       /// 电子邮件
       /// </summary>
       public string Email { get; set; }

       /// <summary>
       /// 密码
       /// </summary>
       public string Password { get; set; }

       /// <summary>
       /// 导航属性--UserProfile
       /// </summary>
       public virtual UserProfile UserProfile { get; set; }

   }
}
UserProfile实体:
using System;
using System.Collections.Generic;
using System.Linq;
using System.Text;

namespace Ioc.Entities.User
{
   public class UserProfile:BaseEntity
    {
       /// <summary>
       /// 姓
       /// </summary>
       public string FirstName { get; set; }

       /// <summary>
       /// 名
       /// </summary>
       public string LastName { get; set; }

       /// <summary>
       /// 住址
       /// </summary>
       public string Address { get; set; }

       /// <summary>
       /// 导航属性--User
       /// </summary>
       public virtual User User { get; set; }
    }
}
实体层的代码到此就写完了,我们看下实体层的结构:
现在开始数据层的开发,因为我们使用EF,所以在Ioc.Data和Ioc.Service以及Ioc.Web项目都引入EF。
先来定义数据上下文接口:
IDbContext接口:
using Ioc.Entities;
using System;
using System.Collections.Generic;
using System.Data.Entity;
using System.Linq;
using System.Text;
using System.Threading.Tasks;

namespace Ioc.Data
{
    public  interface IDbContext
    {

        /// <summary>
        /// 泛型返回值类型IDbSet<TEntity>方法Set,并且TEntity要继承BaseEntity
        /// </summary>
        /// <typeparam name="TEntity"></typeparam>
        /// <returns></returns>
        IDbSet<TEntity> Set<TEntity>() where TEntity : BaseEntity;

        /// <summary>
        /// 保存
        /// </summary>
        /// <returns></returns>
        int SaveChanges();
    }
}
IocDbContext数据上下文类:
using System;
using System.Collections.Generic;
using System.Data.Entity;
using System.Data.Entity.ModelConfiguration;
using System.Linq;
using System.Reflection;
using System.Text;
using System.Threading.Tasks;

namespace Ioc.Data
{
    /// <summary>
    /// 数据上下文类,要继承DbContext类
    /// </summary>
   public class IocDbContext:DbContext,IDbContext
    {
       public IocDbContext()
           : base("name=DbConnectionstring")
       {

       }
       /// <summary>
       /// 重写DbContext类的OnModelCreating方法
       /// </summary>
       /// <param name="modelBuilder"></param>
       protected override void OnModelCreating(DbModelBuilder modelBuilder)
       {
           var typesToRegister = Assembly.GetExecutingAssembly().GetTypes()
          .Where(type => !String.IsNullOrEmpty(type.Namespace))
          .Where(type => type.BaseType != null && type.BaseType.IsGenericType && type.BaseType.GetGenericTypeDefinition() == typeof(EntityTypeConfiguration<>));
           foreach (var type in typesToRegister)
           {
               dynamic configurationInstance = Activator.CreateInstance(type);
               modelBuilder.Configurations.Add(configurationInstance);
           }
           base.OnModelCreating(modelBuilder);
       }

       /// <summary>
       /// IocDbContext实现接口IDbContext中的 Set<TEntity>() 方法
       /// </summary>
       /// <typeparam name="TEntity"></typeparam>
       /// <returns></returns>
       public new IDbSet<TEntity> Set<TEntity>() where TEntity : Entities.BaseEntity
       {
           return base.Set<TEntity>();
           //throw new NotImplementedException();//可以看出来,接口的默认实现没有实现
       }
    }
}
Ioc.Data的配置文件中,需要配置数据库连接字符串:
<connectionStrings>
    <add name="DbConnectionstring" connectionString="server=.;database=IocDB;uid=sa;pwd=Password_1" providerName="System.Data.SqlClient"/>
  </connectionStrings>
这些配置完了,之后,就是实体的映射类了。还是在Ioc.Data项目中:
UserMap实体类:
using Ioc.Entities.User;
using System;
using System.Collections.Generic;
using System.Data.Entity.ModelConfiguration;
using System.Linq;
using System.Text;
using System.Threading.Tasks;

namespace Ioc.Data.Mapping.User
{
    /// <summary>
    /// 实体映射类,需要继承EntityTypeConfiguration类
    /// </summary>
    public class UserMap : EntityTypeConfiguration<Ioc.Entities.User.User>
    {
        public UserMap()
        {
           //key
           HasKey(t => t.Id);
           //properties
           Property(t => t.UserName).IsRequired();
           Property(t => t.Email).IsRequired();
           Property(t => t.Password).IsRequired();
           Property(t => t.AddedDate).IsRequired();
           Property(t => t.ModifiedDate).IsRequired();
           Property(t => t.IP);
           //table
           ToTable("Users");
        }
    }
}
UserProfileMap实体类:
using Ioc.Entities.User;
using System;
using System.Collections.Generic;
using System.Data.Entity.ModelConfiguration;
using System.Linq;
using System.Text;
using System.Threading.Tasks;

namespace Ioc.Data.Mapping.User
{
    /// <summary>
    /// UserProfileMap实体映射类 ,需要继承EntityTypeConfiguration类
    /// </summary>
   public class UserProfileMap:EntityTypeConfiguration<UserProfile>
    {
       public UserProfileMap()
       {
           //key
           HasKey(t => t.Id);
           //properties
           Property(t => t.FirstName).IsRequired().HasMaxLength(100).HasColumnType("nvarchar");
           Property(t => t.LastName).HasMaxLength(100).HasColumnType("nvarchar");
           Property(t => t.Address).HasColumnType("nvarchar");
           Property(t => t.AddedDate).IsRequired();
           Property(t => t.ModifiedDate).IsRequired();
           Property(t => t.IP);
           //table
           ToTable("UserProfiles");
           //relation
           HasRequired(t => t.User).WithRequiredDependent(u => u.UserProfile);
       }
    }
}
至此实体映射类写完了。现在我们继续开发,写泛型仓储模式,关于泛型仓储模式的介绍,请看这个系列前面的文章的介绍,这里就不再罗嗦了。
我们在Ioc.Data项目中,创建一个泛型仓储接口。
IRepository接口
using Ioc.Entities;
using System;
using System.Collections.Generic;
using System.Linq;
using System.Text;
using System.Threading.Tasks;

namespace Ioc.Data
{
    /// <summary>
    /// 泛型仓储接口
    /// </summary>
    /// <typeparam name="T"></typeparam>
   public interface IRepository<T> where T:BaseEntity  //类型参数和接口名称之间没有任何符号,where关键字和类型参数之间,有一个空格。
    {
       /// <summary>
       /// 泛型方法,通过id获取实体
       /// </summary>
       /// <param name="id"></param>
       /// <returns></returns>
       T GetById(object id);

       /// <summary>
       /// 泛型方法--添加实体
       /// </summary>
       /// <param name="model"></param>
       void Insert(T model);

       /// <summary>
       /// 泛型方法,更新实体
       /// </summary>
       /// <param name="model"></param>
       void Update(T model);

       /// <summary>
       /// 泛型方法--删除实体
       /// </summary>
       /// <param name="model"></param>
       void Delete(T model);

       /// <summary>
       /// 只读Table
       /// </summary>
       IQueryable<T> Table { get; }
    }
}
接着创建泛型仓储类,实现这个泛型接口。
using Ioc.Entities;
using System;
using System.Collections.Generic;
using System.Data.Entity;
using System.Data.Entity.Validation;
using System.Linq;
using System.Text;
using System.Threading.Tasks;

namespace Ioc.Data
{
    /// <summary>
    /// 泛型仓储类,实现泛型仓储接口。
    /// </summary>
    /// <typeparam name="T"></typeparam>
    public class Repository<T> : IRepository<T> where T : BaseEntity  //约束在最后面。
    {
        private readonly IocDbContext _context;
        private IDbSet<T> _entities;

        /// <summary>
        ///
        /// </summary>
        public Repository(IocDbContext context)
        {
            this._context = context;
        }

        public IDbSet<T> Entities
        {
            get
            {
                if (_entities == null)
                {
                    _entities = _context.Set<T>();
                }
                return _entities;
            }
        }

        /// <summary>
        /// 实现泛型接口中的IQueryable<T>类型的 Table属性
        /// 标记为virtual是为了可以重写它
        /// </summary>
        public virtual IQueryable<T> Table
        {
            get
            {
                return this.Entities;
            }

        }

        public T GetById(object id)
        {
            return this.Entities.Find(id);
            //throw new NotImplementedException();
        }

        public void Insert(T model)
        {
            try
            {
                if(model==null)
                {
            throw new ArgumentNullException("model");
                }
                else
                {
                    this.Entities.Add(model);
                    this._context.SaveChanges();
                }
            }
            catch(DbEntityValidationException ex)//DbEntityValidationException从这个类中获取错误信息
            {
                var msg=string.Empty;
                foreach (var errorList in ex.EntityValidationErrors)
                {
                    foreach (var item in errorList.ValidationErrors)
                    {
                     msg+=string.Format("Property:{0} Error:{1}",item.PropertyName,item.ErrorMessage)+Environment.NewLine;
                    }
                }
                     var fail=new Exception(msg,ex);
                    throw fail;
            }

            //throw new NotImplementedException();
        }

        public void Update(T model)
        {
            try
            {
                //model为空,抛空异常
                if (model == null)
                {
                    throw new ArgumentNullException("model");
                }
                else
                {
                    //直接保存了
                    this._context.SaveChanges();
                }
            }
            catch (DbEntityValidationException ex)
            {
                var msg = string.Empty;//记录错误信息
                foreach (var errorList in ex.EntityValidationErrors)
                {
                    foreach (var item in errorList.ValidationErrors)
                    {
                        msg+=string.Format("Property:{0},Error:{1}",item.PropertyName,item.ErrorMessage)+Environment.NewLine;
                    }

                }
                //创建一个异常实例,把错误信息传递进去
                var fail = new Exception(msg, ex);
                throw fail;
            }
            //throw new NotImplementedException();
        }

        public void Delete(T model)
        {
            try
            {
                if (model == null)
                {
                    throw new ArgumentNullException("entity");
                }
                this.Entities.Remove(model);
                this._context.SaveChanges();
            }
            catch (DbEntityValidationException dbEx)
            {
                var msg = string.Empty;

                foreach (var validationErrors in dbEx.EntityValidationErrors)
                {
                    foreach (var validationError in validationErrors.ValidationErrors)
                    {
                        msg += Environment.NewLine + string.Format("Property: {0} Error: {1}", validationError.PropertyName, validationError.ErrorMessage);
                    }
                }
                var fail = new Exception(msg, dbEx);
                throw fail;
                // throw new NotImplementedException();
            }
        }
    }
}
好吧,至此,我们的数据访问层,也就是Ioc.Data就开发完毕了,我们来看下这个层的结构:
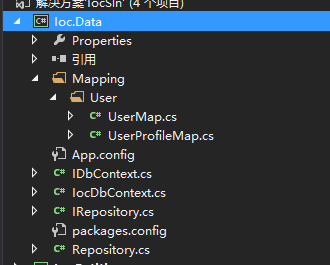
为了,实现依赖倒置原则,我们创建了一个Ioc.Service层,这个层负责与用户层【UI】,和数据访问层【Ioc.Data】进行通信。因为,依赖倒置原则声明:高级的模块不能依赖于低级的模块,所以我们在Ioc.Service项目中创建一个IUserService接口,负责和UI层的交互【增删查改】,下面是IUserService接口的代码:
IUserService接口代码:
using Ioc.Entities.User;
using System;
using System.Collections.Generic;
using System.Linq;
using System.Text;
using System.Threading.Tasks;

namespace Ioc.Service
{
    public interface IUserService
    {
        /// <summary>
        /// 获取所有用户
        /// </summary>
        /// <returns></returns>
        IQueryable<User> GetUsers();

        /// <summary>
        /// 通过Id获取用户
        /// </summary>
        /// <param name="id"></param>
        /// <returns></returns>
        User GetUserById(long id);

        /// <summary>
        /// 新增User
        /// </summary>
        /// <param name="model"></param>
        void InsertUser(User model);

        /// <summary>
        /// 更新User
        /// </summary>
        /// <param name="model"></param>
        void UpdateUser(User model);

        /// <summary>
        /// 删除User
        /// </summary>
        /// <param name="model"></param>
        void DeleteUser(User model);

    }
}
接着就是创建用户操作类,继承IUserService接口,来做增删查改了。
UserService类的代码:
using Ioc.Data;
using Ioc.Entities.User;
using System;
using System.Collections.Generic;
using System.Linq;
using System.Text;
using System.Threading.Tasks;

namespace Ioc.Service
{
   public class UserService:IUserService
    {
       private IRepository<User> userRepository;
       private IRepository<UserProfile> userProfileRepository;
       /// <summary>
       /// 构造函数注入
       /// </summary>
       /// <param name="userRepository"></param>
       /// <param name="userProfileRepository"></param>
       public UserService(IRepository<User> userRepository, IRepository<UserProfile> userProfileRepository)
       {
           this.userRepository = userRepository;
           this.userProfileRepository = userProfileRepository;
       }


       /// <summary>
       /// 获取所有用户
       /// </summary>
       /// <returns></returns>
       public IQueryable<User> GetUsers()
       {
           return this.userRepository.Table;
           //throw new NotImplementedException();//接口方法的默认实现,是抛异常
       }

       /// <summary>
       /// 通过Id获取用户
       /// </summary>
       /// <param name="id"></param>
       /// <returns></returns>
       public User GetUserById(long id)
       {
           return userRepository.GetById(id);
           //throw new NotImplementedException();
       }

       public void InsertUser(User model)
       {
           userRepository.Insert(model);
           //throw new NotImplementedException();
       }

       public void UpdateUser(User model)
       {
           userRepository.Update(model);
           //throw new NotImplementedException();
       }

       public void DeleteUser(User model)
       {
           userRepository.Delete(model);//删除用户
           userProfileRepository.Delete(model.UserProfile);//删除用户详情
           //throw new NotImplementedException();
       }
    }
}
好了,到此为止,我们的服务层也开发完了,我们看下这个层的结构:
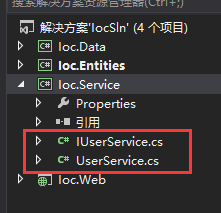
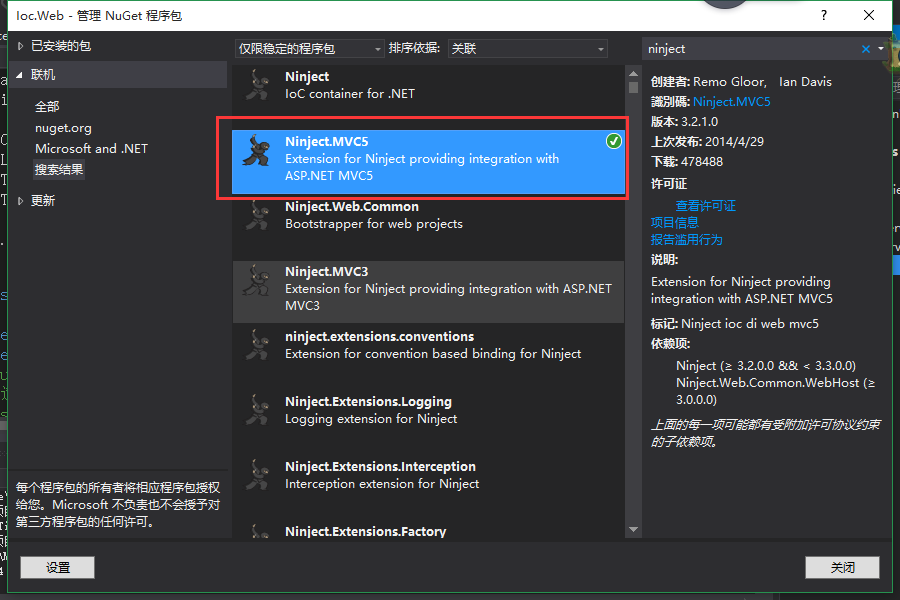
现在就是我们的Ui层了,也就是Ioc.Web,既然文章开头已经说了,要做依赖注入,那么现在就是重头戏了,我们使用Niject注入容器。
The Ninject is a lightweight dependency injection framework for .NET applications. It helps us split our application into a collection of loosely-coupled, highly-cohesive pieces and then glue them back together in a flexible manner. By using Ninject to support our application's architecture, our code will become easier to write, reuse, test and modify. You can learn more about it from: http://www.ninject.org/
翻译:Ninject是一个轻量级的依赖注入.net框架.它帮助我们,把程序拆分成松耦合,高内聚的块,然后又以灵活的方式,把它们组合在一起。通过使用Ninject我们的程序框架,将会变得很容易扩展,测试和修改,你可以上这个网站了解更多关于Ninject的知识。http://www.ninject.org/
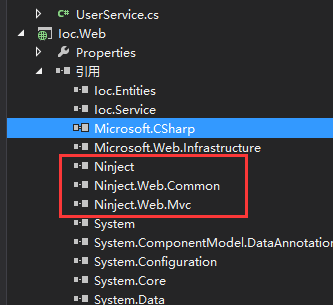
引入Ninject。
引入Ninject.MVC5之后,我们程序中就有了下面的引用:
并且在App_Start文件夹下生成了一个类:

然后我们写注入代码。
注意:1.按理说,Ioc.Web不用引入Ioc.Data项目的引用,但这里配置依赖注入,就还是需要添加Ioc.Data的引用了。
2.并且Ioc.Web项目也要引入EF,配置文件中也要配置连接字符串。
自动生成的NinjectWebCommon类代码:
[assembly: WebActivatorEx.PreApplicationStartMethod(typeof(Ioc.Web.App_Start.NinjectWebCommon), "Start")]
[assembly: WebActivatorEx.ApplicationShutdownMethodAttribute(typeof(Ioc.Web.App_Start.NinjectWebCommon), "Stop")]

namespace Ioc.Web.App_Start
{
    using System;
    using System.Web;

    using Microsoft.Web.Infrastructure.DynamicModuleHelper;

    using Ninject;
    using Ninject.Web.Common;
    using Ioc.Data;
    using Ioc.Service;

    public static class NinjectWebCommon
    {
        private static readonly Bootstrapper bootstrapper = new Bootstrapper();

        /// <summary>
        /// Starts the application
        /// </summary>
        public static void Start()
        {
            DynamicModuleUtility.RegisterModule(typeof(OnePerRequestHttpModule));
            DynamicModuleUtility.RegisterModule(typeof(NinjectHttpModule));
            bootstrapper.Initialize(CreateKernel);
        }

        /// <summary>
        /// Stops the application.
        /// </summary>
        public static void Stop()
        {
            bootstrapper.ShutDown();
        }

        /// <summary>
        /// Creates the kernel that will manage your application.
        /// </summary>
        /// <returns>The created kernel.</returns>
        private static IKernel CreateKernel()
        {
            var kernel = new StandardKernel();
            try
            {
                kernel.Bind<Func<IKernel>>().ToMethod(ctx => () => new Bootstrapper().Kernel);
                kernel.Bind<IHttpModule>().To<HttpApplicationInitializationHttpModule>();

                RegisterServices(kernel);
                return kernel;
            }
            catch
            {
                kernel.Dispose();
                throw;
            }
        }

        /// <summary>
        /// Load your modules or register your services here!
        /// </summary>
        /// <param name="kernel">The kernel.</param>
        private static void RegisterServices(IKernel kernel)
        {
            //这里面写我们的注入代码
            //Bind方法要绑定的服务, To方法指定实现的类
            kernel.Bind<IDbContext>().To<IocDbContext>().InRequestScope();
            //泛型类型配置麻烦点
            kernel.Bind(typeof(IRepository<>)).To(typeof(Repository<>)).InRequestScope();
            kernel.Bind<IUserService>().To<UserService>().InRequestScope();
        }
    }
}
好了,到此为止,我们的程序,大部分都完成了,主要的逻辑。
现在我们来创建一个ViewModel类,用于操作。
UserModel类:
using System;
using System.Collections.Generic;
using System.ComponentModel.DataAnnotations;
using System.Linq;
using System.Web;

namespace Ioc.Web.Models
{
    public class UserModel
    {
        public Int64 ID { get; set; }
        [Display(Name = "First Name")]
        public string FirstName { get; set; }
        [Display(Name = "Last Name")]
        public string LastName { get; set; }
        public string Address { get; set; }
        [Display(Name = "User Name")]
        public string UserName { get; set; }
        public string Email { get; set; }
        public string Password { get; set; }
        [Display(Name = "Added Date")]
        public DateTime AddedDate { get; set; }
    }
}
最后就是控制器中的代码实现,和视图了,快要大功告成了。
using Ioc.Entities.User;
using Ioc.Service;
using Ioc.Web.Models;
using System;
using System.Collections.Generic;
using System.Linq;
using System.Web;
using System.Web.Mvc;

namespace Ioc.Web.Controllers
{
    public class UserController : Controller
    {
        private IUserService userService;

        /// <summary>
        /// 构造函数注入
        /// </summary>
        /// <param name="userService"></param>
        public UserController(IUserService userService)
        {
            this.userService = userService;
        }

        public ActionResult Index()
        {
           IEnumerable<UserModel> users = userService.GetUsers().Select(u => new UserModel
            {
                FirstName = u.UserProfile.FirstName,
                LastName = u.UserProfile.LastName,
                Email = u.Email,
                Address = u.UserProfile.Address,
                ID = u.Id
            });
           return View(users);
        }

        [HttpGet]
        public ActionResult CreateEditUser(int? id)
        {
            UserModel model = new UserModel();
            if (id.HasValue && id != 0)
            {
                User userEntity = userService.GetUserById(id.Value);
                model.FirstName = userEntity.UserProfile.FirstName;
                model.LastName = userEntity.UserProfile.LastName;
                model.Address = userEntity.UserProfile.Address;
                model.Email = userEntity.Email;
                model.UserName = userEntity.UserName;
                model.Password = userEntity.Password;
            }
            return View(model);
        }

        [HttpPost]
        public ActionResult CreateEditUser(UserModel model)
        {
            if (model.ID == 0)
            {
                Ioc.Entities.User.User userEntity = new User
                {
                    UserName = model.UserName,
                    Email = model.Email,
                    Password = model.Password,
                    AddedDate = DateTime.UtcNow,
                    ModifiedDate = DateTime.UtcNow,
                    IP = Request.UserHostAddress,
                    UserProfile = new UserProfile
                    {
                        FirstName = model.FirstName,
                        LastName = model.LastName,
                        Address = model.Address,
                        AddedDate = DateTime.UtcNow,
                        ModifiedDate = DateTime.UtcNow,
                        IP = Request.UserHostAddress
                    }
                };
                userService.InsertUser(userEntity);
                if (userEntity.Id > 0)
                {
                    return RedirectToAction("index");
                }
            }
            else
            {
                Ioc.Entities.User.User userEntity = userService.GetUserById(model.ID);
                userEntity.UserName = model.UserName;
                userEntity.Email = model.Email;
                userEntity.Password = model.Password;
                userEntity.ModifiedDate = DateTime.UtcNow;
                userEntity.IP = Request.UserHostAddress;
                userEntity.UserProfile.FirstName = model.FirstName;
                userEntity.UserProfile.LastName = model.LastName;
                userEntity.UserProfile.Address = model.Address;
                userEntity.UserProfile.ModifiedDate = DateTime.UtcNow;
                userEntity.UserProfile.IP = Request.UserHostAddress;
                userService.UpdateUser(userEntity);
                if (userEntity.Id > 0)
                {
                    return RedirectToAction("index");
                }

            }
            return View(model);
        }

        public ActionResult DetailUser(int? id)
        {
            UserModel model = new UserModel();
            if (id.HasValue && id != 0)
            {
                Ioc.Entities.User.User userEntity = userService.GetUserById(id.Value);
                // model.ID = userEntity.ID;
                model.FirstName = userEntity.UserProfile.FirstName;
                model.LastName = userEntity.UserProfile.LastName;
                model.Address = userEntity.UserProfile.Address;
                model.Email = userEntity.Email;
                model.AddedDate = userEntity.AddedDate;
                model.UserName = userEntity.UserName;
            }
            return View(model);
        }

        public ActionResult DeleteUser(int id)
        {
            UserModel model = new UserModel();
            if (id != 0)
            {
                Ioc.Entities.User.User userEntity = userService.GetUserById(id);
                model.FirstName = userEntity.UserProfile.FirstName;
                model.LastName = userEntity.UserProfile.LastName;
                model.Address = userEntity.UserProfile.Address;
                model.Email = userEntity.Email;
                model.AddedDate = userEntity.AddedDate;
                model.UserName = userEntity.UserName;
            }
            return View(model);
        }


        [HttpPost]
        public ActionResult DeleteUser(int id, FormCollection collection)
        {
            try
            {
                if (id != 0)
                {
                    Ioc.Entities.User.User userEntity = userService.GetUserById(id);
                    userService.DeleteUser(userEntity);
                    return RedirectToAction("Index");
                }
                return View();
            }
            catch
            {
                return View();
            }
        }

    }
}
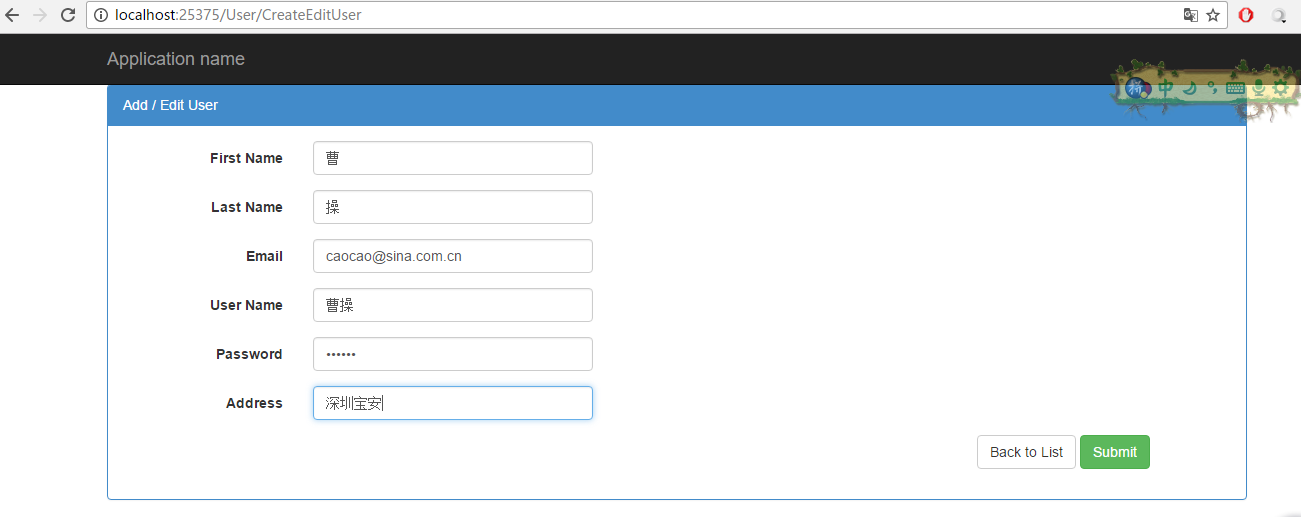
创建和编辑视图:
@model Ioc.Web.Models.UserModel
@{
    ViewBag.Title = "Create Edit User";
}
<div class="book-example panel panel-primary">
    <div class="panel-heading panel-head">Add / Edit User</div>
    <div class="panel-body">
        @using (Html.BeginForm())
        {
            <div class="form-horizontal">
                <div class="form-group">
                    @Html.LabelFor(model => model.FirstName, new { @class = "col-lg-2 control-label" })
                    <div class="col-lg-9">
                        @Html.TextBoxFor(model => model.FirstName, new { @class = "form-control" })
                    </div>
                </div>
                <div class="form-group">
                    @Html.LabelFor(model => model.LastName, new { @class = "col-lg-2 control-label" })
                    <div class="col-lg-9">
                        @Html.TextBoxFor(model => model.LastName, new { @class = "form-control" })
                    </div>
                </div>
                <div class="form-group">
                    @Html.LabelFor(model => model.Email, new { @class = "col-lg-2 control-label" })
                    <div class="col-lg-9">
                        @Html.TextBoxFor(model => model.Email, new { @class = "form-control" })
                    </div>
                </div>
                <div class="form-group">
                    @Html.LabelFor(model => model.UserName, new { @class = "col-lg-2 control-label" })
                    <div class="col-lg-9">
                        @Html.TextBoxFor(model => model.UserName, new { @class = "form-control" })
                    </div>
                </div>
                <div class="form-group">
                    @Html.LabelFor(model => model.Password, new { @class = "col-lg-2 control-label" })
                    <div class="col-lg-9">
                        @Html.PasswordFor(model => model.Password, new { @class = "form-control" })
                    </div>
                </div>
                <div class="form-group">
                    @Html.LabelFor(model => model.Address, new { @class = "col-lg-2 control-label" })
                    <div class="col-lg-9">
                        @Html.TextBoxFor(model => model.Address, new { @class = "form-control" })
                    </div>
                </div>
                <div class="form-group">
                    <div class="col-lg-9"></div>
                    <div class="col-lg-3">
                        @Html.ActionLink("Back to List", "Index", null, new { @class = "btn btn-default" })
                        <button class="btn btn-success" id="btnSubmit" type="submit">
                            Submit
                        </button>
                    </div>
                </div>
            </div>
        }
    </div>
</div>
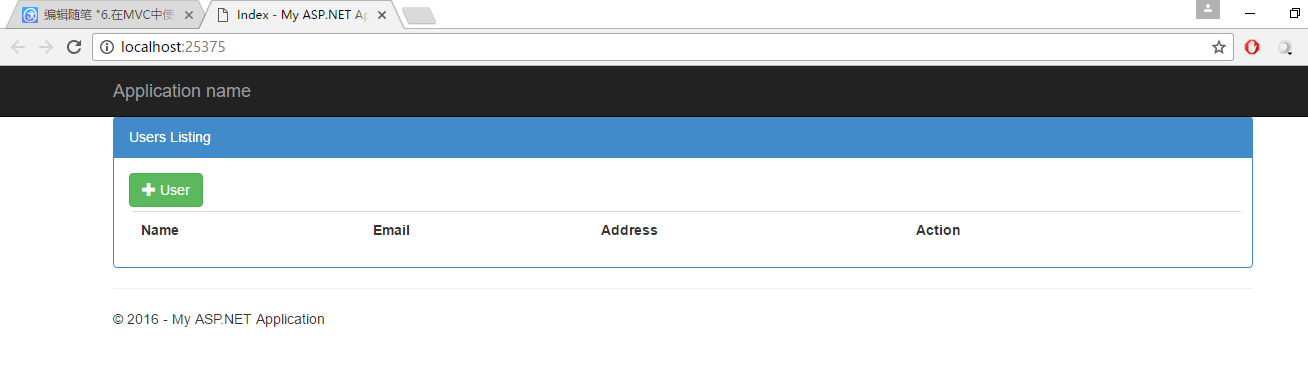
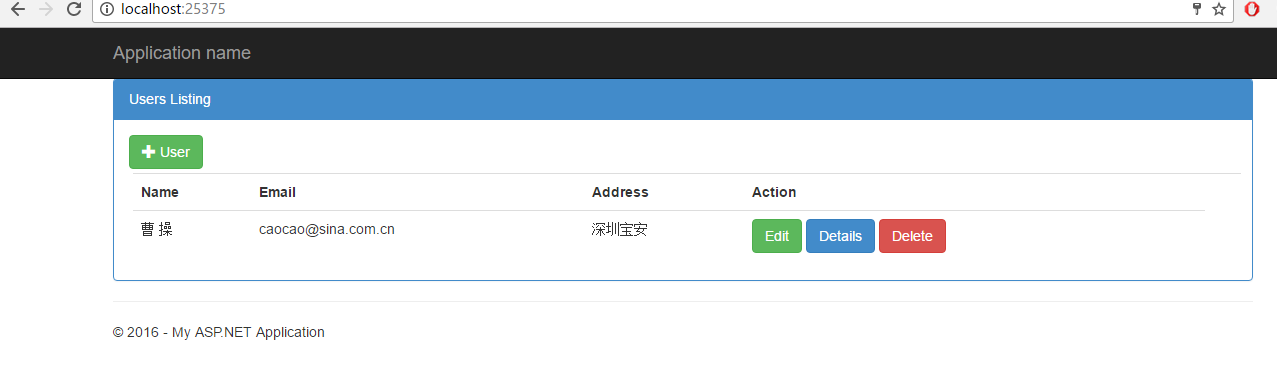
Index视图:
@{
    ViewBag.Title = "Index";
}

@model IEnumerable<Ioc.Web.Models.UserModel>

<div class="book-example panel panel-primary">
    <div class="panel-heading panel-head">Users Listing</div>
    <div class="panel-body">
        <a id="createEditBookModal" href="@Url.Action("CreateEditUser")" class="btn btn-success">
            <span class="glyphicon glyphicon-plus"></span> User
        </a>

        <table class="table" style="margin: 4px">
            <tr>
                <th>
                    @Html.DisplayName("Name")
                </th>
                <th>
                    @Html.DisplayNameFor(model => model.Email)
                </th>
                <th>
                    @Html.DisplayNameFor(model => model.Address)
                </th>
                <th>
                    Action
                </th>
                <th></th>
            </tr>
            @foreach (var item in Model)
            {
                <tr>
                    <td>
                        @Html.DisplayFor(modelItem => item.FirstName) @Html.DisplayFor(modelItem => item.LastName)
                    </td>
                    <td>
                        @Html.DisplayFor(modelItem => item.Email)
                    </td>
                    <td>
                        @Html.DisplayFor(modelItem => item.Address)
                    </td>
                    <td>
                        @Html.ActionLink("Edit", "CreateEditUser", new { id = item.ID }, new { @class = "btn btn-success" })
                        @Html.ActionLink("Details", "DetailUser", new { id = item.ID }, new { @class = "btn btn-primary" })
                        @Html.ActionLink("Delete", "DeleteUser", new { id = item.ID }, new { @class = "btn btn-danger" })
                    </td>
                </tr>
            }

        </table>
    </div>
</div>
Delete视图:
@model Ioc.Web.Models.UserModel

@{
    ViewBag.Title = "Delete User";
}

<div class="book-example panel panel-primary">
    <div class="panel-heading panel-head">Delete User</div>
    <div class="panel-body">
        <h3>Are you sure you want to delete this?</h3>
        <h1>@ViewBag.ErrorMessage</h1>
        <div class="form-horizontal">
            <div class="form-group">
                @Html.LabelFor(model => model.FirstName, new { @class = "col-lg-2 control-label" })
                <div class="col-lg-9">
                    @Html.DisplayFor(model => model.FirstName, new { @class = "form-control" })
                </div>
            </div>

            <div class="form-group">
                @Html.LabelFor(model => model.LastName, new { @class = "col-lg-2 control-label" })
                <div class="col-lg-9">
                    @Html.DisplayFor(model => model.LastName, new { @class = "form-control" })
                </div>
            </div>

            <div class="form-group">
                @Html.LabelFor(model => model.UserName, new { @class = "col-lg-2 control-label" })
                <div class="col-lg-9">
                    @Html.DisplayFor(model => model.UserName, new { @class = "form-control" })
                </div>
            </div>

            <div class="form-group">
                @Html.LabelFor(model => model.Email, new { @class = "col-lg-2 control-label" })
                <div class="col-lg-9">
                    @Html.DisplayFor(model => model.Address, new { @class = "form-control" })
                </div>
            </div>

            <div class="form-group">
                @Html.LabelFor(model => model.Address, new { @class = "col-lg-2 control-label" })
                <div class="col-lg-9">
                    @Html.DisplayFor(model => model.Address, new { @class = "form-control" })
                </div>
            </div>

            @using (Html.BeginForm())
            {
                <div class="form-group">
                    <div class="col-lg-2"></div>
                    <div class="col-lg-9">
                        <input type="submit" value="Delete" class="btn btn-danger" />
                        @Html.ActionLink("Back to List", "Index", null, new { @class = "btn btn-success" })
                    </div>
                </div>
            }
        </div>
    </div>
</div>
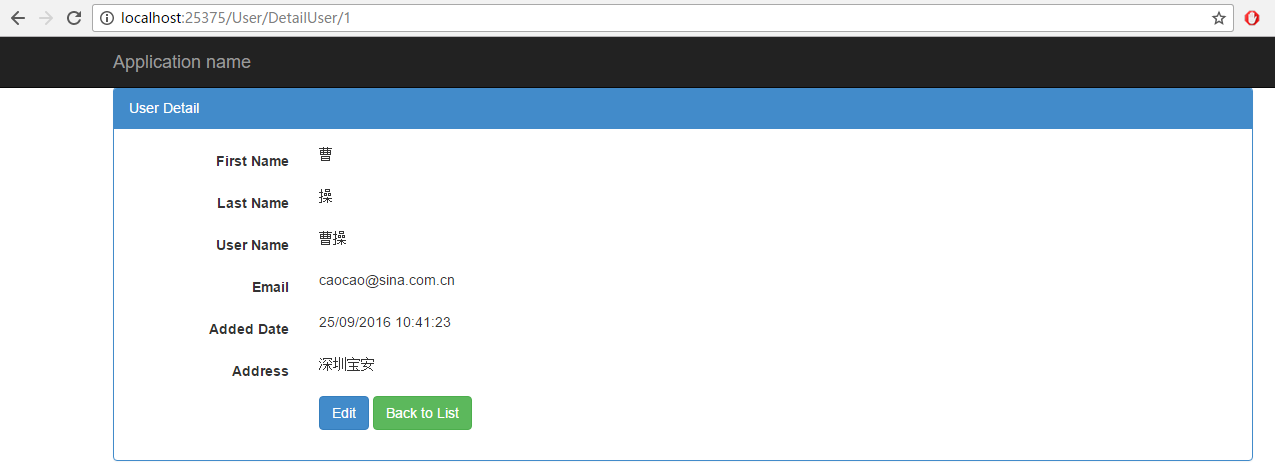
detail视图:
@model Ioc.Web.Models.UserModel

@{
    ViewBag.Title = "User Detail";
}

<div class="book-example panel panel-primary">
    <div class="panel-heading panel-head">User Detail</div>
    <div class="panel-body">
        <div class="form-horizontal">
            <div class="form-group">
                @Html.LabelFor(model => model.FirstName, new { @class = "col-lg-2 control-label" })
                <div class="col-lg-9">
                    @Html.DisplayFor(model => model.FirstName, new { @class = "form-control" })
                </div>
            </div>

            <div class="form-group">
                @Html.LabelFor(model => model.LastName, new { @class = "col-lg-2 control-label" })
                <div class="col-lg-9">
                    @Html.DisplayFor(model => model.LastName, new { @class = "form-control" })
                </div>
            </div>

            <div class="form-group">
                @Html.LabelFor(model => model.UserName, new { @class = "col-lg-2 control-label" })
                <div class="col-lg-9">
                    @Html.DisplayFor(model => model.UserName, new { @class = "form-control" })
                </div>
            </div>

            <div class="form-group">
                @Html.LabelFor(model => model.Email, new { @class = "col-lg-2 control-label" })
                <div class="col-lg-9">
                    @Html.DisplayFor(model => model.Email, new { @class = "form-control" })
                </div>
            </div>

            <div class="form-group">
                @Html.LabelFor(model => model.AddedDate, new { @class = "col-lg-2 control-label" })
                <div class="col-lg-9">
                    @Html.DisplayFor(model => model.AddedDate, new { @class = "form-control" })
                </div>
            </div>

            <div class="form-group">
                @Html.LabelFor(model => model.Address, new { @class = "col-lg-2 control-label" })
                <div class="col-lg-9">
                    @Html.DisplayFor(model => model.Address, new { @class = "form-control" })
                </div>
            </div>

            @using (Html.BeginForm())
            {
                <div class="form-group">
                    <div class="col-lg-2"></div>
                    <div class="col-lg-9">
                        @Html.ActionLink("Edit", "CreateEditUser", new { id = ViewContext.RouteData.Values["id"] }, new { @class = "btn btn-primary" })
                        @Html.ActionLink("Back to List", "Index", null, new { @class = "btn btn-success" })
                    </div>
                </div>
            }
        </div>
    </div>
</div>
效果图:
好了,到此为止,这个系列的文章就学完了,欢迎大家提意见。

 浙公网安备 33010602011771号