Spring学习总结(五)——Spring整合MyBatis(Maven+MySQL)二
接着上一篇博客《Spring整合MyBatis(Maven+MySQL)一》继续。
Spring的开放性和扩张性在J2EE应用领域得到了充分的证明,与其他优秀框架无缝的集成是Spring最为强大的功能。Spring类似电脑的主板,可以将许多部件集成在一起协调工作。
一、在Web项目中启动Spring容器
在Web项目中当Web容器启动时我们要同时启动Spring容器,有三种办法,第一种使用监听器启动,第二使用Servlet启动,第三使用MVC框架的扩展点启动,这里主要选择第一种,因为监听器的启动时机早于Servlet。强烈建议使用办法一。
1.1、使用监听器启动Spring容器
我们需要使用到Spring定义好的一个监听器:org.springframework.web.context.ContextLoaderListener,该监听器在包Spring-web.x.x.x.jar下,修改pom.xml文件,添加依赖:
        <dependency>
            <groupId>org.springframework</groupId>
            <artifactId>spring-web</artifactId>
            <version>${spring.version}</version>
        </dependency>
修改web.xml文件,新增监听器声明,代码如下:
    <listener>
        <description>Spring容器启动监听器</description>
        <listener-class>org.springframework.web.context.ContextLoaderListener</listener-class>
    </listener>
当监听器在启动Spring容器时会自动查找Web-INF/lib目录下名为applicationContext.xml配置文件,当然也可以设置参数指定配置文件的具体位置,特别是有多个配置文件的情况,指定办法如下:
    <listener>
        <description>Spring容器加载监听器</description>
        <listener-class>org.springframework.web.context.ContextLoaderListener</listener-class>
    </listener>
    <context-param>
        <param-name>contextConfigLocation</param-name>
        <param-value>classpath*:applicationContext.xml</param-value>
    </context-param>
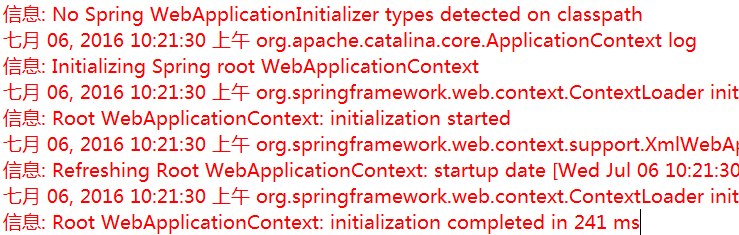
如果有多个配置文件则可以通过逗号分开。怎么判断是否启动成功,则可以参考本文第二点,获得ApplicationContext实例,也可以查看tomcat启动时的信息,如果没有出现错误且能找到如下说明基本成功。
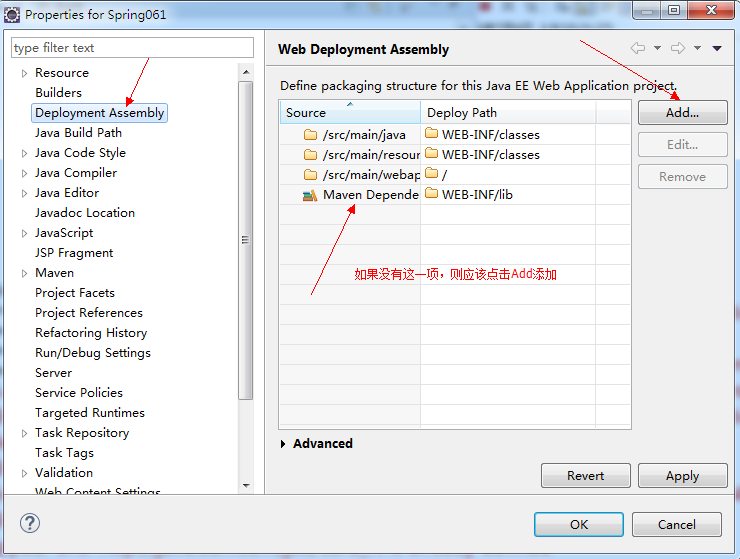
启动失败也有几种可能,如applicationContext.xml文件的路径错误;找不到类ContextLoaderListener;如果提示找不到类,很可能是因为没有将Maven依赖的包发布出去,可以在项目属性中设置,如下所示:
1.2、使用Servlet方式启动Spring容器
方法与1.1基本相同,只是配置有小的区别,修改web.xml的具体内容如下:
<servlet>
    <servlet-name>context</servlet-name>
    <servlet-class>org.springframework.web.context.ContextLoaderServlet</servlet-class>
    <load-on-startup>1</load-on-startup>
</ servlet >
<context-param>
    <param-name>contextConfigLocation</param-name>
       <!-- 多个配置文件之间以“,”隔开 -->
    <param-value>
           classpath:beans1.xml,classpath:beans2.xml...
     </param-value>
  </context-param>
需要注意的是两者都是继承类ContextLoader,但从Spring3.0开始已经移除了ContextLoaderServlet,用ContextLoaderListener的方式替代。第3种启动方式只有在特定的框架中才有效,所以不多用。
二、获取ApplicationContext实例
当web容器启动时Spring容器如果也成功启动了,则可以在整个web应用程序中获得ApplicationContext完成IOC、AOP及Spring的其它功能,获得ApplicationContext的常用方法有两种:
2.1、使用工具类WebApplicationContextUtils获得Spring容器
2.1.1、定义一个Service类,BookTypeService代码如下:
package com.zhangguo.Spring61.service;

import java.util.List;

import javax.annotation.Resource;

import org.springframework.stereotype.Service;
import com.zhangguo.Spring61.entities.BookType;
import com.zhangguo.Spring61.mapping.BookTypeDAO;

/*
 * 图书类型服务
 */
@Service
public class BookTypeService {

    @Resource
    BookTypeDAO bookTypeDAO;

    public List<BookType> getAllBookTypes() {
        System.err.println("一些被省去的业务");
        return bookTypeDAO.getAllBookTypes();
    }
}
@Service表示Spring容器将自动管理BookTypeService实例,@Resource表示自动装配,会自动从Spring容器中找到类型为BookTypeDAO的Bean完成bookTypeDAO字段的初始化。
2.1.2、定义一个Servlet,BookTypeList Servlet代码如下:
package com.zhangguo.Spring61.action;

import java.io.IOException;
import java.io.PrintWriter;

import javax.servlet.ServletException;
import javax.servlet.annotation.WebServlet;
import javax.servlet.http.HttpServlet;
import javax.servlet.http.HttpServletRequest;
import javax.servlet.http.HttpServletResponse;

import org.springframework.web.context.WebApplicationContext;
import org.springframework.web.context.support.WebApplicationContextUtils;

import com.zhangguo.Spring61.service.BookTypeService;

@WebServlet("/BookTypeList.do")
public class BookTypeList extends HttpServlet {
    private static final long serialVersionUID = 1L;

     BookTypeService bookTypeService;

    @Override
    public void init() throws ServletException {
      //在当前上下文中获得Spring容器
      WebApplicationContext ctx=WebApplicationContextUtils.getWebApplicationContext(getServletContext());
      //从容器中获得bean
      bookTypeService=ctx.getBean(BookTypeService.class);
    }

    protected void doGet(HttpServletRequest request, HttpServletResponse response) throws ServletException, IOException {
        PrintWriter writer=response.getWriter();
        writer.print(bookTypeService.getAllBookTypes().size());
    }

    protected void doPost(HttpServletRequest request, HttpServletResponse response) throws ServletException, IOException {
        doGet(request, response);
    }

}
在Servlet中我们重写了父类的init方法,注意如果重写带参数的那个init方法init(ServletConfig config),则一定要记得调用父类的init方法完成参数的初始化,即不要删除super.init(config),如果不这样将获不到servlet下上文;在init方法中我们通过WebApplicationContextUtils类获得得了Spring容器。
此时的applicationContext.xml文件如下:


<?xml version="1.0" encoding="UTF-8"?>
<beans xmlns="http://www.springframework.org/schema/beans"
    xmlns:xsi="http://www.w3.org/2001/XMLSchema-instance" xmlns:p="http://www.springframework.org/schema/p"
    xmlns:aop="http://www.springframework.org/schema/aop" xmlns:context="http://www.springframework.org/schema/context"
    xsi:schemaLocation="http://www.springframework.org/schema/beans
        http://www.springframework.org/schema/beans/spring-beans.xsd
        http://www.springframework.org/schema/context
        http://www.springframework.org/schema/context/spring-context-4.3.xsd
        http://www.springframework.org/schema/aop
        http://www.springframework.org/schema/aop/spring-aop-4.3.xsd">

    <!--属性占位文件引入,可以通过${属性名}获得属性文件中的内容 -->
    <context:property-placeholder location="classpath:db.properties" />

    <!--定义一个jdbc数据源,创建一个驱动管理数据源的bean -->
    <bean id="jdbcDataSource" class="com.mchange.v2.c3p0.ComboPooledDataSource"
        destroy-method="close">
        <property name="driverClass" value="${jdbc.driver}" />
        <property name="jdbcUrl" value="${jdbc.url}" />
        <property name="user" value="${jdbc.uid}" />
        <property name="password" value="${jdbc.pwd}" />
        <property name="acquireIncrement" value="5"></property>
        <property name="initialPoolSize" value="10"></property>
        <property name="minPoolSize" value="5"></property>
        <property name="maxPoolSize" value="20"></property>
    </bean>

    <!--定义一个jdbc数据源,创建一个驱动管理数据源的bean -->
    <bean id="jdbcDataSourceBak"
        class="org.springframework.jdbc.datasource.DriverManagerDataSource">
        <property name="driverClassName" value="${jdbc.driver}" />
        <property name="url" value="${jdbc.url}" />
        <property name="username" value="${jdbc.uid}" />
        <property name="password" value="${jdbc.pwd}" />
    </bean>

    <!--创建一个sql会话工厂bean,指定数据源 -->
    <bean id="sqlSessionFactory" class="org.mybatis.spring.SqlSessionFactoryBean">
        <!-- 指定数据源 -->
        <property name="dataSource" ref="jdbcDataSource" />
        <!--类型别名包,默认引入com.zhangguo.Spring61.entities下的所有类 -->
        <property name="typeAliasesPackage" value="com.zhangguo.Spring61.entities"></property>
        <!--指定sql映射xml文件的路径 -->
        <property name="mapperLocations"
            value="classpath:com/zhangguo/Spring61/mapping/*Mapper.xml"></property>
    </bean>

    <!--自动扫描映射接口 -->
    <bean class="org.mybatis.spring.mapper.MapperScannerConfigurer">
        <!-- 指定sql会话工厂,在上面配置过的 -->
        <property name="sqlSessionFactoryBeanName" value="sqlSessionFactory"></property>
        <!-- 指定基础包,即自动扫描com.zhangguo.Spring61.mapping这个包以及它的子包下的所有映射接口类 -->
        <property name="basePackage" value="com.zhangguo.Spring61.mapping"></property>
    </bean>

    <!-- 创建一个sqlSession对象 -->
    <bean id="sqlSession" class="org.mybatis.spring.SqlSessionTemplate">
        <constructor-arg index="0" ref="sqlSessionFactory" />
    </bean>

    <!--自动扫描组件 -->
    <context:component-scan base-package="com.zhangguo.Spring61">
        <context:exclude-filter type="aspectj" expression="com.zhangguo.Spring61.dao.*"/>
    </context:component-scan>
    <aop:aspectj-autoproxy proxy-target-class="true"></aop:aspectj-autoproxy>
</beans>
运行结果:

2.2、实现接口ApplicationContextAware
当一个类实现了org.springframework.context.ApplicationContextAware接口时且实现该接口的类被Spring容器管理,则Spring容器会自动意识到需要调用接口中的方法setApplicationContext设置当前的Spring上下文。通俗说实现这个接口可以方便获得Spring上下文。该接口如下:
/*
 * Copyright 2002-2012 the original author or authors.
 *
 * Licensed under the Apache License, Version 2.0 (the "License");
 * you may not use this file except in compliance with the License.
 * You may obtain a copy of the License at
 *
 *      http://www.apache.org/licenses/LICENSE-2.0
 *
 * Unless required by applicable law or agreed to in writing, software
 * distributed under the License is distributed on an "AS IS" BASIS,
 * WITHOUT WARRANTIES OR CONDITIONS OF ANY KIND, either express or implied.
 * See the License for the specific language governing permissions and
 * limitations under the License.
 */

package org.springframework.context;

import org.springframework.beans.BeansException;
import org.springframework.beans.factory.Aware;

/**
 * Interface to be implemented by any object that wishes to be notified
 * of the {@link ApplicationContext} that it runs in.
 *
 * <p>Implementing this interface makes sense for example when an object
 * requires access to a set of collaborating beans. Note that configuration
 * via bean references is preferable to implementing this interface just
 * for bean lookup purposes.
 *
 * <p>This interface can also be implemented if an object needs access to file
 * resources, i.e. wants to call {@code getResource}, wants to publish
 * an application event, or requires access to the MessageSource. However,
 * it is preferable to implement the more specific {@link ResourceLoaderAware},
 * {@link ApplicationEventPublisherAware} or {@link MessageSourceAware} interface
 * in such a specific scenario.
 *
 * <p>Note that file resource dependencies can also be exposed as bean properties
 * of type {@link org.springframework.core.io.Resource}, populated via Strings
 * with automatic type conversion by the bean factory. This removes the need
 * for implementing any callback interface just for the purpose of accessing
 * a specific file resource.
 *
 * <p>{@link org.springframework.context.support.ApplicationObjectSupport} is a
 * convenience base class for application objects, implementing this interface.
 *
 * <p>For a list of all bean lifecycle methods, see the
 * {@link org.springframework.beans.factory.BeanFactory BeanFactory javadocs}.
 *
 * @author Rod Johnson
 * @author Juergen Hoeller
 * @author Chris Beams
 * @see ResourceLoaderAware
 * @see ApplicationEventPublisherAware
 * @see MessageSourceAware
 * @see org.springframework.context.support.ApplicationObjectSupport
 * @see org.springframework.beans.factory.BeanFactoryAware
 */
public interface ApplicationContextAware extends Aware {

    /**
     * Set the ApplicationContext that this object runs in.
     * Normally this call will be used to initialize the object.
     * <p>Invoked after population of normal bean properties but before an init callback such
     * as {@link org.springframework.beans.factory.InitializingBean#afterPropertiesSet()}
     * or a custom init-method. Invoked after {@link ResourceLoaderAware#setResourceLoader},
     * {@link ApplicationEventPublisherAware#setApplicationEventPublisher} and
     * {@link MessageSourceAware}, if applicable.
     * @param applicationContext the ApplicationContext object to be used by this object
     * @throws ApplicationContextException in case of context initialization errors
     * @throws BeansException if thrown by application context methods
     * @see org.springframework.beans.factory.BeanInitializationException
     */
    void setApplicationContext(ApplicationContext applicationContext) throws BeansException;

}
为了达到目的,我们现在创建一个名为CtxUtil.java的类,实现该接口,代如下:
package com.zhangguo.Spring61.action;

import org.springframework.beans.BeansException;
import org.springframework.context.ApplicationContext;
import org.springframework.context.ApplicationContextAware;
import org.springframework.stereotype.Component;

@Component
public class CtxUtil implements ApplicationContextAware {

    public static ApplicationContext springCtx;

    @Override
    public void setApplicationContext(ApplicationContext applicationContext) throws BeansException {
        springCtx=applicationContext;
    }

    //根据名称获得容器中的bean
    public static Object getBean(String name){
        return springCtx.getBean(name);
    }

    //根据类型获得容器中的bean
    public static <T> T getBean(Class<T> clazz){
        return springCtx.getBean(clazz);
    }

}
为了让Spring容器在加载时能扫描到该类,我们在类上注解了@Component;其实也可以直接在ApplicationContext.xml中新增一个bean,如下所示:
    <bean id="ctxUtil" class="com.zhangguo.Spring61.action.CtxUtil"></bean>

    <!--自动扫描组件 -->
    <context:component-scan base-package="com.zhangguo.Spring61">
        <context:exclude-filter type="aspectj" expression="com.zhangguo.Spring61.dao.*"/>
    </context:component-scan>
测试代码如下:
package com.zhangguo.Spring61.action;

import java.io.IOException;
import java.io.PrintWriter;

import javax.servlet.ServletConfig;
import javax.servlet.ServletException;
import javax.servlet.annotation.WebServlet;
import javax.servlet.http.HttpServlet;
import javax.servlet.http.HttpServletRequest;
import javax.servlet.http.HttpServletResponse;

import org.springframework.web.context.WebApplicationContext;
import org.springframework.web.context.support.WebApplicationContextUtils;

import com.zhangguo.Spring61.service.BookTypeService;

@WebServlet("/BookTypeSize.do")
public class BookTypeSize extends HttpServlet {
    private static final long serialVersionUID = 1L;

     BookTypeService bookTypeService;

    @Override
    public void init() throws ServletException {
      //从容器中获得bean
      bookTypeService=CtxUtil.getBean(BookTypeService.class);
    }

    protected void doGet(HttpServletRequest request, HttpServletResponse response) throws ServletException, IOException {
        PrintWriter writer=response.getWriter();
        writer.print(bookTypeService.getAllBookTypes().size());
    }

    protected void doPost(HttpServletRequest request, HttpServletResponse response) throws ServletException, IOException {
        doGet(request, response);
    }

}
运行结果同2.1。
三、基于注解的声明式事务管理配置
MyBatis-Spring利用了存在于Spring中的DataSourceTransactionManager管理事务。
一旦Spring的PlatformTransactionManager配置好了,你可以在Spring中以你通常的做法来配置事务。@Transactional注解和AOP方式的配置都是支持的。在事务处理期间,一个单独的SqlSession对象将会被创建和使用。当事务完成时,这个session会以合适的方式提交或回滚。一旦事务创建之后,MyBatis-Spring将会透明的管理事务。在你的DAO类中就不需要额外的代码了。
我们先使用一个简单的示例,证明没有事务时的状态:
        PrintWriter writer=response.getWriter();
        BookType entity1=new BookType();
        entity1.setTypeName("中国文学");

        BookType entity2=new BookType();
        entity1.setTypeName("外国文学");  //请注意这是是entity1
        writer.print(bookTypeService.addDouble(entity1, entity2));
当运行时会发现有异常,因为entity2的typeName属性是null,报异常了;按照事务的特性两条记录要么都添加成功要么都添加不成功。但查看数据库会发现,有一个对象的数据被添加成功了,另一个则失败了,这不符合原子特性。
为了解决上面的问题,我们引入Spring中的事务与MyBatis-Spring的事务管理。一定要记得添加Spring-tx.jar的依赖。修改ApplicationContext.xml如下所示:
<?xml version="1.0" encoding="UTF-8"?>
<beans xmlns="http://www.springframework.org/schema/beans"
    xmlns:xsi="http://www.w3.org/2001/XMLSchema-instance"
    xmlns:p="http://www.springframework.org/schema/p"
    xmlns:aop="http://www.springframework.org/schema/aop"
    xmlns:context="http://www.springframework.org/schema/context"
    xmlns:tx="http://www.springframework.org/schema/tx"
    xsi:schemaLocation="http://www.springframework.org/schema/beans
        http://www.springframework.org/schema/beans/spring-beans.xsd
        http://www.springframework.org/schema/context
        http://www.springframework.org/schema/context/spring-context-4.3.xsd
        http://www.springframework.org/schema/aop
        http://www.springframework.org/schema/aop/spring-aop-4.3.xsd
        http://www.springframework.org/schema/tx
        http://www.springframework.org/schema/tx/spring-tx-4.3.xsd">

    <!--属性占位文件引入,可以通过${属性名}获得属性文件中的内容 -->
    <context:property-placeholder location="classpath:db.properties" />

    <!--定义一个jdbc数据源,创建一个驱动管理数据源的bean -->
    <bean id="jdbcDataSource" class="com.mchange.v2.c3p0.ComboPooledDataSource"
        destroy-method="close">
        <property name="driverClass" value="${jdbc.driver}" />
        <property name="jdbcUrl" value="${jdbc.url}" />
        <property name="user" value="${jdbc.uid}" />
        <property name="password" value="${jdbc.pwd}" />
        <property name="acquireIncrement" value="5"></property>
        <property name="initialPoolSize" value="10"></property>
        <property name="minPoolSize" value="5"></property>
        <property name="maxPoolSize" value="20"></property>
    </bean>

    <!--定义一个jdbc数据源,创建一个驱动管理数据源的bean -->
    <bean id="jdbcDataSourceBak"
        class="org.springframework.jdbc.datasource.DriverManagerDataSource">
        <property name="driverClassName" value="${jdbc.driver}" />
        <property name="url" value="${jdbc.url}" />
        <property name="username" value="${jdbc.uid}" />
        <property name="password" value="${jdbc.pwd}" />
    </bean>

    <!--创建一个sql会话工厂bean,指定数据源 -->
    <bean id="sqlSessionFactory" class="org.mybatis.spring.SqlSessionFactoryBean">
        <!-- 指定数据源 -->
        <property name="dataSource" ref="jdbcDataSource" />
        <!--类型别名包,默认引入com.zhangguo.Spring61.entities下的所有类 -->
        <property name="typeAliasesPackage" value="com.zhangguo.Spring61.entities"></property>
        <!--指定sql映射xml文件的路径 -->
        <property name="mapperLocations"
            value="classpath:com/zhangguo/Spring61/mapping/*Mapper.xml"></property>
    </bean>

    <!--自动扫描映射接口 -->
    <bean class="org.mybatis.spring.mapper.MapperScannerConfigurer">
        <!-- 指定sql会话工厂,在上面配置过的 -->
        <property name="sqlSessionFactoryBeanName" value="sqlSessionFactory"></property>
        <!-- 指定基础包,即自动扫描com.zhangguo.Spring61.mapping这个包以及它的子包下的所有映射接口类 -->
        <property name="basePackage" value="com.zhangguo.Spring61.mapping"></property>
    </bean>

    <!-- 创建一个sqlSession对象 -->
    <bean id="sqlSession" class="org.mybatis.spring.SqlSessionTemplate">
        <constructor-arg index="0" ref="sqlSessionFactory" />
    </bean>

    <bean id="ctxUtil" class="com.zhangguo.Spring61.action.CtxUtil"></bean>

    <!--声明式事务管理 -->
    <bean id="txManager" class="org.springframework.jdbc.datasource.DataSourceTransactionManager">
        <property name="dataSource" ref="jdbcDataSource"></property>
    </bean>
    <!--声明支持使用注解管理事务 -->
    <tx:annotation-driven transaction-manager="txManager"/>

    <!--自动扫描组件 -->
    <context:component-scan base-package="com.zhangguo.Spring61">
        <context:exclude-filter type="aspectj" expression="com.zhangguo.Spring61.dao.*"/>
    </context:component-scan>
    <aop:aspectj-autoproxy proxy-target-class="true"></aop:aspectj-autoproxy>
</beans>
请注意,加粗字体的部分是新增的。 修改后的BookTypeDAO接口如下:
package com.zhangguo.Spring61.mapping;

import java.util.List;

import com.zhangguo.Spring61.entities.BookType;

/**
 * 图书类型数据访问接口
 *
 */
public interface BookTypeDAO {
    /*
     * 获得所有图书类型
     */
    public List<BookType> getAllBookTypes();

    /**
     * 添加新的图书类型
     */
    public int add(BookType entity);
}
修改后的BookTypeMapper.xml映射文件如下:
<?xml version="1.0" encoding="UTF-8"?>
<!DOCTYPE mapper PUBLIC "-//mybatis.org//DTD Mapper 3.0//EN" "http://mybatis.org/dtd/mybatis-3-mapper.dtd">
<!--命名空间应该是对应接口的包名+类名 -->
<mapper namespace="com.zhangguo.Spring61.mapping.BookTypeDAO">
    <!--id应该是接口中的方法,结果类型如没有配置别名则应该使用全名称 -->
    <select id="getAllBookTypes" resultType="BookType">
        select id,typeName from booktypes
    </select>

    <insert id="add" parameterType="BookType">
        insert into booktypes(typeName) values(#{typeName})
    </insert>
</mapper>
修改后的BookTypeService类如下:
package com.zhangguo.Spring61.service;

import java.util.List;
import javax.annotation.Resource;
import org.springframework.stereotype.Service;
import org.springframework.transaction.annotation.Transactional;
import com.zhangguo.Spring61.entities.BookType;
import com.zhangguo.Spring61.mapping.BookTypeDAO;

/*
 * 图书类型服务
 */
@Service
public class BookTypeService {

    @Resource
    BookTypeDAO bookTypeDAO;

    public List<BookType> getAllBookTypes() {
        System.err.println("一些被省去的业务");
        return bookTypeDAO.getAllBookTypes();
    }

    @Transactional
    public int addDouble(BookType entity1,BookType entity2){
        int rows=0;
        rows+=bookTypeDAO.add(entity1);
        rows+=bookTypeDAO.add(entity2);
        return rows;
    }
}
在方法addDouble上增加了一个注解@Transactional,用于显式声明该方法需要事务处理,如果把该注解移除则不会拥有事务特性。
测试的Servlet代码如下:
package com.zhangguo.Spring61.action;

import java.io.IOException;
import java.io.PrintWriter;

import javax.servlet.ServletConfig;
import javax.servlet.ServletException;
import javax.servlet.annotation.WebServlet;
import javax.servlet.http.HttpServlet;
import javax.servlet.http.HttpServletRequest;
import javax.servlet.http.HttpServletResponse;

import org.springframework.web.context.WebApplicationContext;
import org.springframework.web.context.support.WebApplicationContextUtils;

import com.zhangguo.Spring61.entities.BookType;
import com.zhangguo.Spring61.service.BookTypeService;

@WebServlet("/BookTypeAdd.do")
public class BookTypeAdd extends HttpServlet {
    private static final long serialVersionUID = 1L;

     BookTypeService bookTypeService;

    @Override
    public void init() throws ServletException {
      //从容器中获得bean
      bookTypeService=CtxUtil.getBean(BookTypeService.class);
    }

    protected void doGet(HttpServletRequest request, HttpServletResponse response) throws ServletException, IOException {
        PrintWriter writer=response.getWriter();
        BookType entity1=new BookType();
        entity1.setTypeName("量子力学");

        BookType entity2=new BookType();
        entity1.setTypeName("天体物理");  //请注意这是是entity1,entity2的typeName属性为空
        writer.print(bookTypeService.addDouble(entity1, entity2));
    }

    protected void doPost(HttpServletRequest request, HttpServletResponse response) throws ServletException, IOException {
        doGet(request, response);
    }

}
entity2因为没有typeName属性,添加时会异常,有事务存在,则数据库并没有变化,entity1与entity2都未添加到数据库中。
除了使用声明式事务管理,也可以使用AOP进行事务拦截,参考代码如下:
    <!-- 拦截器方式配置事物 -->
    <tx:advice id="transactionAdvice" transaction-manager="transactionManager">
        <tx:attributes>
            <tx:method name="add*" propagation="REQUIRED" />
            <tx:method name="append*" propagation="REQUIRED" />
            <tx:method name="insert*" propagation="REQUIRED" />
            <tx:method name="save*" propagation="REQUIRED" />
            <tx:method name="update*" propagation="REQUIRED" />
            <tx:method name="modify*" propagation="REQUIRED" />
            <tx:method name="edit*" propagation="REQUIRED" />
            <tx:method name="delete*" propagation="REQUIRED" />
            <tx:method name="remove*" propagation="REQUIRED" />
            <tx:method name="repair" propagation="REQUIRED" />
            <tx:method name="delAndRepair" propagation="REQUIRED" />
            <tx:method name="get*" propagation="SUPPORTS" />
            <tx:method name="find*" propagation="SUPPORTS" />
            <tx:method name="load*" propagation="SUPPORTS" />
            <tx:method name="search*" propagation="SUPPORTS" />
            <tx:method name="datagrid*" propagation="SUPPORTS" />
            <tx:method name="*" propagation="SUPPORTS" />
        </tx:attributes>
    </tx:advice>
    <aop:config>
        <aop:pointcut id="transactionPointcut" expression="execution(* com.service..*Impl.*(..))" />
        <aop:advisor pointcut-ref="transactionPointcut" advice-ref="transactionAdvice" />
    </aop:config>
小结:声明式事务管理需要根据实际情况编码注解方法要不要事务处理,拦截方式配置事务则是根据方法名统一处理,一般查询是不需要事务参与的。在上面的配置中REQUIRED则表示需要事务支持,而SUPPORTS则不需要事务支持。

 浙公网安备 33010602011771号