
Ubuntu 12.04 Server OpenStack Havana多节点(OVS+GRE)安装
1.需求
| 节点角色 | NICs |
| 控制节点 | eth0(10.10.10.51)eth1(192.168.100.51) |
| 网络节点 | eth0(10.10.10.52)eth1(10.20.20.52)eth2(192.168.100.52) |
| 计算结点 | eth0(10.10.10.53)eth1(10.20.20.53) |
注意1:你总是可以使用dpkg -s <packagename>确认你是用的是Havana版本
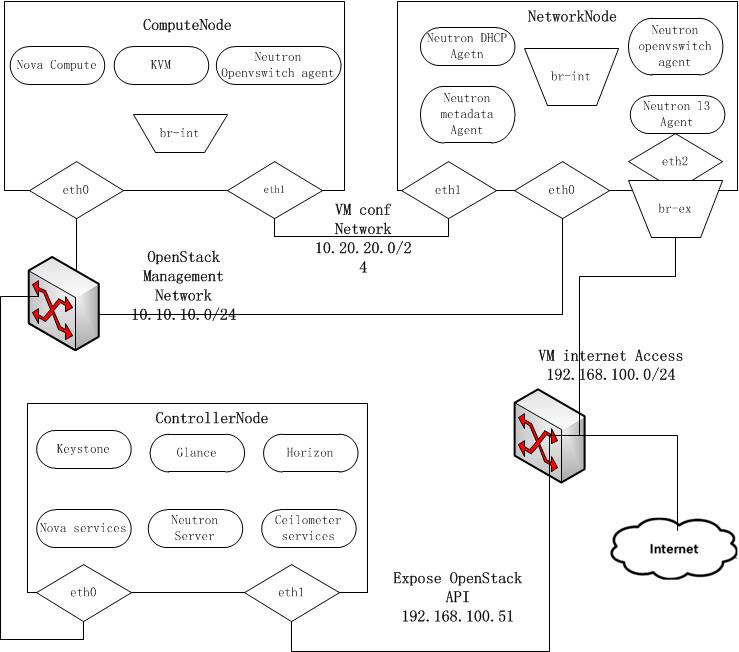
注意2:这个是当前网络架构
2.控制节点
2.1.准备Ubuntu-
安装好Ubuntu12.04 server 64bits后,进入root模式进行安装。
sudo su -
- 添加Havana仓库:
#apt-get install python-software-properties
#add-apt-repository cloud-archive:havana
- 升级系统:
#apt-get update
#apt-get upgrade
#apt-get dist-upgrade
-
配置网卡编辑/etc/network/interfaces:
#For Exposing OpenStack API over the internet
auto eth1
iface eth1 inet static
address 192.168.100.51
netmask 255.255.255.0
gateway 192.168.100.1
dns-nameservers 8.8.8.8

#Not internet connected(used for OpenStack management)
auto eth0
iface eth0 inet static
address 10.10.10.52
netmask 255.255.255.0
- 重启网络服务
#/etc/init.d/networking restart
-
开启路由转发:
sed -i 's/#net.ipv4.ip_forward=1/net.ipv4.ip_forward=1/' /etc/sysctl.conf
sysctl -p
- 安装MySQL并为root用户设置密码:
#apt-get install mysql-server python-mysqldb
- 配置mysql监听所有网络请求
#sed -i 's/127.0.0.1/0.0.0.0/g' /etc/mysql/my.cnf
#service mysql restart
2.4安装RabbitMQ和NTP
- 安装RabbitMQ:
#apt-get install rabbitmq-server
- 安装NTP服务
#apt-get install ntp
- 创建数据库
#mysql -u root -p

#Keystone
CREATE DATABASE keystone;
GRANT ALL ON keystone.* TO 'keystoneUser'@'%' IDENTIFIED BY 'keystonePass';
#Glance
CREATE DATABASE glance;
GRANT ALL ON glance.* TO 'glanceUser'@'%' IDENTIFIED BY 'glancePass';
#Neutron
CREATE DATABASE neutron;
GRANT ALL ON neutron.* TO 'neutronUser'@'%' IDENTIFIED BY 'neutronPass';
#Nova
CREATE DATABASE nova;
GRANT ALL ON nova.* TO 'novaUser'@'%' IDENTIFIED BY 'novaPass';
#Cinder
CREATE DATABASE cinder;
GRANT ALL ON cinder.* TO 'cinderUser'@'%' IDENTIFIED BY 'cinderPass';
#Swift
CREATE DATABASE swift;
GRANT ALL ON swift.* TO 'swiftUser'@'%' IDENTIFIED BY 'swiftPass';

quit;
2.6.配置Keystone
-
安装keystone软件包:
apt-get install keystone
-
在/etc/keystone/keystone.conf中设置连接到新创建的数据库:
connection=mysql://keystone:keystonePass@10.10.10.51/keystone
-
重启身份认证服务并同步数据库:
service keystone restart
keystone-manage db_dync
#!/bin/sh
#
# Keystone Datas
#
# Description: Fill Keystone with datas.
#


# Please set 13, 30 lines of variables
ADMIN_PASSWORD=${ADMIN_PASSWORD:-admin_pass}
SERVICE_PASSWORD=${SERVICE_PASSWORD:-service_pass}
export SERVICE_TOKEN="ADMIN"
export SERVICE_ENDPOINT="http://10.10.10.51:35357/v2.0"
SERVICE_TENANT_NAME=${SERVICE_TENANT_NAME:-service}
KEYSTONE_REGION=RegionOne
# If you need to provide the service, please to open keystone_wlan_ip and swift_wlan_ip
# of course you are a multi-node architecture, and swift service
# corresponding ip address set the following variables
KEYSTONE_IP="10.10.10.51"
EXT_HOST_IP="192.168.100.51"
SWIFT_IP="10.10.10.51"
COMPUTE_IP=$KEYSTONE_IP
EC2_IP=$KEYSTONE_IP
GLANCE_IP=$KEYSTONE_IP
VOLUME_IP=$KEYSTONE_IP
NEUTRON_IP=$KEYSTONE_IP
CEILOMETER=$KEYSTONE_IP

get_id () {
    echo `$@ | awk '/ id / { print $4 }'`
}

# Create Tenants
ADMIN_TENANT=$(get_id keystone --token $SERVICE_TOKEN --endpoint $SERVICE_ENDPOINT tenant-create --name=admin)
SERVICE_TENANT=$(get_id keystone --token $SERVICE_TOKEN --endpoint $SERVICE_ENDPOINT tenant-create --name=$SERVICE_TENANT_NAME)
DEMO_TENANT=$(get_id keystone --token $SERVICE_TOKEN --endpoint $SERVICE_ENDPOINT tenant-create --name=demo)
INVIS_TENANT=$(get_id keystone --token $SERVICE_TOKEN --endpoint $SERVICE_ENDPOINT tenant-create --name=invisible_to_admin)

# Create Users
ADMIN_USER=$(get_id keystone --token $SERVICE_TOKEN --endpoint $SERVICE_ENDPOINT user-create --name=admin --pass="$ADMIN_PASSWORD" --email=admin@domain.com)
DEMO_USER=$(get_id keystone --token $SERVICE_TOKEN --endpoint $SERVICE_ENDPOINT user-create --name=demo --pass="$ADMIN_PASSWORD" --email=demo@domain.com)

# Create Roles
ADMIN_ROLE=$(get_id keystone --token $SERVICE_TOKEN --endpoint $SERVICE_ENDPOINT role-create --name=admin)
KEYSTONEADMIN_ROLE=$(get_id keystone --token $SERVICE_TOKEN --endpoint $SERVICE_ENDPOINT role-create --name=KeystoneAdmin)
KEYSTONESERVICE_ROLE=$(get_id keystone --token $SERVICE_TOKEN --endpoint $SERVICE_ENDPOINT role-create --name=KeystoneServiceAdmin)

# Add Roles to Users in Tenants
keystone --token $SERVICE_TOKEN --endpoint $SERVICE_ENDPOINT user-role-add --user-id $ADMIN_USER --role-id $ADMIN_ROLE --tenant-id $ADMIN_TENANT
keystone --token $SERVICE_TOKEN --endpoint $SERVICE_ENDPOINT user-role-add --user-id $ADMIN_USER --role-id $ADMIN_ROLE --tenant-id $DEMO_TENANT
keystone --token $SERVICE_TOKEN --endpoint $SERVICE_ENDPOINT user-role-add --user-id $ADMIN_USER --role-id $KEYSTONEADMIN_ROLE --tenant-id $ADMIN_TENANT
keystone --token $SERVICE_TOKEN --endpoint $SERVICE_ENDPOINT user-role-add --user-id $ADMIN_USER --role-id $KEYSTONESERVICE_ROLE --tenant-id $ADMIN_TENANT

# The Member role is used by Horizon and Swift
MEMBER_ROLE=$(get_id keystone --token $SERVICE_TOKEN --endpoint $SERVICE_ENDPOINT role-create --name=Member)
keystone --token $SERVICE_TOKEN --endpoint $SERVICE_ENDPOINT user-role-add --user-id $DEMO_USER --role-id $MEMBER_ROLE --tenant-id $DEMO_TENANT
keystone --token $SERVICE_TOKEN --endpoint $SERVICE_ENDPOINT user-role-add --user-id $DEMO_USER --role-id $MEMBER_ROLE --tenant-id $INVIS_TENANT

# Configure service users/roles
NOVA_USER=$(get_id keystone --token $SERVICE_TOKEN --endpoint $SERVICE_ENDPOINT user-create --name=nova --pass="$SERVICE_PASSWORD" --tenant-id $SERVICE_TENANT --email=nova@domain.com)
keystone --token $SERVICE_TOKEN --endpoint $SERVICE_ENDPOINT user-role-add --tenant-id $SERVICE_TENANT --user-id $NOVA_USER --role-id $ADMIN_ROLE

GLANCE_USER=$(get_id keystone --token $SERVICE_TOKEN --endpoint $SERVICE_ENDPOINT user-create --name=glance --pass="$SERVICE_PASSWORD" --tenant-id $SERVICE_TENANT --email=glance@domain.com)
keystone --token $SERVICE_TOKEN --endpoint $SERVICE_ENDPOINT user-role-add --tenant-id $SERVICE_TENANT --user-id $GLANCE_USER --role-id $ADMIN_ROLE

SWIFT_USER=$(get_id keystone --token $SERVICE_TOKEN --endpoint $SERVICE_ENDPOINT user-create --name=swift --pass="$SERVICE_PASSWORD" --tenant-id $SERVICE_TENANT --email=swift@domain.com)
keystone --token $SERVICE_TOKEN --endpoint $SERVICE_ENDPOINT user-role-add --tenant-id $SERVICE_TENANT --user-id $SWIFT_USER --role-id $ADMIN_ROLE

RESELLER_ROLE=$(get_id keystone --token $SERVICE_TOKEN --endpoint $SERVICE_ENDPOINT role-create --name=ResellerAdmin)
keystone --token $SERVICE_TOKEN --endpoint $SERVICE_ENDPOINT user-role-add --tenant-id $SERVICE_TENANT --user-id $NOVA_USER --role-id $RESELLER_ROLE

NEUTRON_USER=$(get_id keystone --token $SERVICE_TOKEN --endpoint $SERVICE_ENDPOINT user-create --name=neutron --pass="$SERVICE_PASSWORD" --tenant-id $SERVICE_TENANT --email=neutron@domain.com)
keystone --token $SERVICE_TOKEN --endpoint $SERVICE_ENDPOINT user-role-add --tenant-id $SERVICE_TENANT --user-id $NEUTRON_USER --role-id $ADMIN_ROLE

CINDER_USER=$(get_id keystone --token $SERVICE_TOKEN --endpoint $SERVICE_ENDPOINT user-create --name=cinder --pass="$SERVICE_PASSWORD" --tenant-id $SERVICE_TENANT --email=cinder@domain.com)
keystone --token $SERVICE_TOKEN --endpoint $SERVICE_ENDPOINT user-role-add --tenant-id $SERVICE_TENANT --user-id $CINDER_USER --role-id $ADMIN_ROLE

CEILOMETER_USER=$(get_id keystone --token $SERVICE_TOKEN --endpoint $SERVICE_ENDPOINT user-create --name=ceilometer --pass="$SERVICE_PASSWORD" --tenant-id $SERVICE_TENANT --email=ceilometer@domain.com)
keystone --token $SERVICE_TOKEN --endpoint $SERVICE_ENDPOINT user-role-add --tenant-id $SERVICE_TENANT --user-id $CEILOMETER_USER --role-id $ADMIN_ROLE


## Create Service
KEYSTONE_ID=$(keystone --token $SERVICE_TOKEN --endpoint $SERVICE_ENDPOINT service-create --name keystone --type identity --description 'OpenStack Identity'| awk '/ id / { print $4 }' )
COMPUTE_ID=$(keystone --token $SERVICE_TOKEN --endpoint $SERVICE_ENDPOINT service-create --name=nova --type=compute --description='OpenStack Compute Service'| awk '/ id / { print $4 }' )
CINDER_ID=$(keystone --token $SERVICE_TOKEN --endpoint $SERVICE_ENDPOINT service-create --name=cinder --type=volume --description='OpenStack Volume Service'| awk '/ id / { print $4 }' )
GLANCE_ID=$(keystone --token $SERVICE_TOKEN --endpoint $SERVICE_ENDPOINT service-create --name=glance --type=image --description='OpenStack Image Service'| awk '/ id / { print $4 }' )
SWIFT_ID=$(keystone --token $SERVICE_TOKEN --endpoint $SERVICE_ENDPOINT service-create --name=swift --type=object-store --description='OpenStack Storage Service' | awk '/ id / { print $4 }'  )
EC2_ID=$(keystone --token $SERVICE_TOKEN --endpoint $SERVICE_ENDPOINT service-create --name=ec2 --type=ec2 --description='OpenStack EC2 service'| awk '/ id / { print $4 }' )
NEUTRON_ID=$(keystone --token $SERVICE_TOKEN --endpoint $SERVICE_ENDPOINT service-create --name=neutron --type=network --description='OpenStack Networking service'| awk '/ id / { print $4 }'  )
CEILOMETER_ID=$(keystone --token $SERVICE_TOKEN --endpoint $SERVICE_ENDPOINT service-create --name=ceilometer --type=metering --description='Ceilometer Metering Service'| awk '/ id / { print $4 }' )

## Create Endpoint
#identity
if [ "$KEYSTONE_WLAN_IP" != '' ];then
    keystone --token $SERVICE_TOKEN --endpoint $SERVICE_ENDPOINT endpoint-create --region $KEYSTONE_REGION --service-id=$KEYSTONE_ID --publicurl http://"$EXT_HOST_IP":5000/v2.0 --adminurl http://"$KEYSTONE_WLAN_IP":35357/v2.0 --internalurl http://"$KEYSTONE_WLAN_IP":5000/v2.0
fi
keystone --token $SERVICE_TOKEN --endpoint $SERVICE_ENDPOINT endpoint-create --region $KEYSTONE_REGION --service-id=$KEYSTONE_ID --publicurl http://"$EXT_HOST_IP":5000/v2.0 --adminurl http://"$KEYSTONE_IP":35357/v2.0 --internalurl http://"$KEYSTONE_IP":5000/v2.0

#compute
keystone --token $SERVICE_TOKEN --endpoint $SERVICE_ENDPOINT endpoint-create --region $KEYSTONE_REGION --service-id=$COMPUTE_ID --publicurl http://"$EXT_HOST_IP":8774/v2/\$\(tenant_id\)s --adminurl http://"$COMPUTE_IP":8774/v2/\$\(tenant_id\)s --internalurl http://"$COMPUTE_IP":8774/v2/\$\(tenant_id\)s

#volume
keystone --token $SERVICE_TOKEN --endpoint $SERVICE_ENDPOINT endpoint-create --region $KEYSTONE_REGION --service-id=$CINDER_ID --publicurl http://"$EXT_HOST_IP":8776/v1/\$\(tenant_id\)s --adminurl http://"$VOLUME_IP":8776/v1/\$\(tenant_id\)s --internalurl http://"$VOLUME_IP":8776/v1/\$\(tenant_id\)s

#image
keystone --token $SERVICE_TOKEN --endpoint $SERVICE_ENDPOINT endpoint-create --region $KEYSTONE_REGION --service-id=$GLANCE_ID --publicurl http://"$EXT_HOST_IP":9292/v2 --adminurl http://"$GLANCE_IP":9292/v2 --internalurl http://"$GLANCE_IP":9292/v2

#object-store
if [ "$SWIFT_WLAN_IP" != '' ];then
    keystone --token $SERVICE_TOKEN --endpoint $SERVICE_ENDPOINT endpoint-create --region $KEYSTONE_REGION --service-id=$SWIFT_ID --publicurl http://"$EXT_HOST_IP":8080/v1/AUTH_\$\(tenant_id\)s --adminurl http://"$SWIFT_WLAN_IP":8080/v1 --internalurl http://"$SWIFT_WLAN_IP":8080/v1/AUTH_\$\(tenant_id\)s
fi
keystone --token $SERVICE_TOKEN --endpoint $SERVICE_ENDPOINT endpoint-create --region $KEYSTONE_REGION --service-id=$SWIFT_ID --publicurl http://"$EXT_HOST_IP":8080/v1/AUTH_\$\(tenant_id\)s --adminurl http://"$SWIFT_IP":8080/v1 --internalurl http://"$SWIFT_IP":8080/v1/AUTH_\$\(tenant_id\)s

#ec2
keystone --token $SERVICE_TOKEN --endpoint $SERVICE_ENDPOINT endpoint-create --region $KEYSTONE_REGION --service-id=$EC2_ID --publicurl http://"$EXT_HOST_IP":8773/services/Cloud --adminurl http://"$EC2_IP":8773/services/Admin --internalurl http://"$EC2_IP":8773/services/Cloud

#network
keystone --token $SERVICE_TOKEN --endpoint $SERVICE_ENDPOINT endpoint-create --region $KEYSTONE_REGION --service-id=$NEUTRON_ID --publicurl http://"$EXT_HOST_IP":9696/ --adminurl http://"$NUETRON_IP":9696/ --internalurl http://"$NEUTRON_IP":9696/

#ceilometer
keystone --token $SERVICE_TOKEN --endpoint $SERVICE_ENDPOINT endpoint-create --region $KEYSTONE_REGION --service-id=$CEILOMETER_ID --publicurl http://"$EXT_HOST_IP":8777/ --adminurl http://"$CEILOMETER_IP":8777/ --internalurl http://"$CEILOMETER_IP":8777/
-
上述脚本文件为了填充keystone数据库,其中还有些内容根据自身情况修改。
-
创建一个简单的凭据文件,这样稍后不会因为输入过多的环境变量而感到厌烦。
vi creds-admin


export OS_TENANT_NAME=admin
export OS_USERNAME=admin
export OS_PASSWORD=admin_pass
export OS_AUTH_URL="http://192.168.100.51:5000/v2.0/"


source creds-admin
-
通过命令列出keystone中添加的用户以及得到token:
keystone user-list
keystone token-get
2.7.设置Glance
-
安装Glance
apt-get install glance
- 更新/etc/glance/glance-api-paste.ini
[filter:authtoken]
paste.filter_factory = keystoneclient.middleware.auth_token:filter_factory
delay_auth_decision = true
auth_host = 10.10.10.51
auth_port = 35357
auth_protocol = http
admin_tenant_name = service
admin_user = glance
admin_password = service_pass
- 更新/etc/glance/glance-registry-paste.ini
[filter:authtoken]
paste.filter_factory = keystoneclient.middleware.auth_token:filter_factory
auth_host = 10.10.10.51
auth_port = 35357
auth_protocol = http
admin_tenant_name = service
admin_user = glance
admin_password = service_pass
- 更新/etc/glance/glance-api.conf
sql_connection = mysql://glanceUser:glancePass@10.10.10.51/glance
和
[paste_deploy]
flavor = keystone
- 更新/etc/glance/glance-registry.conf
sql_connection = mysql://glanceUser:glancePass@10.10.10.51/glance
和
[paste_deploy]
flavor = keystone
- 重新启动glance服务:
cd /etc/init.d/;for i in $( ls glance-* );do service $i restart;done
- 同步glance数据库
glance-manage db_sync
- 测试Glance
mkdir images
cd images
wget http://cdn.download.cirros-cloud.net/0.3.1/cirros-0.3.1-x86_64-disk.img
glance image-create --name="Cirros 0.3.1" --disk-format=qcow2 --container-format=bare --is-public=true <cirros-0.3.1-x86_64-disk.img
- 列出镜像检查是否上传成功:
glance image-list
-
安装Neutron组件:
apt-get install neutron-server
-
编辑/etc/neutron/api-paste.ini
[filter:authtoken]
paste.filter_factory = keystoneclient.middleware.auth_token:filter_factory
auth_host = 10.10.10.51
auth_port = 35357
auth_protocol = http
admin_tenant_name = service
admin_user = neutron
admin_password = service_pass
-
编辑OVS配置文件/etc/neutron/plugins/openvswitch/ovs_neutron_plugin.ini:
[OVS]
tenant_network_type = gre
tunnel_id_ranges = 1:1000
enable_tunneling = True

#Firewall driver for realizing neutron security group function
[SECURITYGROUP]
firewall_driver = neutron.agent.linux.iptables_firewall.OVSHybridIptablesFirewallDriver
-
编辑/etc/neutron/neutron.conf
[database]
connection = mysql://neutronUser:NEUTRON_DAPASS@10.10.10.51/neutron

[keystone_authtoken]
auth_host = 10.10.10.51
auth_port = 35357
auth_protocol = http
admin_tenant_name = service
admin_user = neutron
admin_password = service_pass
signing_dir = /var/lib/neutron/keystone-signing
- 重启Neutron所有服务:
cd /etc/init.d/; for i in $( ls neutron-* ); do sudo service $i restart; done
- 安装nova组件:
apt-get install nova-api nova-cert novnc nova-consoleauth nova-scheduler nova-novncproxy nova-doc nova-conductor nova-ajax-console-proxy
- 编辑/etc/nova/api-paste.ini修改认证信息:
[filter:authtoken]
paste.filter_factory = keystoneclient.middleware.auth_token:filter_factory
auth_host = 10.10.10.51
auth_port = 35357
auth_protocol = http
admin_tenant_name = service
admin_user = nova
admin_password = service_pass
signing_dir = /var/lib/nova/keystone-signing
# Workaround for https://bugs.launchpad.net/nova/+bug/1154809
auth_version = v2.0
- 编辑修改/etc/nova/nova.conf
[DEFAULT]
logdir=/var/log/nova
state_path=/var/lib/nova
lock_path=/run/lock/nova
verbose=True
api_paste_config=/etc/nova/api-paste.ini
compute_scheduler_driver=nova.scheduler.simple.SimpleScheduler
rabbit_host=10.10.10.51
nova_url=http://10.10.10.51:8774/v1.1/
sql_connection=mysql://novaUser:novaPass@10.10.10.51/nova
root_helper=sudo nova-rootwrap /etc/nova/rootwrap.conf

# Auth
use_deprecated_auth=false
auth_strategy=keystone

# Imaging service
glance_api_servers=10.10.10.51:9292
image_service=nova.image.glance.GlanceImageService

# Vnc configuration
novnc_enabled=true
novncproxy_base_url=http://192.168.100.51:6080/vnc_auto.html
novncproxy_port=6080
vncserver_proxyclient_address=10.10.10.51
vncserver_listen=0.0.0.0

# Network settings
network_api_class=nova.network.neutronv2.api.API
neutron_url=http://10.10.10.51:9696
neutron_auth_strategy=keystone
neutron_admin_tenant_name=service
neutron_admin_username=neutron
neutron_admin_password=service_pass
neutron_admin_auth_url=http://10.10.10.51:35357/v2.0
libvirt_vif_driver=nova.virt.libvirt.vif.LibvirtHybridOVSBridgeDriver
linuxnet_interface_driver=nova.network.linux_net.LinuxOVSInterfaceDriver
#If you want Neutron + Nova Security groups
firewall_driver=nova.virt.firewall.NoopFirewallDriver
security_group_api=neutron
#If you want Nova Security groups only, comment the two lines above and uncomment line -1-.
#-1-firewall_driver=nova.virt.libvirt.firewall.IptablesFirewallDriver

#Metadata
service_neutron_metadata_proxy = True
neutron_metadata_proxy_shared_secret = helloOpenStack

# Compute #
compute_driver=libvirt.LibvirtDriver

# Cinder #
volume_api_class=nova.volume.cinder.API
osapi_volume_listen_port=5900
- 同步数据库:
nova-manage db sync
- 重启Nova所有服务:
cd /etc/init.d/; for i in $( ls nova-* ); do service $i restart; done
- 检查所有nova服务是否启动正常:
nova-manage service list
- 安装Cinder软件包
apt-get install cinder-api cinder-scheduler cinder-volume iscsitarget open-iscsi iscsitarget-dkms
- 配置iscsi服务:
sed -i 's/false/true/g' /etc/default/iscsitarget
- 重启服务:
service iscsitarget start
service open-iscsi start
- 配置/etc/cinder/api-paste.ini
filter:authtoken]
paste.filter_factory = keystoneclient.middleware.auth_token:filter_factory
service_protocol = http
service_host = 192.168.100.51
service_port = 5000
auth_host = 10.10.10.51
auth_port = 35357
auth_protocol = http
admin_tenant_name = service
admin_user = cinder
admin_password = service_pass
- 编辑/etc/cinder/cinder.conf
[DEFAULT]
rootwrap_config=/etc/cinder/rootwrap.conf
sql_connection = mysql://cinderUser:cinderPass@10.10.10.51/cinder
api_paste_config = /etc/cinder/api-paste.ini
iscsi_helper=ietadm
volume_name_template = volume-%s
volume_group = cinder-volumes
verbose = True
auth_strategy = keystone
#osapi_volume_listen_port=5900
- 接下来同步数据库:
cinder-manage db sync
- 最后别忘记创建一个卷组命名为cinder-volumes:
dd if=/dev/zero of=cinder-volumes bs=1 count=0 seek=2G
losetup /dev/loop2 cinder-volumes
fdisk /dev/loop2
#Type in the followings:
n
p
1
ENTER
ENTER
t
8e
w
- 创建物理卷和卷组:
pvcreate /dev/loop2
vgcreate cinder-volumes /dev/loop2
- 注意:重启后卷组不会自动挂载,如下进行设置:
vim /etc/init/losetup.conf

description "set up loop devices"
start on mounted MOUNTPOINT=/
task
exec /sbin/losetup  /dev/loop2 /home/cloud/cinder-volumes
- 重启cinder服务:
cd /etc/init.d/; for i in $( ls cinder-* ); do service $i restart; done
- 确认Cinder服务在运行:
cd /etc/init.d/; for i in $( ls cinder-* ); do service $i status; done
- 安装horizon:
apt-get install openstack-dashboard memcached
- 如果你不喜欢OpenStack ubuntu主题,你可以停用它:
dpkg --purge openstack-dashboard-ubuntu-theme
- 重启Apache和memcached服务:
service apache2 restart; service memcached restart
注意:重启apache2,出现could not reliably determine the server's fully domain name,using 127.0.0.1 for ServerName.这是由于没有解析出域名导致的。解决方法如下:编辑/etc/apache2/apache2.conf,添加如下操作即可。
ServerName localhost
2.12.设置Ceilometer
- 安装Metering服务
apt-get install ceilometer-api ceilometer-collector ceilometer-agent-central python-ceilometerclient
- 安装MongoDB数据库
apt-get install mongodb
- 配置mongodb监听所有网络接口请求:
sed -i 's/127.0.0.1/0.0.0.0/g' /etc/mongodb.conf

service mongodb restart
- 创建ceilometer数据库用户:
#mongo
>use ceilometer
>db.addUser({ user:"ceilometer",pwd:"CEILOMETER_DBPASS",roles:["readWrite","dbAdmin"]})
- 配置Metering服务使用数据库
...
[database]
...
# The SQLAlchemy connection string used to connect to the
# database (string value)
connection = mongodb://ceilometer:CEILOMETER_DBPASS@10.10.10.51:27017/ceilometer
...
- 配置RabbitMQ访问,编辑/etc/ceilometer/ceilometer.conf
...
[DEFAULT]
rabbit_host = 10.10.10.51
- 编辑/etc/ceilometer/ceilometer.conf使认证信息生效
[keystone_authtoken]
auth_host = 10.10.10.51
auth_port = 35357
auth_protocol = http
admin_tenant_name = service
admin_user = ceilometer
admin_password = CEILOMETER_PASS
- 简单获取镜像,你必须配置镜像服务以发送通知给总线,编辑/etc/glance/glance-api.conf修改[DEFAULT]部分
notifier_strategy=rabbit
rabbit_host=10.10.10.51
- 重启镜像服务
cd /etc/init.d/;for i in $(ls glance-* );do service $i restart;done
- 重启服务,使配置信息生效
cd /etc/init.d;for i in $( ls ceilometer-* );do service $i restart;done
- 编辑/etc/cinder/cinder.conf,获取volume。
control_exchange=cinder
notification_driver=cinder.openstack.common.notifier.rpc_notifier
- 重启Cinder服务
cd /etc/init.d/;for i in $( ls cinder-* );do service $i restart;done
3.网络结点
-
安装好ubuntu 12.04 Server 64bits后,进入root模式下完成配置:
sudo su -
- 添加Havana源:
#apt-get install python-software-properties
#add-apt-repository cloud-archive:havana
-
升级系统:
-
apt-get update
apt-get upgrade
apt-get dist-upgrade
- 安装ntp服务:
apt-get install ntp
- 配置ntp服务从控制节点上同步时间:
sed -i 's/server 0.ubuntu.pool.ntp.org/#server 0.ubuntu.pool.ntp.org/g' /etc/ntp.conf
sed -i 's/server 1.ubuntu.pool.ntp.org/#server 1.ubuntu.pool.ntp.org/g' /etc/ntp.conf
sed -i 's/server 2.ubuntu.pool.ntp.org/#server 2.ubuntu.pool.ntp.org/g' /etc/ntp.conf
sed -i 's/server 3.ubuntu.pool.ntp.org/#server 3.ubuntu.pool.ntp.org/g' /etc/ntp.conf

#Set the network node to follow up your conroller node
sed -i 's/server ntp.ubuntu.com/server 10.10.10.51/g' /etc/ntp.conf

service ntp restart
- 配置网络:
# OpenStack management
auto eth0
iface eth0 inet static
address 10.10.10.52
netmask 255.255.255.0

# VM Configuration
auto eth1
iface eth1 inet static
address 10.20.20.52
netmask 255.255.255.0

# VM internet Access
auto eth2
iface eth2 inet static
address 192.168.100.52
netmask 255.255.255.0
gateway 192.168.100.1
dns-servers 8.8.8.8
- 编辑/etc/sysctl.conf,开启路由转发和关闭包目的过滤,这样网络节点能协作VMs的traffic。
net.ipv4.ip_forward=1
net.ipv4.conf.all.rp_filter=0
net.ipv4.conf.default.rp_filter=0

#运行下面命令,使生效
sysctl -p
3.3.安装OpenVSwitch
- 安装OpenVSwitch软件包:
apt-get install openvswitch-controller openvswitch-switch openvswitch-datapath-dkms openvswitch-datapath-source
module-assistant auto-install openvswitch-datapath
/etc/init.d/openvswitch-switch restart
- 创建网桥
#br-int will be used for VM integration
ovs-vsctl add-br br-int

#br-ex is used to make to VM accessable from the internet
ovs-vsctl add-br br-ex
- 把网卡eth2加入br-ex:
ovs-vsctl add-port br-ex eth2
- 重新修改网卡配置/etc/network/interfaces:
# This file describes the network interfaces available on your system
# and how to activate them. For more information, see interfaces(5).

# The loopback network interface
auto lo
iface lo inet loopback

# Not internet connected(used for OpenStack management)
# The primary network interface
auto eth0
iface eth0 inet static
# This is an autoconfigured IPv6 interface
# iface eth0 inet6 auto
address 10.10.10.52
netmask 255.255.255.0

auto eth1
iface eth1 inet static
address 10.20.20.52
netmask 255.255.255.0

#For Exposing OpenStack API over the internet
auto eth2
iface eth2 inet manual
up ifconfig $IFACE 0.0.0.0 up
up ip link set $IFACE promisc on
down ip link set $IFACE promisc off
down ifconfig $IFACE down

auto br-ex
iface br-ex inet static
address 192.168.0.52
netmask 255.255.255.0
gateway 192.168.100.1
dns-nameservers 8.8.8.8
- 重启网络服务:
/etc/init.d/networking restart
- 查看网桥配置:
root@network:~# ovs-vsctl list-br
br-ex
br-int

root@network:~# ovs-vsctl show
    Bridge br-int
        Port br-int
            Interface br-int
                type: internal
    Bridge br-ex
        Port "eth2"
            Interface "eth2"
        Port br-ex
            Interface br-ex
                type: internal
    ovs_version: "1.4.0+build0"
3.4.Neutron-*
- 安装Neutron组件:
apt-get install neutron-plugin-openvswitch-agent neutron-dhcp-agent neutron-l3-agent neutron-metadata-agent
- 编辑/etc/neutron/api-paste.ini
[filter:authtoken]
paste.filter_factory = keystoneclient.middleware.auth_token:filter_factory
auth_host = 10.10.10.51
auth_port = 35357
auth_protocol = http
admin_tenant_name = service
admin_user = neutron
admin_password = service_pass
- 编辑OVS配置文件:/etc/neutron/plugins/openvswitch/ovs_neutron_plugin.ini
[OVS]
tenant_network_type = gre
enable_tunneling = True
tunnel_id_ranges = 1:1000
integration_bridge = br-int
tunnel_bridge = br-tun
local_ip = 10.20.20.52

#Firewall driver for realizing neutron security group function
[SECURITYGROUP]
firewall_driver = neutron.agent.linux.iptables_firewall.OVSHybridIptablesFirewallDriver
- 更新/etc/neutron/metadata_agent.ini:
auth_url = http://10.10.10.51:35357/v2.0
auth_region = RegionOne
admin_tenant_name = service
admin_user = neutron
admin_password = service_pass

# IP address used by Nova metadata server
nova_metadata_ip = 10.10.10.51

# TCP Port used by Nova metadata server
nova_metadata_port = 8775

metadata_proxy_shared_secret = helloOpenStack
- 编辑/etc/neutron/neutron.conf
rabbit_host = 10.10.10.51

[keystone_authtoken]
auth_host = 10.10.10.51
auth_port = 35357
auth_protocol = http
admin_tenant_name = service
admin_user = neutron
admin_password = service_pass
signing_dir = /var/lib/quantum/keystone-signing

[database]
connection = mysql://neutronUser:neutronPass@10.10.10.51/neutron
- 编辑/etc/neutron/l3_agent.ini:
[DEFAULT]
interface_driver = neutron.agent.linux.interface.OVSInterfaceDriver
use_namespaces = True
external_network_bridge = br-ex
signing_dir = /var/cache/neutron
admin_tenant_name = service
admin_user = neutron
admin_password = service_pass
auth_url = http://10.10.10.51:35357/v2.0
l3_agent_manager = neutron.agent.l3_agent.L3NATAgentWithStateReport
root_helper = sudo neutron-rootwrap /etc/neutron/rootwrap.conf
- 编辑/etc/neutron/dhcp_agent.ini:
[DEFAULT]
interface_driver = neutron.agent.linux.interface.OVSInterfaceDriver
dhcp_driver = neutron.agent.linux.dhcp.Dnsmasq
use_namespaces = True
signing_dir = /var/cache/neutron
admin_tenant_name = service
admin_user = neutron
admin_password = service_pass
auth_url = http://10.10.10.51:35357/v2.0
dhcp_agent_manager = neutron.agent.dhcp_agent.DhcpAgentWithStateReport
root_helper = sudo neutron-rootwrap /etc/neutron/rootwrap.conf
state_path = /var/lib/neutron
- 重启服务:
cd /etc/init.d/; for i in $( ls neutron-* ); do service $i restart; done
4.计算结点
4.1.准备结点
- 安装好ubuntu 12.04 Server 64bits后,进入root模式进行安装:
sudo su -
- 添加Havana源:
#apt-get install python-software-properties
#add-apt-repository cloud-archive:havana
- 升级系统:
apt-get update
apt-get upgrade
apt-get dist-upgrade
- 安装ntp服务:
apt-get install ntp
- 配置ntp服务从控制节点同步时间:
sed -i 's/server 0.ubuntu.pool.ntp.org/#server 0.ubuntu.pool.ntp.org/g' /etc/ntp.conf
sed -i 's/server 1.ubuntu.pool.ntp.org/#server 1.ubuntu.pool.ntp.org/g' /etc/ntp.conf
sed -i 's/server 2.ubuntu.pool.ntp.org/#server 2.ubuntu.pool.ntp.org/g' /etc/ntp.conf
sed -i 's/server 3.ubuntu.pool.ntp.org/#server 3.ubuntu.pool.ntp.org/g' /etc/ntp.conf

#Set the network node to follow up your conroller node
sed -i 's/server ntp.ubuntu.com/server 10.10.10.51/g' /etc/ntp.conf

service ntp restart
4.2.配置网络
- 如下配置网络/etc/network/interfaces:
# The loopback network interface
auto lo
iface lo inet loopback

# Not internet connected(used for OpenStack management)
# The primary network interface
auto eth0
iface eth0 inet static
# This is an autoconfigured IPv6 interface
# iface eth0 inet6 auto
address 10.10.10.53
netmask 255.255.255.0

# VM Configuration
auto eth1
iface eth1 inet static
address 10.20.20.53
netmask 255.255.255.0
- 开启路由转发:
sed -i 's/#net.ipv4.ip_forward=1/net.ipv4.ip_forward=1/' /etc/sysctl.conf
sysctl -p
4.3.KVM
- 确保你的硬件启动virtualization:
apt-get install cpu-checker
kvm-ok
- 安装kvm并配置它:
apt-get install -y kvm libvirt-bin pm-utils
- 在/etc/libvirt/qemu.conf配置文件中启用cgroup_device_aci数组:
cgroup_device_acl = [
"/dev/null", "/dev/full", "/dev/zero",
"/dev/random", "/dev/urandom",
"/dev/ptmx", "/dev/kvm", "/dev/kqemu",
"/dev/rtc", "/dev/hpet","/dev/net/tun"
]
- 删除默认的虚拟网桥:
virsh net-destroy default
virsh net-undefine default
- 更新/etc/libvirt/libvirtd.conf配置文件:
listen_tls = 0
listen_tcp = 1
auth_tcp = "none"
- 编辑libvirtd_opts变量在/etc/init/libvirt-bin.conf配置文件中:
env libvirtd_opts="-d -l"
- 编辑/etc/default/libvirt-bin文件:
libvirtd_opts="-d -l"
- 重启libvirt服务使配置生效:
service libvirt-bin restart
4.4.OpenVSwitch
- 安装OpenVSwitch软件包:
apt-get install openvswitch-switch openvswitch-datapath-dkms openvswitch-datapath-source
module-assistant auto-install openvswitch-datapath
service openvswitch-switch restart
- 创建网桥:
ovs-vsctl add-br br-int
4.5.Neutron
- 安装Neutron OpenVSwitch代理:
apt-get install neutron-plugin-openvswitch-agent
- 编辑OVS配置文件/etc/neutron/plugins/openvswitch/ovs_neutron_plugin.ini:
[OVS]
tenant_network_type = gre
tunnel_id_ranges = 1:1000
integration_bridge = br-int
tunnel_bridge = br-tun
local_ip = 10.20.20.53
enable_tunneling = True

#Firewall driver for realizing quantum security group function
[SECURITYGROUP]
firewall_driver = neutron.agent.linux.iptables_firewall.OVSHybridIptablesFirewallDriver
- 编辑/etc/neutron/neutron.conf
rabbit_host = 10.10.10.51

[keystone_authtoken]
auth_host = 10.10.10.51
auth_port = 35357
auth_protocol = http
admin_tenant_name = service
admin_user = neutron
admin_password = service_pass
signing_dir = /var/lib/neutron/keystone-signing

[database]
connection = mysql://neutronUser:neutronPass@10.10.10.51/neutron
- 重启服务:
service neutron-plugin-openvswitch-agent restart
4.6.Nova
- 安装nova组件:
apt-get install nova-compute-kvm python-guestfs
- 注意:如果你的宿主机不支持kvm虚拟化,可把nova-compute-kvm换成nova-compute-qemu
- 同时/etc/nova/nova-compute.conf配置文件中的libvirt_type=qemu
- 在/etc/nova/api-paste.ini配置文件中修改认证信息:
[filter:authtoken]
paste.filter_factory = keystoneclient.middleware.auth_token:filter_factory
auth_host = 10.10.10.51
auth_port = 35357
auth_protocol = http
admin_tenant_name = service
admin_user = nova
admin_password = service_pass
signing_dirname = /tmp/keystone-signing-nova
# Workaround for https://bugs.launchpad.net/nova/+bug/1154809
auth_version = v2.0
- 编辑修改/etc/nova/nova.conf
[DEFAULT]
logdir=/var/log/nova
state_path=/var/lib/nova
lock_path=/run/lock/nova
verbose=True
api_paste_config=/etc/nova/api-paste.ini
compute_scheduler_driver=nova.scheduler.simple.SimpleScheduler
rabbit_host=10.10.10.51
nova_url=http://10.10.10.51:8774/v1.1/
sql_connection=mysql://novaUser:novaPass@10.10.10.51/nova
root_helper=sudo nova-rootwrap /etc/nova/rootwrap.conf
my_ip = 10.10.10.53
# Auth
use_deprecated_auth=false
auth_strategy=keystone

# Imaging service
glance_api_servers=10.10.10.51:9292
image_service=nova.image.glance.GlanceImageService

# Vnc configuration
novnc_enabled=true
novncproxy_base_url=http://192.168.100.51:6080/vnc_auto.html
novncproxy_port=6080
vncserver_proxyclient_address=10.10.10.53                   #这是与控制节点不同的地方。
vncserver_listen=0.0.0.0

# Network settings
network_api_class=nova.network.neutronv2.api.API
neutron_url=http://10.10.10.51:9696
neutron_auth_strategy=keystone
neutron_admin_tenant_name=service
neutron_admin_username=neutron
neutron_admin_password=service_pass
neutron_admin_auth_url=http://10.10.10.51:35357/v2.0
libvirt_vif_driver=nova.virt.libvirt.vif.LibvirtHybridOVSBridgeDriver
linuxnet_interface_driver=nova.network.linux_net.LinuxOVSInterfaceDriver
#If you want Neutron + Nova Security groups
firewall_driver=nova.virt.firewall.NoopFirewallDriver
security_group_api=neutron
#If you want Nova Security groups only, comment the two lines above and uncomment line -1-.
#-1-firewall_driver=nova.virt.libvirt.firewall.IptablesFirewallDriver

#Metadata
service_neutron_metadata_proxy = True
neutron_metadata_proxy_shared_secret = helloOpenStack

# Compute #
compute_driver=libvirt.LibvirtDriver

# Cinder #
volume_api_class=nova.volume.cinder.API
osapi_volume_listen_port=5900
- 重启nova-*服务:
cd /etc/init.d/; for i in $( ls nova-* ); do service $i restart; done
- 检查所有nova服务是否正常启动:
nova-manage service list
4.7. 为监控服务安装计算代理
- 安装监控服务:
ap-get install ceilometer-agent-compute
- 配置修改/etc/nova/nova.conf:
...
[DEFAULT]
...
instance_usage_audit=True
instance_usage_audit_period=hour
notify_on_state_change=vm_and_task_state
notification_driver=nova.openstack.common.notifier.rpc_notifier
notification_driver=ceilometer.compute.nova_notifier
- 重启服务:
service ceilometer-agent-compute restart
5.创建第一VM
5.1.为admin租户创建内网、外网、路由器和虚拟机
- 设置环境变量:
vim creds-admin

#Paste the following:
export OS_TENANT_NAME=admin
export OS_USERNAME=admin
export OS_PASSWORD=admin_pass
export OS_AUTH_URL="http://192.168.100.51:5000/v2.0/"

source creds-admin
- 列出已创建的用户和租户:
keystone user-list
# keystone tenant-list
+----------------------------------+--------------------+---------+
| id | name | enabled |
+----------------------------------+--------------------+---------+
| 4cb714b719204285acc7ecea40c33ca8 | admin | True |
| eb8c703bee4549feb2c9c551013296d5 | demo | True |
| 1e78ea73b9d741a7bcde1eaf6a6b5555 | invisible_to_admin | True |
| 16542d36818f480d94554438c1fc0761 | service | True |
+----------------------------------+--------------------+---------+
- 为admin租户创建网络:
neutron net-create --tenant-id $id_of_tenant --router:external=True net_admin
Created a new network:
+---------------------------+--------------------------------------+
| Field | Value |
+---------------------------+--------------------------------------+
| admin_state_up | True |
| id | 04d2e397-ceae-43df-b4e9-63e8ea12ddfa |
| name | net_admin |
| provider:network_type | gre |
| provider:physical_network | |
| provider:segmentation_id | 1 |
| shared | False |
| status | ACTIVE |
| subnets | |
| tenant_id | 4cb714b719204285acc7ecea40c33ca8 |
+---------------------------+--------------------------------------+
- 为admin租户创建子网:
# neutron subnet-create --tenant-id 4cb714b719204285acc7ecea40c33ca8 net_admin 50.50.1.0/24
Created a new subnet:
+------------------+----------------------------------------------+
| Field | Value |
+------------------+----------------------------------------------+
| allocation_pools | {"start": "50.50.1.2", "end": "50.50.1.254"} |
| cidr | 50.50.1.0/24 |
| dns_nameservers | |
| enable_dhcp | True |
| gateway_ip | 50.50.1.1 |
| host_routes | |
| id | 13be7adc-5837-4462-8887-d20548f6283f |
| ip_version | 4 |
| name | |
| network_id | 04d2e397-ceae-43df-b4e9-63e8ea12ddfa |
| tenant_id | 4cb714b719204285acc7ecea40c33ca8 |
+------------------+----------------------------------------------+
- 为admin租户创建路由器:
# neutron router-create --tenant-id 4cb714b719204285acc7ecea40c33ca8 router_admin
Created a new router:
+-----------------------+--------------------------------------+
| Field | Value |
+-----------------------+--------------------------------------+
| admin_state_up | True |
| external_gateway_info | |
| id | 04f207ec-6d4b-49e7-8614-b69eee12feb8 |
| name | router_admin |
| status | ACTIVE |
| tenant_id | 4cb714b719204285acc7ecea40c33ca8 |
+-----------------------+--------------------------------------+
- 列出路由代理类型:
# neutron agent-list
+--------------------------------------+--------------------+---------+-------+----------------+
| id | agent_type | host | alive | admin_state_up |
+--------------------------------------+--------------------+---------+-------+----------------+
| 18c4a977-f9b3-4a36-bcb5-a7d92346522c | DHCP agent | network | :-) | True |
| 70e2b440-49d2-4860-9888-401dd7f6102b | Open vSwitch agent | network | :-) | True |
| b4b9781d-de82-476f-97f6-560914210f0a | L3 agent | network | :-) | True |
| d1a3c1cb-9383-410d-b84b-a9574ad328ec | Open vSwitch agent | compute | :-) | True |
+--------------------------------------+--------------------+---------+-------+----------------+
- 将router_admin设置为L3代理类型:
neutron l3-agent-router-add $id_of_l3_agent router_admin

Added router router_admin to L3 agent
- 将net_admin子网与router_admin路由关联:
# neutron router-interface-add 1568ec23-0c79-43d0-8b83-52b0a63cf1df c5ac3b09-829c-48d4-8ac7-f07619479a66
Added interface 6e2533c9-f6a0-4e40-a05c-074b62164995 to router 1568ec23-0c79-43d0-8b83-52b0a63cf1df.
- 创建外网net_external,注意设置--router:external=True:
# neutron net-create net_external --router:external=True --shared
Created a new network:
+---------------------------+--------------------------------------+
| Field | Value |
+---------------------------+--------------------------------------+
| admin_state_up | True |
| id | bcf6e1cb-dd57-40a8-9b61-a6bc6d0a6696 |
| name | net_external |
| provider:network_type | gre |
| provider:physical_network | |
| provider:segmentation_id | 2 |
| router:external | True |
| shared | True |
| status | ACTIVE |
| subnets | |
| tenant_id | 4cb714b719204285acc7ecea40c33ca8 |
+---------------------------+--------------------------------------+
- 为net_admin创建子网,注意设置的gateway必须在给到的网段内:
neutron subnet-create --tenant-id 4cb714b719204285acc7ecea40c33ca8 --allocation-pool start=192.168.100.110,end=192.168.100.130 --gateway=192.168.100.1 net_external 192.168.100.0/24 --enable_dhcp=False
Created a new subnet:
+------------------+----------------------------------------------------+
| Field | Value |
+------------------+----------------------------------------------------+
| allocation_pools | {"start": "192.168.100.110", "end": "192.168.100.130"} |
| cidr | 192.168.100.0/24 |
| dns_nameservers | |
| enable_dhcp | False |
| gateway_ip | 192.168.100.1 |
| host_routes | |
| id | d8461e75-e259-43c5-9bdc-68221a6cf111 |
| ip_version | 4 |
| name | |
| network_id | bcf6e1cb-dd57-40a8-9b61-a6bc6d0a6696 |
| tenant_id | 4cb714b719204285acc7ecea40c33ca8 |
+------------------+----------------------------------------------------+
- 将net_external与router_admin路由器关联:
neutron router-gateway-set router_admin net_external

Set gateway for router router_admin
- 创建floating ip:
neutron floatingip-create net_external
Created a new floatingip:
+---------------------+--------------------------------------+
| Field | Value |
+---------------------+--------------------------------------+
| fixed_ip_address | |
| floating_ip_address | 192.168.100.111 |
| floating_network_id | bcf6e1cb-dd57-40a8-9b61-a6bc6d0a6696 |
| id | 942b66e7-d4a5-4136-8be0-3bf00688a56d |
| port_id | |
| router_id | |
| tenant_id | 4cb714b719204285acc7ecea40c33ca8 |
+---------------------+--------------------------------------+
# neutron floatingip-create net_external
Created a new floatingip:
+---------------------+--------------------------------------+
| Field | Value |
+---------------------+--------------------------------------+
| fixed_ip_address | |
| floating_ip_address | 192.168.100.112 |
| floating_network_id | bcf6e1cb-dd57-40a8-9b61-a6bc6d0a6696 |
| id | e46c9811-59f2-4a0f-a7b0-3c93185dde58 |
| port_id | |
| router_id | |
| tenant_id | 4cb714b719204285acc7ecea40c33ca8 |
+---------------------+--------------------------------------+
6.参考文档:
1.openstack官方文档:http://docs.openstack.org/havana/install-guide/install/apt/openstack-install-guide-apt-havana.pdf 目前openstack官方文档已经做的很好了,如何安装,配置,写的都挺不错的,还有neutron那一节对各种情况的网络结构列出的很详细。
2.感谢Bilel Msekni做出的贡献,https://github.com/mseknibilel/OpenStack-Grizzly-Install-Guide/blob/OVS_MultiNode/OpenStack_Grizzly_Install_Guide.rst
