

接下来一系列的文章都是学习https://docs.angularjs.org/tutorial的笔记,主要学习的angular-phonecat项目的实现,来介绍angularjs的使用.
1.下载angular-phonecat
使用git clone phonecat:
git clone --depth=14 https://github.com/angular/angular-phonecat.git
可以把--depth=14去掉,这里是拉最新的14个commit.
The --depth=14 option just tells Git to pull down only the last 14 commits. This makes the download much smaller and faster.
2.安装所需工具
Bower - client-side code package manager
Http-Server - simple local static web server
Karma - unit test runner
Protractor - end 2 end test runner
nodejs,npm,karma的安装可以参考前面的文章:Angularjs学习---ubuntu12.04中karma安装配置中常见的问题总结
1).ubuntu中安装bower命令为:
sudo npm install -g bower
2).安装驱动:
npm run update-webdriver
这里好像安装的是selenium驱动.
3).启动项目:npm start
amosli@amosli-pc:~/develop/angular-phonecat$ npm start

> angular-phonecat@0.0.0 prestart /home/amosli/develop/angular-phonecat
> npm install


> angular-phonecat@0.0.0 postinstall /home/amosli/develop/angular-phonecat
> bower install


> angular-phonecat@0.0.0 start /home/amosli/develop/angular-phonecat
> http-server -p 8000

Starting up http-server, serving ./ on port: 8000
Hit CTRL-C to stop the server
4).端到端的测试:
npm run protractor
- open up a Chrome browser and connect it to the application
- execute all the End to End tests in this browser
- report the results of these tests in the terminal/command line window
- close down the browser and exit
自动化测试步骤是打开chrome浏览器,连接到应用程序这里是angular-phonecat---->执行所有的端到端的测试---->在命令行中报告测试结果---->关闭浏览器并退出.
3.phonecat项目教程概述
教程分为13步,每一步可以切换到相应的分支上直接运行其步骤,比如要学习第0步的内容,那么执行如下命令:
amosli@amosli-pc:~/develop/angular-phonecat$ git checkout step-0
Previous HEAD position was b1e657a... step-4 phone ordering
HEAD is now at c5495a2... step-0 bootstrap angular app
同样,可以看到的切换的步骤有step-0到12.
4.phonecat项目step-0
1).切换到第0步,启动项目:
amosli@amosli-pc:~/develop/angular-phonecat$ git checkout step-0
Previous HEAD position was b1e657a... step-4 phone ordering
HEAD is now at c5495a2... step-0 bootstrap angular app
amosli@amosli-pc:~/develop/angular-phonecat$ npm start
2).在浏览器输入http://localhost:8000/app/index.html
效果:
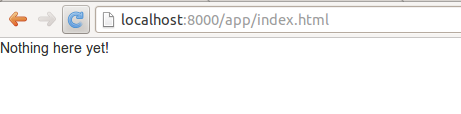
index.html的源码
<!doctype html>
<html lang="en" ng-app>
<head>
  <meta charset="utf-8">
  <title>My HTML File</title>
  <link rel="stylesheet" href="../bower_components/bootstrap/dist/css/bootstrap.css">
  <link rel="stylesheet" href="css/app.css">
  <script src="../bower_components/angular/angular.js"></script>
</head>
<body>

  <p>Nothing here {{'yet' + '!'}}</p>

</body>
</html>
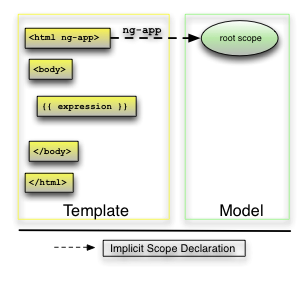
其数据渲染顺序:
-
injector that will be used for dependency injection is created.
-
The injector will then create the root scope that will become the context for the model of our application.
-
Angular will then "compile" the DOM starting at the
ngApproot element, processing any directives and bindings found along the way.
5.phonecat项目step-1
请编辑app/index.html文件,将下面的代码添加到index.html文件中,然后运行该应用查看效果。
<ul>
    <li>
        <span>Nexus S</span>
        <p>
        Fast just got faster with Nexus S.
        </p>
    </li>
    <li>
        <span>Motorola XOOM™ with Wi-Fi</span>
        <p>
        The Next, Next Generation tablet.
        </p>
    li>
</ul>
效果:


 浙公网安备 33010602011771号