

玩转spring boot——结合jQuery和AngularJs
在上篇的基础上
准备工作:
修改pom.xml


<project xmlns="http://maven.apache.org/POM/4.0.0" xmlns:xsi="http://www.w3.org/2001/XMLSchema-instance"
    xsi:schemaLocation="http://maven.apache.org/POM/4.0.0 http://maven.apache.org/xsd/maven-4.0.0.xsd">
    <modelVersion>4.0.0</modelVersion>

    <groupId>com.github.carter659</groupId>
    <artifactId>spring03</artifactId>
    <version>0.0.1-SNAPSHOT</version>
    <packaging>jar</packaging>

    <name>spring03</name>
    <url>http://maven.apache.org</url>

    <parent>
        <groupId>org.springframework.boot</groupId>
        <artifactId>spring-boot-starter-parent</artifactId>
        <version>1.4.2.RELEASE</version>
    </parent>

    <properties>
        <project.build.sourceEncoding>UTF-8</project.build.sourceEncoding>
        <java.version>1.8</java.version>
    </properties>


    <dependencies>
        <dependency>
            <groupId>org.springframework.boot</groupId>
            <artifactId>spring-boot-starter-thymeleaf</artifactId>
        </dependency>
        <dependency>
            <groupId>org.springframework.boot</groupId>
            <artifactId>spring-boot-devtools</artifactId>
            <optional>true</optional>
        </dependency>
    </dependencies>

    <build>
        <plugins>
            <plugin>
                <groupId>org.springframework.boot</groupId>
                <artifactId>spring-boot-maven-plugin</artifactId>
            </plugin>
        </plugins>
    </build>

</project>
修改App.java
package com.github.carter659.spring03;

import org.springframework.boot.SpringApplication;
import org.springframework.boot.autoconfigure.SpringBootApplication;

@SpringBootApplication
public class App {

    public static void main(String[] args) {
        SpringApplication.run(App.class, args);
    }

}
新建“Order.java”类文件:
package com.github.carter659.spring03;

import java.util.Date;

public class Order {

    public String no;

    public Date date;

    public int quantity;
}
说明一下:这里我直接使用public字段了,get/set方法就不写了。
新建控制器“MainController”:
package com.github.carter659.spring03;

import java.time.ZoneId;
import java.util.HashMap;
import java.util.Map;

import org.springframework.stereotype.Controller;
import org.springframework.web.bind.annotation.GetMapping;
import org.springframework.web.bind.annotation.PostMapping;
import org.springframework.web.bind.annotation.RequestBody;
import org.springframework.web.bind.annotation.ResponseBody;

@Controller
public class MainController {

    @GetMapping("/")
    public String index() {
        return "index";
    }

    @GetMapping("/jquery")
    public String jquery() {
        return "jquery";
    }

    @GetMapping("/angularjs")
    public String angularjs() {
        return "angularjs";
    }

    @PostMapping("/postData")
    public @ResponseBody Map<String, Object> postData(String no, int quantity, String date) {
        System.out.println("no:" + no);
        System.out.println("quantity:" + quantity);
        System.out.println("date:" + date);
        Map<String, Object> map = new HashMap<>();
        map.put("msg", "ok");
        map.put("quantity", quantity);
        map.put("no", no);
        map.put("date", date);
        return map;
    }

    @PostMapping("/postJson")
    public @ResponseBody Map<String, Object> postJson(@RequestBody Order order) {
        System.out.println("order no:" + order.no);
        System.out.println("order quantity:" + order.quantity);
        System.out.println("order date:" + order.date.toInstant().atZone(ZoneId.systemDefault()).toLocalDate());
        Map<String, Object> map = new HashMap<>();
        map.put("msg", "ok");
        map.put("value", order);
        return map;
    }
}
新建jquery.htm文件l:
<!DOCTYPE html>
<html xmlns:th="http://www.thymeleaf.org">
<head>
<meta http-equiv="Content-Type" content="text/html; charset=UTF-8" />
<title>jquery</title>
<script src="//cdn.bootcss.com/jquery/1.11.3/jquery.min.js"></script>
<script type="text/javascript">
    /*<![CDATA[*/
    function postData() {
        var data = 'no=' + $('#no').val() + '&quantity=' + $('#quantity').val()
                + '&date=' + $('#date').val();

        $.ajax({
            type : 'POST',
            url : '/postData',
            data : data,
            success : function(r) {
                console.log(r);
            },
            error : function() {
                alert('error!')
            }
        });
    }

    function postJson() {
        var data = {
            no : $('#no').val(),
            quantity : $('#quantity').val(),
            date : $('#date').val()
        };
        $.ajax({
            type : 'POST',
            contentType : 'application/json',
            url : '/postJson',
            data : JSON.stringify(data),
            success : function(r) {
                console.log(r);
            },
            error : function() {
                alert('error!')
            }
        });
    }
    /*]]>*/
</script>
</head>
<body>
    no:
    <input id="no" value="No.1234567890" />
    <br /> quantity:
    <input id="quantity" value="100" />
    <br /> date:
    <input id="date" value="2016-12-20" />
    <br />
    <input value="postData" type="button" onclick="postData()" />
    <br />
    <input value="postJson" type="button" onclick="postJson()" />
</body>
</html>
新建“angularjs.html”文件:
<!DOCTYPE html>
<html xmlns:th="http://www.thymeleaf.org">
<head>
<meta http-equiv="Content-Type" content="text/html; charset=UTF-8" />
<title>angularjs</title>
<script src="//cdn.bootcss.com/angular.js/1.5.6/angular.min.js"></script>
<script type="text/javascript">
    var app = angular.module('app', []);
    app.controller('MainController', function($rootScope, $scope, $http) {

        $scope.data = {
            no : 'No.1234567890',
            quantity : 100,
            'date' : '2016-12-20'
        };

        $scope.postJson = function() {
            $http({
                url : '/postJson',
                method : 'POST',
                data : $scope.data
            }).success(function(r) {
                $scope.responseBody = r;
            });

        }
    });
</script>
</head>
<body ng-app="app" ng-controller="MainController">
    no:
    <input id="no" ng-model="data.no" />
    <br /> quantity:
    <input id="quantity" ng-model="data.quantity" />
    <br /> date:
    <input id="date" ng-model="data.date" />
    <br />
    <input value="postJson" type="button" ng-click="postJson()" />
    <br />
    <br />
    <div>{{responseBody}}</div>
</body>
</html>
项目结构如下图:

一、结合jquery
运行App.java后进去“http://localhost:8080/jquery”页面
点击“postData”按钮:
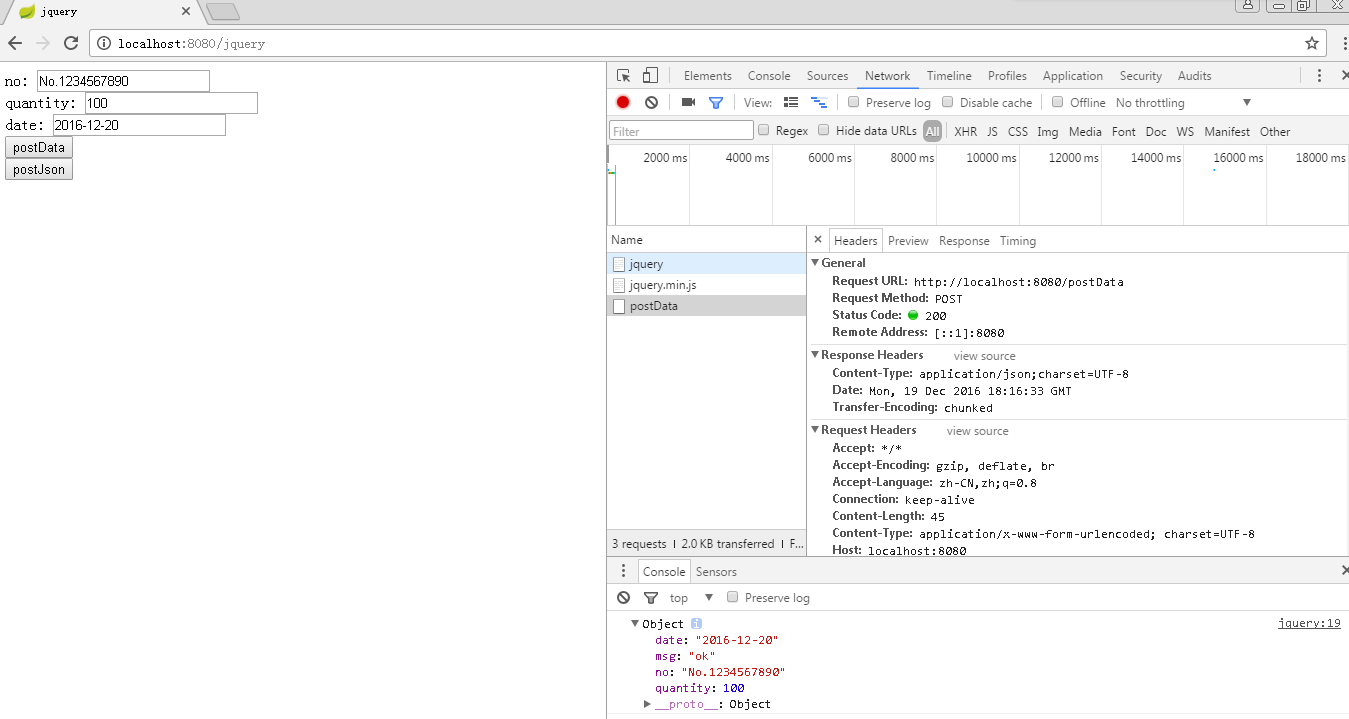
jquery成功的调用了spring mvc的后台方法“public @ResponseBody Map<String, Object> postData(String no, int quantity, String date) ”
这里,“date”参数我使用的是String类型,而并不是Date类型。因为大多数情况是使用对象形式来接收ajax客户端的值,所以我这里偷懒了,就直接使用String类型。如果想使用Date类型,则需要使用@InitBinder注解,后面的篇幅中会讲到,在这里就不再赘述。
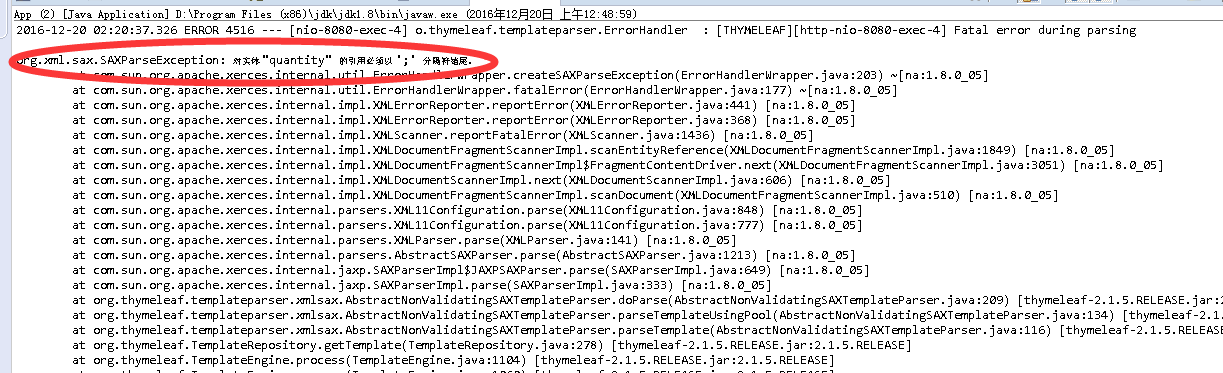
另外,使用“thymeleaf ”模板引擎在编写js时,“&”关键字要特别注意,因为“thymeleaf ”模板引擎使用的是xml语法。因此,在<script>标签的开始——结束的位置要加“/*<![CDATA[*/ ...../*]]>*/”
例如:
<script type="text/javascript">
    /*<![CDATA[*/

        // javascript code ...


    /*]]>*/
</script>
否则,运行“thymeleaf ”模板引擎时就会出现错误“org.xml.sax.SAXParseException:...”
点击“postJson”按钮:
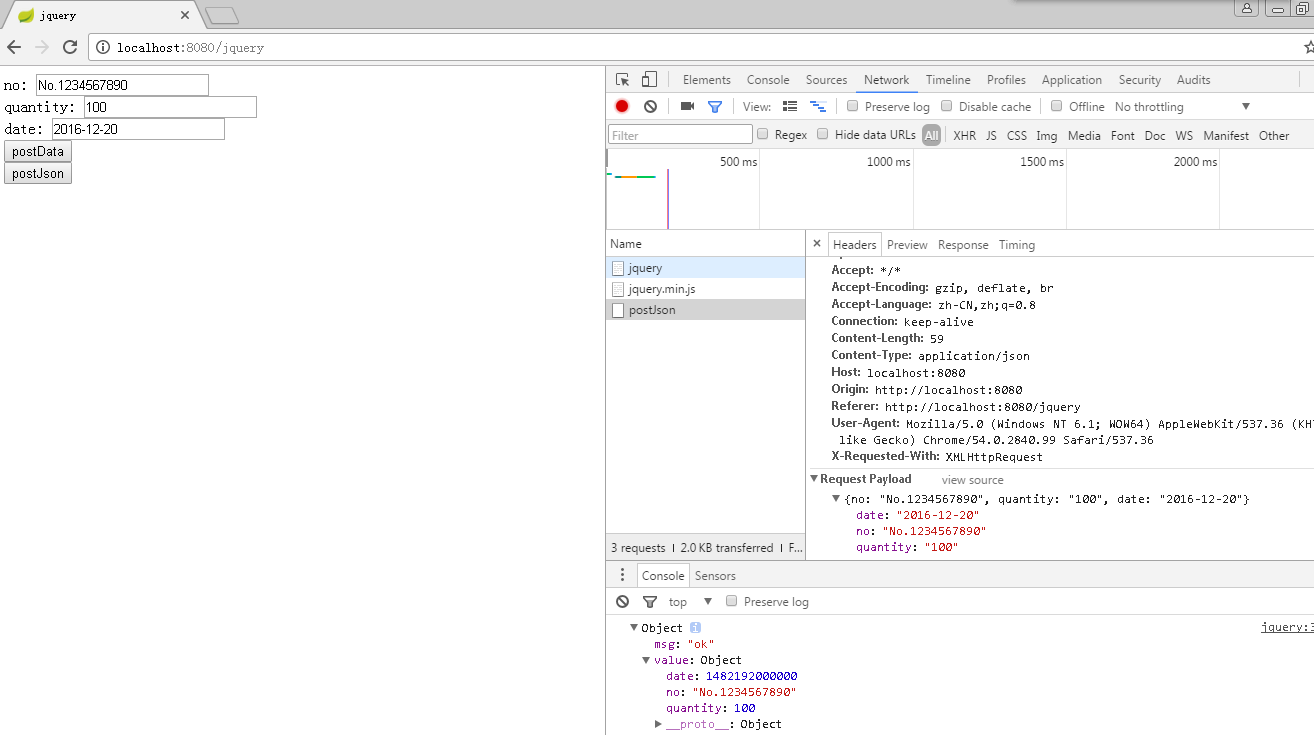
jquery则成功调用了后台“public @ResponseBody Map<String, Object> postJson(@RequestBody Order order)”方法,
并且参数“order”中的属性或字段也能被自动赋值,而Date类一样会被赋值。
注意的是:在使用jquery的$.ajax方法时,contentType参数需要使用“application/json”,而后台spring mvc的“postJson”方法中的“order”参数也需要使用@RequestBody注解。
二、结合angularjs
进入“后进去http://localhost:8080/angularjs”页面
点击“postJson”按钮:
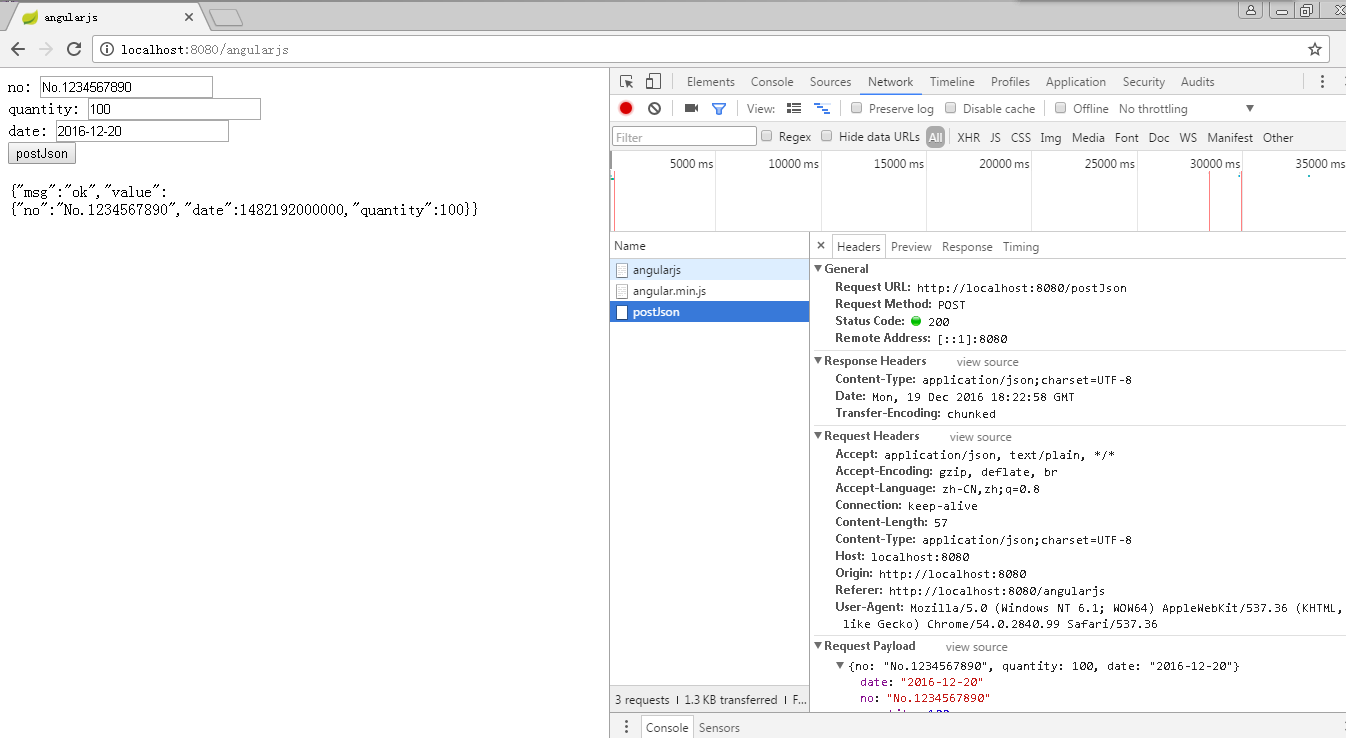
使用angularjs后,依然能调用“public @ResponseBody Map<String, Object> postJson(@RequestBody Order order) ”方法。
代码:https://github.com/carter659/spring-boot-03.git

如果你觉得我的博客对你有帮助,可以给我点儿打赏,左侧微信,右侧支付宝。
有可能就是你的一点打赏会让我的博客写的更好:)

 浙公网安备 33010602011771号