
k8s实用整理(15)-产品安装试用之ICP
安装测试基于k8s的各开源和商用产品:红帽的openshift rancher2.0 IBM的icp等
此文为整理的icp 2.1.0.2安装说明及参考资料
官方安装说明及其他网页:
https://www.ibm.com/support/knowledgecenter/SSBS6K_2.1.0.2/installing/install_app_mod.html
前期配置
https://www.ibm.com/support/knowledgecenter/SSBS6K_2.1.0.2/installing/prep_cluster.html
https://www.ibm.com/support/knowledgecenter/SSBS6K_2.1.0.2/installing/custom_install.html#HA
注意:
./cluster/hosts中PROXY大于1 (installer/playbook/roles/check/tasks/local.yaml ),则需服务器及hosts配置proxy_vip,参考上述页面。
1 服务器preinstall配置
实验服务器操作系统 ubuntu 16.04
1.1 python版本
Python versions 2.6 to 2.9.x are supported.

root@ICP-K8SMASTER:~# python --version
Python 2.7.12
安装参考:使用Kubespray在ubuntu上自动部署K8s1.9.0集群 之python安装
apt-add-repository ppa:ansible/ansible

apt-get install python
1.2 内核参数
修改/etc/sysctl.conf文件
vm.max_map_count=262144
net.ipv4.ip_forward=1
执行命令sysctl –p生效
echo "vm.max_map_count=262144" >> /etc/sysctl.conf
echo "net.ipv4.ip_forward=1" >> /etc/sysctl.conf
sysctl -p
1.3 /etc/hosts


cat /etc/hosts
127.0.0.1    localhost

172.28.2.230    icp-k8smaster
172.28.2.231    icp-k8snode01
172.28.2.232    icp-k8snode02

# The following lines are desirable for IPv6 capable hosts
#::1     localhost ip6-localhost ip6-loopback
ff02::1 ip6-allnodes
ff02::2 ip6-allrouters
1.4 ssh无密码远程配置
ssh-keygen
#cp ~/.ssh/id_rsa ./cluster/ssh_key #此命令在安装过程2.3中操作
ssh-copy-id root@172.28.2.230
ssh-copy-id root@172.28.2.231
ssh-copy-id root@172.28.2.232
2、安装
2.1 解压并load镜像(本节各步骤适用于linux x64,其他版本查看IBM官方说明 )
tar xf ibm-cp-app-mod-x86_64-2.1.0.2.tar.gz -O | sudo docker load
导入完成后查看
docker images
docker images|wc -l
82个镜像
2.2 master创建安装目录,拷贝镜像(ibmcom/icp-inception:2.1.0.2)中文件
mkdir /opt/ibm-cp-app-mod-2.1.0.2;  \
cd /opt/ibm-cp-app-mod-2.1.0.2
sudo docker run -v $(pwd):/data -e LICENSE=accept \
ibmcom/icp-inception:2.1.0.2-ee \
cp -r cluster /data
sudo docker run -v $(pwd):/data -e LICENSE=accept \
-d --name=copyfile \
ibmcom/icp-inception:2.1.0.2-ee \
tail -f /dev/null
docker cp copyfile:/ /root/icp-inception
docker stop copyfile
docker rm copyfile
2.3 配置无密码远程,用于ansible部署
同1.4
ssh-keygen
cd /opt/ibm-cp-app-mod-2.1.0.2
cp ~/.ssh/id_rsa ./cluster/ssh_key
ssh-copy-id root@172.28.2.230
ssh-copy-id root@172.28.2.231
ssh-copy-id root@172.28.2.232
2.4 拷贝镜像安装包至指定目录
cd /opt/ibm-cp-app-mod-2.1.0.2
mkdir -p cluster/images
#sudo mv /<path_to_installation_file>/ibm-cp-app-mod-x86_64-2.1.0.2.tar.gz  cluster/images/
mv /root/icp/ibm-cloud-private-x86_64-2.1.0.2.tar.gz cluster/images/
2.5 修改ansible相关配置,用于安装部署
vim cluster/hosts
[master]
172.28.2.230

[worker]
172.28.2.231
172.28.2.232

[proxy]
172.28.2.230
#172.28.2.231
#172.28.2.232
1个master 2个worker(node)
1个proxy(多个proxy需提供HA proxy_vip)
2.6 开始安装(实为创建安装容器,运行安装命令,使用ansible跑playbook)
cd ./cluster
docker run --net=host -t -e LICENSE=accept \
-v "$(pwd)":/installer/cluster ibmcom/icp-inception:2.1.0.2-ee install##&&tail -f /dev/null

#若正常安装完成,安装容器退出,不便于直接检查安装结果
#因icp安装后,默认并不会给master安装kubectl
#通过安装过程中的问题排查需使用命令docker exec,如docker exec 安装容器id kubectl get pod -n kube-system
2.7 安装结果
很幸运,安装成功,若过程中出现问题,根据对应task查找相关yaml进行定位解决。
PLAY RECAP ******************************************************************************************************************************************************
172.28.2.230               : ok=220  changed=73   unreachable=0    failed=0
172.28.2.231               : ok=154  changed=48   unreachable=0    failed=0
172.28.2.232               : ok=145  changed=40   unreachable=0    failed=0
localhost                  : ok=225  changed=149  unreachable=0    failed=0


POST DEPLOY MESSAGE *********************************************************************************************************************************************

The Dashboard URL: https://172.28.2.230:8443, default username/password is admin/admin

Playbook run took 0 days, 1 hours, 29 minutes, 3611 seconds
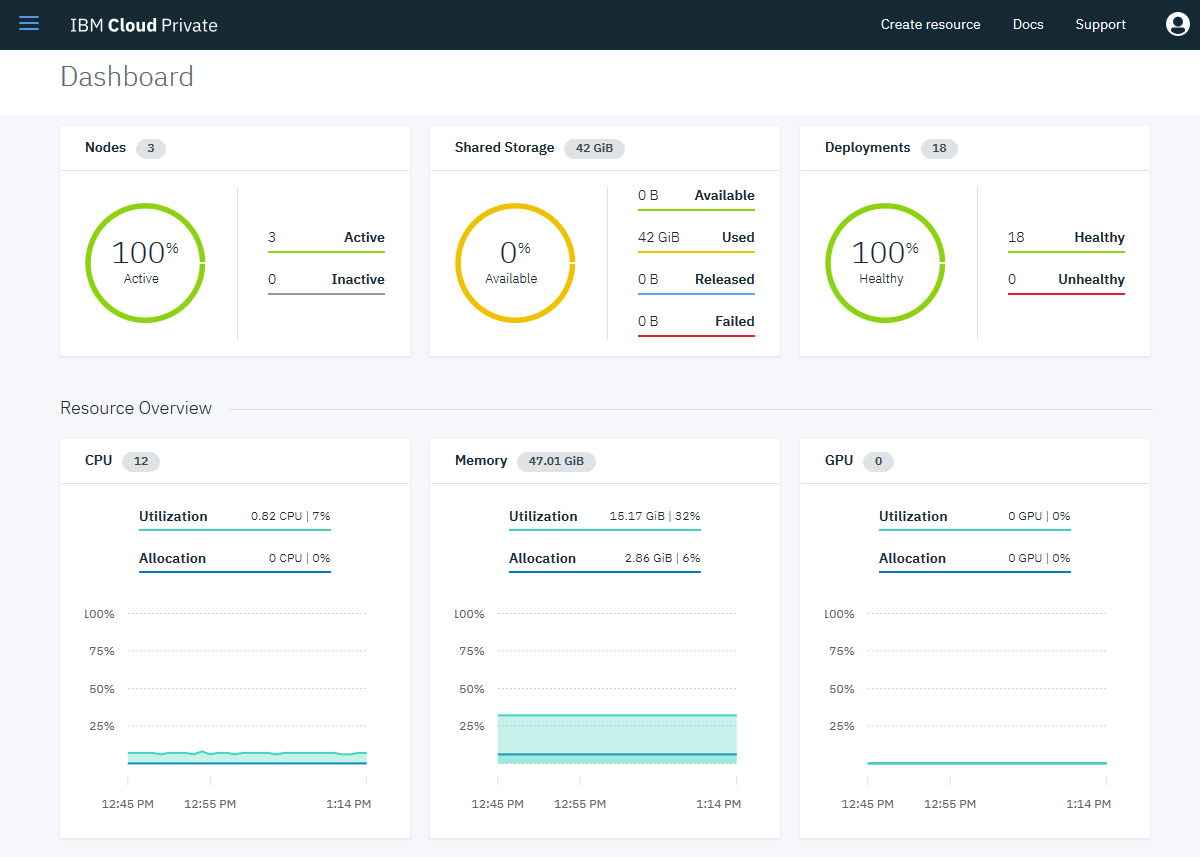
3 The Dashboard URL
相关说明及
及根据提示安装IBM Cloud Private CLI kubectl CLI Helm CLI

给出的几项快捷连接说明:
①kubernetes官方文档连接:Kubernetes
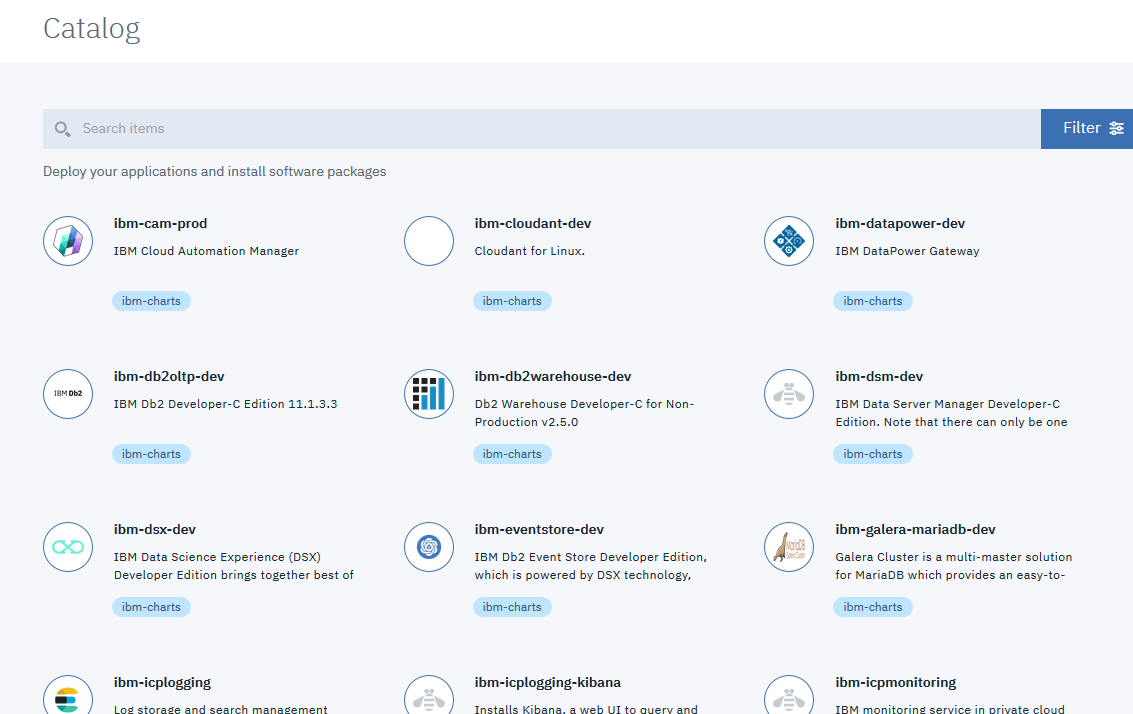
②已部署的catlog helm地址,可下载ibm的各helm包,如下图
③IBM提供的迁移支持,需license
④CLI安装(默认各CLI均未安装,需参考步骤进行安装部署)下面则为整理的安装步骤
3.1 安装kubectl
官网安装,需FQ,安装参考地址
https://v1-9.docs.kubernetes.io/docs/tasks/tools/install-kubectl/
-
If you are on Ubuntu or one of other Linux distributions that support snap package manager, you can install with:
sudo snap install kubectl --classic -
Run
kubectl versionto verify that the version you’ve installed is sufficiently up-to-date.
为了使kubectl找到并访问Kubernetes集群,需要一个kubeconfig文件,当你使用kube-up.sh创建集群或成功部署Minikube集群时,该文件将自动创建。有关创建集群的更多信息,请参阅入门指南。如果你需要访问未创建的群集,请参阅共享群集访问文档。默认情况下,kubectl配置位于~/.kube/config。
kubectl配置位于~/.kube/config
docker run -e LICENSE=accept --net=host -v /usr/local/bin:/data ibmcom/icp-inception:2.1.0.2-ee cp /usr/local/bin/kubectl /data
登陆cluster management console
点击右上角Select User Name > Configure client. The cluster configuration details display and resemble the following code:
kubectl config set-cluster mycluster.icp --server=https://172.28.2.230:8001 --insecure-skip-tls-verify=true
kubectl config set-context mycluster.icp-context --cluster=mycluster.icp
kubectl config set-credentials admin --token=eyJ0eXAiOiJKV1QiLCJhbGciOiJSUzI1NiJ9.eyJhdF9oYXNoIjoieHo3ODhmcTNha2xtMmpseGx2c2kiLCJyZWFsbU5hbWUiOiJjdXN0b21SZWFsbSIsInVuaXF1ZVNlY3VyaXR5TmFtZSI6ImFkbWluIiwiaXNzIjoiaHR0cHM6Ly9teWNsdXN0ZXIuaWNwOjk0NDMvb2lkYy9lbmRwb2ludC9PUCIsImF1ZCI6IjNkZjlkNjM0NDE3MTM4NmY3ZTgwY2I3YWNmNzE3NDNhIiwiZXhwIjoxNTI1Mzk0NjIwLCJpYXQiOjE1MjUzOTQ2MjAsInN1YiI6ImFkbWluIiwidGVhbVJvbGVNYXBwaW5ncyI6W119.Bym5qdzo1M3ApN4kuw5yEZ7avXrtm638WGA6hPAkvc-IE9G6Sryk5Ym3UHQlombpNmXEPftjtDahi4HMMuLbCWk0NlqLVPacmssU21DKPSz4w4jY4OM0VjOIrt1epvQKAty9g8F-IPK4sKzMXeA1e4540qmzX4o9ArlhPB-sTiImAuUG7_-Svd_aIh87IcixgAKIm6As_AEpUtSKb_mb1zh4uaVzUQrePj6CxmQdk7Nkz9JyFfONrKQyc7EPYP4L1Nadu4WDgnzkKHab1vrstZ3gwjbRxlmIawDvIR70g99RuRiV-q_olHPQL3z1W-Bpfud1EnLe9vFRETUto2Zwzw
kubectl config set-context mycluster.icp-context --user=admin --namespace=default
kubectl config use-context mycluster.icp-context
root@ICP-K8SMASTER:~# docker run -e LICENSE=accept --net=host -v /usr/local/bin:/data ibmcom/icp-inception:2.1.0.2-ee cp /usr/local/bin/kubectl /data
root@ICP-K8SMASTER:~# kubectl config set-cluster mycluster.icp --server=https://172.28.2.230:8001 --insecure-skip-tls-verify=true
joxNTI1Mzk0NjIwLCJpYXQiOjE1MjUzOTQ2MjAsInN1YiI6ImFkbWluIiwidGVhbVJvbGVNYXBwaW5ncyI6W119.Bym5qdzo1M3ApN4kuw5yEZ7avXrtm638WGA6hPAkvc-IE9G6Sryk5Ym3UHQlombpNmXEPftjtDahi4HMMuLbCWk0NlqLVPacmssU21DKPSz4w4jY4OM0VjOIrt1epvQKAty9g8F-IPK4sKzMXeA1e4540qmzX4o9ArlhPB-sTiImAuUG7_-Svd_aIh87IcixgAKIm6As_AEpUtSKb_mb1zh4uaVzUQrePj6CxmQdk7Nkz9JyFfONrKQyc7EPYP4L1Nadu4WDgnzkKHab1vrstZ3gwjbRxlmIawDvIR70g99RuRiV-q_olHPQL3z1W-Bpfud1EnLe9vFRETUto2Zwzw
kubectl config set-context mycluster.icp-context --user=admin --namespace=default
kubectl config use-context mycluster.icp-context
Cluster "mycluster.icp" set.
root@ICP-K8SMASTER:~# kubectl config set-context mycluster.icp-context --cluster=mycluster.icp
Context "mycluster.icp-context" created.
root@ICP-K8SMASTER:~# kubectl config set-credentials admin --token=eyJ0eXAiOiJKV1QiLCJhbGciOiJSUzI1NiJ9.eyJhdF9oYXNoIjoieHo3ODhmcTNha2xtMmpseGx2c2kiLCJyZWFsbU5hbWUiOiJjdXN0b21SZWFsbSIsInVuaXF1ZVNlY3VyaXR5TmFtZSI6ImFkbWluIiwiaXNzIjoiaHR0cHM6Ly9teWNsdXN0ZXIuaWNwOjk0NDMvb2lkYy9lbmRwb2ludC9PUCIsImF1ZCI6IjNkZjlkNjM0NDE3MTM4NmY3ZTgwY2I3YWNmNzE3NDNhIiwiZXhwIjoxNTI1Mzk0NjIwLCJpYXQiOjE1MjUzOTQ2MjAsInN1YiI6ImFkbWluIiwidGVhbVJvbGVNYXBwaW5ncyI6W119.Bym5qdzo1M3ApN4kuw5yEZ7avXrtm638WGA6hPAkvc-IE9G6Sryk5Ym3UHQlombpNmXEPftjtDahi4HMMuLbCWk0NlqLVPacmssU21DKPSz4w4jY4OM0VjOIrt1epvQKAty9g8F-IPK4sKzMXeA1e4540qmzX4o9ArlhPB-sTiImAuUG7_-Svd_aIh87IcixgAKIm6As_AEpUtSKb_mb1zh4uaVzUQrePj6CxmQdk7Nkz9JyFfONrKQyc7EPYP4L1Nadu4WDgnzkKHab1vrstZ3gwjbRxlmIawDvIR70g99RuRiV-q_olHPQL3z1W-Bpfud1EnLe9vFRETUto2Zwzw
User "admin" set.
root@ICP-K8SMASTER:~# kubectl config set-context mycluster.icp-context --user=admin --namespace=default
Context "mycluster.icp-context" modified.
root@ICP-K8SMASTER:~# kubectl config use-context mycluster.icp-context
Switched to context "mycluster.icp-context".
root@ICP-K8SMASTER:~# kubectl
kubectl controls the Kubernetes cluster manager.

Find more information at https://github.com/kubernetes/kubernetes.

Basic Commands (Beginner):
  create         Create a resource from a file or from stdin.
root@ICP-K8SMASTER:/opt/ibm-cp-app-mod-2.1.0.2/cluster/images# kubectl get deployment --all-namespaces
NAMESPACE     NAME                                     DESIRED   CURRENT   UP-TO-DATE   AVAILABLE   AGE
kube-system   calico-kube-controllers                  1         1         1            1           18h
kube-system   catalog-catalog-controller-manager       1         1         1            1           18h
kube-system   default-http-backend                     1         1         1            1           18h
kube-system   elasticsearch-client                     1         1         1            1           18h
kube-system   elasticsearch-master                     1         1         1            1           18h
kube-system   heapster                                 1         1         1            1           18h
kube-system   helm-api                                 1         1         1            1           18h
kube-system   helmrepo                                 1         1         1            1           18h
kube-system   logstash                                 1         1         1            1           18h
kube-system   metering-dm                              1         1         1            1           18h
kube-system   metering-server                          1         1         1            1           18h
kube-system   metering-ui                              1         1         1            1           18h
kube-system   monitoring-exporter                      1         1         1            1           18h
kube-system   monitoring-grafana                       1         1         1            1           18h
kube-system   monitoring-prometheus                    1         1         1            1           18h
kube-system   monitoring-prometheus-alertmanager       1         1         1            1           18h
kube-system   monitoring-prometheus-kubestatemetrics   1         1         1            1           18h
kube-system   tiller-deploy                            1         1         1            1           18h
root@ICP-K8SMASTER:/opt/ibm-cp-app-mod-2.1.0.2/cluster/images# kubectl get namespaces
NAME          STATUS    AGE
default       Active    18h
kube-public   Active    18h
kube-system   Active    18h
platform      Active    18h
services      Active    18h
普通用户配置kubectl,并配置命令自动补全
#为了使用更便捷,启用 kubectl 命令的自动补全功能,root及普通用户均可执行。
echo "source <(kubectl completion bash)" >> ~/.bashrc
troubleshooting
IBM-ICP按上述方式安装kubectl后可用;但过一段时间后,kubectl clusterinfo报错:(稳定性?)
root@ICP-K8SMASTER:~# kubectl cluster-info
Kubernetes master is running at https://172.28.2.230:8001

To further debug and diagnose cluster problems, use 'kubectl cluster-info dump'.
error: You must be logged in to the server (Unauthorized)
error: You must be logged in to the server (Unauthorized)
解决方法,再次执行dashboard给出的命令:
kubectl config set-cluster mycluster.icp --server=https://172.28.2.230:8001 --insecure-skip-tls-verify=true
kubectl config set-context mycluster.icp-context --cluster=mycluster.icp
kubectl config set-credentials admin --token=eyJ0eXAiOiJKV1QiLCJhbGciOiJSUzI1NiJ9.eyJhdF9oYXNoIjoiYXNmNWh4a3c0ZnRtZHZ3bmRtMzAiLCJyZWFsbU5hbWUiOiJjdXN0b21SZWFsbSIsInVuaXF1ZVNlY3VyaXR5TmFtZSI6ImFkbWluIiwiaXNzIjoiaHR0cHM6Ly9teWNsdXN0ZXIuaWNwOjk0NDMvb2lkYy9lbmRwb2ludC9PUCIsImF1ZCI6IjNkZjlkNjM0NDE3MTM4NmY3ZTgwY2I3YWNmNzE3NDNhIiwiZXhwIjoxNTI1NTA0MjY4LCJpYXQiOjE1MjU1MDQyNjgsInN1YiI6ImFkbWluIiwidGVhbVJvbGVNYXBwaW5ncyI6W119.iA9_-cqM25GdL69I5CyMb9nAR1QFn1jR870FMXL8znV8e2E3OPtxp4UPXC-de_O7TO5vpnU4fnMQs2sNFHegDOUWK4Fqy5DjkHUuckRngAXY7c2zA5iNfEXVl9jXc_tC7O36Kdb5FsE8giIhldx1WJIRd2uKr6m8mlQD9u9zQMciOykHJysKQqPvxaLv62u3iz46QSyw-fOvUFGpI0JYx_AGn5eAoWA9VJgpsrlcywOM6TF1VictD79sa25nmXyyfbzR7M7YYJG3lXDU-9zYEluE9jERBHjNWNJ-2qDcVsIg2E9X_isRVX0E3jF0K6ba2DS4zlPlUqlSv6N5nF4lnQ
kubectl config set-context mycluster.icp-context --user=admin --namespace=default
kubectl config use-context mycluster.icp-context
3.2 安装ICP CLI
IBM官方相关页面
① 安装参考页面
② 使用说明
参考步骤:
##安装bx
curl -fsSL https://clis.ng.bluemix.net/install/linux | sh
##From the IBM Cloud Private management console, click左上角 Menu > Command Line Tools > Cloud Private CLI.
mkdir /root/cli
cd /root/cli
wget https://172.28.2.230:8443/api/cli/icp-linux-amd64 --no-check-certificate
bx plugin install /root/cli/icp-linux-amd64
bx pr –help  ##安装成功
##log in to your cluster:
bx pr login -a https://172.28.2.230:8443 --skip-ssl-validation
##Find the name of your cluster.
bx pr clusters
##Configure your cluster.
bx pr cluster-config <clustername>
##之后方可安装helm
root@ICP-K8SMASTER:~# curl -fsSL https://clis.ng.bluemix.net/install/linux | sh
Current platform is linux64. Downloading corresponding Bluemix CLI...
  % Total    % Received % Xferd  Average Speed   Time    Time     Time  Current
                                 Dload  Upload   Total   Spent    Left  Speed
100   118    0   118    0     0     78      0 --:--:--  0:00:01 --:--:--    78
100 13.8M  100 13.8M    0     0   131k      0  0:01:47  0:01:47 --:--:--  207k
Download complete. Executing installer...
  % Total    % Received % Xferd  Average Speed   Time    Time     Time  Current
                                 Dload  Upload   Total   Spent    Left  Speed
100    40    0    40    0     0     18      0 --:--:--  0:00:02 --:--:--    18
Bluemix_CLI/
Bluemix_CLI/bx/
Bluemix_CLI/bx/zsh_autocomplete
Bluemix_CLI/bx/bash_autocomplete
Bluemix_CLI/bin/
Bluemix_CLI/bin/NOTICE
Bluemix_CLI/bin/cfcli/
Bluemix_CLI/bin/cfcli/cf
Bluemix_CLI/bin/LICENSE
Bluemix_CLI/bin/bluemix
Bluemix_CLI/bin/bluemix-analytics
Bluemix_CLI/install_bluemix_cli
Copying files ...
IBM Cloud Command Line Interface(IBM Cloud CLI) is installed successfully.
To get started, open a terminal window and enter "bluemix help".

IBM Cloud CLI has plug-in framework to extend its capability. Go to https://console.bluemix.net/docs/cli/reference/bluemix_cli/extend_cli.html for how to install plug-ins.

IBM Cloud CLI automatically collects data for usage analysis and use experience improvement. No personally identifiable data is collected.
To disable the collecting,  run:
        "bluemix config --usage-stats-collect false"
Install complete.
root@ICP-K8SMASTER:~# cd /root/cli
-bash: cd: /root/cli: No such file or directory
root@ICP-K8SMASTER:~# mkdir cli
root@ICP-K8SMASTER:~# cd cli/
root@ICP-K8SMASTER:~/cli# wget https://172.28.2.230:8443/api/cli/icp-linux-amd64 --no-check-certificate
--2018-05-03 12:03:24--  https://172.28.2.230:8443/api/cli/icp-linux-amd64
Connecting to 172.28.2.230:8443... connected.
WARNING: cannot verify 172.28.2.230's certificate, issued by ‘CN=mycluster.icp’:
  Self-signed certificate encountered.
    WARNING: certificate common name ‘mycluster.icp’ doesn't match requested host name ‘172.28.2.230’.
HTTP request sent, awaiting response... 200 OK
Length: 20746952 (20M) [application/octet-stream]
Saving to: ‘icp-linux-amd64’

icp-linux-amd64                          100%[===============================================================================>]  19.79M   128MB/s    in 0.2s

2018-05-03 12:03:24 (128 MB/s) - ‘icp-linux-amd64’ saved [20746952/20746952]

root@ICP-K8SMASTER:~/cli# bx plugin install /root/cli/icp-linux-amd64
正在安装二进制文件...
确定
已成功将插件“icp 2.1.182”安装到 /root/.bluemix/plugins/icp。请使用“bx plugin show icp”来显示其详细信息。
root@ICP-K8SMASTER:~/cli# bx pr login -a https://172.28.2.230:8443 --skip-ssl-validation
API endpoint: https://172.28.2.230:8443

Username> admin

Password>
Authenticating...
OK

Select an account:
1. mycluster Account (id-mycluster-account)
Enter a number> 1
Targeted account: mycluster Account (id-mycluster-account)

root@ICP-K8SMASTER:~/cli# bx pr clusters
OK
Name        ID                                 State      Created                    Masters   Workers   Datacenter
mycluster   00000000000000000000000000000001   deployed   2018-05-03T00:57:27+0000   1         2         default

root@ICP-K8SMASTER:~/cli# bx pr cluster-config mycluster
Configuring kubectl: /root/.bluemix/plugins/icp/clusters/mycluster/kube-config
Cluster "mycluster" set.
Cluster "mycluster" set.
User "mycluster-user" set.
Context "mycluster-context" created.
Context "mycluster-context" modified.
Switched to context "mycluster-context".

OK
Cluster mycluster configured successfully.
3.3 helm安装
wget https://172.28.2.230:8443/helm-api/cli/linux-amd64/helm --no-check-certificate
mv helm /usr/local/bin
chmod a+x /usr/local/bin/helm
helm init --client-only --skip-refresh
root@ICP-K8SMASTER:~/cli#
root@ICP-K8SMASTER:~/cli# wget https://172.28.2.230:8443/helm-api/cli/linux-amd64/helm --no-check-certificate
--2018-05-03 12:11:09--  https://172.28.2.230:8443/helm-api/cli/linux-amd64/helm
Connecting to 172.28.2.230:8443... connected.
WARNING: cannot verify 172.28.2.230's certificate, issued by ‘CN=mycluster.icp’:
  Self-signed certificate encountered.
    WARNING: certificate common name ‘mycluster.icp’ doesn't match requested host name ‘172.28.2.230’.
HTTP request sent, awaiting response... 200 OK
Length: 68393980 (65M) [application/octet-stream]
Saving to: ‘helm’

helm                                     100%[===============================================================================>]  65.22M   108MB/s    in 0.6s

2018-05-03 12:11:09 (108 MB/s) - ‘helm’ saved [68393980/68393980]

root@ICP-K8SMASTER:~/cli# mv helm /usr/local/bin
root@ICP-K8SMASTER:~/cli# chmod a+x /usr/local/bin/helm
root@ICP-K8SMASTER:~/cli# helm init --client-only --skip-refresh
Creating /root/.helm/repository
Creating /root/.helm/repository/cache
Creating /root/.helm/repository/local
Creating /root/.helm/plugins
Creating /root/.helm/starters
Creating /root/.helm/cache/archive
Creating /root/.helm/repository/repositories.yaml
Adding stable repo with URL: https://kubernetes-charts.storage.googleapis.com
Adding local repo with URL: http://127.0.0.1:8879/charts
$HELM_HOME has been configured at /root/.helm.
Not installing Tiller due to 'client-only' flag having been set
Happy Helming!
检查是否可用,可能会遇到镜像下载失败,导致helm不可用的问题,解决方法参考下述页面
K8S脉络整理(015)-Helm包管理器\示例\创建自己的chart
debug确认问题出错位置参考:
root@ICP-K8SMASTER:~# export HELM_HOST=10.0.0.239:44134
root@ICP-K8SMASTER:~# helm init
$HELM_HOME has been configured at /root/.helm.
Warning: Tiller is already installed in the cluster.
(Use --client-only to suppress this message, or --upgrade to upgrade Tiller to the current version.)
Happy Helming!
root@ICP-K8SMASTER:~# helm version --debug
[debug] SERVER: "10.0.0.239:44134"

Client: &version.Version{SemVer:"v2.7.2+icp", GitCommit:"d41a5c2da480efc555ddca57d3972bcad3351801", GitTreeState:"dirty"}
Kubernetes: &version.Info{Major:"1", Minor:"9", GitVersion:"v1.9.1+icp-ee", GitCommit:"d97ba3f083461e0ae0a8881550e83350af4c8f57", GitTreeState:"clean", BuildDate:"2018-02-23T07:20:41Z", GoVersion:"go1.9.2", Compiler:"gc", Platform:"linux/amd64"}
[debug] rpc error: code = Unknown desc = No TLS creds found
Error: cannot connect to Tiller
ibmcom相关镜像若一直报错,则重装参考如下:K8S脉络整理(015)-Helm包管理器\示例\创建自己的chart
删除helm重建:helm reset -f    helm reset --remove-helm-home

参考K8S脉络整理(015)-Helm包管理器\示例\创建自己的chart重装

curl https://raw.githubusercontent.com/kubernetes/helm/master/scripts/get | bash

helm init

kubectl -n kube-system get pod -o wide  | grep tiller   #指定节点下载镜像

docker pull jiang7865134/tiller:v2.8.2

docker tag jiang7865134/tiller:v2.8.2 gcr.io/kubernetes-helm/tiller:v2.8.2

helm version --debug #查看是否报错
kubectl get svc -n kube-system | grep tiller  #查看tiller service ip和port

export HELM_HOST=10.0.0.82:44134 #设置为上述检索出的ip port
helm version --debug
helm version
helm completion bash > .helmrc
echo "source .helmrc" >> .bashrc
3.4 Dashbord ui
封装了很多add-on


如上,ICP安装参考。
CE版页面:ICP-CE
Docker hub相关repo:ibmcom
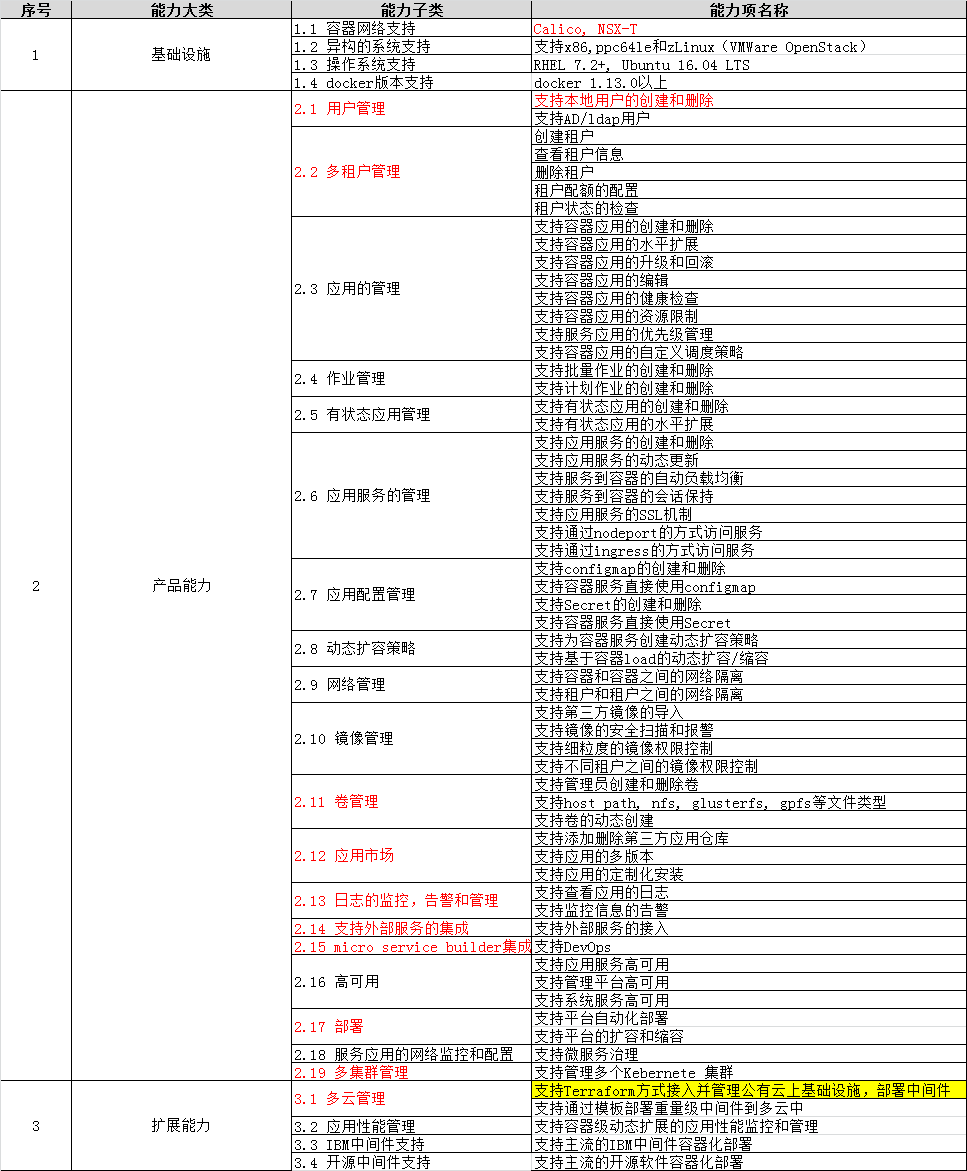
查看是否具备下述功能,及各功能使用方法。 重点关注标红相关能力。
英文文档
https://www.ibm.com/support/knowledgecenter/SSBS6K_2.1.0.2/kc_welcome_containers.html
中文文档
2.1 用户管理
默认用户admin,添加用户需连接LDAP。
检查k8s中web ui相关容器:
root@ICP-K8SMASTER:~# kubectl get service -n kube-system | grep 8443
icp-management-ingress                   ClusterIP   10.0.0.154   <none>        8443/TCP                              2d
root@ICP-K8SMASTER:~# kubectl get pod -n kube-system -o wide | grep icp-management
icp-management-ingress-l8q52                              1/1       Running   0          2d        10.1.65.133    172.28.2.230
root@ICP-K8SMASTER:~# kubectl edit pod icp-management-ingress-l8q52 -n kube-system
root@ICP-K8SMASTER:~# docker ps | grep icp-management
8a9bb7b3a8cd        87d3abb1da60                      "/icp-management-i..."   2 days ago          Up 2 days                               k8s_icp-management-ingress_icp-management-ingress-l8q52_kube-system_53f99352-4df9-11e8-a15a-005056a90315_0
root@ICP-K8SMASTER:~/icp-inception/installer# pwd
/root/icp-inception/installer
root@ICP-K8SMASTER:~/icp-inception/installer# grep -r 'admin'
部署LDAP服务器,在dashboard中配置。
https://www.ibm.com/support/knowledgecenter/SSBS6K_2.1.0.2/cloud_foundry/configuring/authentication_ldap.html
ldap配置
https://www.ibm.com/support/knowledgecenter/SSBS6K_2.1.0.2/user_management/configure_ldap.html
2.2 多租户管理
2.3~2.8 k8s实现
3.1 管理vm?
other
修改kubelet参数
playbook/roles/kubelet/templates/kube-proxy.json.j2
添加节点#Adding a worker node
1、preinstall 同本页面:1 服务器preinstall配置
2、master操作:
cd /<installation_directory>/cluster
#Adding a worker node
docker run -e LICENSE=accept --net=host \
-v "$(pwd)":/installer/cluster \
ibmcom/icp-inception:2.1.0.2-ee worker -l \
ip_address_workernode1,ip_address_workernode2
其他见IBM支持

 浙公网安备 33010602011771号