
Python 3 利用机器学习模型 进行手写体数字检测
0.引言
介绍了如何生成手写体数字的数据,提取特征,借助 sklearn 机器学习模型建模,进行识别手写体数字 1-9 模型的建立和测试。
用到的几种模型:
1. LR,Logistic Regression, (线性模型)中的逻辑斯特回归
2. Linear SVC,Support Vector Classification, (支持向量机)中的线性支持向量分类
3. MLPC,Multi-Layer Perceptron Classification, (神经网络)多层感知机分类
4. SGDC,Stochastic Gradient Descent Classification, (线性模型)随机梯度法求解
手写体的识别是一个 分类 问题,提取图像特征作为模型输入,输出到标记数字 1-9;
主要内容:
1. 生成手写体数字数据集;
2. 提取图像特征存入 CSV;
3. 利用机器学习建立和测试手写体数字识别模型;
(如果你想尝试生成自己的数据集可以参考我的另一篇博客:http://www.cnblogs.com/AdaminXie/p/8379749.html)
源码上传到了我的 GitHub: https://github.com/coneypo/ML_handwritten_number, 有问题可以留言或者联系我邮箱;
得到不同样本量训练下,几种机器学习模型精度随样本的变化关系曲线:
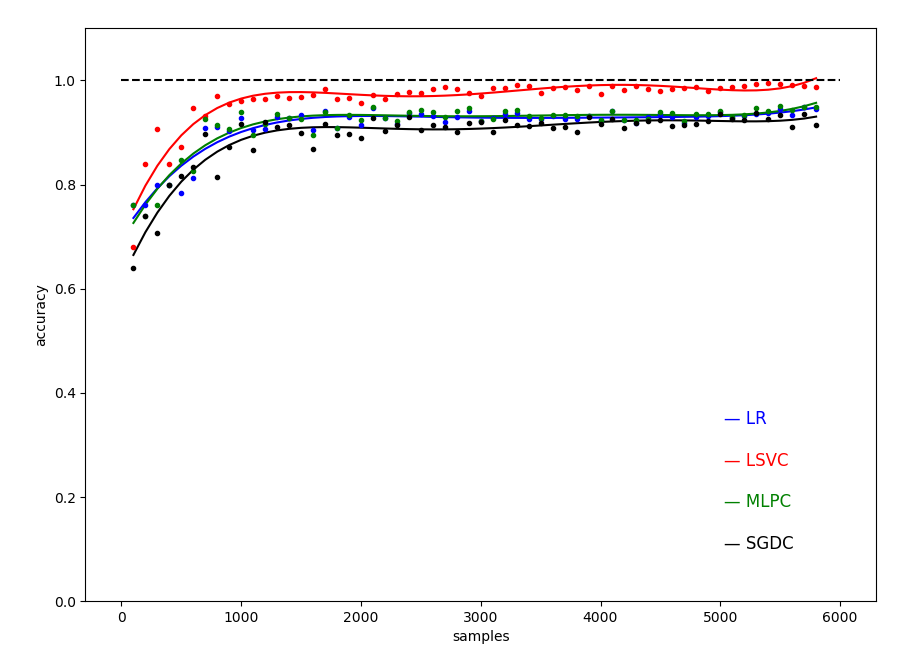
图 0 不同样本数目下的四种模型的测试精度( 数据集大小从 100 到 5800,间隔 100 )
1. 开发环境
python: 3.6.3
import PIL, cv2, pandas, numpy, os, csv, random
需要调用的 sklearn 库:
1 from sklearn.linear_model import LogisticRegression     # 线性模型中的 Logistic 回归模型
2 from sklearn.linear_model import SGDClassifier          # 线性模型中的随机梯度下降模型
3 from sklearn.svm import LinearSVC                       # SVM 模型中的线性 SVC 模型
4 from sklearn.neural_network import MLPClassifier        # 神经网络模型中的多层网络模型
2.整体设计思路
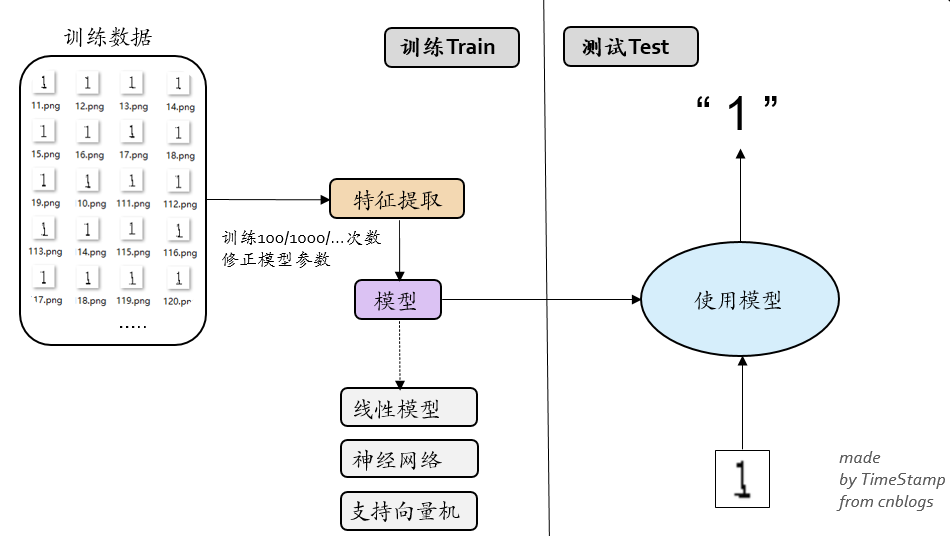
图 1 整体的框架设计
工程的目的,是想利用机器学习模型去训练识别生成的随机验证码图像(单个数字 1-9 ),通过以下三个步骤实现:
1. 生成手写体数据集
2. 提取特征向量写入 CSV
3. sklearn 模型训练和测试

图 2 整体的设计流程
3. 编程过程
3.1 生成多张单个验证码图像 ( generate_folders.py, generate_handwritten_numbers.py )
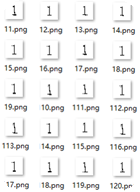
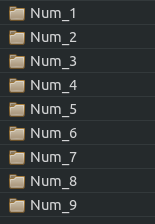
图 3 生成的多张单个验证码图像
手写体数据集的生成在我的另一篇博客详细介绍:( Link:http://www.cnblogs.com/AdaminXie/p/8379749.html )
思路就是 random 随机生成数字 1-9,然后利用PIL的画笔工具进行画图,对图像进行扭曲,然后根据随机数的真实标记 1-9,保存到对应文件夹内,用标记+序号命名。
1 draw = ImageDraw.Draw(im) # 画笔工具
3.2 提取特征向量写入 CSV ( get_features.py )
这一步是提取图像中的特征。生成的单个图像是 30*30 即 900 个像素点的;
为了降低维度,没有选择 900 个像素点每点的灰度作为输入,而是选取了 30 行每行的黑点数,和 30 列每列的黑点数作为输入,这样降到了 60 维。
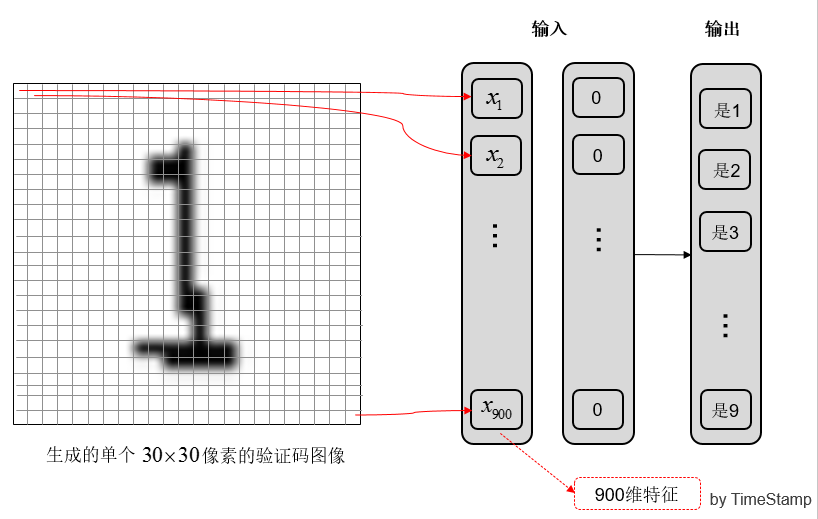
(a) 提取 900 维特征
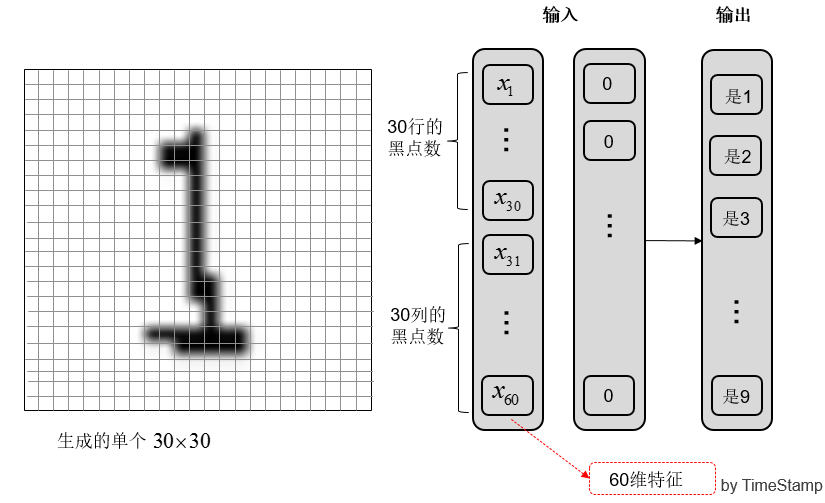
(b) 提取 60 维特征
图 4 提取图像特征
特征的提取也比较简单,逐行逐列计算然后计数求和:
 1     def get_feature(img):
 2         # 提取特征
 3         # 30*30的图像,
 4
 5         width, height = img.size
 6
 7         global pixel_cnt_list
 8         pixel_cnt_list=[]
 9
10         height = 30
11         for y in range(height):
12             pixel_cnt_x = 0
13             for x in range(width):
14                 # print(img.getpixel((x,y)))
15                 if img.getpixel((x, y)) == 0:  # 黑点
16                     pixel_cnt_x += 1
17
18             pixel_cnt_list.append(pixel_cnt_x)
19
20         for x in range(width):
21             pixel_cnt_y = 0
22             for y in range(height):
23                 if img.getpixel((x, y)) == 0:  # 黑点
24                     pixel_cnt_y += 1
25
26             pixel_cnt_list.append(pixel_cnt_y)
27
28         return pixel_cnt_list
所以我们接下来需要做的工作是,遍历访问文件夹 num_1-9 中的所有图像文件,进行特征提取,然后写入 CSV 文件中:
 1   with open(path_csv+"tmp.csv", "w", newline="") as csvfile:
 2         writer = csv.writer(csvfile)
 3         # 访问文件夹 1-9
 4         for i in range(1, 10):
 5             num_list = os.listdir(path_images + "num_" + str(i))
 6             print(path_images + "num_" + str(i))
 7             print("num_list:", num_list)
 8             # 读到图像文件
 9             if os.path.isdir(path_images + "num_" + str(i)):
10                 print("样本个数:", len(num_list))
11                 sum_images = sum_images + len(num_list)
12
13                 # Travsel every single image to generate the features
14                 for j in range(0, (len(num_list))):
15
16                     # 处理读取单个图像文件提取特征
17                     img = Image.open(path_images + "num_" + str(i)+"/" + num_list[j])
18                     get_features_single(img)
19                     pixel_cnt_list.append(num_list[j][0])
20
21                     # 写入CSV
22                     writer.writerow(pixel_cnt_list)
图 5 提取出来的 CSV 文件(前 60 列为输入特征,第 61 列为输出标记)
3.3 sklearn 模型训练和测试 ( ml_ana.py, test_single_images.py )
之前的准备工作都做完之后,我们生成了存放着 60 维输入特征和 1 维输出标记的 61 列的 CSV 文件;
然后就可以利用这些数据,交给 sklearn 的机器学习模型进行建模处理。
3.3.1 特征数据加工
第一步需要对 CSV 文件中的数据进行提取,利用 pd.read_csv 进行读取。写入 CSV 时,前 60 列为 60 维的特征向量,第 61 列为输出标记 1-9;
利用前面已经提取好的特征 CSV;
 1 # 从 CSV 中读取数据
 2 def pre_data():
 3     # CSV61维表头名
 4     column_names = []
 5
 6     for i in range(0, 60):
 7         column_names.append("feature_" + str(i))
 8     column_names.append("true_number")
 9
10     # 读取csv
11     path_csv = "../data/data_csvs/"
12     data = pd.read_csv(path_csv + "data_10000.csv", names=column_names)
13
14     # 提取数据集
15     global X_train, X_test, y_train, y_test
16     X_train, X_test, y_train, y_test = train_test_split(
17         data[column_names[0:60]],
18         data[column_names[60]],
19         test_size=0.25,  # 75% for 训练,25% for 测试
20         random_state=33
21         )
利用sklearn库的 train_test_split 函数 将数据进行分割,
得到训练集数据:X_train, y_train
得到测试集数据:X_test, y_test
3.3.2 模型训练和测试
经过前面一系列的准备工作做完,这里正式开始使用 sklearn 的机器学习模型建模;
调用 sklearn 利用训练数据对模型进行训练,然后利用测试数据进行性能测试,并且保存模型到本地 ( "/data/data_models/model_xxx.m");
ml_ana.py:
  1 # created at 2018-01-29
  2 # updated at 2018-09-28
  3
  4 # Author:   coneypo
  5 # Blog:     http://www.cnblogs.com/AdaminXie
  6 # GitHub:   https://github.com/coneypo/ML_handwritten_number
  7
  8
  9 from sklearn.model_selection import train_test_split
 10 import pandas as pd
 11
 12 from sklearn.preprocessing import StandardScaler     # 标准化
 13
 14 # 调用模型
 15 from sklearn.linear_model import LogisticRegression  # 线性模型中的 Logistic 回归模型
 16 from sklearn.svm import LinearSVC                    # SVM 模型中的线性 SVC 模型
 17 from sklearn.neural_network import MLPClassifier     # 神经网络模型中的多层网络模型
 18 from sklearn.linear_model import SGDClassifier       # 线性模型中的随机梯度下降模型
 19
 20 # 保存模型
 21 from sklearn.externals import joblib
 22
 23
 24 # 从 CSV 中读取数据
 25 def pre_data():
 26     # CSV61维表头名
 27     column_names = []
 28
 29     for i in range(0, 60):
 30         column_names.append("feature_" + str(i))
 31     column_names.append("true_number")
 32
 33     # 读取csv
 34     path_csv = "../data/data_csvs/"
 35     data = pd.read_csv(path_csv + "data_10000.csv", names=column_names)
 36
 37     # 提取数据集
 38     global X_train, X_test, y_train, y_test
 39     X_train, X_test, y_train, y_test = train_test_split(
 40         data[column_names[0:60]],
 41         data[column_names[60]],
 42         test_size=0.25,  # 75% for 训练,25% for 测试
 43         random_state=33
 44         )
 45
 46
 47 path_saved_models = "../data/data_models/"
 48
 49
 50 # LR, logistic regression, 逻辑斯特回归分类(线性模型)
 51 def way_LR():
 52     X_train_LR = X_train
 53     y_train_LR = y_train
 54
 55     X_test_LR = X_test
 56     y_test_LR = y_test
 57
 58     # 数据预加工
 59     # ss_LR = StandardScaler()
 60     # X_train_LR = ss_LR.fit_transform(X_train_LR)
 61     # X_test_LR = ss_LR.transform(X_test_LR)
 62
 63     # 初始化LogisticRegression
 64     LR = LogisticRegression()
 65
 66     # 调用LogisticRegression中的fit()来训练模型参数
 67     LR.fit(X_train_LR, y_train_LR)
 68
 69     # 使用训练好的模型lr对X_test进行预测
 70     # 结果储存在y_predict_LR中
 71     global y_predict_LR
 72     y_predict_LR = LR.predict(X_test_LR)
 73
 74     # 评分函数
 75     global score_LR
 76     score_LR = LR.score(X_test_LR, y_test_LR)
 77     print("The accurary of LR:", '\t', score_LR)
 78
 79     # 保存模型
 80     joblib.dump(LR, path_saved_models + "model_LR.m")
 81
 82     return LR
 83
 84
 85 # 多层感知机分类(神经网络)
 86 def way_MLPC():
 87     X_train_MLPC = X_train
 88     y_train_MLPC = y_train
 89
 90     X_test_MLPC = X_test
 91     y_test_MLPC = y_test
 92
 93     # ss_MLPC = StandardScaler()
 94     # X_train_MLPC = ss_MLPC.fit_transform(X_train_MLPC)
 95     # X_test_MLPC = ss_MLPC.transform(X_test_MLPC)
 96
 97     MLPC = MLPClassifier(hidden_layer_sizes=(13, 13, 13), max_iter=500)
 98     MLPC.fit(X_train_MLPC, y_train_MLPC)
 99
100     global y_predict_MLPC
101     y_predict_MLPC = MLPC.predict(X_test_MLPC)
102
103     global score_MLPC
104     score_MLPC = MLPC.score(X_test_MLPC, y_test_MLPC)
105     print("The accurary of MLPC:", '\t', score_MLPC)
106
107     # 保存模型
108     joblib.dump(MLPC, path_saved_models + "model_MLPC.m")
109
110     return MLPC
111
112
113 # Linear SVC, Linear Supported Vector Classifier, 线性支持向量分类(SVM支持向量机)
114 def way_LSVC():
115     X_train_LSVC = X_train
116     y_train_LSVC = y_train
117
118     X_test_LSVC = X_test
119     y_test_LSVC = y_test
120
121     # Standard Scaler
122     # ss_LSVC = StandardScaler()
123     # X_train_LSVC = ss_LSVC.fit_transform(X_train_LSVC)
124     # X_test_LSVC = ss_LSVC.transform(X_test_LSVC)
125
126     LSVC = LinearSVC()
127     LSVC.fit(X_train_LSVC, y_train_LSVC)
128
129     global y_predict_LSVC
130     y_predict_LSVC = LSVC.predict(X_test_LSVC)
131
132     global score_LSVC
133     score_LSVC = LSVC.score(X_test_LSVC, y_test_LSVC)
134     print("The accurary of LSVC:", '\t', score_LSVC)
135
136     # 保存模型
137     joblib.dump(LSVC, path_saved_models + "model_LSVC.m")
138
139     return LSVC
140
141
142 # SGDC, stochastic gradient decent 随机梯度下降法求解(线性模型)
143 def way_SGDC():
144     X_train_SGDC = X_train
145     y_train_SGDC = y_train
146
147     X_test_SGDC = X_test
148     y_test_SGDC = y_test
149
150     # ss_SGDC = StandardScaler()
151     # X_train_SGDC = ss_SGDC.fit_transform(X_train_SGDC)
152     # X_test_SGDC = ss_SGDC.transform(X_test_SGDC)
153
154     SGDC = SGDClassifier(max_iter=5)
155
156     SGDC.fit(X_train_SGDC, y_train_SGDC)
157
158     global y_predict_SGDC
159     y_predict_SGDC = SGDC.predict(X_test_SGDC)
160
161     global score_SGDC
162     score_SGDC = SGDC.score(X_test_SGDC, y_test_SGDC)
163     print("The accurary of SGDC:", '\t', score_SGDC)
164
165     # 保存模型
166     joblib.dump(SGDC, path_saved_models + "model_SGDC.m")
167
168     return SGDC
169
170
171 pre_data()
172 way_LR()
173 way_LSVC()
174 way_MLPC()
175 way_SGDC()
3.3.3 测试 ( test_single_images.py )
对于一张手写体数字,提取特征然后利用保存的模型进行预测;
 1 # created at 2018-01-29
 2 # updated at 2018-09-28
 3
 4 # Author:   coneypo
 5 # Blog:     http://www.cnblogs.com/AdaminXie
 6 # GitHub:   https://github.com/coneypo/ML_handwritten_number
 7
 8 # 利用保存到本地的训练好的模型,来检测单张 image 的标记
 9
10 from sklearn.externals import joblib
11 from PIL import Image
12
13 img = Image.open("../test/test_1.png")
14
15 # Get features
16 from generate_datebase import get_features
17 features_test_png = get_features.get_features_single(img)
18
19 path_saved_models = "../data/data_models/"
20
21 # LR
22 LR = joblib.load(path_saved_models + "model_LR.m")
23 predict_LR = LR.predict([features_test_png])
24 print("LR:", predict_LR[0])
25
26 # LSVC
27 LSVC = joblib.load(path_saved_models + "model_LSVC.m")
28 predict_LSVC = LSVC.predict([features_test_png])
29 print("LSVC:", predict_LSVC[0])
30
31 # MLPC
32 MLPC = joblib.load(path_saved_models + "model_MLPC.m")
33 predict_MLPC = MLPC.predict([features_test_png])
34 print("MLPC:", predict_MLPC[0])
35
36 # SGDC
37 SGDC = joblib.load(path_saved_models + "model_SGDC.m")
38 predict_SGDC = SGDC.predict([features_test_png])
39 print("SGDC:", predict_SGDC[0])
3.3.4 绘制样本数-精度图像
可以绘图来更加直观的精度:
 1 # 2018-01-29
 2 # By TimeStamp
 3 # cnblogs: http://www.cnblogs.com/AdaminXie/
 4 # plot_from_csv.py
 5 # 从存放样本数-精度的CSV中读取数据,绘制图形
 6
 7
 8 import numpy as np
 9 import matplotlib.pyplot as plt
10 import pandas as pd
11
12 # CSV路径
13 path_csv = "F:/***/P_ML_handwritten_number/data/score_csv/"
14
15 # 存储x轴坐标
16 x_array = []
17
18 # 存储精度
19 LR_score_arr = []
20 LSVC_score_arr = []
21 MLPC_score_arr = []
22 SGDC_score_arr = []
23
24 # 读取CSV数据
25 column_names = ["samples", "acc_LR", "acc_LSVC", "acc_MLPC", "acc_SGDC"]
26 rd_csv = pd.read_csv(path_csv + "score_100to5800.csv", names=column_names)
27
28 print(rd_csv.shape)
29
30 for i in range(len(rd_csv)):
31     x_array.append(float(rd_csv["samples"][i]))
32     LR_score_arr.append(float(rd_csv["acc_LR"][i]))
33     LSVC_score_arr.append(float(rd_csv["acc_LSVC"][i]))
34     MLPC_score_arr.append(float(rd_csv["acc_MLPC"][i]))
35     SGDC_score_arr.append(float(rd_csv["acc_SGDC"][i]))
36
37 ################ 3次线性拟合 ################
38 xray = np.array(x_array)
39 y_LR = np.array(LR_score_arr)
40 y_LSVC = np.array(LSVC_score_arr)
41 y_MLPC = np.array(MLPC_score_arr)
42 y_SGDC = np.array(SGDC_score_arr)
43
44 z1 = np.polyfit(xray, y_LR, 5)
45 z2 = np.polyfit(xray, y_LSVC, 5)
46 z3 = np.polyfit(xray, y_MLPC, 5)
47 z4 = np.polyfit(xray, y_SGDC, 5)
48
49 p1 = np.poly1d(z1)
50 p2 = np.poly1d(z2)
51 p3 = np.poly1d(z3)
52 p4 = np.poly1d(z4)
53
54 y_LR_vals = p1(xray)
55 y_LSVC_vals = p2(xray)
56 y_MLPC_vals = p3(xray)
57 y_SGDC_vals = p4(xray)
58 #################################
59
60 # 标明线条说明
61 plt.annotate("— LR", xy=(5030, 0.34), color='b', size=12)
62 plt.annotate("— LSVC", xy=(5030, 0.26), color='r', size=12)
63 plt.annotate("— MLPC", xy=(5030, 0.18), color='g', size=12)
64 plt.annotate("— SGDC", xy=(5030, 0.10), color='black', size=12)
65
66 # 画拟合曲线
67 plt.plot(xray, y_LR_vals, color='b')
68 plt.plot(xray, y_LSVC_vals, color='r')
69 plt.plot(xray, y_MLPC_vals, color='g')
70 plt.plot(xray, y_SGDC_vals, color='black')
71
72 # 画离散点
73 plt.plot(xray, y_LR, color='b', linestyle='None', marker='.', label='y_test', linewidth=100)
74 plt.plot(xray, y_LSVC, color='r', linestyle='None', marker='.', label='y_test', linewidth=0.01)
75 plt.plot(xray, y_MLPC, color='g', linestyle='None', marker='.', label='y_test', linewidth=0.01)
76 plt.plot(xray, y_SGDC, color='black', linestyle='None', marker='.', label='y_test', linewidth=0.01)
77
78 # 绘制y=1参考线
79 plt.plot([0, 6000], [1, 1], 'k--')
80
81 # 设置y轴坐标范围
82 plt.ylim(0, 1.1)
83
84 # 标明xy轴
85 plt.xlabel('samples')
86 plt.ylabel('accuracy')
87
88 plt.show()
3.3.4 测试结果
在样本数 sample_num = 50 的情况下,训练 75% 数据,用 25% 的数据即 13 个样本进行测试;
几种模型的测试结果如 图 6 所示,可见除了 SVM 达到 84.7% 的精度之外,其他都在 60-70% 左右;
但是因为只有 50 个样本点,小样本的情况下测试精度的偶然性误差比较大。
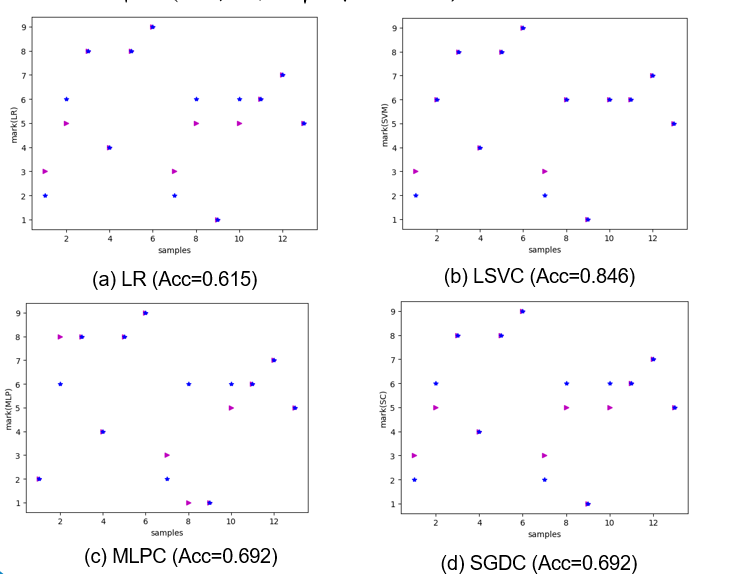
图 6 手写体识别的性能分析( 在样本数为 50 的情况下 )
增加样本数到 100,即生成了 100 张单个手写体图像,75 张用来训练,25 张用来测试;
25 张的测试结果 图 6 所示,几种模型的测试精度都达到了 90% 左右。

图 7 手写体识别的性能分析(在样本数为 100 的情况下)
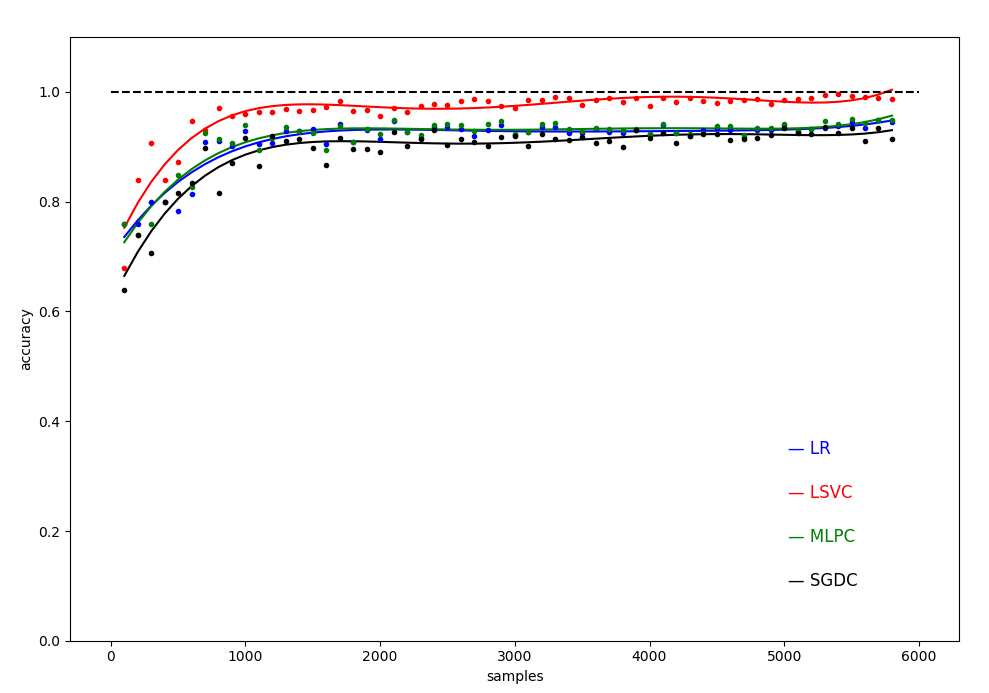
图 8 不同样本数目下的四种模型的测试精度( 5次拟合 )
# 如果对您有帮助,欢迎在 GitHub 上 Star 支持我: https://github.com/coneypo/ML_handwritten_number
# 请尊重他人劳动成果,转载或者使用源码请注明出处: http://www.cnblogs.com/AdaminXie
# 如有问题请联系邮箱 :coneypo@foxmail.com

 浙公网安备 33010602011771号