
ASP.NET Identity 2集成到MVC5项目--笔记01
Identiry2是微软推出的Identity的升级版本,较之上一个版本更加易于扩展,总之更好用。如果需要具体细节。网上具体参考Identity2源代码下载 参考文章 在项目中,是不太想直接把这一堆堆的东西直接放到我们项目中的,我的做法是单独建立一个解决方案,方便以后懒得写代码,类似的可以使用解决方案稍微改改代码就完事。以下的代码均是参考或者直接复制Identity2给的简单示例而来,所以有需要的童鞋可以使用Nuget下载一个演示版本,自己参考代码达到自己的要求。Identity Samples
ASP.NET Identity 2集成到MVC5项目--笔记01
ASP.NET Identity 2集成到MVC5项目--笔记02
1.目标
- 扩展用户字段
- 扩展角色字段
- 使用用户名、邮箱登陆
- 注册后邮件注册登陆
- ···
2.基础结构搭建
2.1网站结构搭建
(1)建立一个名为Identity2Study的MVC5项目,身份验证选择空
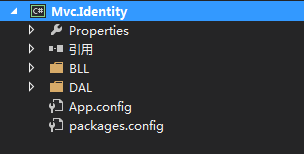
(2) 新建一个解决方案并且命名为Mvc.Identity
(3)在解决方案下建立两个文件夹分别命名为DAL 和BLL
(4)Nuget下载相关组件
首先下载Identity EntityFramework 2.1.0 下载这个之后Nuget会根据依赖自动帮我们下载Identity Core
PM> Install-Package Microsoft.AspNet.Identity.Core -Version 2.1.0-alpha1 -Pre
还需要下载 Identity Owin 2.1.0
PM> Install-Package Microsoft.AspNet.Identity.Owin -Version 2.1.0-alpha1 -Pre
下载Optimization
Install-Package Microsoft.AspNet.Web.Optimization
下载 Microsoft.Owin.Host.SystemWeb
PM> Install-Package Microsoft.Owin.Host.SystemWeb -Version 2.1.0
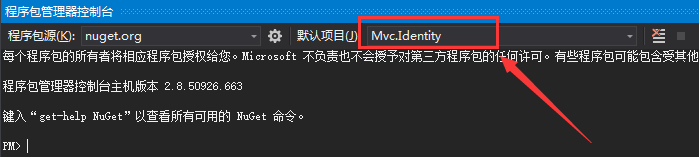
这里用命令行下载的时候需要注意:默认项目需要的是Mvc.Identity,如图:
2.2 扩展用户属性
在DAL文件夹中添加如下类(继承至IdentityUser),例如我们用户里面需要扩展一个字段用于存储用户的头像URL地址。
public class ApplicationUser : IdentityUser
{
    //在这个类扩展自定义字段
    /// <summary>
    /// 头像URL
    /// </summary>
    public string headImage { get; set; }

    //添加一个方法 后面会用到
    public async Task<ClaimsIdentity> GenerateUserIdentityAsync(UserManager<ApplicationUser> manager)
    {
        var userIdentity = await manager.CreateIdentityAsync(this, DefaultAuthenticationTypes.ApplicationCookie);
        return userIdentity;
    }
}
2.3 扩展角色属性
在DAL文件夹中添加如下类ApplicationRole(继承至IdentityRole),我们添加一个字段用于描述当前角色的含义。
  public class ApplicationRole : IdentityRole
  {
      public ApplicationRole() : base() { }
      public ApplicationRole(string name) : base(name) { }

      /// <summary>
      /// 角色描述
      /// </summary>
      [DisplayName("角色描述")]
      public string Description { get; set; }
  }
2.4 数据持久化(数据库上下文)
我们使用的Identity是基于EF框架的CodeFirst来完成数据持久保存的。所以需要添加数据库上下文。在DAL文件夹添加如下类ApplicationDbContext(继承至IdentityDbContext
public class ApplicationDbContext : IdentityDbContext<ApplicationUser>
{
    public ApplicationDbContext()
        : base("DefaultConnection", throwIfV1Schema: false)
    {
    }

    static ApplicationDbContext()
    {
        //Database.SetInitializer<ApplicationDbContext>(new ApplicationDbInitializer());
    }

    public static ApplicationDbContext Create()
    {
        return new ApplicationDbContext();
    }

}
2.5 用户管理业务逻辑实现
在BLL文件夹下添加如下类ApplicationUserManager(继承至UserManager
public class ApplicationUserManager : UserManager<ApplicationUser>
{
    public ApplicationUserManager(IUserStore<ApplicationUser> store)
        : base(store)
    {
    }

    public static ApplicationUserManager Create(IdentityFactoryOptions<ApplicationUserManager> options,
        IOwinContext context)
    {
        var manager = new ApplicationUserManager(new UserStore<ApplicationUser>(context.Get<ApplicationDbContext>()));
        // Configure validation logic for usernames
        manager.UserValidator = new UserValidator<ApplicationUser>(manager)
        {
            AllowOnlyAlphanumericUserNames = false,
            RequireUniqueEmail = true
        };
        // Configure validation logic for passwords
        manager.PasswordValidator = new PasswordValidator
        {
            RequiredLength = 6,
            RequireNonLetterOrDigit = true,
            RequireDigit = true,
            RequireLowercase = true,
            RequireUppercase = true,
        };
        // Configure user lockout defaults
        manager.UserLockoutEnabledByDefault = true;
        manager.DefaultAccountLockoutTimeSpan = TimeSpan.FromMinutes(5);
        manager.MaxFailedAccessAttemptsBeforeLockout = 5;
        // Register two factor authentication providers. This application uses Phone and Emails as a step of receiving a code for verifying the user
        // You can write your own provider and plug in here.
        manager.RegisterTwoFactorProvider("PhoneCode", new PhoneNumberTokenProvider<ApplicationUser>
        {
            MessageFormat = "Your security code is: {0}"
        });
        manager.RegisterTwoFactorProvider("EmailCode", new EmailTokenProvider<ApplicationUser>
        {
            Subject = "SecurityCode",
            BodyFormat = "Your security code is {0}"
        });
        //manager.EmailService = new EmailService();
        var dataProtectionProvider = options.DataProtectionProvider;
        if (dataProtectionProvider != null)
        {
            manager.UserTokenProvider =
                new DataProtectorTokenProvider<ApplicationUser>(dataProtectionProvider.Create("ASP.NET Identity"));
        }
        return manager;
    }
}
2.6 角色管理业务逻辑实现
在BLL文件夹下添加如下类ApplicationRoleManager(继承至RoleManager
public class ApplicationRoleManager : RoleManager<ApplicationRole>
{
    public ApplicationRoleManager(IRoleStore<ApplicationRole, string> roleStore)
        : base(roleStore)
    {
    }

    public static ApplicationRoleManager Create(IdentityFactoryOptions<ApplicationRoleManager> options, IOwinContext context)
    {
        return new ApplicationRoleManager(new RoleStore<ApplicationRole>(context.Get<ApplicationDbContext>()));
    }
}
2.7 登录业务逻辑实现
在BLL文件夹下添加如下类ApplicationSignInManager(继承至SignInManager<ApplicationUser, string>)
public class ApplicationSignInManager : SignInManager<ApplicationUser, string>
{
    public ApplicationSignInManager(ApplicationUserManager userManager, IAuthenticationManager authenticationManager) :
        base(userManager, authenticationManager) { }

    public override Task<ClaimsIdentity> CreateUserIdentityAsync(ApplicationUser user)
    {
        return user.GenerateUserIdentityAsync((ApplicationUserManager)UserManager);
    }

    public static ApplicationSignInManager Create(IdentityFactoryOptions<ApplicationSignInManager> options, IOwinContext context)
    {
        return new ApplicationSignInManager(context.GetUserManager<ApplicationUserManager>(), context.Authentication);
    }
}
2.8 邮件发送业务逻辑实现
用于发送邮件,在BLL文件夹下面建立类EmailService(继承至IIdentityMessageService)
    public class EmailService : IIdentityMessageService
    {
        public Task SendAsync(IdentityMessage message)
        {
            var credentialUserName = "邮箱登录名";
            var sentFrom = "你的邮箱地址";
            var pwd = "邮箱登录密码";

            System.Net.Mail.SmtpClient client =
                new System.Net.Mail.SmtpClient("smtp服务器地址");

            client.Port = 25;//smtp邮件服务器端口
            client.DeliveryMethod = System.Net.Mail.SmtpDeliveryMethod.Network;
            client.UseDefaultCredentials = false;

            System.Net.NetworkCredential credentials =
                new System.Net.NetworkCredential(credentialUserName, pwd);

            client.EnableSsl = true;
            client.Credentials = credentials;

            var mail =
                new System.Net.Mail.MailMessage(sentFrom, message.Destination);

            mail.Subject = message.Subject;
            mail.Body = message.Body;
            return client.SendMailAsync(mail);
        }
    }
这个类添加完毕后需要我们在ApplicationUserManager类下面的create方法里面大概55行左右添加如下代码用于我们在新建用户的时候会收到一封确认注册的邮件
manager.EmailService = new EmailService();
2.9 添加默认账号和角色
在DAL文件夹下面的ApplicationDbContext.cs添加一个数据初始化策略类名为ApplicationDbInitializer(继承至DropCreateDatabaseIfModelChanges
public class ApplicationDbInitializer : DropCreateDatabaseIfModelChanges<ApplicationDbContext>
{
    protected override void Seed(ApplicationDbContext context)
    {
        InitializeIdentityForEF(context);
        base.Seed(context);
    }

    //Create User=Admin@Admin.com with password=Admin@123456 in the Admin role
    public static void InitializeIdentityForEF(ApplicationDbContext db)
    {
        var userManager = HttpContext.Current.GetOwinContext().GetUserManager<ApplicationUserManager>();
        var roleManager = HttpContext.Current.GetOwinContext().Get<ApplicationRoleManager>();
        const string name = "Admin@Admin.com";
        const string password = "Admin@Admin123";
        const string roleName = "Admin";

        //Create Role Admin if it does not exist
        var role = roleManager.FindByName(roleName);
        if (role == null)
        {
            role = new ApplicationRole(roleName);
            var roleresult = roleManager.Create(role);
        }

        var user = userManager.FindByName(name);
        if (user == null)
        {
            user = new ApplicationUser { UserName = name, Email = name };
            var result = userManager.Create(user, password);
            result = userManager.SetLockoutEnabled(user.Id, false);
        }

        // Add user admin to Role Admin if not already added
        var rolesForUser = userManager.GetRoles(user.Id);
        if (!rolesForUser.Contains(role.Name))
        {
            var result = userManager.AddToRole(user.Id, role.Name);
        }
    }
}
建立完毕后记得把ApplicationDbContext类里面构造函数的初始化策略取消注释
Database.SetInitializer<ApplicationDbContext>(new ApplicationDbInitializer());
如果允许到这里提示httpcontext未定义,则需要我们添加System.Web组件。自行在引用搜一下加到解决方案即可。
到这里,项目的大致结构搭建完成
这篇只是搭建一个大致的框架,下一篇才是想要的功能。

 浙公网安备 33010602011771号