XSLT入门
以XSL为开始
XSL代表着可扩充样式表语言(EXtensible Stylesheet Language)。
因为基于XML样式表语言的需要,万维网联盟(W3C)开始发展XSL。
层叠式样式表(CSS)= HTML样式表
HTML使用预定的标签,标签的含义比较容易理解。
在HTML中,<table>元素定义了一个表格,浏览器知道如何去显示它。
给HTML元素定义样式是比较容易的。通过使用CSS,告诉浏览器对特殊字体和颜色的元素进行显示,是非常容易的。
XSL=XML样式表
XML不使用预定的标签(我们可以使用任何我们自己喜欢的标签名字),这些标签的含义比较难以理解。
<table>元素可以表示HTML表格,一种设备,或者别的一些东西,因此浏览器不知道如何去显示它们。
XSL描述的是如何显示XML文档。
XSL-超越样式表语言(More Than a Style Sheet Language)
XSL由3部分组成:
- XSLT - a language for transforming XML documents
XSLT - 转变XML文档的语言。 - XPath - a language for navigating in XML documents
XPath-对XML文档进行操作的语言。 - XSL-FO - a language for formatting XML documents
XSL-FO - 格式化XML文档的语言。
什么是XSLT?
- XSLT stands for XSL Transformations
XSLT代表XSL转换(XSL Transformations) - XSLT is the most important part of XSL
XSLT是XSL最重要的部分 - XSLT transforms an XML document into another XML document
XSLT可以把XML文档转换成另一个XML文档 - XSLT uses XPath to navigate in XML documents
XSLT通过XPath操作XML文档 - XSLT is a W3C Recommendation
XSLT是一种W3C参考标准
XSLT=XSL转换(XSL Transformations)
XSLT是XSL的最重要的一部分。
XSLT用于把XML文件转换成另一份XML文件,或者转换成另一种被浏览器所识别的诸如HTML和XHTML类型的文件。通常情况下,XSLT是通过把每个XML元素转换成(X)HTML文件来完成的。
通过XSML,你可以从已输出的文件里添加/移除元素和属性。你也可以把元素重新排列和分类,执行测试语句,决定是隐藏还是显示元素,或者实现其它更多的功能。
对于描述转换过程,可以形象的描述为:XSLT把XML源树转(XML source-tree)换成XML结果树(XML result-tree)。
XSLT对于XPath的使用
XSLT通过对XPath的使用来找寻XML文档中的信息。XPath用于操作XML文件中的元素和属性。
如果你想先学习XPath,请先阅读XPath教程。
如何使它运行?
在转换过程中,XSLT通过XPath来定义部分应该和一个或更多预定的模板相匹配的源文件。当一个匹配找到后,XSLT将会把相匹配的部分源文件转换成结果文档。
XSLT是一个网络标准
XSLT在1999年11月16日成为W3C参考标准
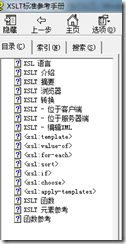
以上内容引自:XSLT标准参考手册.chm,XSLT标准参考手册.chm目录如下:
较全面的介绍了XSLT的基础内容,包括:基本概念、模板、取值、循环、分类、判断、选择、使用模板,常用函数等。
更详细的介绍可以查阅《XSLT从入门到精通》。
接下来我主要讲讲在Microsoft Visual studio 下的XSLT入门应用知识。
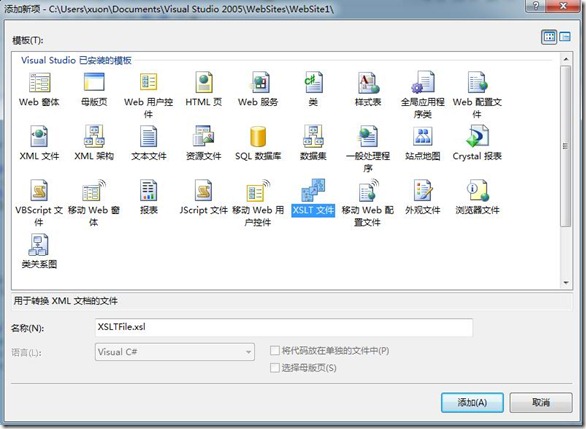
在VS的WebSite项目里添加新建项,可以选择“XSLT文件”:
以jQueryCheckTree的XML+XSLT实现为例:
未使用XML+XSLT前页面的HTML如下:
<!DOCTYPE html PUBLIC "-//W3C//DTD XHTML 1.0 Transitional//EN" "http://www.w3.org/TR/xhtml1/DTD/xhtml1-transitional.dtd">
<html>
<head>
<title>CheckTree v 0.2 by JJ Geewax</title>
<script src="jquery-1.2.6.min.js" type="text/javascript"></script>
<script src="jquery.checktree.js" type="text/javascript"></script>
<script>
$(document).ready(function(){
    $("ul.tree").checkTree({
        /*
        // You can add callbacks to the expand, collapse, check, uncheck, and  halfcheck
        // events of the tree. The element you use as the argument is the LI element of
        // the object that fired the event.
        onExpand: function(el) {
            console.log("expanded ", el.find("label:first").text());
        },
        onCollapse: function(el) {
            console.log("collapsed ", el.find("label:first").text());
        },
        onCheck: function(el) {
            console.log("checked ", el.find("label:first").text());
        },
        onUnCheck: function(el) {
            console.log("un checked ", el.find("label:first").text());
        },
        onHalfCheck: function(el) {
            console.log("half checked ", el.find("label:first").text());
        }*/
        /*
        // You can set the labelAction variable to either "check" or "expand"
        // to change what happens when you click on the label item.
        // The default is expand, which expands the tree. Check will toggle
        // the checked state of the items.
        labelAction: "expand"
        */
        /*
        // You can also change what happens when you hover over a label (over and out)
        onLabelHoverOver: function(el) { alert("You hovered over " + el.text()); },
        onLabelHoverOut: function(el) { alert("You hovered out of " + el.text()); }
        */
    });
});
</script>

<link type="text/css" rel="stylesheet" href="checktree.css" />

</head>
<body>
<h1>CheckTree v 0.2</h1>

<div style="width: 600px; margin: 0 auto; padding: 15px; border: 1px solid #28f; background-color: #def; text-align: center; font-size: 20px; font-weight: bold;">
CheckTree is on Google Code!
<div style="font-weight: normal; font-size: 15px; margin-top: 10px;">
Visit the CheckTree GoogleCode project page: <a href="http://jquery-checktree.googlecode.com">http://jquery-checktree.googlecode.com</a>
</div>
</div>

<h2>Demo</h2>
<p>
Here is a quick demo of the code which renders an unordered list and gives an example of how to format your
hierarchy to be rendered appropriately by CheckTree.
</p>

<ul class="tree" style="margin-left: 15px;">
    <li>
        <input type="checkbox">
        <label>United States</label>
        <ul>
            <li>
            <input type="checkbox" name="geo" value="pennsylvania">
            <label>Pennsylvania</label>
            </li>
        </ul>
    </li>
    <li>
        <input type="checkbox">
        <label>Canadia</label>
        <ul>
            <li>
                <input type="checkbox" name="geo" value="province in canadia">
                <label>Province In Canadia</label>
            </li>
        </ul>
    </li>
    <li>
        <input type="checkbox" name="geo" value="afghanistan">
        <label>Afghanistan</label>
    </li>
    <li>
        <input type="checkbox">
        <label>Sealand</label>
        <ul>
            <li>
                <input type="checkbox" name="geo" value="tree_city">
                <label>Tree City</label>
            </li>
            <li>
                <input type="checkbox" name="geo" value="oil_province">
                <label>Oil Province</label>
                <ul>
                    <li>
                        <input type="checkbox" name="geo" value="oil_city">
                        <label>Oil City</label>
                    </li>
                </ul>
            </li>
            <li>
                <input type="checkbox" value="fun_province_checkbox">
                <label>Fun Province</label>
                <ul>
                    <li>
                        <input type="checkbox" name="geo" value="fun_city">
                        <label>Fun City</label>
                    </li>
                    <li>
                        <input type="checkbox" name="geo" value="not_fun_city">
                        <label>Not Fun City</label>
                    </li>
                </ul>
            </li>
        </ul>
    </li>
</ul>

</body>
</html>
分离出XML文件如下(只取了部分数据测试用):
<?xml version="1.0" encoding="utf-8" ?>
<?xml-stylesheet type="text/xsl" href="XSLTSampleFile.xsl"?>
<data>
<tree tlabel="United States" >
<tree tlabel="Pennsylvania" tname="geo" tvalue="pennsylvania"></tree>
</tree>
<tree tlabel="United States" >
<tree tlabel="Pennsylvania" tname="geo" tvalue="pennsylvania"></tree>
</tree>
<tree tlabel="United States" >
<tree tlabel="Pennsylvania" tname="geo" tvalue="pennsylvania"></tree>
</tree>
</data>
你会发现这个XML文件中设置了一个XSLT文件“XSLTSampleFile.xsl”,其内容如下(使用XSTL写的一个递归调用模板的方法将XML数据转换成需要的HTML):
<?xml version="1.0" encoding="utf-8"?>
<xsl:stylesheet version="1.0" xmlns:xsl="http://www.w3.org/1999/XSL/Transform">
  <xsl:template match="/">
    <html>
      <head>
        <title>CheckTree v 0.2 by JJ Geewax</title>
        <script src="jquery_checktree/jquery-1.2.6.min.js" type="text/javascript"></script>
        <script src="jquery_checktree/jquery.checktree.js" type="text/javascript"></script>
        <script>
          $(document).ready(function(){
          $("ul.tree").checkTree({
          /*
          // You can add callbacks to the expand, collapse, check, uncheck, and  halfcheck
          // events of the tree. The element you use as the argument is the LI element of
          // the object that fired the event.
          onExpand: function(el) {
          console.log("expanded ", el.find("label:first").text());
          },
          onCollapse: function(el) {
          console.log("collapsed ", el.find("label:first").text());
          },
          onCheck: function(el) {
          console.log("checked ", el.find("label:first").text());
          },
          onUnCheck: function(el) {
          console.log("un checked ", el.find("label:first").text());
          },
          onHalfCheck: function(el) {
          console.log("half checked ", el.find("label:first").text());
          }*/
          /*
          // You can set the labelAction variable to either "check" or "expand"
          // to change what happens when you click on the label item.
          // The default is expand, which expands the tree. Check will toggle
          // the checked state of the items.
          labelAction: "expand"
          */
          /*
          // You can also change what happens when you hover over a label (over and out)
          onLabelHoverOver: function(el) { alert("You hovered over " + el.text()); },
          onLabelHoverOut: function(el) { alert("You hovered out of " + el.text()); }
          */
          });
          });
        </script>

        <link type="text/css" rel="stylesheet" href="jquery_checktree/checktree.css" />

      </head>
      <body>
        <h1>CheckTree v 0.2</h1>

        <div style="width: 600px; margin: 0 auto; padding: 15px; border: 1px solid #28f; background-color: #def; text-align: center; font-size: 20px; font-weight: bold;">
          CheckTree is on Google Code!
          <div style="font-weight: normal; font-size: 15px; margin-top: 10px;">
            Visit the CheckTree GoogleCode project page: <a href="http://jquery-checktree.googlecode.com">http://jquery-checktree.googlecode.com</a>
          </div>
        </div>

        <h2>Demo</h2>
        <p>
          Here is a quick demo of the code which renders an unordered list and gives an example of how to format your
          hierarchy to be rendered appropriately by CheckTree.
        </p>

        <ul class="tree" style="margin-left: 15px;">
          <xsl:call-template name="createTreeView">
            <xsl:with-param name="treePar"  select="/data/tree"></xsl:with-param>
          </xsl:call-template>
        </ul>
      </body>
    </html>
  </xsl:template>

  <xsl:template name="createTreeView">
    <xsl:param name="treePar"></xsl:param>
    <xsl:for-each select ="$treePar">
      <xsl:call-template name ="CreatTreeNode">
        <xsl:with-param name="treePar" select="$treePar"></xsl:with-param>
      </xsl:call-template>
    </xsl:for-each>
  </xsl:template>

  <xsl:template name="CreatTreeNode">
    <xsl:param name="treePar"></xsl:param>
    <li>

      <input type="checkbox">
        <xsl:if test="$treePar/@tname!=''">
          <xsl:attribute name="name">
            <xsl:value-of select="$treePar/@tname"/>
          </xsl:attribute>
        </xsl:if>
        <xsl:if test="$treePar/@tvalue!=''">
          <xsl:attribute name="value">
            <xsl:value-of select="$treePar/@tvalue"/>
          </xsl:attribute>
        </xsl:if>
      </input>

      <label>
        <xsl:value-of select ="$treePar/@tlabel"/>
      </label>


      <xsl:variable  name="innerTreePar" select="$treePar/tree"/>
      <xsl:if test="$innerTreePar">
        <ul>
          <xsl:call-template name="CreatTreeNode">
            <xsl:with-param name ="treePar" select ="$innerTreePar">
            </xsl:with-param>
          </xsl:call-template>
        </ul>
      </xsl:if>

    </li>

  </xsl:template>
</xsl:stylesheet>
代码比较简单,查阅前面提到的手册和电子书就可以较快的理解。
接下来,我详细介绍一下,在VS下写这段XSLT的过程(包括调试跟踪等过程)。
我们需要得到的HTML就是第一段页面源码中的<ul class="tree" style="margin-left: 15px;">中的内容,而我们需要的数据就是XML中的数据。
现在结果和已知数据都有了,怎么根据不同的数据得到对应的checktree的HTML呢?(即实现动态加载checktree,数据来自XML,实现工具是XSLT)
只用分析checktree中哪些是动态的哪些是静态的,然后使用XSLT即可较快的实现。
在编写XSLT的过程,VS的智能提示同样会提示XSLT的相关元素。
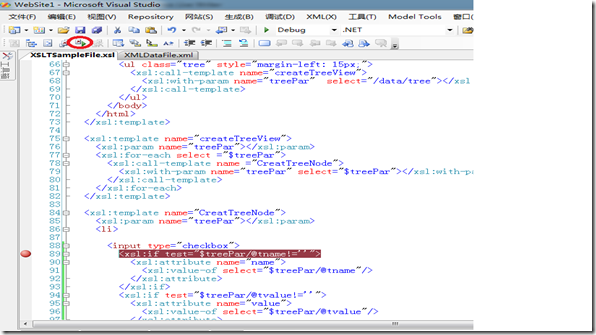
查看页面效果的时候,有时会发现与预想的效果不一样。这时可以在指定的代码行设置断点,单步调试跟踪问题。分析是XML数据还是XSLT的问题。
点击工具栏中的“调试XSLT”按钮(上图已标注),会提示提供XML文件,点击“确定”,选择对应的XML文件即可。
然后再次点击“调试XSLT”,即可进行调试,调试的方法与调试C#的方法一样,使用F5、F11、F10,监视变量等即可达到目的。
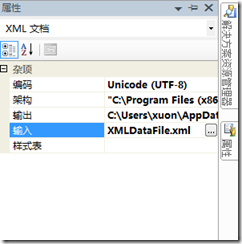
第一次调试XSLT文件的时候指定的XML文件路径会被自动记录在文件属性中,以后在XSLT文件的属性项里可以更改设置,也可以指定输出文件的格式。
输出为对应的HTML文件的时候,在弹出的输出页中可以通过右键菜单项中的“查看源”查看对应的HTML。
指定格式的效果与XSLT中的使用output元素控制输出格式目的一样。
我使用XSLT也才一个月的时间,分享一些小收获:
1.常用的函数有position()即取节点索引(从1开始)、normalize-space()即去字符串首尾空格、not(arg)即判断一个表达式是否为false等;
2.常用的一个运算是mod即取余,而除法运算符是div,其他运算与常用语言一样;
3.判断等于只需要一个等号,大于、小于有时需要写成>、< ,像&这样的特殊符号必需写在<![CDATA[]]>里,脚本写在<![CDATA[]]>不仅写特殊符号没问题,排版也不会因为格式化文档而丢失;
4.value-of元素间的内容,如果有常量字符串,常量字符串后不可换行,不然结果字符串中也会有换行;
5.自定义变量variable或者参数param,使用的时候前面加$符号,取属性值在属性名前加@符号且属性名区分大小写;
6.设置属性可以不使用value-of,直接在属性名的等号后的双引号里加{},将表达式写在花括号里即可;
7.Xpath表达式里直接写//代表从顶层开始找到//后指定的节点名;
8.[]括号用来加筛选条件,直接写数字代表索引(即position(),从1开始),在判断里用关键字and或or表示逻辑关系且与或,而[]里用|表示或。
文章代码下载:XSLT_checktree.rar


 浙公网安备 33010602011771号