8) drf 三大认证 认证 权限 频率
一、三大认证功能分析
1)APIView的 dispath(self, request, *args, **kwargs)
2)dispath方法内 self.initial(request, *args, **kwargs) 进入三大认证
    # 认证组件:校验用户 - 游客、合法用户、非法用户
    # 游客:代表校验通过,直接进入下一步校验(权限校验)
    # 合法用户:代表校验通过,将用户存储在request.user中,再进入下一步校验(权限校验)
    # 非法用户:代表校验失败,抛出异常,返回403权限异常结果
    # 只要通过认证不管是游客还是登录用户,request.user都有值
    self.perform_authentication(request)

    # 权限组件:校验用户权限 - 必须登录、所有用户、登录读写游客只读、自定义用户角色
    # 认证通过:可以进入下一步校验(频率认证)
    # 认证失败:抛出异常,返回403权限异常结果
    self.check_permissions(request)

    # 频率组件:限制视图接口被访问的频率次数 - 限制的条件(IP、id、唯一键)、频率周期时间(s、m、h)、频率的次数(3/s)
    # 没有达到限次:正常访问接口
    # 达到限次:限制时间内不能访问,限制时间达到后,可以重新访问
    self.check_throttles(request)
二、认证组件
认证组件:校验认证字符串,得到request.user
    没有认证字符串,直接放回None,游客
    有认证字符串,但认证失败抛异常,非法用户
    有认证字符串,且认证通过返回 用户,认证信息 元组,合法用户
        用户存放到request.user | 认证信息存放到request.auth
1.源码分析1
点进 self.perform_authentication(request)
发现只有request.user,
也没有接收这个值也没有返回,那么这一定是个方法,一定调取了某个函数,不然还怎么玩
那么我们就思考request是谁的?往前面找发现在dispath中
request = self.initialize_request(request, *args, **kwargs),
也就是说能走到认证这一步,request已经完成二次封装,那必然是drf自己的,我们到drf的request中找
drf的 request.py / Request / user(self)
drf下request.py下Request类中有两个user,因为没有值所以肯定走得是get即user(self),如果是request.user = 111,那就是走set即user(self,value)

Request类的 方法属性 user 的get方法 => self._authenticate() 完成认证
    def user(self):
        if not hasattr(self, '_user'):
            with wrap_attributeerrors():
                # 没用户,认证出用户
                self._authenticate()  # 点进去
        # 有用户直接返回
        return self._user
认证的细则:
    # 做认证
    def _authenticate(self):
        # 遍历拿到一个个认证器,进行认证
        # self.authenticators是配置的一堆认证类,产生的认证类对象,组成的 list,一堆认证器
        for authenticator in self.authenticators: # 这个在request下面肯定self就是requst对象的,我们还去diepatch中找二次封装的request
            try:
                # 认证器(对象)调用认证方法authenticate(认证类对象self, request请求对象)
                # 返回值:登陆的用户与认证的信息组成的 tuple
                # 该方法被try包裹,代表该方法会抛异常,抛异常就代表认证失败
                user_auth_tuple = authenticator.authenticate(self)
            except exceptions.APIException:
                self._not_authenticated()
                raise

            # 返回值的处理
            if user_auth_tuple is not None:
                self._authenticator = authenticator
                # 解压赋值,如何有返回值,就将 登陆用户 与 认证信息 分别保存到 request.user、request.auth
                self.user, self.auth = user_auth_tuple
                return  # 这里有return 说明有返回值就直接结束了,不会走下面的代码
        # 如果返回值user_auth_tuple为空,代表认证通过,但是没有 登陆用户 与 登陆认证信息,代表游客
        self._not_authenticated()
2. request 源码分析2
dispatch
request = self.initialize_request(request, *args, **kwargs) # 点进去
   def initialize_request(self, request, *args, **kwargs):
        parser_context = self.get_parser_context(request)
        return Request(
            request,
            parsers=self.get_parsers(),
            authenticators=self.get_authenticators(), # 点进去
            negotiator=self.get_content_negotiator(),
            parser_context=parser_context
        )
    def get_authenticators(self):
        return [auth() for auth in self.authentication_classes] # 从一堆认证类中遍历出每一个类,类加括号实例化成一个个认证器对象,即一堆认证器
class APIView(View):
               ...
    authentication_classes = api_settings.DEFAULT_AUTHENTICATION_CLASSES  # 最终来到APIView源码顶部的一大堆类属性,这些东西一定在drf的settings里面
            ...
'DEFAULT_AUTHENTICATION_CLASSES': [
        'rest_framework.authentication.SessionAuthentication',
        'rest_framework.authentication.BasicAuthentication'
    ],  # 在drf的配置里我们找到这个,直接拿走放进我们项目的settings里面,之后开始定制
3. 原生配置 源码分析3
我们分析上面两个配置的源码学习套路来自定义
rest_framework / authentication.py / SessionAuthentication
    def authenticate(self, request):
        #解析出了用户
        user = getattr(request._request, 'user', None)

        #没有解析出用户返回None
        if not user or not user.is_active:
            return None

        # 解析出用户后,重新启用csrf认证,所以以后我们不用session认证,因为他需要csrf来解码
        # 如果scrf认证失败,就会异常,就是非法用户
        self.enforce_csrf(request)

        # csrf通过,就是合法用户,返回用户和none
        return (user, None)
rest_framework / authentication.py / BasicAuthentication
    def authenticate(self, request):
        # 获取认证信息,该认证信息是两段式,合法格式是 ‘basic 认证字符串’
        auth = get_authorization_header(request).split()

        # 没有认证信息就是游客
        if not auth or auth[0].lower() != b'basic':
            return None

        # 有认证信息,信息有误就是非法用户
        if len(auth) == 1:
            msg = _('Invalid basic header. No credentials provided.')
            raise exceptions.AuthenticationFailed(msg)
        # 超过两段,也抛异常
     elif len(auth) > 2:
            msg = _('Invalid basic header. Credentials string should not contain spaces.')
            raise exceptions.AuthenticationFailed(msg)

        try:
            auth_parts = base64.b64decode(auth[1]).decode(HTTP_HEADER_ENCODING).partition(':')

        except (TypeError, UnicodeDecodeError, binascii.Error):
            msg = _('Invalid basic header. Credentials not correctly base64 encoded.')
            raise exceptions.AuthenticationFailed(msg)

        userid, password = auth_parts[0], auth_parts[2]
        # 认证信息处理出用户主键和密码,进一步得到用户对象
        # 得不到或是非活跃用户,代表非法,一切正常才代表 合法用户
        return self.authenticate_credentials(userid, password, request)
    def authenticate_credentials(self, userid, password, request=None):
        credentials = {
            get_user_model().USERNAME_FIELD: userid,
            'password': password
        }
        user = authenticate(request=request, **credentials)

        # 得不到或是非活跃用户,代表非法,一切正常才代表合法用户
        if user is None:
            raise exceptions.AuthenticationFailed(_('Invalid username/password.'))

        if not user.is_active:
            raise exceptions.AuthenticationFailed(_('User inactive or deleted.'))

        return (user, None)
4.自定义认证类
1) 创建继承BaseAuthentication的认证类
2) 重写authenticate(self, request)方法,自定义认证规则
3) 实现体根据认证规则 确定游客、非法用户、合法用户
        认证规则:
            i.没有认证信息返回None(游客)
            ii.有认证信息认证失败抛异常(非法用户)
            iii.有认证信息认证成功返回用户与认证信息元组(合法用户)
4) 完成视图类的全局(settings文件中)或局部(确切的视图类)配置
5. 自定义认证类例子
新建 authentications.py
from rest_framework.authentication import BaseAuthentication
from rest_framework.exceptions import AuthenticationFailed
from . import models
class MyAuthentication(BaseAuthentication):
    """
    同前台请求头拿认证信息auth(获取认证的字段要与前台约定)
    没有auth是游客,返回None
    有auth进行校验
        失败是非法用户,抛出异常
        成功是合法用户,返回 (用户, 认证信息)
    """
    def authenticate(self, request):
        # 前台在请求头携带认证信息,
        #       且默认规范用 Authorization 字段携带认证信息,
        #       后台固定在请求对象的META字段中 HTTP_AUTHORIZATION 获取
        auth = request.META.get('HTTP_AUTHORIZATION', None)

        # 处理游客
        if auth is None:
            return None

        # 设置一下认证字段小规则(两段式):"auth 认证字符串"
        auth_list = auth.split()

        # 校验合法还是非法用户
        if not (len(auth_list) == 2 and auth_list[0].lower() == 'auth'):
            raise AuthenticationFailed('认证信息有误,非法用户')

        # 合法的用户还需要从auth_list[1]中解析出来
        # 注:假设一种情况,信息为abc.123.xyz,就可以解析出admin用户;实际开发,该逻辑一定是校验用户的正常逻辑
        if auth_list[1] != 'abc.123.xyz':  # 校验失败
            raise AuthenticationFailed('用户校验失败,非法用户')

        user = models.User.objects.filter(username='admin').first()  # 这里是示范,写死了找这个用户

        if not user:
            raise AuthenticationFailed('用户数据有误,非法用户')
        return (user, None)
api / views.py
from rest_framework.views import APIViewfrom utils.response import APIResponse

class TestAPIView(APIView):
    def get(self, request, *args, **kwargs):
        # 如果通过了认证组件,request.user就一定有值
        # 游客:AnonymousUser
        # 用户:User表中的具体用户对象
        print(request.user)  # admin
        return APIResponse(0, 'test get ok')
settings.py
# drf配置
REST_FRAMEWORK = {
    # 全局配置异常模块
    'EXCEPTION_HANDLER': 'utils.exception.exception_handler',
    # 认证类配置
    'DEFAULT_AUTHENTICATION_CLASSES': [
        # 'rest_framework.authentication.SessionAuthentication',
        # 'rest_framework.authentication.BasicAuthentication',
        'api.authentications.MyAuthentication',
    ],
    # 权限类配置
    'DEFAULT_PERMISSION_CLASSES': [
        'rest_framework.permissions.AllowAny',
    ],
}
子路由
from django.conf.urls import url
from . import views
urlpatterns = [
    url(r'^test/$', views.TestAPIView.as_view()),
    url(r'^test1/$', views.TestAuthenticatedAPIView.as_view()),
    url(r'^test2/$', views.TestAuthenticatedOrReadOnlyAPIView.as_view()),
    url(r'^test3/$', views.TestAdminOrReadOnlyAPIView.as_view()),
]
# 家庭作业
# 1) 可以采用脚本基于auth组件创建三个普通用户:models.User.objects.create_user()
#         注:直接写出注册接口更好
# 2) 自定义session表:id,u_id,token,为每个用户配置一个固定人认证字符串,可以直接操作数据库
#         注:在注册接口中实现更好
# 3) 自定义认证类,不同的token可以校验出不同的登陆用户
三、权限组件
1.源码分析1
  # 入口 dispatch三大认证中:
    self.check_permissions(request)
    认证细则:
    def check_permissions(self, request):
        # 遍历权限对象列表得到一个个权限对象(权限器),进行权限认证
        for permission in self.get_permissions():
            # 权限类一定有一个has_permission权限方法,用来做权限认证的
            # 参数:权限对象self、请求对象request、视图类对象
            # 返回值:有权限返回True,无权限返回False
            if not permission.has_permission(request, self):
                self.permission_denied(
                    request, message=getattr(permission, 'message', None)
                )
def get_permissions(self):
        # 全局局部配置
        return [permission() for permission in self.permission_classes] # 从一堆权限类中遍历出每一个类,类加括号实例化成一个个权限器对象,即一堆权限器
class APIView(View):

          ...
    permission_classes = api_settings.DEFAULT_PERMISSION_CLASSES  # 最终来到APIView源码顶部的一大堆类属性,这些东西一定在drf的settings里面
...
'DEFAULT_PERMISSION_CLASSES': [
    'rest_framework.permissions.AllowAny',
],
# 在drf的配置里我们找到这个,直接拿走放进我们项目的settings里面,之后开始定制
2. 源码分析3 — 四种权限
rest_framework / permissions 里面有四个类
1)AllowAny:(默认规则)
    认证规则全部返还True:return True
        游客与登陆用户都有所有权限

2) IsAuthenticated:
    认证规则必须有登陆的合法用户:return bool(request.user and request.user.is_authenticated)
        游客没有任何权限,登陆用户才有权限

3) IsAdminUser:
    认证规则必须是后台管理用户:return bool(request.user and request.user.is_staff)
        游客没有任何权限,登陆用户才有权限

4) IsAuthenticatedOrReadOnly
    认证规则必须是只读请求或是合法用户:
        return bool(
            request.method in SAFE_METHODS or
            request.user and
            request.user.is_authenticated
        )
        游客只读,合法用户无限制
注:SAFE_METHODS = ('GET', 'HEAD', 'OPTIONS')
3.应用上面四个类 设置局部权限
# api/views.py
# 必须登录才能访问
from rest_framework.permissions import IsAuthenticated
class TestAuthenticatedAPIView(APIView):
    permission_classes = [IsAuthenticated]  # 局部配置,只有一站式网站例如邮箱才会采用全局配置IsAuthenticated
    # 当定义全局必须登录才能访问情况下,个别接口不需要登录,只需局部配置 permission_classes = []或 permission_classes = [AllowAny]即可
    def get(self, request, *args, **kwargs):
        return APIResponse(0, 'test 登录才能访问的接口 ok')

# 游客只读,登录无限制
from rest_framework.permissions import IsAuthenticatedOrReadOnly
class TestAuthenticatedOrReadOnlyAPIView(APIView):
    permission_classes = [IsAuthenticatedOrReadOnly]

    def get(self, request, *args, **kwargs):
        return APIResponse(0, '读 OK')

    def post(self, request, *args, **kwargs):
        return APIResponse(0, '写 OK')
# settings.py
# 默认全局配置的权限类是AllowAny
REST_FRAMEWORK = {
    # 权限类配置
    'DEFAULT_PERMISSION_CLASSES': [
        'rest_framework.permissions.AllowAny',
    ],
}
4.自定义权限类
除了上面四个类的权限,我们往往有更高的更复杂的权限需求,这就需要自定义权限了
1) 创建继承BasePermission的权限类
2) 实现has_permission方法
3) 实现体根据权限规则 确定有无权限
4) 进行全局或局部配置

认证规则
i.满足设置的用户条件,代表有权限,返回True
ii.不满足设置的用户条件,代表有权限,返回False
# utils/permissions.py
from rest_framework.permissions import BasePermission
from django.contrib.auth.models import Group
class MyPermission(BasePermission):
    def has_permission(self, request, view):
        # 只读接口判断
        r1 = request.method in ('GET', 'HEAD', 'OPTIONS')
        # group为有权限的分组
        group = Group.objects.filter(name='管理员').first()
        # groups为当前用户所属的所有分组
        groups = request.user.groups.all()
        r2 = group and groups
        r3 = group in groups
        # 读接口大家都有权限,写接口必须为指定分组下的登陆用户
        return r1 or (r2 and r3)
api / views.py
# 游客只读,登录用户只读,只有登录用户属于 管理员 分组,才可以增删改
from utils.permissions import MyPermission
class TestAdminOrReadOnlyAPIVie
w(APIView):
    permission_classes = [MyPermission]
    # 所有用户都可以访问
    def get(self, request, *args, **kwargs):
        return APIResponse(0, '自定义读 OK')
    # 必须是 自定义“管理员”分组 下的用户
    def post(self, request, *args, **kwargs):
        return APIResponse(0, '自定义写 OK')
四、频率组件 限制接口的访问频率
源码分析:初始化方法、判断是否有权限方法、计数等待时间方法
1. 入口源码分析
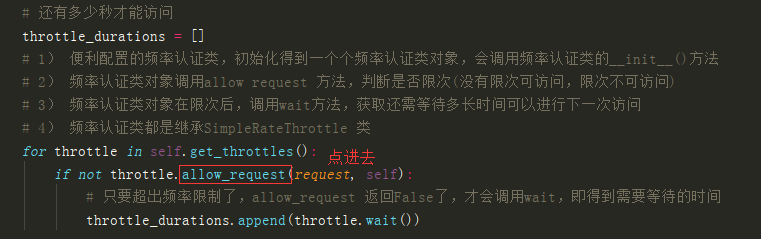
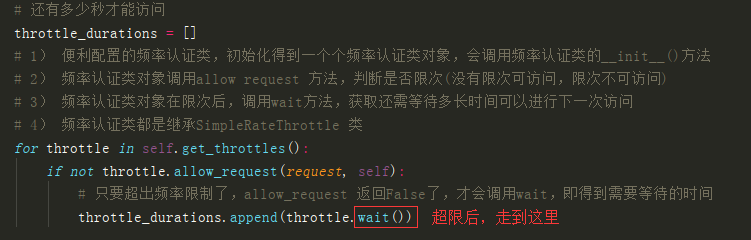
# 1)APIView的dispath方法中的 self.initial(request, *args, **kwargs) 点进去
# 2)self.check_throttles(request) 进行频率认证

# 频率组件核心源码分析
def check_throttles(self, request):
    throttle_durations = []
    # 1)遍历配置的频率认证类,初始化得到一个个频率认证类对象(会调用频率认证类的 __init__() 方法)
    # 2)频率认证类对象调用 allow_request 方法,判断是否限次(没有限次可访问,限次不可访问)
    # 3)频率认证类对象在限次后,调用 wait 方法,获取还需等待多长时间可以进行下一次访问
    # 注:频率认证类都是继承 SimpleRateThrottle 类
    for throttle in self.get_throttles():
        if not throttle.allow_request(request, self):
            # 只要超出频率限制了,allow_request 返回False了,才会调用wait,即得到需要等待的时间
            throttle_durations.append(throttle.wait())
            if throttle_durations:
                durations = [
                    duration for duration in throttle_durations
                    if duration is not None
                ]
                duration = max(durations, default=None)
                self.throttled(request, duration)
# 点进去来到这里,我们再去api_settings看一看
class APIView(View):
            ...
    throttle_classes = api_settings.DEFAULT_THROTTLE_CLASSES
            ...
'DEFAULT_PERMISSION_CLASSES': [], # 默认配置为空,即不作任何频率限制
2. drf / throttling.py 源码
# 分析 第一部分
这里面有BaseThrottle和SimpleRateThrottle,其他类继承他们两个
BaseThrottle


class BaseThrottle:
    # 判断是否限次:没有限次可以请求True,限次了不可以请求False
    def allow_request(self, request, view):
        raise NotImplementedError('.allow_request() must be overridden')

    def get_ident(self, request):
        xff = request.META.get('HTTP_X_FORWARDED_FOR')
        remote_addr = request.META.get('REMOTE_ADDR')
        num_proxies = api_settings.NUM_PROXIES  # 这个可以看到默认为空

        # 上面一大堆默认为空,这个一定不会走,除非去修改默认配置,我们不知道上面一堆是什么先不用管
        if num_proxies is not None:
            if num_proxies == 0 or xff is None:
                return remote_addr
            addrs = xff.split(',')
            client_addr = addrs[-min(num_proxies, len(addrs))]
            return client_addr.strip()

        return ''.join(xff.split()) if xff else remote_addr

    # 限次后调用,显示还需等待多长时间才能再访问,返回等待的时间seconds
    def wait(self):
        return None
这里面代码太少,我们一脸懵逼,看来没找对,来看看SimpleRateThrottle的吧
SimpleRateThrottle
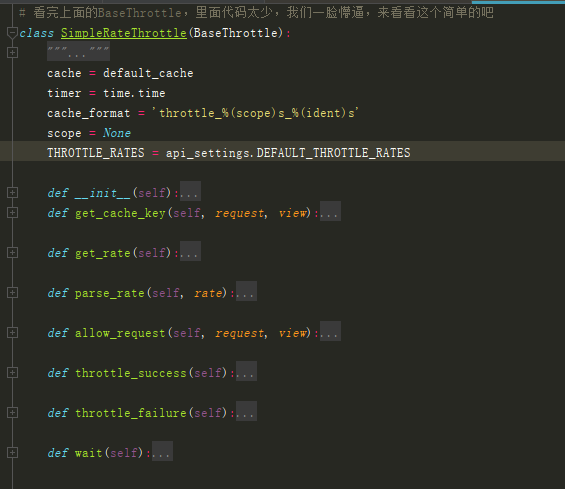
看完这个源码我们发现里面有这么多方法,一一看完也不知啥意思,还是无从下手,怎么办?
往下看,我们发现这三个表:
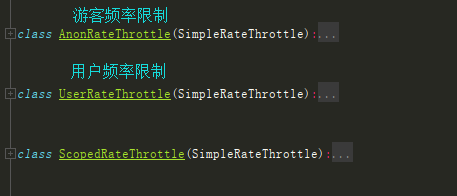
点开用户频率限制可以看到他们三个限制都设置了一个scope变量,都重写了get_cache_key方法 (自定义就仿照这个)
点开一个登录用户的认证:
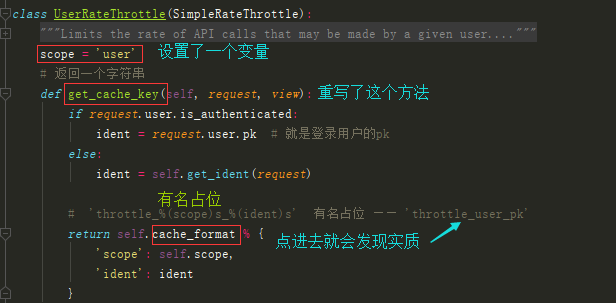
class UserRateThrottle(SimpleRateThrottle):
    scope = 'user'
    # 返回一个字符串
    def get_cache_key(self, request, view):
        if request.user.is_authenticated:
            ident = request.user.pk  # 就是登录用户的pk
        else:
            ident = self.get_ident(request)

        #  'throttle_%(scope)s_%(ident)s'  有名占位 —— 'throttle_user_pk'
        return self.cache_format % {
            'scope': self.scope,
            'ident': ident
        }
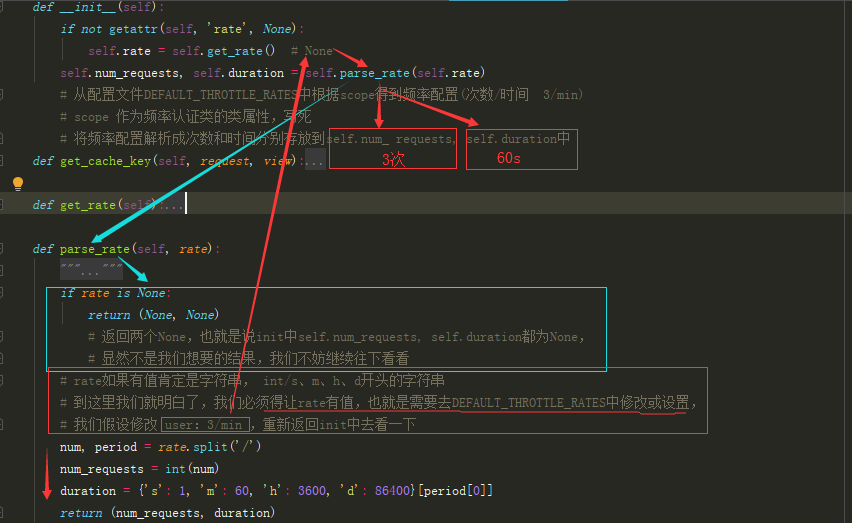
我们考虑,要想走SimpleRateThrottle类,第一步肯定走init:
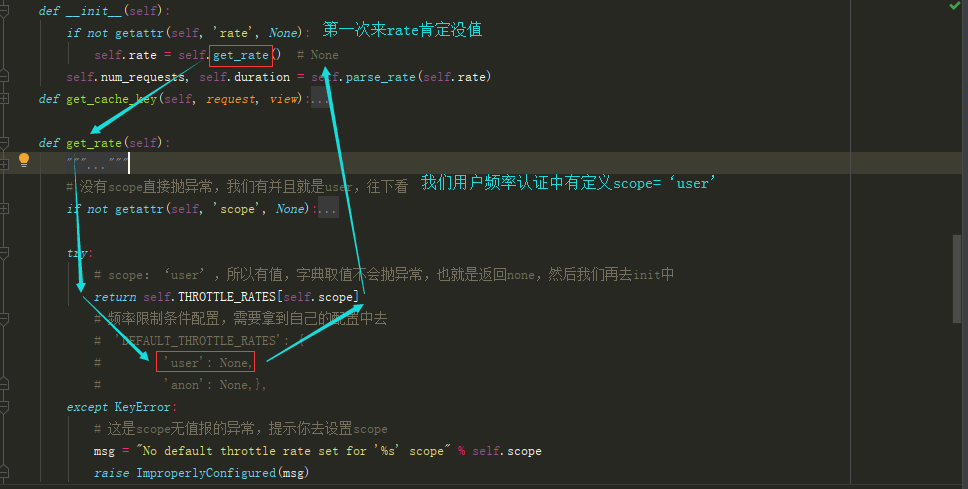
得到self.rate为None,继续往下走进入parse_rate
补充知识: django缓存
        django缓存
        # 1)导包: from django.core.cache import cache
        # 2) 添加缓存: cache.set(key, value, exp
        # 3) 获取缓存: cache.get(key, default_value)
# 分析 第二部分
我们回到入口文件:
# 分析 第三部分
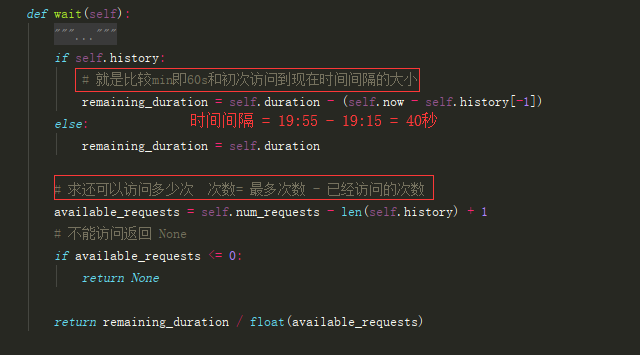
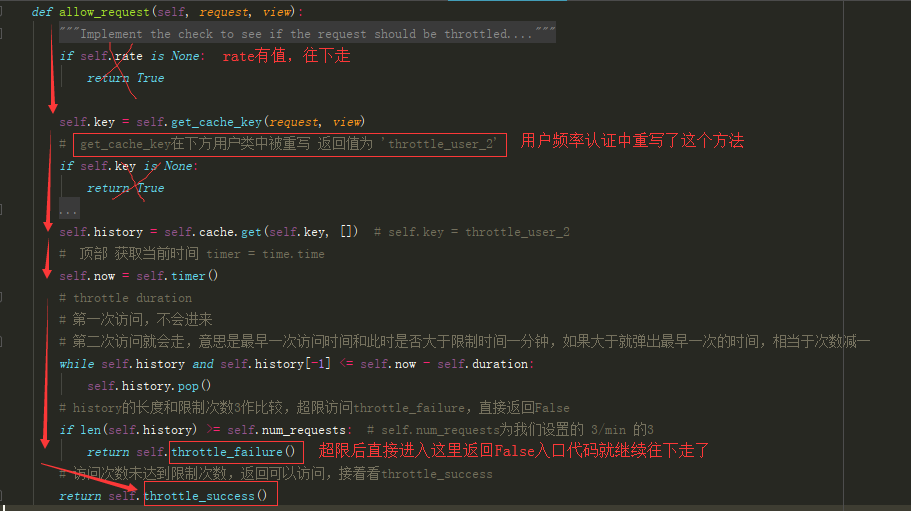
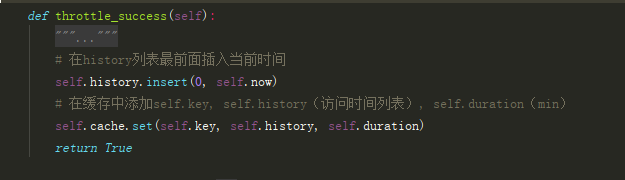
# 看完上面的BaseThrottle,里面代码太少,我们一脸懵逼,来看看这个简单的吧
class SimpleRateThrottle(BaseThrottle):
    """
    A simple cache implementation, that only requires `.get_cache_key()`
    to be overridden.

    The rate (requests / seconds) is set by a `rate` attribute on the View
    class.  The attribute is a string of the form 'number_of_requests/period'.

    Period should be one of: ('s', 'sec', 'm', 'min', 'h', 'hour', 'd', 'day')

    Previous request information used for throttling is stored in the cache.
    """
    cache = default_cache
    timer = time.time
    cache_format = 'throttle_%(scope)s_%(ident)s'
    scope = None
    THROTTLE_RATES = api_settings.DEFAULT_THROTTLE_RATES


    def __init__(self):
        if not getattr(self, 'rate', None):
            self.rate = self.get_rate()  # None
        self.num_requests, self.duration = self.parse_rate(self.rate)
        # 从配置文件DEFAULT_THROTTLE_RATES中根据scope得到频率配置(次数/时间  3/min)
        # scope 作为频率认证类的类属性,写死
        # 将频率配置解析成次数和时间分别存放到self.num_ requests, self.duration中
    def get_cache_key(self, request, view):
        """
        Should return a unique cache-key which can be used for throttling.
        Must be overridden.

        May return `None` if the request should not be throttled.
        """
        raise NotImplementedError('.get_cache_key() must be overridden')  # 提示必须被重写,重写的在下方用户类中

    def get_rate(self):
        """
        Determine the string representation of the allowed request rate.
        """
        # 没有scope直接抛异常,我们有并且就是user,往下看
        if not getattr(self, 'scope', None):
            msg = ("You must set either `.scope` or `.rate` for '%s' throttle" %
                   self.__class__.__name__)
            raise ImproperlyConfigured(msg)

        try:
            # scope:‘user’,所以有值,字典取值不会抛异常,也就是返回none,然后我们再去init中
            return self.THROTTLE_RATES[self.scope]
            # 频率限制条件配置,需要拿到自己的配置中去
            #  'DEFAULT_THROTTLE_RATES': {
            #         'user': None,
            #         'anon': None,},
        except KeyError:
            # 这是scope无值报的异常,提示你去设置scope
            msg = "No default throttle rate set for '%s' scope" % self.scope
            raise ImproperlyConfigured(msg)

    def parse_rate(self, rate):
        """
        Given the request rate string, return a two tuple of:
        <allowed number of requests>, <period of time in seconds>
        """
        if rate is None:
            return (None, None)
            # 返回两个None,也就是说init中self.num_requests, self.duration都为None,
            # 显然不是我们想要的结果,我们不妨继续往下看看
        # rate如果有值肯定是字符串, int/s、m、h、d开头的字符串
        # 到这里我们就明白了,我们必须得让rate有值,也就是需要去DEFAULT_THROTTLE_RATES中修改或设置,
        # 我们假设修改 user:3/min ,重新返回init中去看一下
        num, period = rate.split('/')
        num_requests = int(num)
        duration = {'s': 1, 'm': 60, 'h': 3600, 'd': 86400}[period[0]]
        return (num_requests, duration)

    def allow_request(self, request, view):
        """
        Implement the check to see if the request should be throttled.

        On success calls `throttle_success`.
        On failure calls `throttle_failure`.
        """
        if self.rate is None:
            return True

        self.key = self.get_cache_key(request, view)
        #  get_cache_key在下方用户类中被重写 返回值为 'throttle_user_2'
        if self.key is None:
            return True
        # django缓存
        # 1)导包: from django.core.cache import cache
        # 2) 添加缓存: cache.set(key, value, exp
        # 3) 获取缓存: cache.get(key, default_value)

        # 初次访问缓存为空,history为[]
        self.history = self.cache.get(self.key, [])  # self.key = throttle_user_2
        #  顶部 获取当前时间 timer = time.time
        self.now = self.timer()
        # throttle duration
        # 第一次访问,不会进来
        # 第二次访问就会走,意思是最早一次访问时间和此时是否大于限制时间一分钟,如果大于就弹出最早一次的时间,相当于次数减一
        while self.history and self.history[-1] <= self.now - self.duration:
            self.history.pop()
        # history的长度和限制次数3作比较,超限访问throttle_failure,直接返回False
        if len(self.history) >= self.num_requests:  # self.num_requests为我们设置的 3/min 的3
            return self.throttle_failure()
        # 访问次数未达到限制次数,返回可以访问,接着看throttle_success
        return self.throttle_success()

    def throttle_success(self):
        """
        Inserts the current request's timestamp along with the key
        into the cache.
        """
        # 在history列表最前面插入当前时间
        self.history.insert(0, self.now)
        # 在缓存中添加self.key, self.history(访问时间列表), self.duration(min)
        self.cache.set(self.key, self.history, self.duration)
        return True

    def throttle_failure(self):
        """
        Called when a request to the API has failed due to throttling.
        """
        return False

    def wait(self):
        """
        Returns the recommended next request time in seconds.
        """
        if self.history:
            # 就是比较min即60s和初次访问到现在时间间隔的大小
            remaining_duration = self.duration - (self.now - self.history[-1])
        else:
            remaining_duration = self.duration

        # 求还可以访问多少次  次数= 最多次数 - 已经访问的次数
        available_requests = self.num_requests - len(self.history) + 1
        # 不能访问返回 None
        if available_requests <= 0:
            return None

        return remaining_duration / float(available_requests)


class AnonRateThrottle(SimpleRateThrottle):
    """
    Limits the rate of API calls that may be made by a anonymous users.

    The IP address of the request will be used as the unique cache key.
    """
    scope = 'anon'

    def get_cache_key(self, request, view):
        if request.user.is_authenticated:
            return None  # Only throttle unauthenticated requests.

        return self.cache_format % {
            'scope': self.scope,
            'ident': self.get_ident(request)
        }


class UserRateThrottle(SimpleRateThrottle):
    """
    Limits the rate of API calls that may be made by a given user.

    The user id will be used as a unique cache key if the user is
    authenticated.  For anonymous requests, the IP address of the request will
    be used.
    """
    scope = 'user'
    # 返回一个字符串
    def get_cache_key(self, request, view):
        if request.user.is_authenticated:
            ident = request.user.pk  # 就是登录用户的pk
        else:
            ident = self.get_ident(request)

        #  'throttle_%(scope)s_%(ident)s'  有名占位 —— 'throttle_user_pk'
        return self.cache_format % {
            'scope': self.scope,
            'ident': ident
        }


class ScopedRateThrottle(SimpleRateThrottle):
    """
    Limits the rate of API calls by different amounts for various parts of
    the API.  Any view that has the `throttle_scope` property set will be
    throttled.  The unique cache key will be generated by concatenating the
    user id of the request, and the scope of the view being accessed.
    """
    scope_attr = 'throttle_scope'

    def __init__(self):
        # Override the usual SimpleRateThrottle, because we can't determine
        # the rate until called by the view.
        pass

    def allow_request(self, request, view):
        # We can only determine the scope once we're called by the view.
        self.scope = getattr(view, self.scope_attr, None)

        # If a view does not have a `throttle_scope` always allow the request
        if not self.scope:
            return True

        # Determine the allowed request rate as we normally would during
        # the `__init__` call.
        self.rate = self.get_rate()
        self.num_requests, self.duration = self.parse_rate(self.rate)

        # We can now proceed as normal.
        return super().allow_request(request, view)

    def get_cache_key(self, request, view):
        """
        If `view.throttle_scope` is not set, don't apply this throttle.

        Otherwise generate the unique cache key by concatenating the user id
        with the '.throttle_scope` property of the view.
        """
        if request.user.is_authenticated:
            ident = request.user.pk
        else:
            ident = self.get_ident(request)

        return self.cache_format % {
            'scope': self.scope,
            'ident': ident
        }
3.自定义频率类
# 1) 自定义一个继承 SimpleRateThrottle 类 的频率类
# 2) 设置一个 scope 类属性,属性值为任意见名知意的字符串
# 3) 在settings配置文件中,配置drf的DEFAULT_THROTTLE_RATES,格式为 {scope字符串: '次数/时间'}
# 4) 在自定义频率类中重写 get_cache_key 方法
    # 限制的对象返回 与限制信息有关的字符串
    # 不限制的对象返回 None (只能返回None,不能是False或是''等)
    自定义频率组件:
    class MyThrottle(SimpleRateThrottle):
        scope = 'sms'
        def get_cache_key(self, request, view):
            # 从request的 query_params、data、META 及 view 中 获取限制的条件
            return '与认证信息有关的动态字符串'

    settings文件中要有scope对应的rate配置 {'sms': '3/min'}
示例: 短信接口 1/min 频率限制
频率:api/throttles.py
from rest_framework.throttling import SimpleRateThrottle class SMSRateThrottle(SimpleRateThrottle): scope = 'sms' # 只对提交手机号的get方法(param携带参数)进行限制,因为是query_params里面取的数据 # drf请求的所有url拼接参数(param携带)均被解析到query_params中,所有数据包数据(body携带)都被解析到data中 def get_cache_key(self, request, view): mobile = request.query_params.get('mobile') # 没有手机号,就不做频率限制 if not mobile: return None # 返回可以根据手机号动态变化,且不易重复的字符串,作为操作缓存的key return 'throttle_%(scope)s_%(ident)s' % {'scope': self.scope, 'ident': mobile}
配置:settings.py
# drf配置
REST_FRAMEWORK = {
    # 频率限制条件配置
    'DEFAULT_THROTTLE_RATES': {
        'sms': '1/min'
    },
}
视图:views.py
from .throttles import SMSRateThrottle
class TestSMSAPIView(APIView):
    # 局部配置频率认证
    throttle_classes = [SMSRateThrottle]
    def get(self, request, *args, **kwargs):
        return APIResponse(0, 'get 获取验证码 OK')
    def post(self, request, *args, **kwargs):
        return APIResponse(0, 'post 获取验证码  OK')
路由:api/url.py
url(r'^sms/$', views.TestSMSAPIView.as_view()),
会受限制的接口
# 只会对 /api/sms/?mobile=具体手机号 接口才会有频率限制
# 1)对 /api/sms/ 或其他接口发送无限制
# 2)对数据包提交mobile的/api/sms/接口无限制
# 3)对不是mobile(如phone)字段提交的电话接口无限制

 浙公网安备 33010602011771号