Go语言基础之单元测试
Go语言基础之单元测试
不写测试的开发不是好程序员。崇尚TDD(Test Driven Development)的, 在Go语言中如何做单元测试和基准测试。源码地址
一、go test工具
Go语言中的测试依赖go test命令。编写测试代码和编写普通的Go代码过程是类似的,并不需要学习新的语法、规则或工具。
go test命令是一个按照一定约定和组织的测试代码的驱动程序。在包目录内,所有以_test.go为后缀名的源代码文件都是go test测试的一部分,不会被go build编译到最终的可执行文件中。
在*_test.go文件中有三种类型的函数,单元测试函数、基准测试函数和示例函数。
| 类型 | 格式 | 作用 |
|---|---|---|
| 测试函数 | 函数名前缀为Test | 测试程序的一些逻辑行为是否正确 |
| 基准函数 | 函数名前缀为Benchmark | 测试函数的性能 |
| 示例函数 | 函数名前缀为Example | 为文档提供示例文档 |
go test命令会遍历所有的*_test.go文件中符合上述命名规则的函数,然后生成一个临时的main包用于调用相应的测试函数,然后构建并运行、报告测试结果,最后清理测试中生成的临时文件。
二、测试函数的格式
每个测试函数必须导入testing包,测试函数的基本格式(签名)如下:
func TestName(t *testing.T){
    // ...
}
测试函数的名字必须以Test开头,可选的后缀名必须以大写字母开头,举几个例子:
func TestAdd(t *testing.T){ ... }
func TestSum(t *testing.T){ ... }
func TestLog(t *testing.T){ ... }
其中参数t用于报告测试失败和附加的日志信息。 testing.T的拥有的方法如下:
func (c *T) Error(args ...interface{})
func (c *T) Errorf(format string, args ...interface{})
func (c *T) Fail()
func (c *T) FailNow()
func (c *T) Failed() bool
func (c *T) Fatal(args ...interface{})
func (c *T) Fatalf(format string, args ...interface{})
func (c *T) Log(args ...interface{})
func (c *T) Logf(format string, args ...interface{})
func (c *T) Name() string
func (t *T) Parallel()
func (t *T) Run(name string, f func(t *T)) bool
func (c *T) Skip(args ...interface{})
func (c *T) SkipNow()
func (c *T) Skipf(format string, args ...interface{})
func (c *T) Skipped() bool
三、测试函数示例
就像细胞是构成我们身体的基本单位,一个软件程序也是由很多单元组件构成的。单元组件可以是函数、结构体、方法和最终用户可能依赖的任意东西。总之我们需要确保这些组件是能够正常运行的。单元测试是一些利用各种方法测试单元组件的程序,它会将结果与预期输出进行比较。
接下来,我们定义一个base_demo的包,包中定义了一个Split函数,具体实现如下:
package base_demo

import (
	"strings"
)

/*
@author RandySun
@create 2022-04-30-14:48
*/

//
// Split
//  @Description: 把字符串s按照给定的分隔符sep进行分割返回字符串切片
//  @param s
//  @param sep
//  @return result
//
func Split(s, sep string) (result []string) {
	//返回子串str在字符串s中第一次出现的位置。
	//如果找不到则返回-1;如果str为空,则返回0
	i := strings.Index(s, sep)
	for i > -1 {
		result = append(result, s[:i])
		s = s[i+1:]
		i = strings.Index(s, sep)
	}
	result = append(result, s)
	return
}
在当前目录下,我们创建一个split_test.go的测试文件,并定义一个测试函数如下:
package base_demo

import (
	"fmt"
	"reflect"
	"testing"
)

/*
@author RandySun
@create 2022-04-30-14:57
*/

//
//  TestSplit
//  @Description:  测试函数名必须以Test开头,必须接收一个*testing.T类型参数
//  @param t
//
func TestSplit(t *testing.T) {
	got := Split("a:b:c", ":")         // 程序输出结果
	want := []string{"a", "b", "c"}    // 期望的结果
	if !reflect.DeepEqual(https://img2022.cnblogs.com/blog/1739642/202205/1739642-20220503150434201-1700417592.png 'https://img2022.cnblogs.com/blog/1739642/202205/1739642-20220503150434686-1557975424.png 'want, got'') { // slice不能直接比较,借助反射包中方法比较
		t.Errorf("expected: %v, got: %v", https://img2022.cnblogs.com/blog/1739642/202205/1739642-20220503150434201-1700417592.png 'https://img2022.cnblogs.com/blog/1739642/202205/1739642-20220503150434686-1557975424.png 'want, got'') // 测试失败输出错误提示
	}
}
此时split这个包中的文件如下:
base_demo $ ls -l
total 16
-rw-r--r--  1 randysun  staff  408  4 29 15:50 gen_split.go
-rw-r--r--  1 randysun  staff  466  4 29 16:04 split_test.go
在split包路径下,执行go test命令,可以看到输出结果如下:
base_demo go test
PASS
ok      golang-unit-test-example/01base_demo    0.218s
一个测试用例有点单薄,我们再编写一个测试使用多个字符切割字符串的例子,在split_test.go中添加如下测试函数:
func TestMoreSplit(t *testing.T) {
	got := Split("abcd", "bc")
	want := []string{"a", "d"}
	if !reflect.DeepEqual(https://img2022.cnblogs.com/blog/1739642/202205/1739642-20220503150434201-1700417592.png 'https://img2022.cnblogs.com/blog/1739642/202205/1739642-20220503150434686-1557975424.png 'want, got'') {
		t.Errorf("expected:%v, got:%v", https://img2022.cnblogs.com/blog/1739642/202205/1739642-20220503150434201-1700417592.png 'https://img2022.cnblogs.com/blog/1739642/202205/1739642-20220503150434686-1557975424.png 'want, got'')
	}
}
再次运行go test命令,输出结果如下:
base_demo $ go test
--- FAIL: TestMoreSplit (0.00s)
    split_test.go:30: expected:[a d], got:[a cd]
FAIL
exit status 1
FAIL    golang-unit-test-example/01base_demo    0.247s
这一次,我们的测试失败了。我们可以为go test命令添加-v参数,查看测试函数名称和运行时间:
base_demo $ go test -v
=== RUN   TestMoreSplit
    split_test.go:30: expected:[a d], got:[a cd]
--- FAIL: TestMoreSplit (0.00s)
FAIL
exit status 1
FAIL    golang-unit-test-example/01base_demo    0.258s
这一次我们能清楚的看到是TestMoreSplit这个测试没有成功。 还可以在go test命令后添加-run参数,它对应一个正则表达式,只有函数名匹配上的测试函数才会被go test命令执行。
base_demo $ go test -v -run="More"
=== RUN   TestMoreSplit
    split_test.go:30: expected:[a d], got:[a cd]
--- FAIL: TestMoreSplit (0.00s)
FAIL
exit status 1
FAIL    golang-unit-test-example/01base_demo    0.241s
现在我们回过头来解决我们程序中的问题。很显然我们最初的split函数并没有考虑到sep为多个字符的情况,我们来修复下这个Bug:
package base_demo

import "strings"

/*
@author RandySun
@create 2022-04-30-14:48
*/

// Split
//  @Description: 把字符串s按照给定的分隔符sep进行分割返回字符串切片
//  @param s
//  @param sep
//  @return result
//
func Split(s, sep string) (result []string) {
	i := strings.Index(s, sep)
	result = make([]string, 0, strings.Count(s, sep)+1)
	for i > -1 {
		result = append(result, s[:i])
		s = s[i+len(sep):] // 这里使用len(sep)获取sep的长度
		i = strings.Index(s, sep)

	}
	// 去除首尾作为分隔符
	//if s == "" {
	//	return
	//}
	result = append(result, s)
	return
}
回归测试
这一次我们再来测试一下,我们的程序。注意,当我们修改了我们的代码之后不要仅仅执行那些失败的测试函数,我们应该完整的运行所有的测试,保证不会因为修改代码而引入了新的问题。
base_demo $ go test -v
=== RUN   TestSplit
--- PASS: TestSplit (0.00s)
=== RUN   TestMoreSplit
--- PASS: TestMoreSplit (0.00s)
PASS
ok      golang-unit-test-example/01base_demo    0.230s
这一次我们的测试都通过了。通过这个示例我们可以看到,有了单元测试就能够在代码改动后快速进行回归测试,极大地提高开发效率并保证代码的质量。
跳过某些测试用例
为了节省时间支持在单元测试时跳过某些耗时的测试用例。
func TestTimeConsuming(t *testing.T) {
    if testing.Short() {
        t.Skip("short模式下会跳过该测试用例")
    }
    ...
}
当执行go test -short时就不会执行上面的TestTimeConsuming测试用例。
四、测试组
我们现在还想要测试一下split函数对中文字符串的支持,这个时候我们可以再编写一个TestChineseSplit测试函数,但是我们也可以使用如下更友好的一种方式来添加更多的测试用例。
func TestTypeSplit(t *testing.T) {
	// 定义测试用例类型
	type test struct {
		input string
		sep   string
		want  []string
	}

	// 定义存储测试用例的切片
	tests := []test{
		{input: "a:b:c", sep: ":", want: []string{"a", "b", "c"}},
		{input: "a:b:c", sep: ",", want: []string{"a:b:c"}},
		{input: "abcd", sep: "bc", want: []string{"a", "d"}},
		{input: "梦里有肉,我要吃肉", sep: "肉", want: []string{"梦里有", ",我要吃", ""}},
	}
	// 遍历切片, 逐一测试用例
	for _, tc := range tests {
		got := Split(tc.input, tc.sep)
		if !reflect.DeepEqual(https://img2022.cnblogs.com/blog/1739642/202205/1739642-20220503150429561-2011932053.png 'https://img2022.cnblogs.com/blog/1739642/202205/1739642-20220503150429780-712862928.png 'https://img2022.cnblogs.com/blog/1739642/202205/1739642-20220503150432866-904346281.png 'got, tc.want''') {
			t.Errorf("expected: %#v, got: %#v", tc.https://img2022.cnblogs.com/blog/1739642/202205/1739642-20220503150434201-1700417592.png 'https://img2022.cnblogs.com/blog/1739642/202205/1739642-20220503150434686-1557975424.png 'want, got'')
		}
	}
}
我们通过上面的代码把多个测试用例合到一起,再次执行go test命令。
base_demo $ go test -v -run="Type"
=== RUN   TestTypeSplit
    split_test.go:54: expected: [梦里有 ,我要吃], got: [梦里有 ,我要吃 ]
--- FAIL: TestTypeSplit (0.00s)
FAIL
exit status 1
FAIL    golang-unit-test-example/01base_demo    0.245s
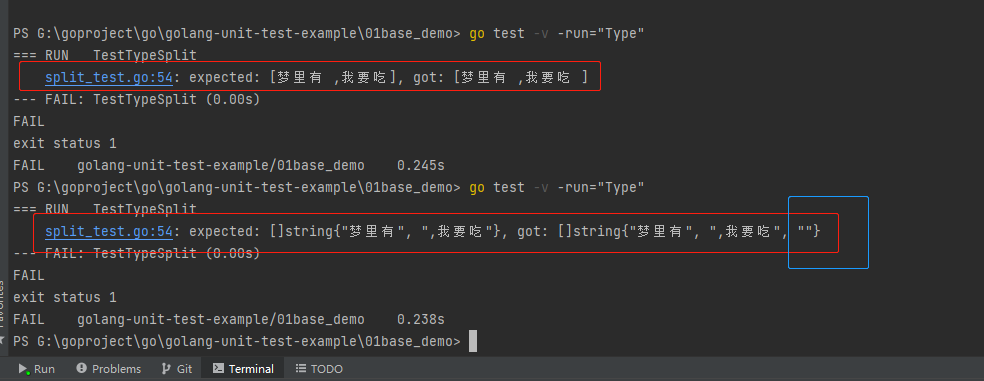
我们的测试出现了问题,仔细看打印的测试失败提示信息:excepted:expected: [梦里有 ,我要吃], got: [梦里有 ,我要吃 ],你会发现[梦里有 ,我要吃 ]中有个不明显的空串,这种情况下十分推荐使用%#v的格式化方式。
我们修改下测试用例的格式化输出错误提示部分:
func TestSplit(t *testing.T) {
   ...

    for _, tc := range tests {
        got := Split(tc.input, tc.sep)
        if !reflect.DeepEqual(https://img2022.cnblogs.com/blog/1739642/202205/1739642-20220503150429561-2011932053.png 'https://img2022.cnblogs.com/blog/1739642/202205/1739642-20220503150429780-712862928.png 'https://img2022.cnblogs.com/blog/1739642/202205/1739642-20220503150432866-904346281.png 'got, tc.want''') {
            t.Errorf("excepted: %#v, got: %#v", tc.https://img2022.cnblogs.com/blog/1739642/202205/1739642-20220503150434201-1700417592.png 'https://img2022.cnblogs.com/blog/1739642/202205/1739642-20220503150434686-1557975424.png 'want, got'')
        }
    }
}
此时运行go test命令后就能看到比较明显的提示信息了:
base_demo $ go test -v
=== RUN   TestTypeSplit
    split_test.go:54: expected: []string{"梦里有", ",我要吃"}, got: []string{"梦里有", ",我要吃", ""}
--- FAIL: TestTypeSplit (0.00s)
FAIL
exit status 1
FAIL    golang-unit-test-example/01base_demo    0.238s
五、子测试
看起来都挺不错的,但是如果测试用例比较多的时候,我们是没办法一眼看出来具体是哪个测试用例失败了。我们可能会想到下面的解决办法:
func TestSplit(t *testing.T) {
    type test struct { // 定义test结构体
        input string
        sep   string
        want  []string
    }

	// 定义存储测试用例的切片
	tests := map[string]test{
		"simple":      {input: "a:b:c", sep: ":", want: []string{"a", "b", "c"}},
		"wrong sep":   {input: "a:b:c", sep: ",", want: []string{"a:b:c"}},
		"more sep":    {input: "abcd", sep: "bc", want: []string{"a", "d"}},
		"leading sep": {input: "梦里有肉,我要吃肉", sep: "肉", want: []string{"梦里有", ",我要吃", ""}},
	}
    for name, tc := range tests {
        got := Split(tc.input, tc.sep)
        if !reflect.DeepEqual(https://img2022.cnblogs.com/blog/1739642/202205/1739642-20220503150429561-2011932053.png 'https://img2022.cnblogs.com/blog/1739642/202205/1739642-20220503150429780-712862928.png 'https://img2022.cnblogs.com/blog/1739642/202205/1739642-20220503150432866-904346281.png 'got, tc.want''') {
            t.Errorf("name: %s excepted: %#v, got: %#v", name, tc.https://img2022.cnblogs.com/blog/1739642/202205/1739642-20220503150434201-1700417592.png 'https://img2022.cnblogs.com/blog/1739642/202205/1739642-20220503150434686-1557975424.png 'want, got'') // 将测试用例的name格式化输出
        }
    }
}
上面的做法是能够解决问题的。同时Go1.7+中新增了子测试,支持在测试函数中使用t.Run执行一组测试用例,这样就不需要为不同的测试数据定义多个测试函数了。
func TestXXX(t *testing.T){
  t.Run("case1", func(t *testing.T){...})
  t.Run("case2", func(t *testing.T){...})
  t.Run("case3", func(t *testing.T){...})
}
5.1 表格驱动测试
介绍
表格驱动测试不是工具、包或其他任何东西,它只是编写更清晰测试的一种方式和视角。
编写好的测试并非易事,但在许多情况下,表格驱动测试可以涵盖很多方面:表格里的每一个条目都是一个完整的测试用例,包含输入和预期结果,有时还包含测试名称等附加信息,以使测试输出易于阅读。
使用表格驱动测试能够很方便的维护多个测试用例,避免在编写单元测试时频繁的复制粘贴。
表格驱动测试的步骤通常是定义一个测试用例表格,然后遍历表格,并使用t.Run对每个条目执行必要的测试。
示例
官方标准库中有很多表格驱动测试的示例,例如fmt包中便有如下测试代码:
var flagtests = []struct {
	in  string
	out string
}{
	{"%a", "[%a]"},
	{"%-a", "[%-a]"},
	{"%+a", "[%+a]"},
	{"%#a", "[%#a]"},
	{"% a", "[% a]"},
	{"%0a", "[%0a]"},
	{"%1.2a", "[%1.2a]"},
	{"%-1.2a", "[%-1.2a]"},
	{"%+1.2a", "[%+1.2a]"},
	{"%-+1.2a", "[%+-1.2a]"},
	{"%-+1.2abc", "[%+-1.2a]bc"},
	{"%-1.2abc", "[%-1.2a]bc"},
}
func TestFlagParser(t *testing.T) {
	var flagprinter flagPrinter
	for _, tt := range flagtests {
		t.Run(tt.in, func(t *testing.T) {
			s := Sprintf(tt.in, &flagprinter)
			if s != tt.out {
				t.Errorf("got %q, want %q", s, tt.out)
			}
		})
	}
}
通常表格是匿名结构体切片,可以定义结构体或使用已经存在的结构进行结构体数组声明。name属性用来描述特定的测试用例。
接下来让我们试着自己编写表格驱动测试:
func TestChildrenSplit(t *testing.T) {
	// 定义测试用例类型
	type test struct {
		input string
		sep   string
		want  []string
	}

	// 定义存储测试用例的切片
	tests := map[string]test{
		"simple":      {input: "a:b:c", sep: ":", want: []string{"a", "b", "c"}},
		"wrong sep":   {input: "a:b:c", sep: ",", want: []string{"a:b:c"}},
		"more sep":    {input: "abcd", sep: "bc", want: []string{"a", "d"}},
		"leading sep": {input: "梦里有肉,我要吃肉", sep: "肉", want: []string{"梦里有", ",我要吃", ""}},
	}
	// 遍历切片, 逐一测试用例
	for name, tc := range tests {
		t.Run(name, func(t *testing.T) {
			got := Split(tc.input, tc.sep)
			if !reflect.DeepEqual(https://img2022.cnblogs.com/blog/1739642/202205/1739642-20220503150429561-2011932053.png 'https://img2022.cnblogs.com/blog/1739642/202205/1739642-20220503150429780-712862928.png 'https://img2022.cnblogs.com/blog/1739642/202205/1739642-20220503150432866-904346281.png 'got, tc.want''') {
				t.Errorf("expected: %#v, got: %#v", tc.https://img2022.cnblogs.com/blog/1739642/202205/1739642-20220503150434201-1700417592.png 'https://img2022.cnblogs.com/blog/1739642/202205/1739642-20220503150434686-1557975424.png 'want, got'')
			}
		})

	}
}
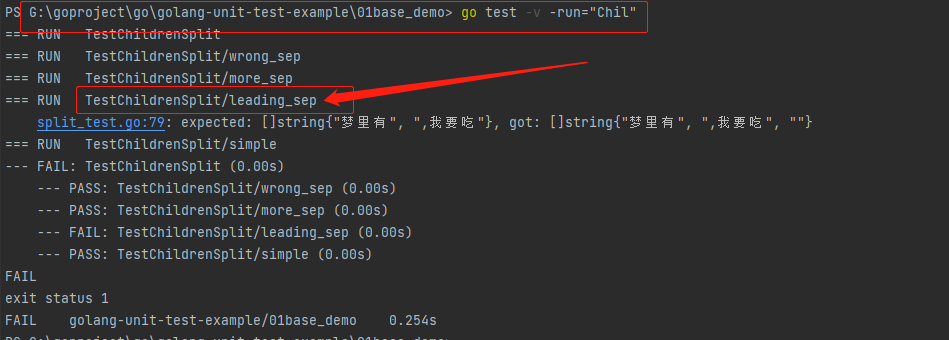
此时我们再执行go test命令就能够看到更清晰的输出内容了:
base_demo$ go test -v
=== RUN   TestChildrenSplit
=== RUN   TestChildrenSplit/wrong_sep
=== RUN   TestChildrenSplit/more_sep
=== RUN   TestChildrenSplit/leading_sep
    split_test.go:79: expected: []string{"梦里有", ",我要吃"}, got: []string{"梦里有", ",我要吃", ""}
=== RUN   TestChildrenSplit/simple
--- FAIL: TestChildrenSplit (0.00s)
    --- PASS: TestChildrenSplit/wrong_sep (0.00s)
    --- PASS: TestChildrenSplit/more_sep (0.00s)
    --- FAIL: TestChildrenSplit/leading_sep (0.00s)
    --- PASS: TestChildrenSplit/simple (0.00s)
FAIL
exit status 1
FAIL    golang-unit-test-example/01base_demo    0.254s
这个时候我们要把测试用例中的错误修改回来:
func TestChildrenSplit(t *testing.T) {
    ...
   // 定义存储测试用例的切片
	tests := map[string]test{
		"simple":      {input: "a:b:c", sep: ":", want: []string{"a", "b", "c"}},
		"wrong sep":   {input: "a:b:c", sep: ",", want: []string{"a:b:c"}},
		"more sep":    {input: "abcd", sep: "bc", want: []string{"a", "d"}},
		"leading sep": {input: "梦里有肉,我要吃肉", sep: "肉", want: []string{"梦里有", ",我要吃", ""}},
	}
    ...
}
我们都知道可以通过-run=RegExp来指定运行的测试用例,还可以通过/来指定要运行的子测试用例,例如:go test -v -run="ChildrenSplit/leading_sep"只会运行simple对应的子测试用例。

5.2 并行测试
表格驱动测试中通常会定义比较多的测试用例,而Go语言又天生支持并发,所以很容易发挥自身并发优势将表格驱动测试并行化。 想要在单元测试过程中使用并行测试,可以像下面的代码示例中那样通过添加t.Parallel()来实现。
func TestSplitAll(t *testing.T) {
	t.Parallel()  // 将 TLog 标记为能够与其他测试并行运行
	// 定义测试表格
	// 这里使用匿名结构体定义了若干个测试用例
	// 并且为每个测试用例设置了一个名称
	tests := []struct {
		name  string
		input string
		sep   string
		want  []string
	}{
        {name: "simple", input: "a:b:c", sep: ":", want: []string{"a", "b", "c"}},
        {name: "wrong sep", input: "a:b:c", sep: ",", want: []string{"a:b:c"}},
        {name: "more sep", input: "abcd", sep: "bc", want: []string{"a", "d"}},
        {name: "leading sep", input: "梦里有肉,我要吃肉", sep: "肉", want: []string{"梦里有", ",我要吃", ""}},
	}
	// 遍历测试用例
	for _, tt := range tests {
		tt := tt  // 注意这里重新声明tt变量(避免多个goroutine中使用了相同的变量)
		t.Run(tt.name, func(t *testing.T) { // 使用t.Run()执行子测试
			t.Parallel()  // 将每个测试用例标记为能够彼此并行运行
			got := Split(tt.input, tt.sep)
			if !reflect.DeepEqual(https://img2022.cnblogs.com/blog/1739642/202205/1739642-20220503150430422-917148809.png 'https://img2022.cnblogs.com/blog/1739642/202205/1739642-20220503150433998-515833876.png 'got, tt.want'') {
				t.Errorf("expected:%#v, got:%#v", tt.https://img2022.cnblogs.com/blog/1739642/202205/1739642-20220503150434201-1700417592.png 'https://img2022.cnblogs.com/blog/1739642/202205/1739642-20220503150434686-1557975424.png 'want, got'')
			}
		})
	}
}
这样我们执行go test -v的时候就会看到每个测试用例并不是按照我们定义的顺序执行,而是互相并行了。
六、测试覆盖率
测试覆盖率是你的代码被测试套件覆盖的百分比。通常我们使用的都是语句的覆盖率,也就是在测试中至少被运行一次的代码占总代码的比例。
Go提供内置功能来检查你的代码覆盖率。我们可以使用go test -cover来查看测试覆盖率。例如:
base_demo $ go test -cover
PASS
coverage: 72.7% of statements
ok      golang-unit-test-example/01base_demo    0.232s
从上面的结果可以看到我们的测试用例覆盖了72.7%的代码。

覆盖率输出到文件中:
go test -cover -coverprofile="文件名"
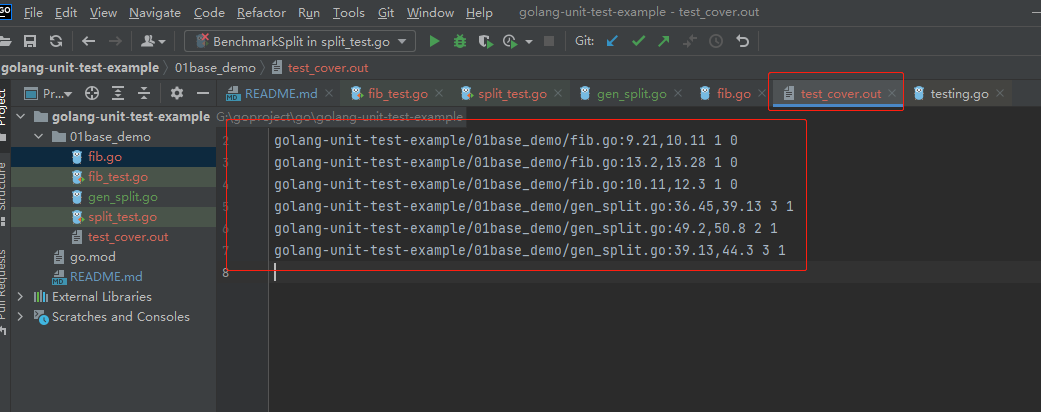
Go还提供了一个额外的-coverprofile参数,用来将覆盖率相关的记录信息输出到一个文件。例如:
base_demo $  go test -cover -coverprofile="test_cover.out"
PASS
coverage: 72.7% of statements
ok      golang-unit-test-example/01base_demo    0.254s

覆盖率生成html报告:
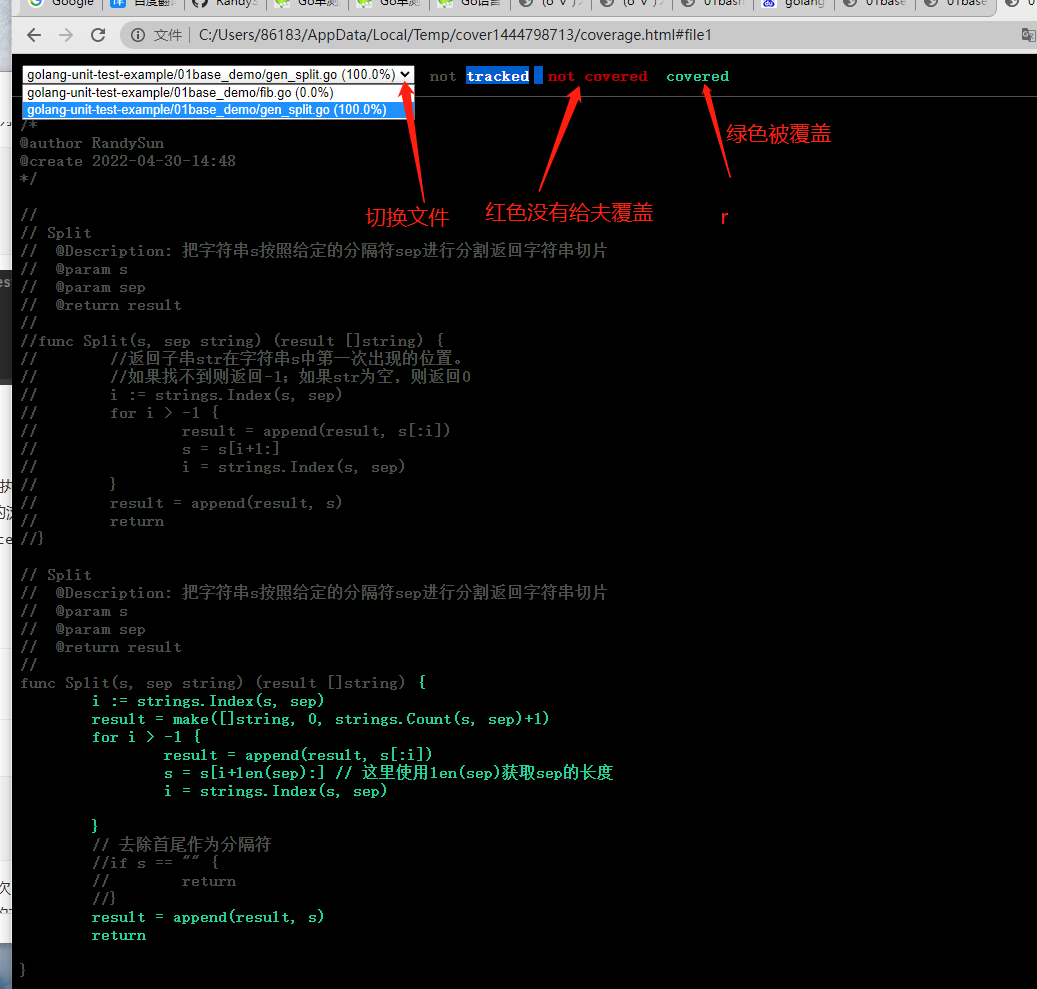
go tool cover -html=test_cover.out
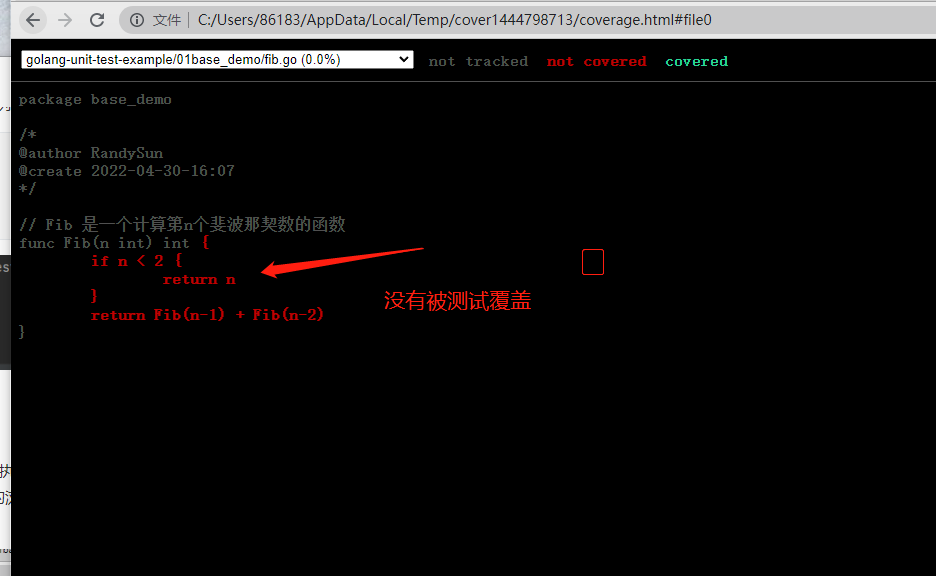
上面的命令会将覆盖率相关的信息输出到当前文件夹下面的test_cover.out文件中,然后我们执行go tool cover -html=test_cover.out,使用cover工具来处理生成的记录信息,该命令会打开本地的浏览器窗口生成一个HTML报告。 上图中每个用绿色标记的语句块表示被覆盖了,而红色的表示没有被覆盖。
七、基准测试函数格式
基准测试就是在一定的工作负载之下检测程序性能的一种方法。基准测试的基本格式如下:
func BenchmarkName(b *testing.B){
    // ...
}
基准测试以Benchmark为前缀,需要一个*testing.B类型的参数b,基准测试必须要执行b.N次,这样的测试才有对照性,b.N的值是系统根据实际情况去调整的,从而保证测试的稳定性。 testing.B拥有的方法如下:
func (c *B) Error(args ...interface{})
func (c *B) Errorf(format string, args ...interface{})
func (c *B) Fail()
func (c *B) FailNow()
func (c *B) Failed() bool
func (c *B) Fatal(args ...interface{})
func (c *B) Fatalf(format string, args ...interface{})
func (c *B) Log(args ...interface{})
func (c *B) Logf(format string, args ...interface{})
func (c *B) Name() string
func (b *B) ReportAllocs()
func (b *B) ResetTimer()
func (b *B) Run(name string, f func(b *B)) bool
func (b *B) RunParallel(body func(*PB))
func (b *B) SetBytes(n int64)
func (b *B) SetParallelism(p int)
func (c *B) Skip(args ...interface{})
func (c *B) SkipNow()
func (c *B) Skipf(format string, args ...interface{})
func (c *B) Skipped() bool
func (b *B) StartTimer()
func (b *B) StopTimer()
7.1 基准测试示例
我们为base_demo包中的Split函数编写基准测试如下:
func BenchmarkSplit(b *testing.B) {
	for i := 0; i < b.N; i++ {
		Split("梦里有肉,我要吃肉", "肉")
	}

}
基准测试并不会默认执行,需要增加-bench参数,所以我们通过执行go test -bench=Split命令执行基准测试,输出结果如下:
base_demo $ go test -bench=Split
goos: windows
goarch: amd64
pkg: golang-unit-test-example/01base_demo
cpu: Intel(R) Core(TM) i5-8300H CPU @ 2.30GHz
BenchmarkSplit-8         8654548               130.6 ns/op
PASS
ok      golang-unit-test-example/01base_demo    1.523s

其中BenchmarkSplit-8表示对Split函数进行基准测试,数字8表示GOMAXPROCS的值,这个对于并发基准测试很重要。8654548和130.6ns/op表示每次调用Split函数耗时130.6ns,这个结果是8654548次调用的平均值。
我们还可以为基准测试添加-benchmem参数,来获得内存分配的统计数据。
base_demo go test -bench=Split -benchmem
goos: darwin
goarch: amd64
pkg: golang-unit-test-example/01base_demo
BenchmarkSplit-8        10000000               215 ns/op             112 B/op          3 allocs/op
PASS
ok      golang-unit-test-example/01base_demo        2.394s
其中,112 B/op表示每次操作内存分配了112字节,3 allocs/op则表示每次操作进行了3次内存分配。 我们将我们的Split函数优化如下:
func Split(s, sep string) (result []string) {
    result = make([]string, 0, strings.Count(s, sep)+1)
    i := strings.Index(s, sep)
    for i > -1 {
        result = append(result, s[:i])
        s = s[i+len(sep):] // 这里使用len(sep)获取sep的长度
        i = strings.Index(s, sep)
    }
    result = append(result, s)
    return
}
这一次我们提前使用make函数将result初始化为一个容量足够大的切片,而不再像之前一样通过调用append函数来追加。我们来看一下这个改进会带来多大的性能提升:
base_demo $ go test -bench=Split -benchmem
goos: windows
goarch: amd64
pkg: golang-unit-test-example/01base_demo
cpu: Intel(R) Core(TM) i5-8300H CPU @ 2.30GHz
BenchmarkSplit-8         8674988               132.9 ns/op            48 B/op          1 allocs/op
PASS
ok      golang-unit-test-example/01base_demo    1.547
这个使用make函数提前分配内存的改动,减少了2/3的内存分配次数,并且减少了一半的内存分配。

7.2 性能比较函数
上面的基准测试只能得到给定操作的绝对耗时,但是在很多性能问题是发生在两个不同操作之间的相对耗时,比如同一个函数处理1000个元素的耗时与处理1万甚至100万个元素的耗时的差别是多少?再或者对于同一个任务究竟使用哪种算法性能最佳?我们通常需要对两个不同算法的实现使用相同的输入来进行基准比较测试。
性能比较函数通常是一个带有参数的函数,被多个不同的Benchmark函数传入不同的值来调用。举个例子如下:
func benchmark(b *testing.B, size int){/* ... */}
func Benchmark10(b *testing.B){ benchmark(b, 10) }
func Benchmark100(b *testing.B){ benchmark(b, 100) }
func Benchmark1000(b *testing.B){ benchmark(b, 1000) }
例如我们编写了一个计算斐波那契数列的函数如下:
// fib.go

// Fib 是一个计算第n个斐波那契数的函数
func Fib(n int) int {
	if n < 2 {
		return n
	}
	return Fib(n-1) + Fib(n-2)
}
我们编写的性能比较函数如下:
// fib_test.go

func benchmarkFib(b *testing.B, n int) {
	for i := 0; i < b.N; i++ {
		Fib(n)
	}
}

//
// go test  -bench=Fib
func BenchmarkFib1(b *testing.B)  { benchmarkFib(b, 1) }
func BenchmarkFib2(b *testing.B)  { benchmarkFib(b, 2) }
func BenchmarkFib3(b *testing.B)  { benchmarkFib(b, 3) }
func BenchmarkFib10(b *testing.B) { benchmarkFib(b, 10) }
func BenchmarkFib20(b *testing.B) { benchmarkFib(b, 20) }
func BenchmarkFib40(b *testing.B) { benchmarkFib(b, 40) }
运行基准测试:
base_demo $ go test  -bench=Fib
goos: windows
goarch: amd64
pkg: golang-unit-test-example/01base_demo
cpu: Intel(R) Core(TM) i5-8300H CPU @ 2.30GHz
BenchmarkFib1-8         819753882                1.540 ns/op
BenchmarkFib2-8         292171341                4.238 ns/op
BenchmarkFib3-8         172517798                7.269 ns/op
BenchmarkFib10-8         4566440               269.4 ns/op
BenchmarkFib20-8           38749             33077 ns/op
BenchmarkFib40-8               3         475459333 ns/op
PASS
ok      golang-unit-test-example/01base_demo    11.253s
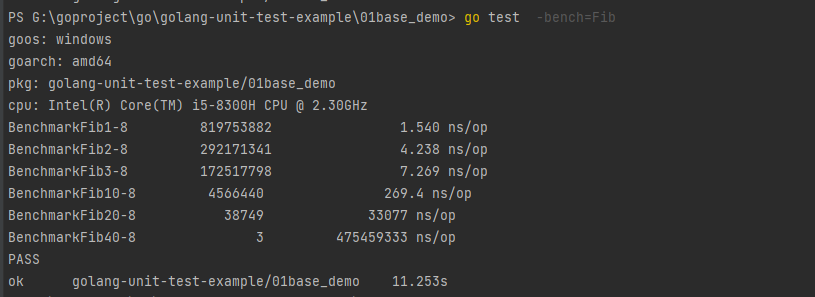
这里需要注意的是,默认情况下,每个基准测试至少运行1秒。如果在Benchmark函数返回时没有到1秒,则b.N的值会按1,2,5,10,20,50,…增加,并且函数再次运行。
最终的BenchmarkFib40只运行了两次,每次运行的平均值只有不到一秒。像这种情况下我们应该可以使用-benchtime标志增加最小基准时间,以产生更准确的结果。例如:
base_demo $ go test -bench=Fib40 -benchtime=20s
goos: windows
goarch: amd64
pkg: golang-unit-test-example/01base_demo
cpu: Intel(R) Core(TM) i5-8300H CPU @ 2.30GHz
BenchmarkFib40-8              50         487085074 ns/op
PASS
ok      golang-unit-test-example/01base_demo    25.088s

这一次BenchmarkFib40函数运行了50次,结果就会更准确一些了。
使用性能比较函数做测试的时候一个容易犯的错误就是把b.N作为输入的大小,例如以下两个例子都是错误的示范:
// 错误示范1
func BenchmarkFibWrong(b *testing.B) {
    for n := 0; n < b.N; n++ {
        Fib(n)
    }
}

// 错误示范2
func BenchmarkFibWrong2(b *testing.B) {
    Fib(b.N)
}
八、重置时间
b.ResetTimer之前的处理不会放到执行时间里,也不会输出到报告中,所以可以在之前做一些不计划作为测试报告的操作。例如:
func BenchmarkSplit(b *testing.B) {
    time.Sleep(5 * time.Second) // 假设需要做一些耗时的无关操作
    b.ResetTimer()              // 重置计时器
    for i := 0; i < b.N; i++ {
        Split("梦里有肉,我要吃肉", "肉")
    }
}
九、并行测试
func (b *B) RunParallel(body func(*PB))会以并行的方式执行给定的基准测试。
RunParallel会创建出多个goroutine,并将b.N分配给这些goroutine执行, 其中goroutine数量的默认值为GOMAXPROCS。用户如果想要增加非CPU受限(non-CPU-bound)基准测试的并行性, 那么可以在RunParallel之前调用SetParallelism 。RunParallel通常会与-cpu标志一同使用。
func BenchmarkSplitParallel(b *testing.B) {
    // b.SetParallelism(1) // 设置使用的CPU数
    b.RunParallel(func(pb *testing.PB) {
        for pb.Next() {
            Split("梦里有肉,我要吃肉", "肉")
        }
    })
}
执行一下基准测试:
base_demo $ go test -bench=.
goos: darwin
goarch: amd64
pkg: golang-unit-test-example/01base_demo
BenchmarkSplit-8                10000000               131 ns/op
BenchmarkSplitParallel-8        50000000                36.1 ns/op
PASS
ok      golang-unit-test-example/01base_demo       3.308s
指定cup执行基准测试:
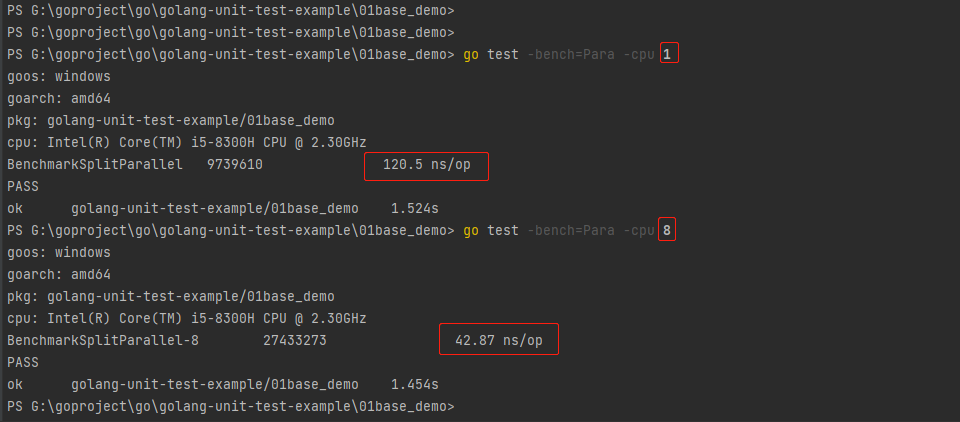
在测试命令后添加-cpu参数如go test -bench=. -cpu 1来指定使用的CPU数量。
// 1核心
base_demo $ go test -bench=Para -cpu 1
goos: windows
goarch: amd64
pkg: golang-unit-test-example/01base_demo
cpu: Intel(R) Core(TM) i5-8300H CPU @ 2.30GHz
BenchmarkSplitParallel   9739610               120.5 ns/op
PASS
ok      golang-unit-test-example/01base_demo    1.524s

// 8核心
base_demo $ go test -bench=Para -cpu 8
goos: windows
goarch: amd64
pkg: golang-unit-test-example/01base_demo
cpu: Intel(R) Core(TM) i5-8300H CPU @ 2.30GHz
BenchmarkSplitParallel-8        27433273                42.87 ns/op
PASS
ok      golang-unit-test-example/01base_demo    1.454s
十、Setup与TearDown
测试程序有时需要在测试之前进行额外的设置(setup)或在测试之后进行拆卸(teardown)。
10.1 TestMain
通过在*_test.go文件中定义TestMain函数来可以在测试之前进行额外的设置(setup)或在测试之后进行拆卸(teardown)操作。
如果测试文件包含函数:func TestMain(m *testing.M)那么生成的测试会先调用 TestMain(m),然后再运行具体测试。TestMain运行在主goroutine中, 可以在调用 m.Run前后做任何设置(setup)和拆卸(teardown)。退出测试的时候应该使用m.Run的返回值作为参数调用os.Exit。
一个使用TestMain来设置Setup和TearDown的示例如下:
func TestMain(m *testing.M) {
    fmt.Println("write setup code here...") // 测试之前的做一些设置
    // 如果 TestMain 使用了 flags,这里应该加上flag.Parse()
    retCode := m.Run()                         // 执行测试
    fmt.Println("write teardown code here...") // 测试之后做一些拆卸工作
    os.Exit(retCode)                           // 退出测试
}
需要注意的是:在调用TestMain时, flag.Parse并没有被调用。所以如果TestMain 依赖于command-line标志 (包括 testing 包的标记), 则应该显示的调用flag.Parse。
10.2 子测试的Setup与Teardown
有时候我们可能需要为每个测试集设置Setup与Teardown,也有可能需要为每个子测试设置Setup与Teardown。下面我们定义两个函数工具函数如下:
// 测试集的Setup与Teardown
func setupTestCase(t *testing.T) func(t *testing.T) {
    t.Log("如有需要在此执行:测试之前的setup")
    return func(t *testing.T) {
        t.Log("如有需要在此执行:测试之后的teardown")
    }
}

// 子测试的Setup与Teardown
func setupSubTest(t *testing.T) func(t *testing.T) {
    t.Log("如有需要在此执行:子测试之前的setup")
    return func(t *testing.T) {
        t.Log("如有需要在此执行:子测试之后的teardown")
    }
}
使用方式如下:
func TestSubSetupDownSplit(t *testing.T) {
    type test struct { // 定义test结构体
        input string
        sep   string
        want  []string
    }
    // 定义存储测试用例的切片
	tests := map[string]test{
		"simple":      {input: "a:b:c", sep: ":", want: []string{"a", "b", "c"}},
		"wrong sep":   {input: "a:b:c", sep: ",", want: []string{"a:b:c"}},
		"more sep":    {input: "abcd", sep: "bc", want: []string{"a", "d"}},
		"leading sep": {input: "梦里有肉,我要吃肉", sep: "肉", want: []string{"梦里有", ",我要吃", ""}},
	}

    teardownTestCase := setupTestCase(t) // 测试之前执行setup操作
    defer teardownTestCase(t)            // 测试之后执行testdoen操作

    for name, tc := range tests {
        t.Run(name, func(t *testing.T) { // 使用t.Run()执行子测试
            teardownSubTest := setupSubTest(t) // 子测试之前执行setup操作
            defer teardownSubTest(t)           // 测试之后执行testdoen操作
            got := Split(tc.input, tc.sep)
            if !reflect.DeepEqual(https://img2022.cnblogs.com/blog/1739642/202205/1739642-20220503150429561-2011932053.png 'https://img2022.cnblogs.com/blog/1739642/202205/1739642-20220503150429780-712862928.png 'https://img2022.cnblogs.com/blog/1739642/202205/1739642-20220503150432866-904346281.png 'got, tc.want''') {
                t.Errorf("excepted: %#v, got: %#v", tc.https://img2022.cnblogs.com/blog/1739642/202205/1739642-20220503150434201-1700417592.png 'https://img2022.cnblogs.com/blog/1739642/202205/1739642-20220503150434686-1557975424.png 'want, got'')
            }
        })
    }
}
测试结果如下:
base_demo $  go test -v -run="Setup"
=== RUN   TestSubSetupDownSplit
    split_test.go:105: 如有需要在此执行:测试之前的setup
=== RUN   TestSubSetupDownSplit/more_sep
    split_test.go:113: 如有需要在此执行:子测试之前的setup
    split_test.go:115: 如有需要在此执行:子测试之后的teardown
=== RUN   TestSubSetupDownSplit/leading_sep
    split_test.go:113: 如有需要在此执行:子测试之前的setup
    split_test.go:115: 如有需要在此执行:子测试之后的teardown
=== RUN   TestSubSetupDownSplit/simple
    split_test.go:113: 如有需要在此执行:子测试之前的setup
    split_test.go:115: 如有需要在此执行:子测试之后的teardown
=== RUN   TestSubSetupDownSplit/wrong_sep
    split_test.go:113: 如有需要在此执行:子测试之前的setup
    split_test.go:115: 如有需要在此执行:子测试之后的teardown
=== CONT  TestSubSetupDownSplit
    split_test.go:107: 如有需要在此执行:测试之后的teardown
--- PASS: TestSubSetupDownSplit (0.00s)
    --- PASS: TestSubSetupDownSplit/more_sep (0.00s)
    --- PASS: TestSubSetupDownSplit/leading_sep (0.00s)
    --- PASS: TestSubSetupDownSplit/simple (0.00s)
    --- PASS: TestSubSetupDownSplit/wrong_sep (0.00s)
PASS
ok      golang-unit-test-example/01base_demo    0.245s

十一、示例函数
示例函数的格式
被go test特殊对待的第三种函数就是示例函数,它们的函数名以Example为前缀。它们既没有参数也没有返回值。标准格式如下:
func ExampleName() {
    // ...
}
示例函数示例
下面的代码是我们为Split函数编写的一个示例函数:
// 示例函数示例
func ExampleSplit() {
	fmt.Println(Split("a:b:c", ":"))
	fmt.Println(Split("梦里有肉,我要吃肉", "肉"))
	// Output:
	// [a b c]
	// [梦里有 ,我要吃 ]
}
为你的代码编写示例代码有如下三个用处:
-
示例函数能够作为文档直接使用,例如基于web的godoc中能把示例函数与对应的函数或包相关联。
-
示例函数只要包含了
// Output:也是可以通过go test运行的可执行测试。base_demo $ go test -run Example PASS ok golang-unit-test-example/01base_demo 0.229s
-
示例函数提供了可以直接运行的示例代码,可以直接在
golang.org的godoc文档服务器上使用Go Playground运行示例代码。下图为strings.ToUpper函数在Playground的示例函数效果。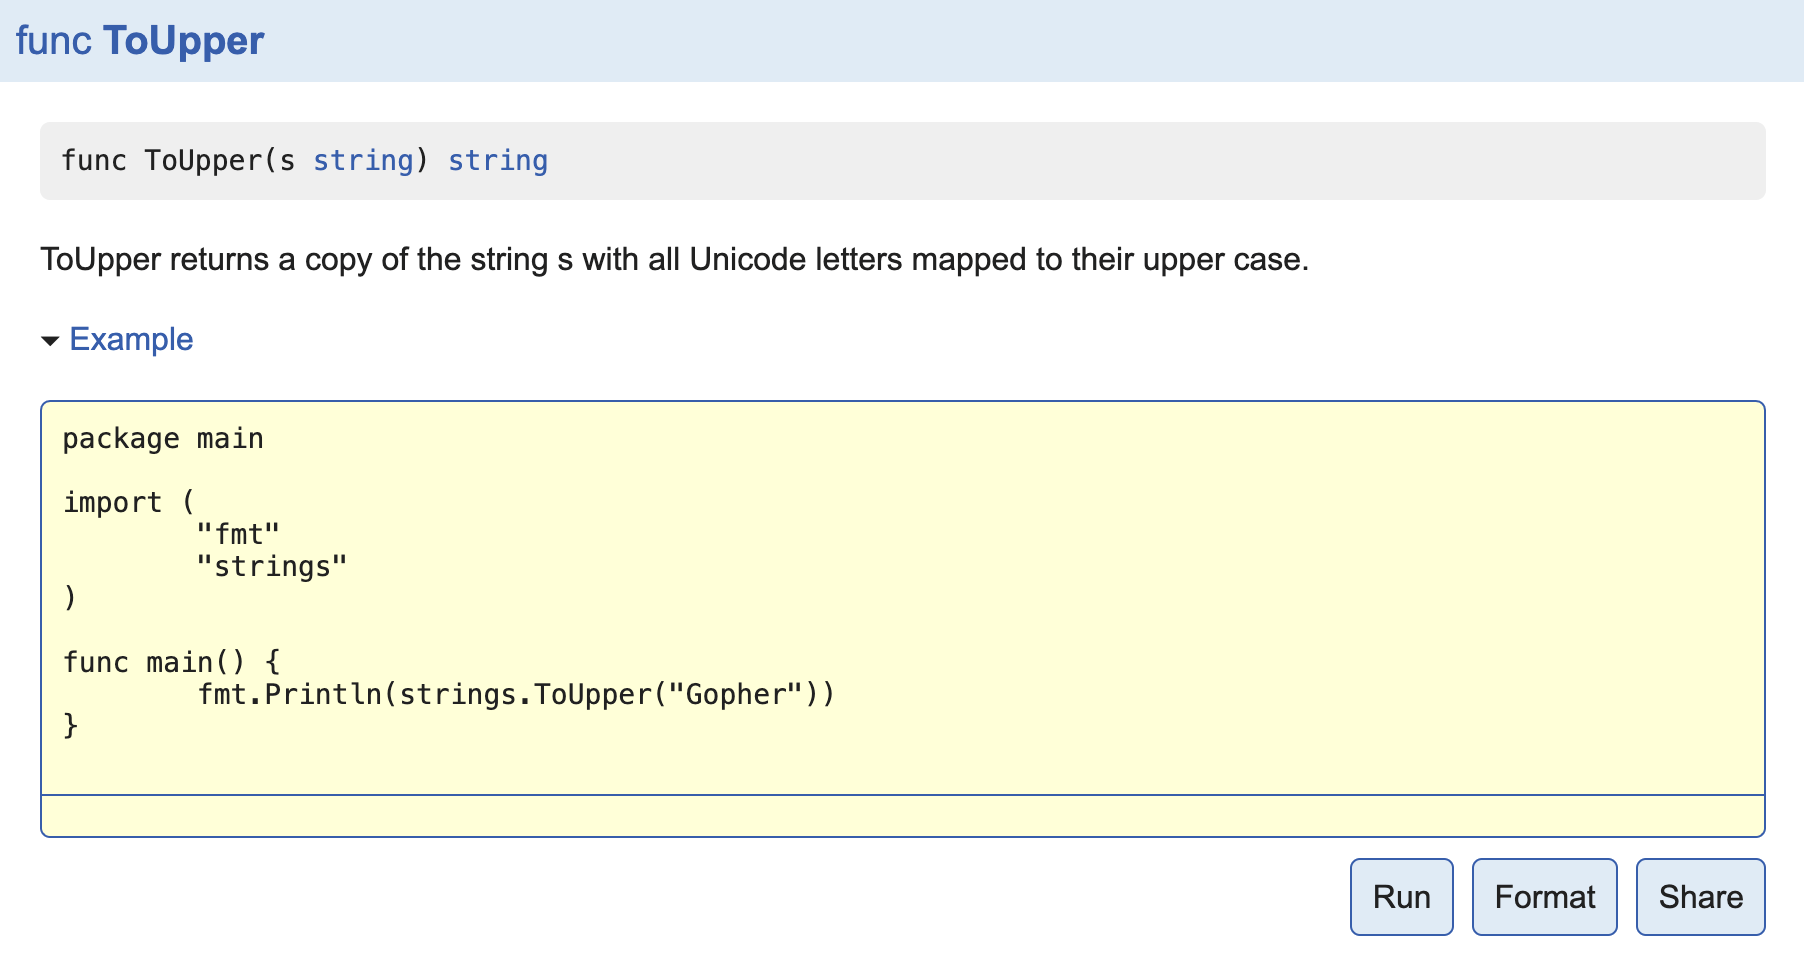
十二、使用工具生成测试代码
社区里有很多自动生成表格驱动测试函数的工具,比如gotests等,很多编辑器如Goland也支持快速生成测试文件。这里简单演示一下gotests的使用。
安装:
go get -u github.com/cweill/gotests/...
用法:
从命令行,gotests可以为特定的源文件或整个目录生成 Go 测试。默认情况下,它将其输出打印到stdout.
$ gotests [选项] 路径 ...
可用选项:
  -all                  generate tests for all functions and methods

  -excl                 regexp. generate tests for functions and methods that don't
                         match. Takes precedence over -only, -exported, and -all

  -exported             generate tests for exported functions and methods. Takes
                         precedence over -only and -all

  -i                    print test inputs in error messages

  -only                 regexp. generate tests for functions and methods that match only.
                         Takes precedence over -all

  -nosubtests           disable subtest generation when >= Go 1.7

  -parallel             enable parallel subtest generation when >= Go 1.7.

  -w                    write output to (test) files instead of stdout

  -template_dir         Path to a directory containing custom test code templates. Takes
                         precedence over -template. This can also be set via environment
                         variable GOTESTS_TEMPLATE_DIR

  -template             Specify custom test code templates, e.g. testify. This can also
                         be set via environment variable GOTESTS_TEMPLATE

  -template_params_file read external parameters to template by json with file

  -template_params      read external parameters to template by json with stdin
执行:
gotests -all -w split.go
上面的命令表示,为split.go文件的所有函数生成测试代码至split_test.go文件(目录下如果事先存在这个文件就不再生成)。
生成的测试代码大致如下:
package base_demo

import (
	"reflect"
	"testing"
)

func TestSplit(t *testing.T) {
	type args struct {
		s   string
		sep string
	}
	tests := []struct {
		name       string
		args       args
		wantResult []string
	}{
		// TODO: Add test cases.
	}
	for _, tt := range tests {
		t.Run(tt.name, func(t *testing.T) {
			if gotResult := Split(tt.args.s, tt.args.sep); !reflect.DeepEqual(https://img2022.cnblogs.com/blog/1739642/202205/1739642-20220503150433768-415854956.png 'gotResult, tt.wantResult') {
				t.Errorf("Split() = %v, want %v", https://img2022.cnblogs.com/blog/1739642/202205/1739642-20220503150433768-415854956.png 'gotResult, tt.wantResult')
			}
		})
	}
}
代码格式与我们上面的类似,只需要在TODO位置添加我们的测试逻辑就可以了。
十三、testify/assert
testify是一个社区非常流行的Go单元测试工具包,其中使用最多的功能就是它提供的断言工具——testify/assert或testify/require。
安装
go get github.com/stretchr/testify
使用示例
我们在写单元测试的时候,通常需要使用断言来校验测试结果,但是由于Go语言官方没有提供断言,所以我们会写出很多的if...else...语句。而testify/assert为我们提供了很多常用的断言函数,并且能够输出友好、易于阅读的错误描述信息。
比如我们之前在TestSplit测试函数中就使用了reflect.DeepEqual来判断期望结果与实际结果是否一致。
t.Run(tt.name, func(t *testing.T) { // 使用t.Run()执行子测试
	got := Split(tt.input, tt.sep)
	if !reflect.DeepEqual(https://img2022.cnblogs.com/blog/1739642/202205/1739642-20220503150430422-917148809.png 'https://img2022.cnblogs.com/blog/1739642/202205/1739642-20220503150433998-515833876.png 'got, tt.want'') {
		t.Errorf("expected:%#v, got:%#v", tt.https://img2022.cnblogs.com/blog/1739642/202205/1739642-20220503150434201-1700417592.png 'https://img2022.cnblogs.com/blog/1739642/202205/1739642-20220503150434686-1557975424.png 'want, got'')
	}
})
使用testify/assert之后就能将上述判断过程简化如下:
t.Run(tt.name, func(t *testing.T) { // 使用t.Run()执行子测试
	got := Split(tt.input, tt.sep)
	assert.Equal(t, https://img2022.cnblogs.com/blog/1739642/202205/1739642-20220503150430422-917148809.png 'https://img2022.cnblogs.com/blog/1739642/202205/1739642-20220503150433998-515833876.png 'got, tt.want'')  // 使用assert提供的断言函数
})
当我们有多个断言语句时,还可以使用assert := assert.New(t)创建一个assert对象,它拥有前面所有的断言方法,只是不需要再传入Testing.T参数了。
func TestSomething(t *testing.T) {
  assert := assert.New(t)

  // assert equality
  assert.Equal(123, 123, "they should be equal")

  // assert inequality
  assert.NotEqual(123, 456, "they should not be equal")

  // assert for nil (good for errors)
  assert.Nil(object)

  // assert for not nil (good when you expect something)
  if assert.NotNil(object) {

    // now we know that object isn't nil, we are safe to make
    // further assertions without causing any errors
    assert.Equal("Something", object.Value)
  }
}
源码
// ObjectsAreEqual determines if two objects are considered equal.
//
// This function does no assertion of any kind.
func ObjectsAreEqual(expected, actual interface{}) bool {
	if expected == nil || actual == nil {
		return expected == actual
	}

	exp, ok := expected.([]byte)
	if !ok {
		return reflect.DeepEqual(expected, actual) // 反射比较
	}

	act, ok := actual.([]byte)
	if !ok {
		return false
	}
	if exp == nil || act == nil {
		return exp == nil && act == nil
	}
	return bytes.Equal(exp, act)
}
示例
正确:
func TestAssertSplit(t *testing.T) {
	got := Split("a:b:c", ":")       // 程序输出结果
	want := []string{"a", "b", "cc"} // 期望的结果
	//if !reflect.DeepEqual(https://img2022.cnblogs.com/blog/1739642/202205/1739642-20220503150434201-1700417592.png 'https://img2022.cnblogs.com/blog/1739642/202205/1739642-20220503150434686-1557975424.png 'want, got'') { // slice不能直接比较,借助反射包中方法比较
	//	t.Errorf("expected: %v, got: %v", https://img2022.cnblogs.com/blog/1739642/202205/1739642-20220503150434201-1700417592.png 'https://img2022.cnblogs.com/blog/1739642/202205/1739642-20220503150434686-1557975424.png 'want, got'') // 测试失败输出错误提示
	//}
	assert.Equal(t, got, want) // 使用assert提供的断言函数

}
1base_demo > go test -v -run Asser
=== RUN   TestAssertSplit
--- PASS: TestAssertSplit (0.00s)
PASS
ok      golang-unit-test-example/01base_demo    0.257s

错误:
func TestAssertSplit(t *testing.T) {
	got := Split("a:b:c", ":")      // 程序输出结果
	want := []string{"a", "b", "cc"} // 期望的结果
	//if !reflect.DeepEqual(https://img2022.cnblogs.com/blog/1739642/202205/1739642-20220503150434201-1700417592.png 'https://img2022.cnblogs.com/blog/1739642/202205/1739642-20220503150434686-1557975424.png 'want, got'') { // slice不能直接比较,借助反射包中方法比较
	//	t.Errorf("expected: %v, got: %v", https://img2022.cnblogs.com/blog/1739642/202205/1739642-20220503150434201-1700417592.png 'https://img2022.cnblogs.com/blog/1739642/202205/1739642-20220503150434686-1557975424.png 'want, got'') // 测试失败输出错误提示
	//}
	assert.Equal(t, got, want) // 使用assert提供的断言函数

}
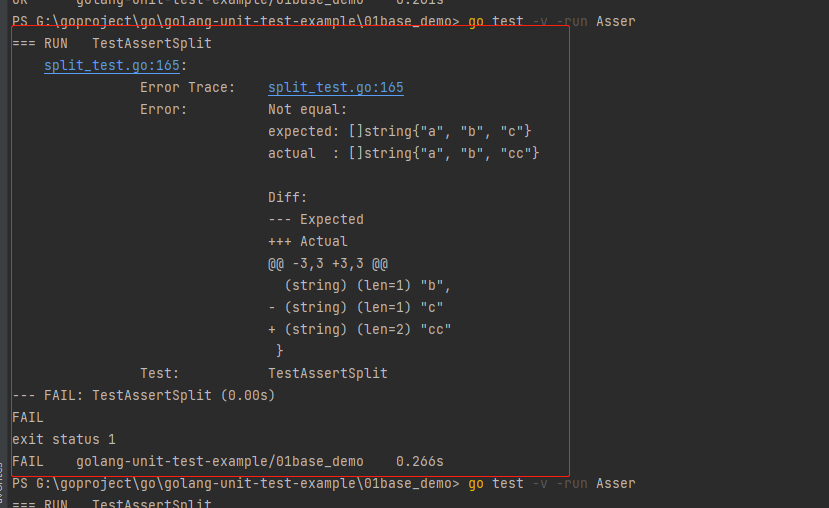
PS G:\goproject\go\golang-unit-test-example\01base_demo> go test -v -run Asser
=== RUN   TestAssertSplit
    split_test.go:165:
                Error Trace:    split_test.go:165
                Error:          Not equal:
                                expected: []string{"a", "b", "c"}
                                actual  : []string{"a", "b", "cc"}

                                Diff:
                                --- Expected
                                +++ Actual
                                @@ -3,3 +3,3 @@
                                  (string) (len=1) "b",
                                - (string) (len=1) "c"
                                + (string) (len=2) "cc"
                                 }
                Test:           TestAssertSplit
--- FAIL: TestAssertSplit (0.00s)
FAIL
exit status 1
FAIL    golang-unit-test-example/01base_demo    0.266s
testify/assert提供了非常多的断言函数,这里没办法一一列举出来,大家可以查看官方文档了解。
testify/require拥有testify/assert所有断言函数,它们的唯一区别就是——testify/require遇到失败的用例会立即终止本次测试。
此外,testify包还提供了mock、http等其他测试工具,篇幅所限这里就不详细介绍了,有兴趣的同学可以自己了解一下。
十四、总结
本文介绍了Go语言单元测试的基本用法,通过为Split函数编写单元测试的真实案例,模拟了日常开发过程中的场景,一步一步详细介绍了表格驱动测试、回归测试和常用的断言工具testify/assert的使用。

