MySQL的安装、配置文件和初始化
STEP01 创建MySQL运行期用户和用户组,当前步骤也可以在安装成功之后做:
[root@localhost objs]# groupadd mysql
[root@localhost objs]# useradd -g mysql mysql
STEP02 将下载好的代码包拷贝到目标服务器,然后解压:
[root@localhost objs]# pwd
/home/motadou/objs
[root@localhost objs]# tar -zxvf mysql-5.1.73.tar.gz
STEP03 按使用惯例,MySQL的库以及可执行程序,我们一般都会安装在/usr/local/mysql目录下。但为了版本升级和替换的便利,一般我都会将每个版本的文件安装在不同的目录。比如MySQL5.1.73,安装在目录/usr/local/myql-5.1.73,然后做一个软连接/usr/local/mysql指向真正的版本路径。后续目录的指定方法都遵循上述原则。
下面开始运行代码包根目录下的configure脚本,配置编译参数,以此来生成Makefile文件: [root@localhost mysql-5.1.73]# pwd
/home/motadou/objs/mysql-5.1.73
[root@localhost mysql-5.1.73]# ./configure
--prefix=/usr/local/mysql-5.1.73
--datadir=/usr/local/mysql-5.1.73/data
--without-debug
--enable-thread-safe-client
--with-charset=utf8
--with-extra-charsets=latin1,gbk
--with-mysqld-user=mysql
--with-unix-socket-path=/usr/local/mysql-5.1.73/sock/mysql.sock
--with-plugins=innobase,partition
STEP04 配置相应参数之后,如果顺利,将在当前目录下生成好Makfile文件,然后我们执行编译命令: [root@localhost mysql-5.1.73]# pwd /home/motadou/objs/mysql-5.1.73 [root@localhost mysql-5.1.73]# make ...... make[1]: Entering directory `/home/motadou/objs/mysql-5.1.73/win' make[1]: Nothing to be done for `all'. make[1]: Leaving directory `/home/motadou/objs/mysql-5.1.73/win' [root@localhost mysql-5.1.73]#如果顺利,我们会看到如上的编译成功信息。进行到此,MySQL库以及可执行程序已经编译出来,可以说已经无限接近成功。现在我们将其安装到指定的目录:
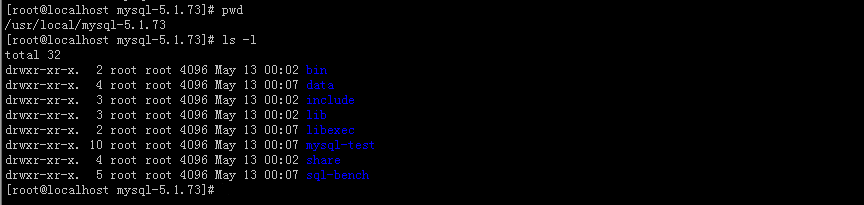
[root@localhost mysql-5.1.73]# pwd
/home/motadou/objs/mysql-5.1.73
[root@localhost mysql-5.1.73]# make install
......
make[1]: Entering directory `/home/motadou/objs/mysql-5.1.73/win'
make[2]: Entering directory `/home/motadou/objs/mysql-5.1.73/win'
make[2]: Nothing to be done for `install-exec-am'.
make[2]: Nothing to be done for `install-data-am'.
make[2]: Leaving directory `/home/motadou/objs/mysql-5.1.73/win'
make[1]: Leaving directory `/home/motadou/objs/mysql-5.1.73/win'
安装成功之后,我们看下/usr/local/mysql-5.1.73的目录结构:
STEP05 前面的步骤我们都是使用root或其他用户执行的命令,下面我们把MySQL的路径权限分配给mysql.mysql:
MySQL的配置文件 进行完上述步骤之后,MySQL已然安装成功。下面就可以初始化和启动了。但在初始化之前,我们首先要了解下my.cnf这个配置文件,因为它与后续的初始化和运行有着莫大的关系。当mysqld服务启动时,系统默认按一定的顺序读取配置文件。该搜索顺序,我们可以使用如下的命令得到。
MySQL的初始化 MySQL安装后,还不能直接启动服务,必须先对数据库进行初始化。初始化的工作主要包括:
** 初始化日志、表空间等数据库必须的文件;
** 创建并初始化系统数据库。
上述的打印信息给了我们一个重要的提醒,就是不要忘记给root设置一个密码,防止恶意用户获得数据库最高权限,或者被其他合法用户误使用root权限而造成事故。
MySQL的管理:启动和停止 初始化数据库之后,我们就可以启动mysqld守护进程,开始访问数据库了。MySQL的启停大致有如下这么几种方法,在实际环境中,我们根据使用场景来选取最合适的方法:
MySQL的测试程序
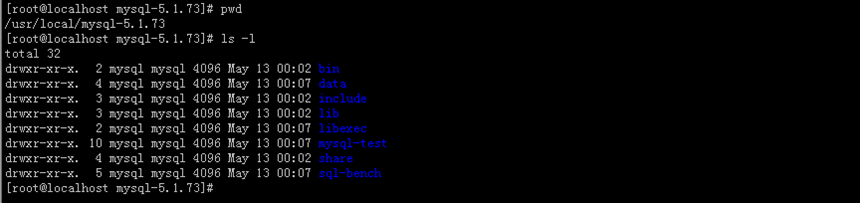
[root@localhost local]# pwd
/usr/local
[root@localhost local]# chown -R mysql:mysql /usr/local/mysql-5.1.73/
执行命令之后,我们再看下/usr/local/mysql-5.1.73的目录结构:

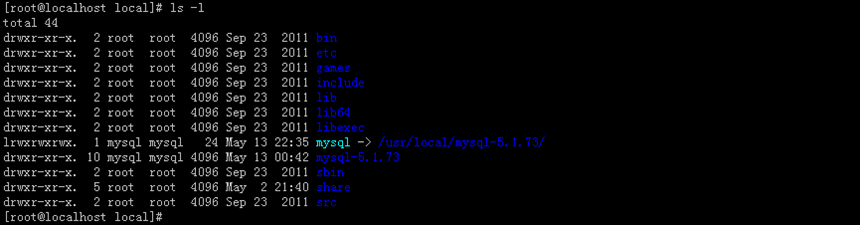
STEP06 下面我们创建指向真实版本的软连接:
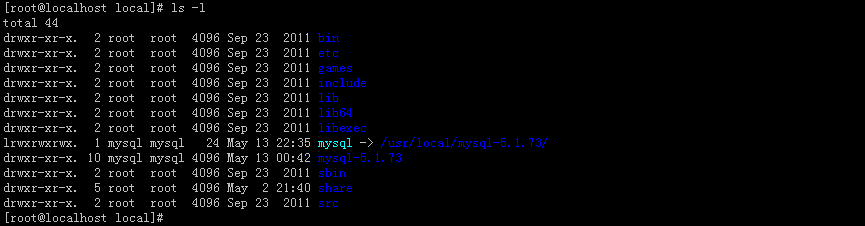
[root@localhost local]# ln -s /usr/local/mysql-5.1.73/ /usr/local/mysql
[root@localhost local]# chown -R mysql.mysql /usr/local/mysql
执行命令之后,我们有如下的目录结构:
[root@localhost libexec]# ./mysqld --verbose --help | more
./mysqld  Ver 5.1.73 for unknown-linux-gnu on x86_64 (Source distribution)
Copyright (c) 2000, 2013, Oracle and/or its affiliates. All rights reserved.

Oracle is a registered trademark of Oracle Corporation and/or its
affiliates. Other names may be trademarks of their respective
owners.

Starts the MySQL database server.

Usage: ./mysqld [OPTIONS]

Default options are read from the following files in the given order:
/etc/my.cnf /etc/mysql/my.cnf /usr/local/mysql-5.1.73/etc/my.cnf ~/.my.cnf
红色文字就是搜索顺序,系统默认是按/etc/my.cnf,/etc/mysql/my.cnf,/usr/local/mysql-5.1.73/etc/my.cnf,~/.my.cnf的顺序读取配置文件(其中/usr/local/mysql-5.1.73为安装目录),当有多个配置文件时,mysql会以读取到的第一个配置文件中的参数为准。 ** 初始化日志、表空间等数据库必须的文件;
** 创建并初始化系统数据库。
在之行configure脚本配置编译参数时,我们曾经指定“--datadir=/usr/local/mysql-5.1.73/data”用来表明数据库文件的存放路径。打开bin/mysql_install_db脚本文件,会发现编译程序会把该路径写入该文件,用作数据库的默认初始化路径。所以我们可以不用加其他参数,使用如下命令直接初始化。
[root@localhost mysql-5.1.73]# bin/mysql_install_db --user=mysql
Installing MySQL system tables...
OK
Filling help tables...
OK

To start mysqld at boot time you have to copy
support-files/mysql.server to the right place for your system

PLEASE REMEMBER TO SET A PASSWORD FOR THE MySQL root USER !
To do so, start the server, then issue the following commands:

/usr/local/mysql-5.1.73/bin/mysqladmin -u root password 'new-password'
/usr/local/mysql-5.1.73/bin/mysqladmin -u root -h localhost.localdomain password 'new-password'

Alternatively you can run:
/usr/local/mysql-5.1.73/bin/mysql_secure_installation

which will also give you the option of removing the test
databases and anonymous user created by default.  This is
strongly recommended for production servers.

See the manual for more instructions.

You can start the MySQL daemon with:
cd /usr/local/mysql-5.1.73 ; /usr/local/mysql-5.1.73/bin/mysqld_safe &

You can test the MySQL daemon with mysql-test-run.pl
cd /usr/local/mysql-5.1.73/mysql-test ; perl mysql-test-run.pl

Please report any problems with the /usr/local/mysql-5.1.73/bin/mysqlbug script!
上述的打印信息给了我们一个重要的提醒,就是不要忘记给root设置一个密码,防止恶意用户获得数据库最高权限,或者被其他合法用户误使用root权限而造成事故。
$mysql_dir/bin/mysqladmin -u root -p shutdown
$mysql_dir/bin/mysqld_safe &
[root@localhost mysql-5.1.73]# bin/mysqld_safe --user=mysql &
[1] 15275
[root@localhost mysql-5.1.73]# 150513 00:22:09 mysqld_safe Logging to '/var/log/mysqld.log'.
150513 00:22:09 mysqld_safe Starting mysqld daemon with databases from /var/lib/mysql
150513 00:22:10 mysqld_safe mysqld from pid file /var/run/mysqld/mysqld.pid ended
[root@localhost lib]# ps aux | grep mysql
root     16035  0.0  0.1 106100  1356 pts/0    S+   00:36   0:00 /bin/sh bin/mysqld_safe
mysql    16116  0.0  2.3 351888 24288 pts/0    Sl+  00:36   0:00 /usr/local/mysql-5.1.73/libexec/mysqld --basedir=/usr/local/mysql-5.1.73 --datadir=/usr/local/mysql-5.1.73/data --user=mysql --log-error=/usr/local/mysql-5.1.73/mysqld.log --pid-file=/usr/local/mysql-5.1.73/mysqld.pid --socket=/usr/local/mysql-5.1.73/mysql.sock
root     16185  0.0  0.0 103252   820 pts/2    S+   00:41   0:00 grep mysql
#include <string>
#include <iostream>
#include "mysql.h"

using namespace std;

const string DB_CONFIG_HOST   = "127.0.0.1";
const string DB_CONFIG_USER   = "easenote";
const string DB_CONFIG_PASSWD = "easenote@123456";
const string DB_CONFIG_DBNAME = "mysql";
const int    DB_CONFIG_PORT   = 3306;

int main() {
	//STEP01 连接数据库
	MYSQL * mHandle = mysql_init(NULL);

	if (mysql_real_connect(mHandle,
		DB_CONFIG_HOST.c_str(),
		DB_CONFIG_USER.c_str(),
		DB_CONFIG_PASSWD.c_str(),
		DB_CONFIG_DBNAME.c_str(),
		DB_CONFIG_PORT, NULL, 0) == NULL)
    {
		cout << "mysql_real_connect fault: " << mysql_errno(mHandle) << "," << string(mysql_error(mHandle)) << endl;
		return -1;
    }

	//STEP02 从mysql.test读取数据
	string sCommand = "SELECT Host,User FROM mysql.user LIMIT 1";
	if (mysql_real_query(mHandle, sCommand.c_str(), sCommand.length()) != 0)
    {
        cout << "mysql_real_query fault: " << mysql_errno(mHandle) << "," << string(mysql_error(mHandle)) << endl;
		return -1;
    }

	MYSQL_RES *pstRes = mysql_store_result(mHandle);
    if (pstRes == NULL)
    {
        cout << "mysql_store_result fault: " << mysql_errno(mHandle) << "," << string(mysql_error(mHandle)) << endl;
		return -1;
    }

	//STEP03 从结果集中读出数据
	MYSQL_ROW stRow;
    while((stRow = mysql_fetch_row(pstRes)) != (MYSQL_ROW)NULL)
    {
		unsigned long * arrLens = mysql_fetch_lengths(pstRes);

		cout << "HOST:" << string(stRow[0], arrLens[0]) << endl;
		cout << "USER:" << string(stRow[1], arrLens[1]) << endl;
    }

    mysql_free_result(pstRes);

	mysql_close(mHandle);
	return 0;
}
现在我们再写一个Makefile文件来编译上述代码: MYSQL_INC := /usr/local/mysql/include/mysql
MYSQL_LIB := /usr/local/mysql/lib/mysql
all:main.cpp
g++ -o main main.cpp -I${MYSQL_INC} -L${MYSQL_LIB} -lmysqlclient
clean:
-rm -f mainMySQL的管理:启动多个实例MySQL的管理:授权MySQL开发环境测试** http://www.cnblogs.com/xiongpq/p/3384681.html
** http://linux.it.net.cn/e/data/mysql/2015/0222/13227.html
** http://caisangzi.blog.51cto.com/6387416/1296931
