
1. 样式中的Setter
使用示例:
01 |
<Window x:Class="DeepXAML.MainWindow" |
03 |
xmlns:x="http://schemas.microsoft.com/winfx/2006/xaml" |
04 |
xmlns:local="clr-namespace:DeepXAML" |
05 |
xmlns:sys="clr-namespace:System;assembly=mscorlib" |
06 |
Title="MainWindow" Height="250" Width="450"> |
07 |
<Window.Resources> |
08 |
<Style TargetType="Button"> |
09 |
<Setter Property="FontSize" Value="30"></Setter> |
10 |
<Setter Property="Margin" Value="10"></Setter> |
11 |
</Style> |
12 |
</Window.Resources> |
13 |
<StackPanel> |
14 |
<Button>New</Button> |
15 |
<Button>Save</Button> |
16 |
<Button>Exit</Button> |
17 |
</StackPanel> |
18 |
</Window> |
19 |
<A href="http://images.cnblogs.com/cnblogs_com/cnblogsfans/201102/201102271111593876.png"><IMG title=image style="BORDER-TOP-WIDTH: 0px; PADDING-RIGHT: 0px; DISPLAY: inline; PADDING-LEFT: 0px; BORDER-LEFT-WIDTH: 0px; BACKGROUND-IMAGE: none; BORDER-BOTTOM-WIDTH: 0px; MARGIN: 0px; PADDING-TOP: 0px; BORDER-RIGHT-WIDTH: 0px" height=137 alt=image src="http://images.cnblogs.com/cnblogs_com/cnblogsfans/201102/201102271112008793.png" width=244 border=0></A> |
很明显,使用样式让我们代码更精简,而且界面的外观可以集中处理。
2. 样式中的Trigger
当某些条件满足时,触发一个行为
a. 基本Trigger
01 |
<Window x:Class="DeepXAML.MainWindow" |
03 |
xmlns:x="http://schemas.microsoft.com/winfx/2006/xaml" |
04 |
xmlns:local="clr-namespace:DeepXAML" |
05 |
xmlns:sys="clr-namespace:System;assembly=mscorlib" |
06 |
Title="MainWindow" Height="250" Width="450"> |
07 |
<Window.Resources> |
08 |
<Style TargetType="CheckBox"> |
09 |
<Setter Property="FontSize" Value="30"></Setter> |
10 |
<Setter Property="Margin" Value="10"></Setter> |
11 |
<Style.Triggers> |
12 |
<Trigger Property="IsChecked" Value="true"> |
13 |
<Trigger.Setters> |
14 |
<Setter Property="Foreground" Value="Red"></Setter> |
15 |
</Trigger.Setters> |
16 |
</Trigger> |
17 |
</Style.Triggers> |
18 |
</Style> |
19 |
</Window.Resources> |
20 |
<StackPanel> |
21 |
<CheckBox>.Net</CheckBox> |
22 |
<CheckBox>Java</CheckBox> |
23 |
<CheckBox>Ruby</CheckBox> |
24 |
<CheckBox>Python</CheckBox> |
25 |
</StackPanel> |
26 |
</Window> |

b. MultiTrigger
01 |
<Window x:Class="DeepXAML.MainWindow" |
03 |
xmlns:x="http://schemas.microsoft.com/winfx/2006/xaml" |
04 |
xmlns:local="clr-namespace:DeepXAML" |
05 |
xmlns:sys="clr-namespace:System;assembly=mscorlib" |
06 |
Title="MainWindow" Height="250" Width="450"> |
07 |
<Window.Resources> |
08 |
<Style TargetType="CheckBox"> |
09 |
<Setter Property="FontSize" Value="30"></Setter> |
10 |
<Setter Property="Margin" Value="10"></Setter> |
11 |
<Style.Triggers> |
12 |
<MultiTrigger> |
13 |
<MultiTrigger.Conditions> |
14 |
<Condition Property="IsChecked" Value="true"></Condition> |
15 |
<Condition Property="Content" Value="Java"></Condition> |
16 |
</MultiTrigger.Conditions> |
17 |
<MultiTrigger.Setters> |
18 |
<Setter Property="Foreground" Value="Red"></Setter> |
19 |
</MultiTrigger.Setters> |
20 |
</MultiTrigger> |
21 |
</Style.Triggers> |
22 |
</Style> |
23 |
</Window.Resources> |
24 |
<StackPanel> |
25 |
<CheckBox>.Net</CheckBox> |
26 |
<CheckBox>Java</CheckBox> |
27 |
<CheckBox>Ruby</CheckBox> |
28 |
<CheckBox>Python</CheckBox> |
29 |
</StackPanel> |
30 |
</Window> |

c. DataTrigger
01 |
<Window x:Class="DeepXAML.MainWindow" |
03 |
xmlns:x="http://schemas.microsoft.com/winfx/2006/xaml" |
04 |
xmlns:local="clr-namespace:DeepXAML" |
05 |
xmlns:sys="clr-namespace:System;assembly=mscorlib" |
06 |
Title="MainWindow" Height="250" Width="450"> |
07 |
<Window.Resources> |
08 |
<Style TargetType="TextBox"> |
09 |
<Setter Property="Margin" Value="10"></Setter> |
10 |
<Style.Triggers> |
11 |
<DataTrigger Binding="{Binding Path=Name}" Value="Jack"> |
12 |
<Setter Property="Foreground" Value="Red"></Setter> |
13 |
</DataTrigger> |
14 |
</Style.Triggers> |
15 |
</Style> |
16 |
</Window.Resources> |
17 |
<StackPanel x:Name="stackPanel"> |
18 |
<TextBox Text="{Binding Path=Name}"></TextBox> |
19 |
<TextBox Text="{Binding Path=Age}"></TextBox> |
20 |
<TextBox></TextBox> |
21 |
</StackPanel> |
22 |
</Window> |
01 |
public MainWindow() |
02 |
{ |
03 |
InitializeComponent(); |
04 |
|
05 |
Person p = new Person { Name = "Jack", Age = 30 }; |
06 |
this.stackPanel.DataContext = p; |
07 |
} |
08 |
|
09 |
public class Person |
10 |
{ |
11 |
public string Name { get; set; } |
12 |
public int Age { get; set; } |
13 |
} |

d. 多数据条件的trigger
MultiDataTrigger这个类似上面的MultiTrigger,不用细说了。
e. EventTrigger
是由事件来触发
01 |
<Window x:Class="DeepXAML.MainWindow" |
03 |
xmlns:x="http://schemas.microsoft.com/winfx/2006/xaml" |
04 |
xmlns:local="clr-namespace:DeepXAML" |
05 |
xmlns:sys="clr-namespace:System;assembly=mscorlib" |
06 |
Title="MainWindow" Height="250" Width="450"> |
07 |
<Window.Resources> |
08 |
<Style TargetType="Button"> |
09 |
<Setter Property="Margin" Value="10"></Setter> |
10 |
<Style.Triggers> |
11 |
<EventTrigger RoutedEvent="MouseEnter"> |
12 |
<BeginStoryboard> |
13 |
<Storyboard> |
14 |
<DoubleAnimation To="20" Duration="0:0:0.2" Storyboard.TargetProperty="Width"></DoubleAnimation> |
15 |
<DoubleAnimation To="70" Duration="0:0:0.2" Storyboard.TargetProperty="Height"></DoubleAnimation> |
16 |
</Storyboard> |
17 |
</BeginStoryboard> |
18 |
</EventTrigger> |
19 |
<EventTrigger RoutedEvent="MouseLeave"> |
20 |
<BeginStoryboard> |
21 |
<Storyboard> |
22 |
<DoubleAnimation To="100" Duration="0:0:0.2" Storyboard.TargetProperty="Width"></DoubleAnimation> |
23 |
<DoubleAnimation To="20" Duration="0:0:0.2" Storyboard.TargetProperty="Height"></DoubleAnimation> |
24 |
</Storyboard> |
25 |
</BeginStoryboard> |
26 |
</EventTrigger> |
27 |
</Style.Triggers> |
28 |
</Style> |
29 |
</Window.Resources> |
30 |
<StackPanel x:Name="stackPanel"> |
31 |
<Button Width="100" Height="20">OK</Button> |
32 |
</StackPanel> |
33 |
</Window> |
34 |
|
35 |
<FONT color=#ff0000>这里DoubleAnimation必须显示设置Button的Width和Height,不能是用默认的,否则会报错。</FONT> |

 浙公网安备 33010602011771号
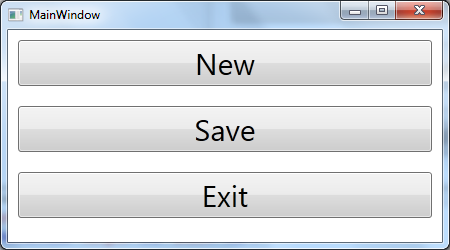