day74:drf:drf其他功能:认证/权限/限流/过滤/排序/分页/异常处理&自动生成接口文档
目录
1.django-admin
1.先创建一个子应用,用来测试接下来drf其他的相关功能。
python manage.py startapp drf_others
2.因为接下来的功能中需要使用到登陆功能,所以我们使用django内置admin站点并创建一个管理员.
python manage.py createsuperuser
# 填一下用户名、邮箱和密码
root
1234567@qq.com
123
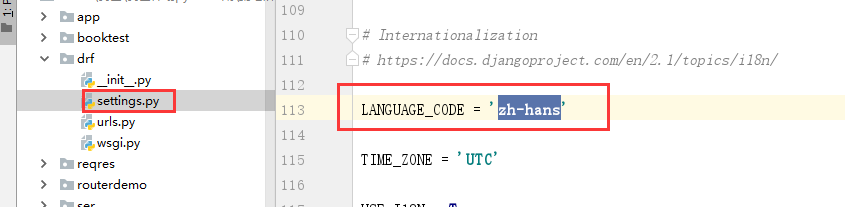
3.创建管理员以后,访问admin站点,先修改站点的语言配置
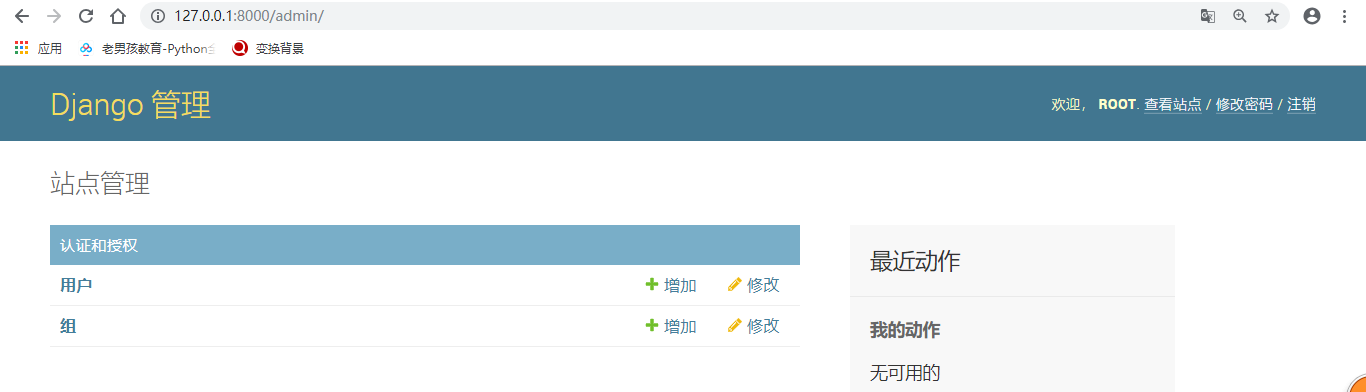
4.访问admin站点效果
admin后台管理简单使用
在应用的admin.py文件中
from app01 import models

class StudentAdmin(admin.ModelAdmin):
    list_display = ['id','name','age','class_null']
    list_editable = ['name','age']

admin.site.register(models.Student,StudentAdmin)
创建超级管理员用户
python manage.py createsuperuser
# 输入用户名和密码,邮箱可以不输入
url
path('admin/', admin.site.urls),
2.认证:Authentication
可以在配置文件中配置全局默认的认证方案
from rest_framework import settings

'''在settings配置文件中,我们可以进行下面的配置来覆盖默认配置'''
REST_FRAMEWORK = {
    'DEFAULT_AUTHENTICATION_CLASSES': (
      # 哪个写在前面,优先使用哪个认证

        'rest_framework.authentication.SessionAuthentication',  # session认证,admin后台其实就使用的session认证,其实接口开发很少用到session认证,所以我们通过配置可以改为其他认证,比如后面项目里面我们用到jwt,JSON WEB TOKEN认证,或者一些配合redis的认证

        'rest_framework.authentication.BasicAuthentication',   # 基本认证,工作当中可能一些测试人员会参与的话,他们会将一些认证数据保存在内存当中,然后验证的,我们基本上用不上
    )
}
也可以在每个视图中通过设置authentication_classes属性来设置,比如说我们很多接口的数据都是可以让别人获取数据的,
但是有可能有些接口是调用给别人网站的,有可能到时候我们就需要一些单独的认证了
from rest_framework.authentication import SessionAuthentication, BasicAuthentication
from rest_framework.views import APIView

class ExampleView(APIView):
    # 类属性
    authentication_classes = [SessionAuthentication, BasicAuthentication] # 也可以写成元组形式的,到时候我们使用我们自己开发的认证组件的时候,就需要自己写一个认证组件类,然后写在列表中来使用
    ...
-
401 Unauthorized 未认证
-
403 Permission Denied 权限被禁止
示例1:自定义认证组件
from rest_framework.authentication import BaseAuthentication
from rest_framework.exceptions import AuthenticationFailed
class APIAuth(BaseAuthentication):

    def authenticate(self, request):
        print(request)

        if 1:
            return 'xx','oo'  # request.user = 'xx'  request.auth = 'oo'

        else:
            raise AuthenticationFailed('认证失败')
全局使用,settings配置文件中使用
REST_FRAMEWORK = {
'DEFAULT_AUTHENTICATION_CLASSES': (
...
'four.utils.auth.APIAuth',  # 类的路径
),
}
局部视图中使用
from rest_framework.authentication import SessionAuthentication, BasicAuthentication
from four.utils.auth import APIAuth

class AuthAPIView(APIView):
    authentication_classes = [APIAuth,]
    def get(self,request):
        print('>>>>',request.user)  # AnonymousUser  匿名用户,假用户
        print('>>>>',request.auth)  # AnonymousUser  匿名用户,假用户
        #>>>> root
        return Response({'msg':'hello'})
3.权限:Permissions
-
在执行视图的dispatch()方法前,会先进行视图访问权限的判断
-
在通过get_object()获取具体对象时,会进行模型对象访问权限的判断
可以在配置文件中全局设置默认的权限管理类
REST_FRAMEWORK = {
    ....

    'DEFAULT_PERMISSION_CLASSES': (
        'rest_framework.permissions.IsAuthenticated', # 登录状态下才能访问我们的接口,可以通过退出admin后台之后,你看一下还能不能访问我们正常的接口就看到效果了
    )
}
如果未指明,则采用如下默认配置
from rest_framework import permissions
'DEFAULT_PERMISSION_CLASSES': (
   'rest_framework.permissions.AllowAny', # 表示任何人都可以进行任何的操作,没做限制
)
也可以在具体的视图中通过permission_classes属性来设置
from rest_framework.permissions import IsAuthenticated
from rest_framework.views import APIView

class ExampleView(APIView):
    permission_classes = (IsAuthenticated,)
    ...
提供的权限
-
-
IsAuthenticated 仅通过认证的用户
-
IsAdminUser 仅管理员用户(可以通过admin创建一个用户进行测试)
-
IsAuthenticatedOrReadOnly 已经登陆认证的用户可以对数据进行增删改操作,没有登陆认证的只能查看数据。
示例
from rest_framework.authentication import SessionAuthentication
from rest_framework.permissions import IsAuthenticated
from rest_framework.generics import RetrieveAPIView

class StudentAPIView(RetrieveAPIView):
    queryset = Student.objects.all()
    serializer_class = StudentSerializer
    authentication_classes = [SessionAuthentication]
    permission_classes = [IsAuthenticated]
自定义权限
-
.has_permission(self, request, view)是否可以访问视图, view表示当前视图对象
-
.has_object_permission(self, request, view, obj)是否可以访问数据对象, view表示当前视图, obj为数据对象
例如在当前子应用下,创建一个权限文件permissions.py中声明自定义权限类:
from rest_framework.permissions import BasePermission

class IsXiaoMingPermission(BasePermission):
    def has_permission(self, request, view):

        if( request.user.username == "xiaoming" ):
            return True
视图函数
from .permissions import IsXiaoMingPermission
class StudentViewSet(ModelViewSet):
    queryset = Student.objects.all()
    serializer_class = StudentSerializer
    permission_classes = [IsXiaoMingPermission]
4.限流:Throttling
一般用于付费购买次数,投票等场景使用.
REST_FRAMEWORK = {

    'DEFAULT_THROTTLE_CLASSES': (
        'rest_framework.throttling.AnonRateThrottle', # 匿名用户,未登录的
        'rest_framework.throttling.UserRateThrottle' # 经过登录之后的用户
    ),
    'DEFAULT_THROTTLE_RATES': {
        'anon': '100/day',
        'user': '1000/day'
    }
}
from rest_framework.throttling import UserRateThrottle
from rest_framework.views import APIView

class ExampleView(APIView):
    throttle_classes = (UserRateThrottle,)  # 局部配置
    ...
可选择的限流类
限制所有匿名未认证用户,使用IP区分用户。
使用DEFAULT_THROTTLE_RATES['anon'] 来设置频次
2)UserRateThrottle
限制认证用户,使用User id 来区分。
使用DEFAULT_THROTTLE_RATES['user'] 来设置频次
3)ScopedRateThrottle (待定...)
限制用户对于每个视图的访问频次,使用ip或user id,先找的用户id,没有设置用户id的话就会使用ip地址。
示例
全局配置中设置访问频率
    'DEFAULT_THROTTLE_RATES': {
        'anon': '3/minute',
        'user': '10/minute'
    }
from rest_framework.authentication import SessionAuthentication
from rest_framework.permissions import IsAuthenticated
from rest_framework.generics import RetrieveAPIView
from rest_framework.throttling import UserRateThrottle

class StudentAPIView(RetrieveAPIView):
    queryset = Student.objects.all()
    serializer_class = StudentSerializer
    authentication_classes = [SessionAuthentication]
    permission_classes = [IsAuthenticated]
    throttle_classes = (UserRateThrottle,)
ScopedRateThrottle局部使用示例
# settings.py内容
'DEFAULT_THROTTLE_RATES': {
        'xx': '3/minute',
        'oo': '5/minute',
    },


# views.py内容

from rest_framework.throttling import ScopedRateThrottle

class StudentAPIView(ListAPIView):
    queryset = models.Student.objects.all()
    serializer_class = StudentModelSerializer
    throttle_classes = [ScopedRateThrottle,]
    throttle_scope = 'xx'

class StudentAPI2View(ListAPIView):
    queryset = models.Student.objects.all()
    serializer_class = StudentModelSerializer
    throttle_classes = [ScopedRateThrottle, ]
    throttle_scope = 'oo'

# urls.py内容
    path(r'students/',views.StudentAPIView.as_view()),
    path(r'students2/',views.StudentAPI2View.as_view()),
5.过滤:Filtering
对于列表数据可能需要根据字段进行过滤,我们可以通过添加django-fitlter扩展来增强支持。
pip install django-filter
在配置文件中增加过滤后端的设置:
INSTALLED_APPS = [
    ...
    'django_filters',  # 需要注册应用,
]

REST_FRAMEWORK = {
    ...
    'DEFAULT_FILTER_BACKENDS': ('django_filters.rest_framework.DjangoFilterBackend',)
}
在视图中添加filter_fields属性,指定可以过滤的字段
class StudentListView(ListAPIView):
    queryset = Student.objects.all()
    serializer_class = StudentSerializer
    filter_fields = ('age', 'sex')

# 127.0.0.1:8000/four/students/?sex=1
6.排序:OrderingFilter
使用方法
在类视图中设置filter_backends,使用rest_framework.filters.OrderingFilter过滤器,REST framework会在请求的查询字符串参数中检查是否包含了ordering参数,如果包含了ordering参数,则按照ordering参数指明的排序字段对数据集进行排序。
前端可以传递的ordering参数的可选字段值需要在ordering_fields中指明。
示例
class StudentListView(ListAPIView):
    queryset = Student.objects.all()
    serializer_class = StudentModelSerializer
    filter_backends = [OrderingFilter]
    ordering_fields = ('id', 'age')

# 127.0.0.1:8000/books/?ordering=-age
# 必须是ordering=某个值
# -id 表示针对id字段进行倒序排序
# id  表示针对id字段进行升序排序
如果需要在过滤以后再次进行排序,则需要两者结合!
from rest_framework.generics import ListAPIView
from students.models import Student
from .serializers import StudentModelSerializer
from django_filters.rest_framework import DjangoFilterBackend # 需要使用一下它才能结合使用
class Student3ListView(ListAPIView):
    queryset = Student.objects.all()
    serializer_class = StudentModelSerializer
    filter_fields = ('age', 'sex')

    # 因为filter_backends是局部过滤配置,局部配置会覆盖全局配置,所以需要重新把过滤组件核心类再次声明,
    # 否则过滤功能会失效
    filter_backends = [OrderingFilter,DjangoFilterBackend]

    ordering_fields = ('id', 'age')


    # 针对的是继承的类中的list方法

# 127.0.0.1:8000/books/?sex=1&ordering=-age
7.分页:Pagination
我们可以在配置文件中设置全局的分页方式
REST_FRAMEWORK = {
  # 全局分页,一旦设置了全局分页,那么我们drf中的视图扩展类里面的list方法提供的列表页都会产生分页的效果。所以一般不用全局分页
    'DEFAULT_PAGINATION_CLASS':  'rest_framework.pagination.PageNumberPagination',
    'PAGE_SIZE': 100  # 每页最大数据量
}
class LargeResultsSetPagination(PageNumberPagination):
    page_size = 1000  # 每页显示多少条
    #127.0.0.1:8001/students/?page=5&page_size=10

    page_size_query_param = 'page_size'
    max_page_size = 10000

class BookDetailView(RetrieveAPIView):
    queryset = BookInfo.objects.all()
    serializer_class = BookInfoSerializer
    pagination_class = LargeResultsSetPagination
pagination_class = None
可选分页器
1.PageNumberPagination
前端访问网址形式
GET http://127.0.0.1:8000/students/?page=4
-
page_size 每页数目
-
page_query_param 前端发送的页数关键字名,默认为"page"
-
page_size_query_param 前端发送的每页数目关键字名,默认为None
-
max_page_size 前端最多能设置的每页数量
# 声明分页的配置类
from rest_framework.pagination import PageNumberPagination
class StandardPageNumberPagination(PageNumberPagination):
    # 默认每一页显示的数据量
    page_size = 2
    # 允许客户端通过get参数来控制每一页的数据量
    page_size_query_param = "size"
    max_page_size = 10  # 客户端通过size指定获取数据的条数时,最大不能超过多少
    # 自定义页码的参数名
    page_query_param = "p"

class StudentAPIView(ListAPIView):
    queryset = Student.objects.all()
    serializer_class = StudentModelSerializer
    pagination_class = StandardPageNumberPagination

# 127.0.0.1/four/students/?p=1&size=5
2.LimitOffsetPagination
前端访问网址形式:其实就是通过偏移量来取数据
GET http://127.0.0.1/four/students/?limit=100&offset=400 # 从下标为400的记录开始,取100条记录
-
default_limit 默认限制,每页数据量大小,默认值与
PAGE_SIZE设置一致 -
limit_query_param limit参数名,默认'limit' , 可以通过这个参数来改名字
-
offset_query_param offset参数名,默认'offset' ,可以通过这个参数来改名字
-
max_limit 最大limit限制,默认None, 无限制
from rest_framework.pagination import LimitOffsetPagination
class StandardLimitOffsetPagination(LimitOffsetPagination):
    # 默认每一页查询的数据量,类似上面的page_size
    default_limit = 2
    limit_query_param = "size"  # 默认是limit
    offset_query_param = "start"  # 默认是offset

class StudentAPIView(ListAPIView):
    queryset = Student.objects.all()
    serializer_class = StudentModelSerializer
    # 调用页码分页类
    # pagination_class = StandardPageNumberPagination
    # 调用查询偏移分页类
    pagination_class = StandardLimitOffsetPagination
8.异常处理:Exception
一个简单的示例
class APIError(Exception):
    pass

class Student2APIView(APIView):
    def get(self,request,pk):
        try:
            instance = Student.objects.get(pk=pk)
        except Student.DoesNotExist:
            raise APIError('自定义API错误')
            return Response({"message":"访问的商品已经下架~"})

        serializer = StudentModelSerializer(instance=instance)
        return Response(serializer.data)
可以创建一个utils文件夹,里面放一个exceptions.py文件,名字随便写,然后写下面的内容
from rest_framework.views import exception_handler

def custom_exception_handler(exc, context): # 自定义的错误处理函数
      ”“”
        exc错误对象
      context 异常发生时的一些上下文信息
    “”“
    # 先调用REST framework默认的异常处理方法获得标准错误响应对象
    response = exception_handler(exc, context) # 这个函数是drf提供的,它处理了一些错误,但是如果它处理不了的,它会返回None,所以,如果是None的话,我们需要自己来处理错误

    # 在此处补充自定义的异常处理
    if response is None:
          if isinstance(exc,APIError)
        # 这里就可以记录错误信息了,一般记录到文件中,可以使用日志系统来进行记录
        # return Respose({'msg':'自定义API错误了'})
        response.data['status_code'] = response.status_code

    return response
在配置文件中还要声明自定义的异常处理
REST_FRAMEWORK = {
    'EXCEPTION_HANDLER': 'my_project.my_app.utils.custom_exception_handler'
}
如果未声明,会采用默认的方式,如下
REST_FRAMEWORK = {
    'EXCEPTION_HANDLER': 'rest_framework.views.exception_handler'
}
处理关于数据库的异常
from rest_framework.views import exception_handler as drf_exception_handler
from rest_framework import status
from django.db import DatabaseError

def exception_handler(exc, context):
    response = drf_exception_handler(exc, context)

    if response is None:
        view = context['view'] # 出错的方法或者函数名称
        if isinstance(exc, DatabaseError):
            print('[%s]: %s' % (view, exc))
            response = Response({'detail': '服务器内部错误'}, status=status.HTTP_507_INSUFFICIENT_STORAGE)

    return response
drf定义的异常
-
-
ParseError 解析错误
-
AuthenticationFailed 认证失败
-
NotAuthenticated 尚未认证
-
PermissionDenied 权限决绝
-
NotFound 未找到
-
MethodNotAllowed 请求方式不支持
-
NotAcceptable 要获取的数据格式不支持
-
Throttled 超过限流次数
-
ValidationError 校验失败
也就是说,上面列出来的异常不需要我们自行处理了,很多的没有在上面列出来的异常,就需要我们在自定义异常中自己处理了。
9.自动生成接口文档
接口文档以网页的方式呈现。
自动接口文档能生成的是继承自APIView及其子类的视图。
1.安装依赖文件
pip install coreapi
2.设置接口文档访问路径
文档路由对应的视图配置为rest_framework.documentation.include_docs_urls,
参数title为接口文档网站的标题。
from rest_framework.documentation import include_docs_urls

urlpatterns = [
    ...
    path('docs/', include_docs_urls(title='站点页面标题'))
]
如果报错了下面的错误,说明我们缺少一个依赖,配置一下就行了
REST_FRAMEWORK = {
    ...
    'DEFAULT_SCHEMA_CLASS': "rest_framework.schemas.AutoSchema",

}

 浙公网安备 33010602011771号