简单了解一下 Nginx
一、Nginx 基本认识
1、Nginx 是什么?
Nginx 是一款开源的、轻量级的、高性能的 HTTP 服务器 以及 反向代理服务器。
特点是 占有内存少、并发能力强。
2、Nginx 用来干什么?
其可以作为一个 HTTP 服务器 进行网站的访问、发布。
也可以作为一个 反向代理服务器 实现负载均衡。
二、正向代理、反向代理
1、什么是代理?
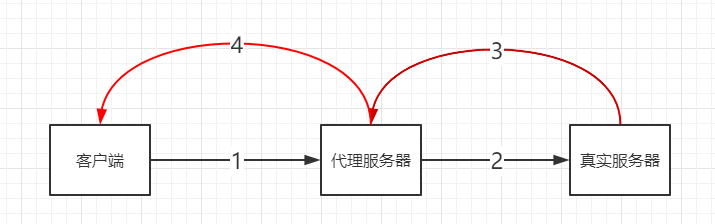
代理本质就相当于一个 中转站,用于处理一个目标到另一个目标。
即两个目标之间并不存在真正的连接,而是通过某个通道 中转。
如下图所示:
客户端 想要访问 真实服务器,需要先经过 代理服务器,通过代理服务器 去访问 真实服务器。
真实服务器响应请求,通过 代理服务器 将请求结果 返回给 客户端。
2、正向代理?
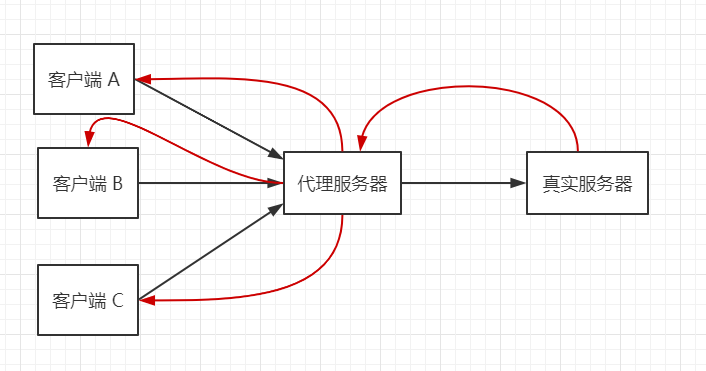
(1)什么是正向代理?
正向代理实质指的是 客户端代理,即代理客户端,为客户端接收、发送请求,服务端不知道实际发起请求的是哪个客户端。
如下图所示:
在客户端设置正向代理服务器(IP 地址 + 端口号)。
多个客户端 可以连接同一个代理服务器,通过代理服务器 去 访问真实的服务器。
真实服务器 响应然后通过 代理服务器 将数据返回给 指定的 客户端。
真实服务器并不清楚 其响应的 是哪个 客户端 发送的请求。
(2)正向代理使用场景:
访问国外网站(Google、YouTube 等),需要FQ(代理服务器)才可以访问。
可以做缓存,加速资源的访问。
3、反向代理?
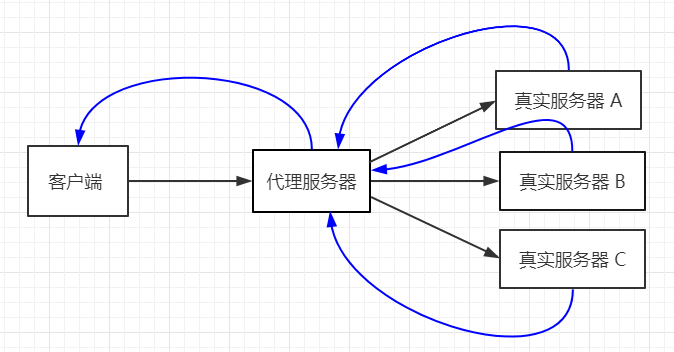
(1)什么是反向代理?
反向代理实质指的是 服务端代理,即代理服务端,为服务端接收、发送请求,客户端不知道实际处理请求的是哪个服务端。
如下图所示:
某个客户端,通过代理服务器访问 网络上的资源。
代理服务器响应,并找到某个 真实的服务器 处理并返回数据。
代理服务器将 数据返回给 客户端。
客户端并不清楚 其请求 被哪个 真实服务器 响应。
(2)反向代理使用场景:
负载均衡,通过反向代理优化网站的负载。
将代理服务器作为公网访问地址,真实服务器为 内网资源,保证内网的安全。
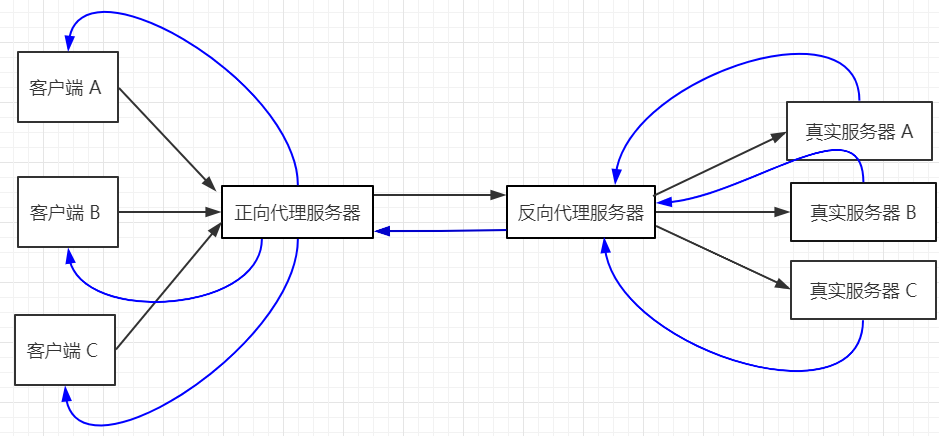
4、正向代理、反向代理同时应用?
某个业务场景下,正向代理、反向代理 可以同时应用。
正向代理,用于代理客户端 去访问服务器(代理多个客户端)。
反向代理,用于代理服务端 去响应客户端请求(代理多个服务端)。
如下图所示:
客户端、服务端 通过 正向代理服务器、反向代理服务器 进行数据的交互。
三、负载均衡、动静分离
1、负载均衡
(1)为什么出现负载均衡?
一个小型的项目,一台服务器可以处理(可以提升机器硬件的能力)。
对于大型的项目,一台服务器处理起来,效率会很低下,采用 多台服务器 进行处理可以提高处理效率,但是请求如何到达服务器、各个服务器处理请求的数量 是需要解决的问题。
可以采用 反向代理 去代理多个服务器(解决请求到达服务器问题),并 根据某种规则 指定 服务器处理请求,使各个服务器处理请求的数量尽量均匀,即负载均衡(解决服务器处理请求问题)。
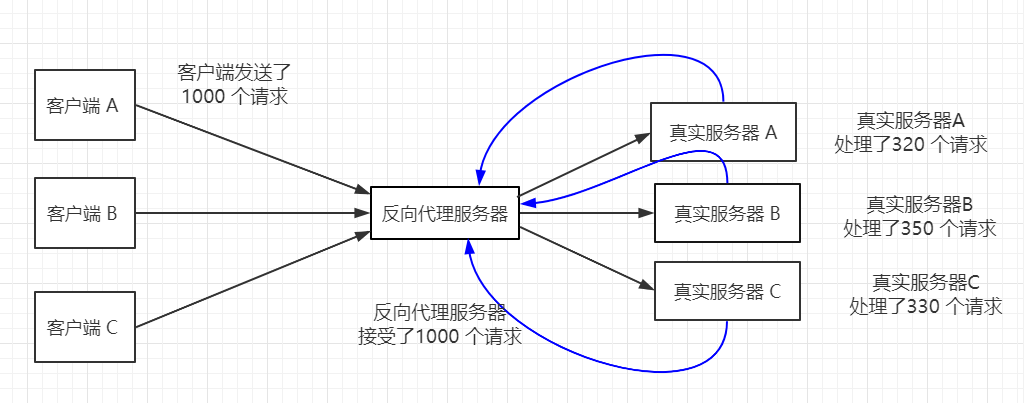
如下图所示:
客户端发送了 1000 个请求到 反向代理服务器。
反向代理服务器通过某种负载均衡算法,将请求分发到不同的真实服务器上处理。
比如真实服务器 A 处理了 320 个请求,B 处理了 350 个请求,C 处理了 330 个请求。
(2)负载量?均衡?什么是负载均衡?
Nginx 在负载均衡中的角色 就是 反向代理服务器。
负载量 实质指的是 客户端发送、被 反向代理服务器 接收到的请求数量。
均衡 实质指的是 按照某种规则,反向代理服务器 将接受的请求 发送给不同的 真实服务器处理(使各个真实服务器处理的请求量尽量均匀)。
所以负载均衡 实质指的是 反向代理服务器接收请求、并按照某种规则发送到 不同的真实服务器 处理的过程。
(3)负载均衡的方式?
负载均衡可以分为 硬件负载均衡、软件负载均衡。
硬件负载均衡 一般造价昂贵,但数据传输更加稳定。比如: F5 负载均衡。
软件负载均衡 一般采用 某种 负载均衡 算法实现(一种消息队列分发机制)。
2、动静分离
为了加快网站的解析速度,通常会将 动态页面 与 静态页面内容 放在不同的服务器上处理,从而降低单个服务器的压力,加快解析速度。
动静分离实质就是将 动态资源 与 静态资源分开,放在不同的服务器上处理。
如下图:
真实服务器分为 动态资源处理服务器 与 静态资源处理服务器,反向代理根据不同的业务需求,将处理发送到不同的服务器上处理并返回内容。

四、使用Docker 安装 Nginx
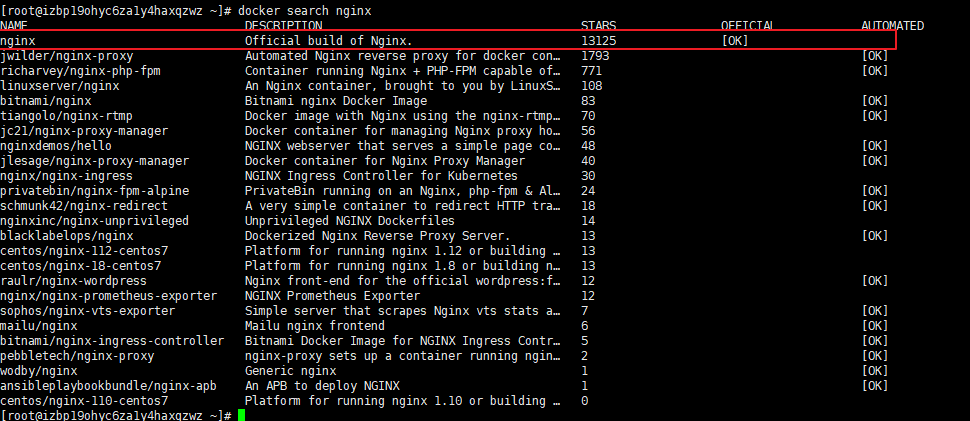
1、查找需要安装的 Nginx 版本
【方式一:官网搜索】
    https://hub.docker.com/
    https://hub.docker.com/_/nginx?tab=tags

【方式二:(通过命令行查询)】
    docker search nginx
2、下载镜像
【下载最新镜像:】
    docker pull nginx

3、运行容器(普通方法)
【查看所有镜像文件:】
    docker images

【运行容器,绑定端口号:(一般不这么使用)】
    docker run -p 80:80 --name nginx -d nginx
注:
    --name nginx      表示容器名为 nginx
    -d                表示后台运行
    -p 80:80          表示绑定端口号为 80

4、挂载自定义目录方式运行容器(推荐)
【目录分析:】
    /etc/nginx/conf.d/default.conf  文件,为默认配置文件。
    /etc/nginx/nginx.conf           文件,为主配置文件。
    /var/log/nginx                  目录,用于保存日志文件。
    /usr/share/nginx/html           目录,用于保存 nginx 主页面。
自定义各个目录,并将对应的配置文件、index.html 页面复制到相应的自定义文件目录下。
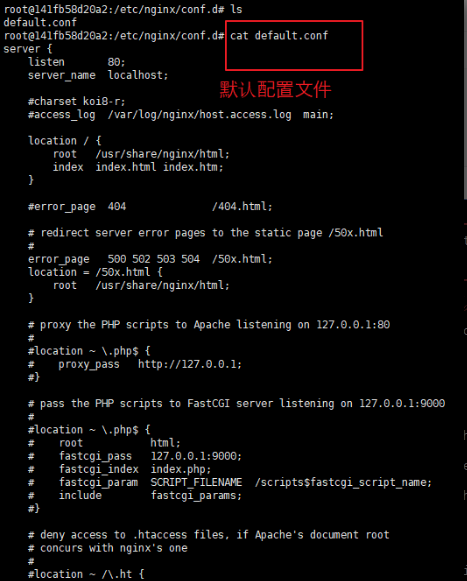
Step1:
/etc/nginx/conf.d/default.conf 默认数据如下。
将内容复制到 /usr/mydata/nginx/conf.d/default.conf 文件中。
【/etc/nginx/conf.d/default.conf】

server {
    listen       80;
    server_name  localhost;

    #charset koi8-r;
    #access_log  /var/log/nginx/host.access.log  main;

    location / {
        root   /usr/share/nginx/html;
        index  index.html index.htm;
    }

    #error_page  404              /404.html;

    # redirect server error pages to the static page /50x.html
    #
    error_page   500 502 503 504  /50x.html;
    location = /50x.html {
        root   /usr/share/nginx/html;
    }

    # proxy the PHP scripts to Apache listening on 127.0.0.1:80
    #
    #location ~ \.php$ {
    #    proxy_pass   http://127.0.0.1;
    #}

    # pass the PHP scripts to FastCGI server listening on 127.0.0.1:9000
    #
    #location ~ \.php$ {
    #    root           html;
    #    fastcgi_pass   127.0.0.1:9000;
    #    fastcgi_index  index.php;
    #    fastcgi_param  SCRIPT_FILENAME  /scripts$fastcgi_script_name;
    #    include        fastcgi_params;
    #}

    # deny access to .htaccess files, if Apache's document root
    # concurs with nginx's one
    #
    #location ~ /\.ht {
    #    deny  all;
    #}
}
Step2:
/etc/nginx/nginx.conf 默认数据如下。
将内容复制到 /usr/mydata/nginx/conf/nginx.conf 文件中。
【/etc/nginx/nginx.conf 】

user  nginx;
worker_processes  1;

error_log  /var/log/nginx/error.log warn;
pid        /var/run/nginx.pid;


events {
    worker_connections  1024;
}


http {
    include       /etc/nginx/mime.types;
    default_type  application/octet-stream;

    log_format  main  '$remote_addr - $remote_user [$time_local] "$request" '
                      '$status $body_bytes_sent "$http_referer" '
                      '"$http_user_agent" "$http_x_forwarded_for"';

    access_log  /var/log/nginx/access.log  main;

    sendfile        on;
    #tcp_nopush     on;

    keepalive_timeout  65;

    #gzip  on;

    include /etc/nginx/conf.d/*.conf;
}

Step3:
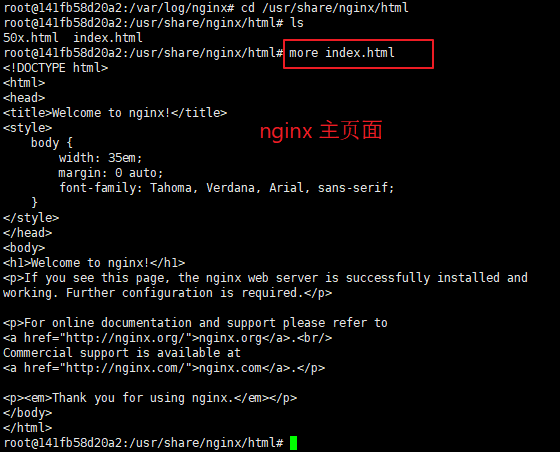
/usr/share/nginx/html/index.html 默认数据如下。
将内容复制到 /usr/mydata/nginx/html/index.html 文件中。
【/usr/share/nginx/html/index.html】

<!DOCTYPE html>
<html>
<head>
<title>Welcome to nginx!</title>
<style>
    body {
        width: 35em;
        margin: 0 auto;
        font-family: Tahoma, Verdana, Arial, sans-serif;
    }
</style>
</head>
<body>
<h1>Welcome to nginx!</h1>
<p>If you see this page, the nginx web server is successfully installed and
working. Further configuration is required.</p>

<p>For online documentation and support please refer to
<a href="http://nginx.org/">nginx.org</a>.<br/>
Commercial support is available at
<a href="http://nginx.com/">nginx.com</a>.</p>

<p><em>Thank you for using nginx.</em></p>
</body>
</html>
Step4:启动容器。
【运行容器,并将配置文件挂载到自定义目录:(推荐使用)】
docker run --name nginx -d -p 80:80 \
  -v /usr/mydata/nginx/log:/var/log/nginx  \
  -v /usr/mydata/nginx/conf/nginx.conf:/etc/nginx/nginx.conf \
  -v /usr/mydata/nginx/conf.d:/etc/nginx/conf.d  \
  -v /usr/mydata/nginx/html:/usr/share/nginx/html \
  nginx

注:
    nginx 根据 nginx.conf 、default.conf 这个文件启动,
    若直接运行上述语句,会直接创建一个 nginx.conf 文件夹,会报错。
    需要先手动创建一个 nginx.conf 文件,然后将 Step2 的数据粘贴,再启动容器。

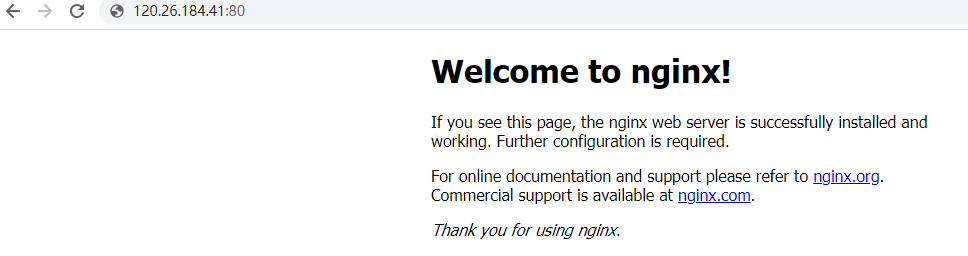
Step5:在页面挂载目录下,自定义一个 index.html ,测试目录挂载是否成功。
若 index.html 页面效果成功修改,则目录挂载成功。下次根据 挂载目录 就可以修改 nginx 配置文件。
【/usr/mydata/nginx/html/index.html】

<!DOCTYPE html>
<html>
<head>
<title>Welcome to nginx!</title>
</head>
<body>
<h1>Hello!!! Welcome to nginx!</h1>
</body>
</html>
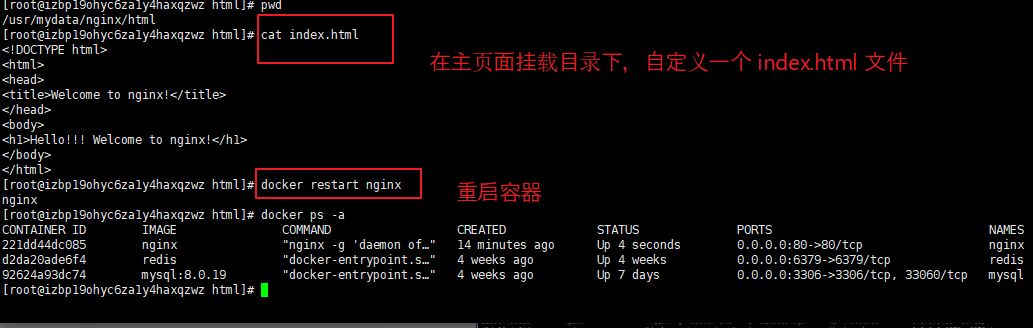
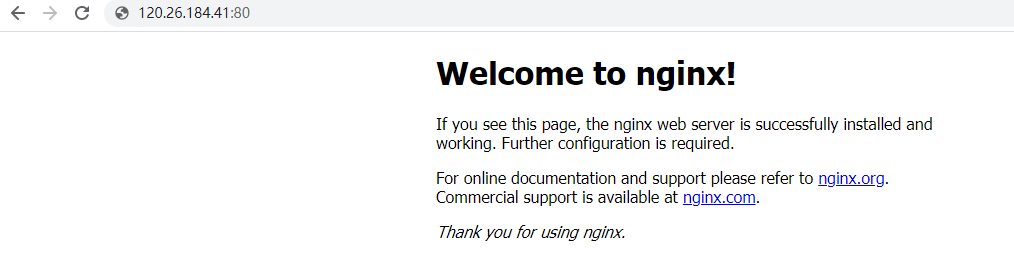
访问页面,可以看到 index.html 页面内容发生变化。即目录挂载成功。

五、Nginx 实现反向代理
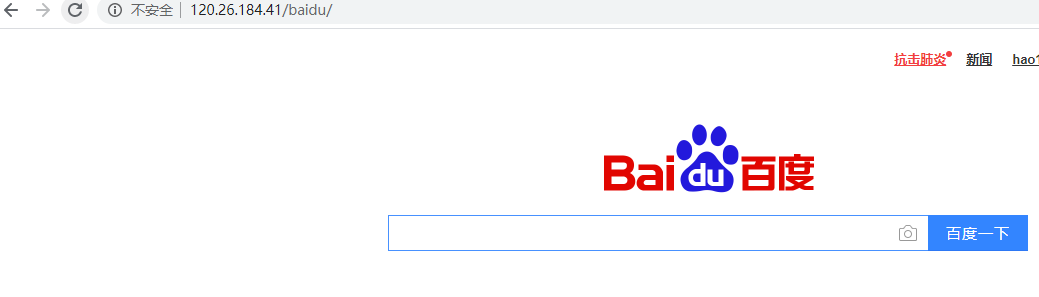
1、实现效果?
使用 nginx 作为反向代理,根据访问路径的不同跳转到不同端口的服务中进行处理。
其中:
nginx 监听 80 端口(可省略),
访问:
http://120.26.184.41/blog,跳转到 https://www.cnblogs.com/l-y-h/。
http://120.26.184.41/baidu,跳转到 https://www.baidu.com/。
2、修改 nginx 配置文件
(1)配置文件简单分析
/etc/nginx/conf.d/default.conf 配置文件如下:
【配置文件中常用关键字解析:(server 块)】
    listen           用于配置网络监听、监听端口、IP地址等。
        比如:
            listen port              监听 port 端口的所有的连接。
            listen IP_address        监听 IP_address 所有端口。
            listen IP_address:port   监听 IP_address 的 port 端口。

    server_name      用于设置虚拟主机,可以为 域名、IP地址。

    location        用于匹配 URL。
        比如:
            location = uri     表示严格匹配 uri,非正则表达式匹配。
            location ~ uri     正则表达式匹配,区分大小写。
            location ~* uri    正则表达式匹配,不区分大小写。

【location 块中常用关键字解析:】
    proxy_pass       用于设置被代理服务器的地址
    index            用于设置网站默认首页

【/etc/nginx/conf.d/default.conf 配置文件如下:】

server {
    listen       80;
    server_name  localhost;

    #charset koi8-r;
    #access_log  /var/log/nginx/host.access.log  main;

    location / {
        root   /usr/share/nginx/html;
        index  index.html index.htm;
    }

    #error_page  404              /404.html;

    # redirect server error pages to the static page /50x.html
    #
    error_page   500 502 503 504  /50x.html;
    location = /50x.html {
        root   /usr/share/nginx/html;
    }

    # proxy the PHP scripts to Apache listening on 127.0.0.1:80
    #
    #location ~ \.php$ {
    #    proxy_pass   http://127.0.0.1;
    #}

    # pass the PHP scripts to FastCGI server listening on 127.0.0.1:9000
    #
    #location ~ \.php$ {
    #    root           html;
    #    fastcgi_pass   127.0.0.1:9000;
    #    fastcgi_index  index.php;
    #    fastcgi_param  SCRIPT_FILENAME  /scripts$fastcgi_script_name;
    #    include        fastcgi_params;
    #}

    # deny access to .htaccess files, if Apache's document root
    # concurs with nginx's one
    #
    #location ~ /\.ht {
    #    deny  all;
    #}
}
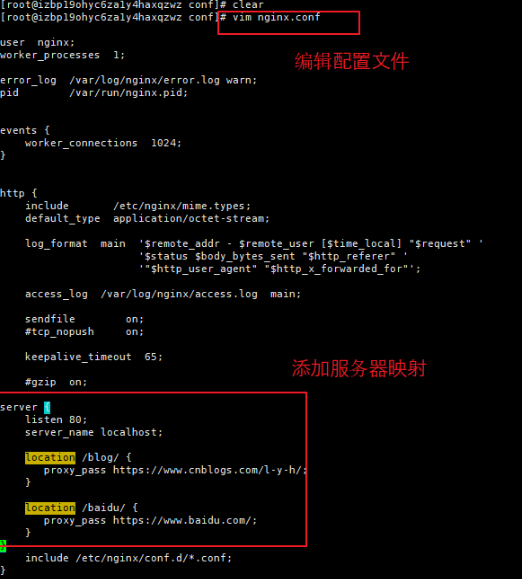
(2)修改 nginx.conf 配置文件,用于添加代理映射。
【添加映射关系:(server 块)】
server {
    listen 80;
    server_name localhost;

    location /blog/ {
       proxy_pass https://www.cnblogs.com/l-y-h/;
    }

    location /baidu/ {
       proxy_pass https://www.baidu.com/;
    }
}

【完整 nginx.conf】
user  nginx;
worker_processes  1;

error_log  /var/log/nginx/error.log warn;
pid        /var/run/nginx.pid;


events {
    worker_connections  1024;
}


http {
    include       /etc/nginx/mime.types;
    default_type  application/octet-stream;

    log_format  main  '$remote_addr - $remote_user [$time_local] "$request" '
                      '$status $body_bytes_sent "$http_referer" '
                      '"$http_user_agent" "$http_x_forwarded_for"';

    access_log  /var/log/nginx/access.log  main;

    sendfile        on;
    #tcp_nopush     on;

    keepalive_timeout  65;

    #gzip  on;

    server {
        listen 80;
        server_name localhost;

        location /blog/ {
           proxy_pass https://www.cnblogs.com/l-y-h/;
        }

        location /baidu/ {
           proxy_pass https://www.baidu.com/;
        }
    }
    include /etc/nginx/conf.d/*.conf;
}
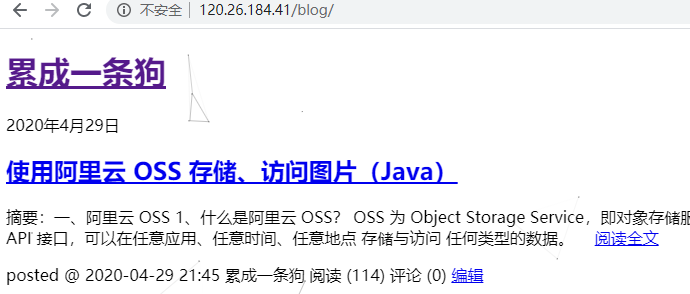
3、测试效果
重启 nginx 容器,并访问 地址。
访问 http://120.26.184.41/blog,会跳转到 https://www.cnblogs.com/l-y-h/。
访问 http://120.26.184.41/baidu,会跳转到 https://www.baidu.com/。