


上篇文章【QuickFlowDesigner教程(1)入门-快速开发可循环流程】讲述了如何快速配置一个审批流程,利用QuickFlow默认的审批界面进行流转,如果客户对界面要较高要求,就需要我们自定义页面了。
QuickFlow支持两种页面定制模式:
1)采用ListForm,ListForm是QuickFlow内置的一套表单框架,提供了一系列控件来组成工作流表单
2)采用标准的aspx.net页面,调用QuickFlow的API,因为QuickFlow是基于SharePoint工作流的,所以自定义的aspx表单直接调用SharePoint的API来驱动流程也是可以的。
本节我们先看看采用ListForm如何快速定义工作流表单。
先回顾下上一节的流程逻辑:
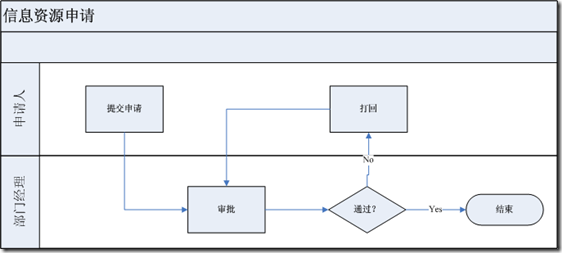
这个流程需要四种表单:
1)提交表单,提交人采用这个表单填写数据,启动流程
2)审批时的表单,审批人使用这个表单审批,可以输入审批意见,申请内容应该是只读的
3)打回时提交人修改的表单,申请内容应该是可以编辑的
4)数据查看表单
--------------------------------------------------------
Step1)首先创建一个网站项目,添加对QuickFlow.dll和QuickFlow.UI.dll的引用,
这两个dll哪里来呢?将安装包中的QuickFlow.wsp改名为QuickFlow.cab,然后就可以解压,你就看到这两个dll了。
Step2)创建DataView控件和DataEdit控件
在这个流程需要的四个表单中,申请数据表单是重复的,它只表现为两种形式:编辑状态或查看状态,为了代码复用,我们将这两种形式分别做成两个用户控件。
DataEdit.ascx代码如下:
<%@ Control Language="C#" AutoEventWireup="true" %>
<%@ Register Assembly="QuickFlow.UI, Version=1.0.0.0, Culture=neutral, PublicKeyToken=ec1e0fe6e1745628"
    Namespace="QuickFlow.UI.Controls" TagPrefix="QFC" %>
<%@ Register Assembly="QuickFlow.UI, Version=1.0.0.0, Culture=neutral, PublicKeyToken=ec1e0fe6e1745628"
    Namespace="QuickFlow.UI.ListForm" TagPrefix="QFL" %>
<table width="735" border="0" align="center" cellpadding="0" cellspacing="0" class="table_stroke">
    <tr>
        <td class="form-title">
            <table width="100%" border="0" cellspacing="0" cellpadding="0">
                <tr>
                    <td height="25" class="form-title_font">
                        QuickFlowDesigner 自定义表单示例
                    </td>
                </tr>
            </table>
        </td>
    </tr>
    <tr>
        <td align="right" class="form-title2">
        </td>
    </tr>
    <tr>
        <td>
            <table width="98%" border="0" cellpadding="2" cellspacing="0" class="table_stroke1">
                <tr>
                    <td class="form-label" width="200px">
                        标题
                    </td>
                    <td class="form-body">
                        <QFL:FormField ID="FormField3" runat="server" FieldName="Title">
                        </QFL:FormField>
                    </td>
                </tr>
                <tr>
                    <td class="form-label">
                        申请内容
                    </td>
                    <td class="form-body">
                        <QFL:FormField ID="FormField4" runat="server" FieldName="申请内容">
                        </QFL:FormField>
                    </td>
                </tr>
                <tr>
                    <td class="form-label">
                        申请理由
                    </td>
                    <td class="form-body">
                        <QFL:FormField ID="FormField5" runat="server" FieldName="申请理由">
                        </QFL:FormField>
                    </td>
                </tr>
                <tr>
                    <td class="form-label">
                        相关附件
                    </td>
                    <td class="form-body">
                        <QFL:FormAttachments ID="FormAttachments1" runat="server">
                        </QFL:FormAttachments>
                    </td>
                </tr>
                <tr>
                    <td class="form-body" colspan="2">
                    </td>
                </tr>
            </table>
        </td>
    </tr>
</table>
DataEdit控件主要使用了FormField来展现列表字段。
FormField内部采用SharePoint的字段控件来展现,通过控制列表的栏类型,即可控制FormField的展现形式。你也可以扩展SharePoint的栏类型,即可扩展FormField的类型。
DataView控件代码跟DataEdit基本一样,只是将每个控件的ControlMode改成Display,如下:
<tr>
                            <td class="form-label" width="200px">
                                标题
                            </td>
                            <td class="form-body">
                                <QFL:FormField ID="FormField3" ControlMode="Display" runat="server" FieldName="Title">
                                </QFL:FormField>
                            </td>
 </tr>
Step3)创建提交页面-NewForm.aspx,先看代码:
<%@ Page Language="C#" AutoEventWireup="true" CodeFile="NewForm.aspx.cs" Inherits="QuickFlowExample_DesignerAndCustomForm_NewForm" %>
<%@ Register Assembly="Microsoft.SharePoint, Version=12.0.0.0, Culture=neutral, PublicKeyToken=71e9bce111e9429c"
    Namespace="Microsoft.SharePoint.WebControls" TagPrefix="SharePoint" %>
<%@ Register Assembly="QuickFlow.UI, Version=1.0.0.0, Culture=neutral, PublicKeyToken=ec1e0fe6e1745628"
    Namespace="QuickFlow.UI.Controls" TagPrefix="QFC" %>
<%@ Register Assembly="QuickFlow.UI, Version=1.0.0.0, Culture=neutral, PublicKeyToken=ec1e0fe6e1745628"
    Namespace="QuickFlow.UI.ListForm" TagPrefix="QFL" %>
<%@ Register Src="DataEdit.ascx" TagName="DataEdit" TagPrefix="uc1" %>
<!DOCTYPE html PUBLIC "-//W3C//DTD XHTML 1.0 Transitional//EN" "http://www.w3.org/TR/xhtml1/DTD/xhtml1-transitional.dtd">
<html xmlns="http://www.w3.org/1999/xhtml">
<head runat="server">
    <title></title>
    <link href="form.css" rel="stylesheet" type="text/css" />
    <SharePoint:ScriptLink ID="ScriptLink1" Language="javascript" Name="core.js" Defer="true"
        runat="server" />
    <SharePoint:CustomJSUrl ID="CustomJSUrl1" runat="server" />
    <SharePoint:CssLink ID="CssLink1" runat="server" />
    <SharePoint:Theme ID="theme1" runat="server" />
</head>
<body>
    <form id="form1" runat="server">
    <QFL:ListFormControl ID="ListFormControl1" runat="server">
        <uc1:DataEdit ID="DataEdit1" runat="server" />
         <table width="735" border="0" align="center" cellpadding="0" cellspacing="0" class="table_stroke">
            <tr>
                <td align="right">
                    <QFC:StartWorkflowButton Text="提交"
                     WorkflowName="信息资源申请流程" ID="StartWorkflowButton1" runat="server" />
                      <input type=button onclick="history.back()" value="返回" />
                </td>
            </tr>
        </table>
    </QFL:ListFormControl>
    <SharePoint:FormDigest ID="FormDigest1" runat="server">
    </SharePoint:FormDigest>
    </form>
</body>
</html>
NewForm.aspx采用ListFormControl 作为容器控件容纳所有的FormField,并且添加了StartWorkflow按钮来启动工作流,StartWorkflow的WorkflowName来制定关联的流程名称。
Step3)创建审批页面-ApproveForm.aspx,先看代码:
<%@ Page Language="C#" AutoEventWireup="true" %>
<%@ Register Assembly="Microsoft.SharePoint, Version=12.0.0.0, Culture=neutral, PublicKeyToken=71e9bce111e9429c"
    Namespace="Microsoft.SharePoint.WebControls" TagPrefix="SharePoint" %>
<%@ Register Assembly="QuickFlow.UI, Version=1.0.0.0, Culture=neutral, PublicKeyToken=ec1e0fe6e1745628"
    Namespace="QuickFlow.UI.ListForm" TagPrefix="QFL" %>
<%@ Register Assembly="QuickFlow.UI, Version=1.0.0.0, Culture=neutral, PublicKeyToken=ec1e0fe6e1745628"
    Namespace="QuickFlow.UI.Controls" TagPrefix="QFC" %>
<%@ Assembly Name="QuickFlow, Version=1.0.0.0, Culture=neutral, PublicKeyToken=ec1e0fe6e1745628" %>
<%@ Register Src="DataView.ascx" TagName="DataView" TagPrefix="uc1" %>
<!DOCTYPE html PUBLIC "-//W3C//DTD XHTML 1.0 Transitional//EN" "http://www.w3.org/TR/xhtml1/DTD/xhtml1-transitional.dtd">
<html xmlns="http://www.w3.org/1999/xhtml">
<head runat="server">
    <title></title>
    <link href="form.css" rel="stylesheet" type="text/css" />
    <SharePoint:ScriptLink ID="ScriptLink1" Language="javascript" Name="core.js" Defer="true"
        runat="server" />
    <SharePoint:CustomJSUrl ID="CustomJSUrl1" runat="server" />
    <SharePoint:CssLink ID="CssLink1" runat="server" />
    <SharePoint:Theme ID="theme1" runat="server" />
</head>
<body>
    <form id="form1" runat="server">
    <QFL:ListFormControl ID="ListFormControl2" runat="server">
        <uc1:DataView ID="DataView1" runat="server" />
        <br/>
        <table width="735" border="0" align="center" cellpadding="0" cellspacing="0" class="table_stroke">
            <tr>
            <td class="form-label" width="200px">
            审批意见
            </td>
                <td>
                    <QFL:TaskPanel runat="server" ID="task1">
                        <QFL:CommentTaskField runat="server" ID="body" />
                    </QFL:TaskPanel>
                </td>
            </tr>
            <tr>
                <td align="right" colspan="2" class="form-label">
                    <QFC:ActionsButton ID="ActionsButton1" runat="server"></QFC:ActionsButton>
                    <input type="button" onclick="history.back()" value="返回" />
                </td>
            </tr>
        </table>
    </QFL:ListFormControl>
    <SharePoint:FormDigest ID="FormDigest1" runat="server">
    </SharePoint:FormDigest>
    </form>
</body>
</html>
ApproveForm.aspx跟NewForm.aspx很类似,为了实现多次循环审批时保留审批意见,QuickFlow默认的审批意见是保存
在任务列表项中,需要用另外一个容器控件TaskPanel来控制任务列表项字段。
TaskPanel内部可以放置TaskField控件,用TaskField可以直接修改当前任务的字段,CommentTaskField是一个标准的TaskField,跟任务的Body字段对应。
如果想要控制任务的其他字段,可以直接利用TaskField:
<QFL:TaskPanelrunat="server"ID="task1">
<QFL:TaskFieldrunat="server"ID="taskF2" TaskFieldName="SomeFieldName"/></QFL:TaskPanel>
在循环审批的场景下,TaskField特别有用:采用TaskField,任务数据(如审批意见)是分散存储在各自的任务中的,不会出现下一及审批人
覆盖上一级审批数据的情况。
Step4)创建打回时修改的页面-RejectedForm.aspx
RejectedForm.aspx跟以上两个页面类似,只不过为了编辑内容,采用了DataEdit控件,并采用CommitTaskButton按钮控件来提交任务:
<QFL:ListFormControl ID="ListFormControl2" runat="server">
        <uc1:DataView ID="DataEdit1" runat="server" />
        <table width="735" border="0" align="center" cellpadding="0" cellspacing="0" class="table_stroke">
            <tr>
            <td class="form-label" width="200px">
            审批意见
            </td>
                <td>
                    <QFL:TaskTraceList ID="TaskTraceList1" runat="server">
                    </QFL:TaskTraceList>
                </td>
            </tr>
            <tr>
                <td align="right" colspan="2" class="form-label">
                    <QFC:CommitTaskButton ID="CommitTaskButton1" runat="server" Text="提交" />
                    <input type="button" onclick="history.back()" value="返回" />
                </td>
            </tr>
        </table>
    </QFL:ListFormControl>
Step5)页面开发完了,我们来将他们跟SharePoint关联起来。
首先,将所有页面部署到Layouts目录,本文的示例项目代码中有个DeployLayouts.cmd批处理文件,这个文件将所有页面部署到
Layouts/QuickFlowExample_DesignerAndCustomFor目录。
用QuickFlowDesigner打开上一节我们设计的流程,修改个节点的TaskFormURL属性,指定为相应的页面,如下图:


审批页面的关联采用QuickFlowDesigner即可,那么提交页面呢?
为了方便用户操作,我们希望用户点击新建按钮就可以直接跳到提交页面。


有两种方式可以实现这一点:
1)自定一个内容类型,在内容类型中指定新建和编辑,查看页面。
2)采用SPCamlEditor直接诶修改默认内容类型的页面路径。
用SPCamlEditor打开站点,定位到“信息资源申请”列表的默认内容类型,单击右键属性菜单,
修改NewFormUrl属性为:/_layouts/QuickFlowExample_DesignerAndCustomForm/NewForm.aspx
修改EditFormUrl和DispFormUrl属性为:/_layouts/QuickFlowExample_DesignerAndCustomForm/DispForm.aspx
如下图:


SPCamlEditor1.2具有这个功能,请到以下地址下载:http://spcamleditor.codeplex.com/
后记:url路径最好不要加 "/", 否则,根站没问题,但是子站会出现找不到页面或其他错误。
下面,就可以来测试这个流程了:
提交:


审批:


重新提交:


示例代码下载:
http://quickflow.codeplex.com/Release/ProjectReleases.aspx?ReleaseId=34627#DownloadId=92600
or: http://cid-7f5a25cdf47d03e6.office.live.com/self.aspx/QuickFlow/Examples/QuickFlowExample%5E_DesignerAndCustomForm.zip
 注:对VS2008+QuickFlow开发的流程,本文讲解的自定义表单方法也是适用的。
      TaskFormUrl属性说明:
      任务活动的TaskFormUrl属性支持 http://    _layouts/    ~site  ~sitecolection, 文件名五种形式
	1)http://xxx.aspx指定绝对路径
	2)_layouts/folder/xxx.aspx指定layouts目录下路径
	3)~site/xxx.apx 指定相对当前站点的路径
	4)~sitecollection指定相对跟站点的路径
        5)如果指定了列表内容类型的NewFormUrl,且TaskForm跟NewForm在一个文件夹内,可以只指定文件名。
 令:
ListForm支持的控件列表如下: (切换到aspx编辑状态,把QuickFlow.UI.dll加到工具箱,可以看到所有控件,直接拖入aspx中即可使用)
|
控件 |
功能 |
|
ListFormControl |
容器控件,所有控件必须在ListFormControl之内 |
|
FormField |
数据字段,所有的DataField字段都是列表的字段,必须先在列表上创建好,可以通过列表的字段管理控制字段的类型(<lf:FormField ID="FormField1" runat="server" FieldName="Title“/>) |
|
TaskPanel |
TaskField容器控件,所有的taskField必须在TaskPanel内 |
|
CommentTaskField |
审批任务TaskField |
|
OutcomeTaskField |
审批结果TaskField,单选框 |
|
StartWorkflowButton |
启动工作流按钮 |
|
CommitTaskButton |
提交任务按钮 |
|
ActionsButton |
审批动作按钮,如:同意,拒绝。按照流程图自动生成 |
|
WorkflowHistory |
任务跟踪控件,显示当前流程所有已完成的任务 |
| ReassignTaskButton | 重新分配任务按钮 |

 浙公网安备 33010602011771号