AceyOffice教程--报表之解决方案(一)
有这样的报表需要你去生成,如下图所示
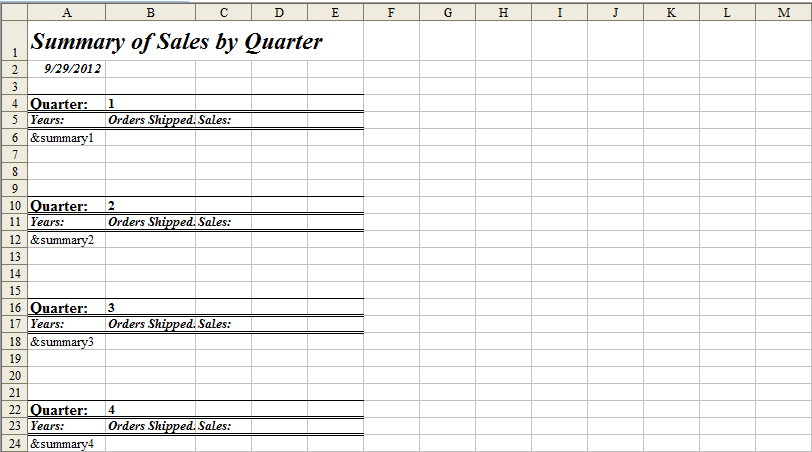
面对这样报表,你可能想到每个单元格每个单元格去填写值和设置样式,那样工作量也小,代码量也不少。我们先来分析下这个报表有什么特色和规律。
其中不难看到还是有一定规律的,发现规律就会很容易找到更好解决方法和方案。其中每个Quarter的部分值是一致的,样式也是相同的,每个Quarter
行间隔是不变的。下面我们看下要生成这样报表的解决方法。
首先导入命名空间:
using Acey.ExcelX;
 View Code

public void Sample()
        {
            //创建工作薄对象。
            IWorkbook workbook = ExcelxApplication.CreateWorkbook();
            //获取工作薄中默认样式。
            IStyle defaultStyle = workbook.NormalStyle;
            //设置工作薄中默认样式的字体。
            defaultStyle.Font.Name = "Times New Roman";
            defaultStyle.Font.Size = 10;
            //获取指定索引的工作表。
            IWorksheet worksheet = workbook.Worksheets[0];
            //获取指定单元格对象。
            ICell cell = worksheet.Cells["A1"];
            //设置单元格值。
            cell.Value = "Summary of Sales by Quarter";
            //设置单元格格式。
            cell.CellFormat.Font.Bold = true;
            cell.CellFormat.Font.Italic = true;
            cell.CellFormat.Font.Size = 18;

            //设置行高。
            worksheet.Rows[0].Height = 30;

            //获取单元格对象。
            cell = worksheet.Cells["A2"];
            //向单元格中赋值。
            cell.Value = new DateTime(2012, 9, 29);
            //设置单元格格式。
            cell.CellFormat.Font.FontStyle = FontStyle.Bold | FontStyle.Italic;

            int startRow = 3, startCol = 0, endCol = 4;
            for (int i = 0; i < 4; i++)
            {
                //获取单元格对象。
                cell = worksheet.Cells[startRow, 0];
                //向单元格中赋值。
                cell.Value = "Quarter:";
                //设置单元格格式。
                cell.CellFormat.Font.Bold = true;

                cell = worksheet.Cells[startRow, 1];
                cell.Value = i + 1;
                cell.CellFormat.Font.Bold = true;

                //获取单元格区域对象。
                IRange range = worksheet.Cells.CreateRange(startRow, startCol, startRow, endCol);
                //设置该单元格区域的边框。
                range.SetBorders(BorderMembers.Top, LineStyle.Thin);

                startRow++;
                cell = worksheet.Cells[startRow, 0];
                cell.Value = "Years:";
                cell.CellFormat.Font.FontStyle = FontStyle.Bold | FontStyle.Italic;

                cell = worksheet.Cells[startRow, 1];
                cell.Value = "Orders Shipped:";
                cell.CellFormat.Font.FontStyle = FontStyle.Bold | FontStyle.Italic;

                cell = worksheet.Cells[startRow, 2];
                cell.Value = "Sales:";
                cell.CellFormat.Font.FontStyle = FontStyle.Bold | FontStyle.Italic;
                //获取单元格区域对象。
                range = worksheet.Cells.CreateRange(startRow, startCol, startRow, endCol);
                //设置该单元格区域的边框。
                range.SetBorders(BorderMembers.Top | BorderMembers.Bottom, LineStyle.Double);

                startRow++;
                cell = worksheet.Cells[startRow, 0];
                cell.Value = "&summary1";

                startRow += 3;
            }
            workbook.SaveAs(@"d:\book1.xls", FileFormat.Excel97To2003);
        }
运行代码就会生成的上图的效果。
解析代码:
1.要求生成的Excel文件默认字体要求为:Name:Times New Roman, size:10, 在代码中通过
//获取工作薄中默认样式。
IStyle defaultStyle = workbook.NormalStyle;
//设置工作薄中默认样式的字体。
defaultStyle.Font.Name = "Times New Roman";
defaultStyle.Font.Size = 10;
来实现设置默认样式的功能。
2.有多个Quarter描述,但每个Quarter描述有一定规律可言,如果能生成一个Quarter描述,那就能轻松生成其他的描述,在这里我们使用了循环语句来
解决生成多个的问题。
其中对于单元格区域边框的设置,Acey.ExcelX给出很好解决方法,通过下面语句就能轻松实现上和下边框的效果。
//获取单元格区域对象。
range = worksheet.Cells.CreateRange(startRow, startCol, startRow, endCol);
//设置该单元格区域的边框。
range.SetBorders(BorderMembers.Top | BorderMembers.Bottom, LineStyle.Double);
总结:
即便要生成再多的Quarter描述,只需要改变循环次数就能生成你想要的效果。
Acey.ExcelX专注于为客户提供生成报表更好的解决方案。

 浙公网安备 33010602011771号