python入门
python特点
- 语法简介,优雅,编写的程序容易阅读
- 跨平台,可以运行在Windows,Linux以及Mac上(在Windows或者Mac平台上开发,部署在Linux上)
- 易于学习,站在非计算机专业的角度来讲,如果把编程语言当作一种解决问题的工具,python相较于c/c++,java,javascript等语言确实易于学习和掌握
- 强大而丰富的标准库和第三方库,比如电子邮件,图形GUI界面
- 面向对象语言
- 易于上手难于精通
- 既有动态脚本的特征,又有面向对象的特征,非常具有自己的特点
- 相较于c,c++,java运行效率要慢,开发效率快(轮子多)
python能做什么
不要把思维局限在某一方向上
- 爬虫
- 大数据与数据分析(Spark)
- 自动化运维与自动化测试
- web开发: flask, django
- 机器学习: tensor flow
- 胶水语言: 混合其它编程语言如C++,Java等来编程,能够把用其它语言制作的各种模块(尤其是C/C++)很轻松的连接起来
基础语法是任何语言的基础,只有熟练掌握,才能灵活运用语言,写出高效,优美,简洁的代码
python的语法是非常灵活又别具一格的
交换a, b变量
c++,java等
temp = a
a = b
b = temp
python写法
a, b = b, a
同样的一个功能,可以有数个乃至数十种写法,但每种写法的性能和美观度是不同的,选择性能最高有易于理解的写法才是正确的
数据结构才是编程的基础(与语言无关)
Python基础
代码是现实世界事物在计算机世界中的映射
写代码是将现实世界中的事物用计算机语言来描述
In [10]: int(True)
Out[10]: 1

In [11]: int(False)
Out[11]: 0
In [16]: a = 123

In [17]: b = a

In [18]: id(a), id(b)
Out[18]: (1904377120, 1904377120)

In [19]: a = 456

In [20]: id(a), id(b)
Out[20]: (1844565027984, 1904377120)
In [21]: a = "123"

In [22]: b = a

In [23]: id(a), id(b)
Out[23]: (1844565778816, 1844565778816)

In [24]: a = "456"

In [25]: id(a), id(b)
Out[25]: (1844564408840, 1844565778816)
In [26]: a = "hello"

In [27]: id(a)
Out[27]: 1844565804960

In [28]: a = a + " world"

In [29]: id(a)
Out[29]: 1844564350256

In [30]: a
Out[30]: 'hello world'
bool
In [34]: bool(0)
Out[34]: False

In [35]: bool("")
Out[35]: False

In [36]: bool(None)
Out[36]: False

In [37]: bool({})
Out[37]: False

In [38]: bool(set())
Out[38]: False

In [39]: bool(())
Out[39]: False

In [40]: bool([])
Out[40]: False
is 和 ==
In [45]: a = {1, 2, 3}

In [46]: b = {3, 2, 1}

In [47]: a == b
Out[47]: True

In [48]: a is b
Out[48]: False

In [49]: a = (1, 2, 3)

In [50]: b = (3, 2, 1)

In [51]: a == b
Out[51]: False

In [52]: a is b
Out[52]: False
is比较的是id()
Python仅仅对比较小的整数对象进行缓存(范围为范围[-5, 256])缓存起来,仅仅是在命令行中执行可以,而在Pycharm或者保存为文件执行,结果是不一样的,这是因为解释器做了一部分优化.使用pycharm,即使整数超过256,使用is也是成立的.
In[14]: a, b = 258, 258
In[15]: a is b
Out[15]: True
In[16]: a, b = '258', '258'
In[17]: a is b
Out[17]: True
while xxx:
    xxx
else:
    xxx
当while正常结束(没有break语句、没有return语句,或者没有异常出现)时,执行else里的语句
for ... else...同上
and or
In [8]: v1 = 1 or 3

In [9]: v2 = 1 and 3

In [10]: v3 = 0 and 2 and 1

In [12]: v4 = 0 and 2 or 1

In [13]: v5 = 0 and 2 or 1 or 4

In [14]: v6 = 0 or False and True

In [15]: v1, v2, v3, v4, v5, v6
Out[15]: (1, 3, 0, 1, 1, False)
函数
必传参数(没有默认值的)放在前面
def func(name, age, gender=None):
    pass
调用时不能混着调用
func("a", b="b", c, d="d")
类和对象
In [60]: class S:
    ...:     name = "nnnn"
    ...:     age = 20
    ...:     def __init__(self, name, age):
    ...:         name=name
    ...:         age=age
    ...:

In [61]: S.name
Out[61]: 'nnnn'

In [62]: s = S("xxx", 300)

In [63]: s.name
Out[63]: 'nnnn'

In [64]: S.name = "xxx"

In [65]: s.name
Out[65]: 'xxx'
枚举
In[2]: from enum import Enum
  ...:
  ...:
  ...: class Color(Enum):
  ...:     YELLOW = 1
  ...:     GREEN = 2
  ...:     BLACK = 3
  ...:     RED = 4
  ...:
In[3]: Color(1)
Out[3]: <Color.YELLOW: 1>
In[4]: Color(1).name
Out[4]: 'YELLOW'
In[5]: Color(1).value
Out[5]: 1
In[6]: Color.YELLOW
Out[6]: <Color.YELLOW: 1>
In[7]: Color.YELLOW.value
Out[7]: 1
In[8]: Color.YELLOW.name
Out[8]: 'YELLOW'
如果两个值相等,后面的会成为前面的别名
In[9]: class Color(Enum):
  ...:     YELLOW = 1
  ...:     YELLOW_ = 1
  ...:     GREEN = 2
  ...:     BLACK = 3
  ...:     RED = 4
  ...:
In[10]: for i in Color:
   ...:     print(i)
   ...:
Color.YELLOW
Color.GREEN
Color.BLACK
Color.RED
In[11]: for i in Color.__members__.items():
   ...:     print(i)
   ...:
('YELLOW', <Color.YELLOW: 1>)
('YELLOW_', <Color.YELLOW: 1>)
('GREEN', <Color.GREEN: 2>)
('BLACK', <Color.BLACK: 3>)
('RED', <Color.RED: 4>)
闭包
注意变量的生命周期(作用范围)
In[2]: def f1():
  ...:     a = 10
  ...:     def f2():
  ...:         a = 20
  ...:         print(a)
  ...:     print(a)
  ...:     f2()
  ...:     print(a)
  ...:
In[3]: f1()
10
20
10
假闭包,没有引用外部,
In[4]: def f2():
  ...:     a = 30
  ...:     def f22():
  ...:         a = 20
  ...:         return a
  ...:     return f22
  ...:
In[5]: f = f2()
In[6]: f.__closure__
In[7]: print(f.__closure__)
None
a只能引用,不能赋值
In[8]: def f2():
  ...:     a = 30
  ...:     def f22():
  ...:         c = 20
  ...:         return a * c
  ...:     return f22
  ...:
In[9]: f = f2()
In[10]: f.__closure__
Out[10]: (<cell at 0x000001FD508B9498: int object at 0x000000006F1C7180>,)
In[11]: f.__closure__[0].cell_contents
Out[11]: 30
def count():
    fs = []
    for i in range(1, 4):
        def f():
             return i*i
        fs.append(f)
    return fs

f1, f2, f3 = count()
fs.append(f)没有调用函数,
返回闭包时牢记一点:返回函数不要引用任何循环变量,或者后续会发生变化的变量.
def count():
    def f(j):
        def g():
            return j*j
        return g
    fs = []
    for i in range(1, 4):
        fs.append(f(i)) # f(i)立刻被执行,因此i的当前值被传入f()
    return fs
全局变量在函数中被赋值
origin = 0

def go(step):
    new_pos = origin + step
    origin = new_pos
    return origin

UnboundLocalError: local variable 'origin' referenced before assignment
报错是因为origin = new_pos,注释掉这一行就没问题了,也可以加global关键字
如果只保留go函数,不在外部给origin赋值,依然会报错
def go(step):
    new_pos = origin + step
    origin = new_pos
    return origin

UnboundLocalError: local variable 'origin' referenced before assignment
是因为origin先使用后定义
In[19]: def func(pos):
   ...:     def go(step):
   ...:         nonlocal pos
   ...:         new_pos = pos + step
   ...:         pos = new_pos
   ...:         return pos
   ...:     return go
   ...:
In[20]: func(0)
Out[20]: <function __main__.func.<locals>.go>
In[21]: f = func(0)
In[22]: f(2)
Out[22]: 2
In[23]: f(4)
Out[23]: 6
In[24]: f(6)
Out[24]: 12
装饰器
函数可以被赋值给其他变量
函数可以被删除
可以在函数里面再定义函数
函数可以作为参数传递给另外一个函数
函数可以作为另一个函数的返回
def wrap_in_tag(tag):
    def decorator(func):
        def wrapped(*args, **kwargs):
            ret = func(*args, **kwargs)
            return '<' + tag + '>' + ret + '</' + tag + '>'
        return wrapped
    return decorator

@wrap_in_tag('h1')
def hello(name):
    return 'hello ' + name

def hello1(name):
    return 'hello ' + name

print(hello("张三"))
print(wrap_in_tag('h1')(hello1)("李四"))

<h1>hello 张三</h1>
<h1>hello 李四</h1>
类装饰器,类要实现__call__方法
class Tag(object):
    def __init__(self, tag):
        self.tag = tag

    def __call__(self, func):
        def wrapped(*args, **kwargs):
            return "<{tag}>{res}</{tag}>".format(
                res=func(*args, **kwargs), tag=self.tag
            )
        return wrapped

@Tag('h1')
def hello(name):
    return 'hello %s' % name

def hello_01(name):
    return 'hello %s' % name

hello("lisi")
Tag('h1')(hell0_1)("zhangsan")

<h1>hello lisi</h1>
<h1>hello zhangsan</h1>
装饰器本质上是一个Python函数,它可以让其他函数在不需要做任何代码变动的前提下增加额外功能,装饰器的返回值也是一个函数对象.它经常用于有切面需求的场景,比如:插入日志、性能测试、事务处理、缓存、权限校验等场景.装饰器是解决这类问题的绝佳设计,有了装饰器,我们就可以抽离出大量与函数功能本身无关的雷同代码并继续重用.
@wraps
避免原有函数的属性被改变,如__doc__,__name__等
不添加@wraps
from functools import wraps


def my_decorator(func):
    def wrapper(*args, **kwargs):
        '''decorator'''
        print('Calling decorated function...')
        return func(*args, **kwargs)

    return wrapper


@my_decorator
def example():
    """Docstring"""
    print('Called example function')


print(example.__name__, example.__doc__)
wrapper decorator
添加@wraps
from functools import wraps


def my_decorator(func):
    @wraps(func)
    def wrapper(*args, **kwargs):
        '''decorator'''
        print('Calling decorated function...')
        return func(*args, **kwargs)

    return wrapper


@my_decorator
def example():
    """Docstring"""
    print('Called example function')


print(example.__name__, example.__doc__)
example Docstring
匿名函数
a = lambda x, y: x**y
print(a(10, 3))

a = lambda x, y: (x**2, y**2)
print(a(10, 3))
切片
切片是可迭代对象取值的一种便捷方式
In[2]: a = ['AAA', 'BBB', 'CCC', 'DDD']
In[3]: a
Out[3]: ['AAA', 'BBB', 'CCC', 'DDD']

In[4]: a[-3]
Out[4]: 'BBB'

In[5]: a[0:-3]
Out[5]: ['AAA']

In[6]: a[::-1]
Out[6]: ['DDD', 'CCC', 'BBB', 'AAA']

In[7]: a[::-2]
Out[7]: ['DDD', 'BBB']

In[8]: a[::2]
Out[8]: ['AAA', 'CCC']

In[9]: type(a[0:-3])
Out[9]: list

In[10]: a[0:-3] = '惊喜'
In[11]: a
Out[11]: ['惊', '喜', 'BBB', 'CCC', 'DDD']

In[12]: a[0:-4] = ['惊', '喜']
In[13]: a
Out[13]: ['惊', '喜', '喜', 'BBB', 'CCC', 'DDD']

In[14]: a[0] = '惊喜'
In[15]: a
Out[15]: ['惊喜', '喜', '喜', 'BBB', 'CCC', 'DDD']

In[16]: a[1] = list('惊喜')
In[17]: a
Out[17]: ['惊喜', ['惊', '喜'], '喜', 'BBB', 'CCC', 'DDD']
纯文本文件形式的收据以一行字符串的形式被解析
>>> invoice = """
... 0.....6................................40........52...55........
... 1909 Pimoroni PiBrella $17.50 3 $52.50
... 1489 6mm Tactile Switch x20 $4.95 2 $9.90
... 1510 Panavise Jr. - PV-201 $28.00 1 $28.00
... 1601 PiTFT Mini Kit 320x240 $34.95 1 $34.95
... """
>>> SKU = slice(0, 6)
>>> DESCRIPTION = slice(6, 40)
>>> UNIT_PRICE = slice(40, 52)
>>> QUANTITY = slice(52, 55)
>>> ITEM_TOTAL = slice(55, None)
>>> line_items = invoice.split('\n')[2:]
>>> for item in line_items:
... print(item[UNIT_PRICE], item[DESCRIPTION])
...
$17.50 Pimoroni PiBrella
$4.95 6mm Tactile Switch x20
$28.00 Panavise Jr. - PV-201
$34.95 PiTFT Mini Kit 320x240
插一道面试题, 注意参数, 越界不报错
In[7]: s = [1, 2, 3, 4]

In[8]: s[:2]
Out[8]: [1, 2]

In[9]: s[-2:]
Out[9]: [3, 4]

In[10]: s[::2]
Out[10]: [1, 3]

In[11]: s[::-1]
Out[11]: [4, 3, 2, 1]

In[12]: s[10:]
Out[12]: []

In[13]: s[4:]
Out[13]: []

In[14]: s[3:]
Out[14]: [4]

In[15]: s[4:]
Out[15]: []

In[16]: s[4: -1]
Out[16]: []

In[17]: s[4: -1 : 2]
Out[17]: []
map
map返回的是一个map对象,可以用list(),tuple()等进行转换
In[12]: def square(x) :
   ...:     return x**2
   ...:
In[13]: map(square, [1, 2, 3, 4, 5])
Out[13]: <map at 0x298cd82cef0>
In[14]: list(map(square, [1, 2, 3, 4, 5]))
Out[14]: [1, 4, 9, 16, 25]

In[15]: map(lambda x: x ** 2, [1, 2, 3, 4, 5])
Out[15]: <map at 0x298cd9947f0>
In[16]: list(map(lambda x: x ** 2, [1, 2, 3, 4, 5]))
Out[16]: [1, 4, 9, 16, 25]

# 提供了两个列表,对相同位置的列表数据进行相加
In[17]: list(map(lambda x, y: x + y, [1, 3, 5, 7, 9], [2, 4, 6, 8, 10]))
Out[17]: [3, 7, 11, 15, 19]
如果两个列表长度不同,按短的来计算
class map(object):
    """
    map(func, *iterables) --> map object

    Make an iterator that computes the function using arguments from
    each of the iterables.  Stops when the shortest iterable is exhausted.
    """
    def __getattribute__(self, *args, **kwargs): # real signature unknown
        """ Return getattr(self, name). """
        pass

    def __init__(self, func, *iterables): # real signature unknown; restored from __doc__
        pass

    def __iter__(self, *args, **kwargs): # real signature unknown
        """ Implement iter(self). """
        pass

    @staticmethod # known case of __new__
    def __new__(*args, **kwargs): # real signature unknown
        """ Create and return a new object.  See help(type) for accurate signature. """
        pass

    def __next__(self, *args, **kwargs): # real signature unknown
        """ Implement next(self). """
        pass

    def __reduce__(self, *args, **kwargs): # real signature unknown
        """ Return state information for pickling. """
        pass
filter
filter返回的是一个filter对象,可以用list(),tuple()等进行转换
In[19]: def is_odd(n):
   ...:     return n % 2 == 1
   ...:
In[20]: filter(is_odd, [1, 2, 3, 4, 5, 6, 7, 8, 9, 10])
Out[20]: <filter at 0x298cd82c4a8>
In[21]: list(filter(is_odd, [1, 2, 3, 4, 5, 6, 7, 8, 9, 10]))
Out[21]: [1, 3, 5, 7, 9]
class filter(object):
    """
    filter(function or None, iterable) --> filter object

    Return an iterator yielding those items of iterable for which function(item)
    is true. If function is None, return the items that are true.
    """
    def __getattribute__(self, *args, **kwargs): # real signature unknown
        """ Return getattr(self, name). """
        pass

    def __init__(self, function_or_None, iterable): # real signature unknown; restored from __doc__
        pass

    def __iter__(self, *args, **kwargs): # real signature unknown
        """ Implement iter(self). """
        pass

    @staticmethod # known case of __new__
    def __new__(*args, **kwargs): # real signature unknown
        """ Create and return a new object.  See help(type) for accurate signature. """
        pass

    def __next__(self, *args, **kwargs): # real signature unknown
        """ Implement next(self). """
        pass

    def __reduce__(self, *args, **kwargs): # real signature unknown
        """ Return state information for pickling. """
        pass
reduce
reduce() 函数会对参数序列中元素进行累积.
函数将一个数据集合(链表,元组等)中的所有数据进行下列操作:用传给 reduce 中的函数 function(有两个参数)先对集合中的第 1、2 个元素进行操作,得到的结果再与第三个数据用 function 函数运算,最后得到一个结果.
>>>def add(x, y) :            # 两数相加
...     return x + y
...
>>> reduce(add, [1,2,3,4,5])   # 计算列表和:1+2+3+4+5
15
>>> reduce(lambda x, y: x+y, [1,2,3,4,5])  # 使用 lambda 匿名函数
15
def reduce(function, sequence, initial=None): # real signature unknown; restored from __doc__
    """
    reduce(function, sequence[, initial]) -> value

    Apply a function of two arguments cumulatively to the items of a sequence,
    from left to right, so as to reduce the sequence to a single value.
    For example, reduce(lambda x, y: x+y, [1, 2, 3, 4, 5]) calculates
    ((((1+2)+3)+4)+5).  If initial is present, it is placed before the items
    of the sequence in the calculation, and serves as a default when the
    sequence is empty.
    """
    pass
zip
函数用于将可迭代的对象作为参数,将对象中对应的元素打包成一个个元组,然后返回由这些元组组成的对象
>>> print(list(zip(('a', 'b', 'c'), (1, 2, 3))))
[('a', 1), ('b', 2), ('c', 3)]

>>> print(list(zip(('a', 'b', 'c', 'd'), (1, 2, 3))))
[('a', 1), ('b', 2), ('c', 3)]

>>> print(list(zip(['a', 'b'], (1, 2, 3))))
[('a', 1), ('b', 2)]

>>> print(list(zip(['a', 'b'], "123")))
[('a', '1'), ('b', '2')]
class zip(object):
    """
    zip(iter1 [,iter2 [...]]) --> zip object

    Return a zip object whose .__next__() method returns a tuple where
    the i-th element comes from the i-th iterable argument.  The .__next__()
    method continues until the shortest iterable in the argument sequence
    is exhausted and then it raises StopIteration.
    """
    def __getattribute__(self, *args, **kwargs): # real signature unknown
        """ Return getattr(self, name). """
        pass

    def __init__(self, iter1, iter2=None, *some): # real signature unknown; restored from __doc__
        pass

    def __iter__(self, *args, **kwargs): # real signature unknown
        """ Implement iter(self). """
        pass

    @staticmethod # known case of __new__
    def __new__(*args, **kwargs): # real signature unknown
        """ Create and return a new object.  See help(type) for accurate signature. """
        pass

    def __next__(self, *args, **kwargs): # real signature unknown
        """ Implement next(self). """
        pass

    def __reduce__(self, *args, **kwargs): # real signature unknown
        """ Return state information for pickling. """
        pass
yield
def count_down(n):
    while n>=0:
        print("before: n-->", n)
        newn = yield n
        print("after: n-->", n, "newn---->", newn)
        if newn:
            n=newn
        else:
            n-=1

cd = count_down(5)
for i in cd:
    print(i)
    if i== 5:
        s = cd.send(3)
        print('-----', s, '-----')
class generator(object):
    # no doc
    def close(self): # real signature unknown; restored from __doc__
        """ close() -> raise GeneratorExit inside generator. """
        pass

    def send(self, arg): # real signature unknown; restored from __doc__
        """
        send(arg) -> send 'arg' into generator,
        return next yielded value or raise StopIteration.
        """
        pass

    ...
运行结果
before: n--> 5
5
after: n--> 5 newn----> 3
before: n--> 3
----- 3 -----
after: n--> 3 newn----> None
before: n--> 2
2
after: n--> 2 newn----> None
before: n--> 1
1
after: n--> 1 newn----> None
before: n--> 0
0
after: n--> 0 newn----> None
namedtuple
In[9]: from collections import namedtuple
In[10]: a = namedtuple('AAA', 'name', 'age', 'gender')
Traceback (most recent call last):
  File "D:\Anaconda3\lib\site-packages\IPython\core\interactiveshell.py", line 2910, in run_code
    exec(code_obj, self.user_global_ns, self.user_ns)
  File "<ipython-input-10-6facf42d4900>", line 1, in <module>
    a = namedtuple('AAA', 'name', 'age', 'gender')
TypeError: namedtuple() takes 2 positional arguments but 4 were given
In[11]: a = namedtuple('AAA', ['name', 'age', 'gender'])
In[12]: a("aaa",'22', 'man')
Out[12]: AAA(name='aaa', age='22', gender='man')

In[13]: help(namedtuple)
Help on function namedtuple in module collections:

namedtuple(typename, field_names, *, verbose=False, rename=False, module=None)
    Returns a new subclass of tuple with named fields.

    >>> Point = namedtuple('Point', ['x', 'y'])
    >>> Point.__doc__                   # docstring for the new class
    'Point(x, y)'
    >>> p = Point(11, y=22)             # instantiate with positional args or keywords
    >>> p[0] + p[1]                     # indexable like a plain tuple
    33
    >>> x, y = p                        # unpack like a regular tuple
    >>> x, y
    (11, 22)
    >>> p.x + p.y                       # fields also accessible by name
    33
    >>> d = p._asdict()                 # convert to a dictionary
    >>> d['x']
    11
    >>> Point(**d)                      # convert from a dictionary
    Point(x=11, y=22)
    >>> p._replace(x=100)               # _replace() is like str.replace() but targets named fields
    Point(x=100, y=22)
>>> from collections import namedtuple
>>> City = namedtuple('City', 'name country population coordinates') ➊
>>> tokyo = City('Tokyo', 'JP', 36.933, (35.689722, 139.691667)) ➋
>>> tokyo
City(name='Tokyo', country='JP', population=36.933, coordinates=(35.689722,
139.691667))
>>> tokyo.population ➌
36.933
>>> tokyo.coordinates
(35.689722, 139.691667)
>>> tokyo[1]
'JP'
❶ 创建一个具名元组需要两个参数,一个是类名,另一个是类的各个字段的名字.后者
可以是由数个字符串组成的可迭代对象,或者是由空格分隔开的字段名组成的字符串.
❷ 存放在对应字段里的数据要以一串参数的形式传入到构造函数中(注意,元组的构造
函数却只接受单一的可迭代对象).
❸ 你可以通过字段名或者位置来获取一个字段的信息
除了从普通元组那里继承来的属性之外,具名元组还有一些自己专有的属性
>>> City._fields ➊
('name', 'country', 'population', 'coordinates')
>>> LatLong = namedtuple('LatLong', 'lat long')
>>> delhi_data = ('Delhi NCR', 'IN', 21.935, LatLong(28.613889, 77.208889))
>>> delhi = City._make(delhi_data) ➋
>>> delhi._asdict() ➌
OrderedDict([('name', 'Delhi NCR'), ('country', 'IN'), ('population',
21.935), ('coordinates', LatLong(lat=28.613889, long=77.208889))])
>>> for key, value in delhi._asdict().items():
print(key + ':', value)
name: Delhi NCR
country: IN
population: 21.935
coordinates: LatLong(lat=28.613889, long=77.208889)
>>>
❶ _fields 属性是一个包含这个类所有字段名称的元组.
❷ 用 _make() 通过接受一个可迭代对象来生成这个类的一个实例,它的作用跟
City(*delhi_data) 是一样的.
❸ _asdict() 把具名元组以 collections.OrderedDict 的形式返回,我们可以利用它
来把元组里的信息友好地呈现出来.
max
# 不存在最大值时,default生效
In[22]: max((), default=1)
Out[22]: 1
In[23]: a = [1, 2 ,5 ,7]
In[24]: max(a)
Out[24]: 7

# key指定取最大值的函数
In[30]: max({'A':1}, {'C':3}, {'B':2}, key=lambda x:x.keys())
Out[30]: {'A': 1}
def max(*args, key=None): # known special case of max
    """
    max(iterable, *[, default=obj, key=func]) -> value
    max(arg1, arg2, *args, *[, key=func]) -> value

    With a single iterable argument, return its biggest item. The
    default keyword-only argument specifies an object to return if
    the provided iterable is empty.
    With two or more arguments, return the largest argument.
    """
    pass
json
json.load()从文件中读取json对象反序列化为python对象
def load(fp, *, cls=None, object_hook=None, parse_float=None,
        parse_int=None, parse_constant=None, object_pairs_hook=None, **kw):
    """Deserialize ``fp`` (a ``.read()``-supporting file-like object containing
    a JSON document) to a Python object.
json.loads()将json对象转化为python对象
def loads(s, *, encoding=None, cls=None, object_hook=None, parse_float=None,
        parse_int=None, parse_constant=None, object_pairs_hook=None, **kw):
    """Deserialize ``s`` (a ``str``, ``bytes`` or ``bytearray`` instance
    containing a JSON document) to a Python object.
json.dump()将python对象转换为json对象,并将数据放到文件中
def dump(obj, fp, *, skipkeys=False, ensure_ascii=True, check_circular=True,
        allow_nan=True, cls=None, indent=None, separators=None,
        default=None, sort_keys=False, **kw):
    """Serialize ``obj`` as a JSON formatted stream to ``fp`` (a
    ``.write()``-supporting file-like object).
json.dumps()将python对象转换为json对象
def dumps(obj, *, skipkeys=False, ensure_ascii=True, check_circular=True,
        allow_nan=True, cls=None, indent=None, separators=None,
        default=None, sort_keys=False, **kw):
    """Serialize ``obj`` to a JSON formatted ``str``.
pickle
用法和json一致,但是序列化后的对象是二进制的
xml
https://docs.python.org/3/library/xml.html
deque
collections.deque 类(双向队列)是一个线程安全、可以快速从两端添加或者删除元
素的数据类型.而且如果想要有一种数据类型来存放“最近用到的几个元素”,deque 也是
一个很好的选择.这是因为在新建一个双向队列的时候,你可以指定这个队列的大小,如
果这个队列满员了,还可以从反向端删除过期的元素,然后在尾端添加新的元素.
class deque(MutableSequence[_T], Generic[_T]):
    @property
    def maxlen(self) -> Optional[int]: ...
    def __init__(self, iterable: Iterable[_T] = ...,
                 maxlen: int = ...) -> None: ...
    def append(self, x: _T) -> None: ...
    def appendleft(self, x: _T) -> None: ...
    def clear(self) -> None: ...
    if sys.version_info >= (3, 5):
        def copy(self) -> deque[_T]: ...
    def count(self, x: _T) -> int: ...
    def extend(self, iterable: Iterable[_T]) -> None: ...
    def extendleft(self, iterable: Iterable[_T]) -> None: ...
    def insert(self, i: int, x: _T) -> None: ...
    def index(self, x: _T, start: int = ..., stop: int = ...) -> int: ...
    def pop(self, i: int = ...) -> _T: ...
    def popleft(self) -> _T: ...
    def remove(self, value: _T) -> None: ...
    def reverse(self) -> None: ...
    def rotate(self, n: int) -> None: ...
>>> from collections import deque
>>> dq = deque(range(10), maxlen=10) ➊
>>> dq
deque([0, 1, 2, 3, 4, 5, 6, 7, 8, 9], maxlen=10)
>>> dq.rotate(3) ➋
>>> dq
deque([7, 8, 9, 0, 1, 2, 3, 4, 5, 6], maxlen=10)
>>> dq.rotate(-4)
>>> dq
deque([1, 2, 3, 4, 5, 6, 7, 8, 9, 0], maxlen=10)
>>> dq.appendleft(-1) ➌
>>> dq
deque([-1, 1, 2, 3, 4, 5, 6, 7, 8, 9], maxlen=10)
>>> dq.extend([11, 22, 33]) ➍
>>> dq
deque([3, 4, 5, 6, 7, 8, 9, 11, 22, 33], maxlen=10)
>>> dq.extendleft([10, 20, 30, 40]) ➎
>>> dq
deque([40, 30, 20, 10, 3, 4, 5, 6, 7, 8], maxlen=10)
❶maxlen是一个可选参数,代表这个队列可以容纳的元素的数量,而且一旦设定,这个
属性就不能修改了.
❷ 队列的旋转操作接受一个参数 n,当 n > 0 时,队列的最右边的n个元素会被移动到
队列的左边.当 n < 0 时,最左边的 n 个元素会被移动到右边.
❸ 当试图对一个已满(len(d) == d.maxlen)的队列做尾部添加操作的时候,它头部
的元素会被删除掉.注意在下一行里,元素0被删除了.
❹ 在尾部添加 3 个元素的操作会挤掉 -1、1 和 2.
❺ extendleft(iter) 方法会把迭代器里的元素逐个添加到双向队列的左边,因此迭代
器里的元素会逆序出现在队列里.
append 和 popleft 都是原子操作,也就说是 deque 可以在多线程程序中安全地当作先
进先出的栈使用,而使用者不需要担心资源锁的问题
queue
提供了同步(线程安全)类Queue、LifoQueue 和 PriorityQueue,不同的线程可
以利用这些数据类型来交换信息.这三个类的构造方法都有一个可选参数 maxsize,它
接收正整数作为输入值,用来限定队列的大小.但是在满员的时候,这些类不会扔掉旧的
元素来腾出位置.相反,如果队列满了,它就会被锁住,直到另外的线程移除了某个元素
而腾出了位置.这一特性让这些类很适合用来控制活跃线程的数量.
优先队列使用了堆来保持优先级别
class PriorityQueue(Queue):
    '''Variant of Queue that retrieves open entries in priority order (lowest first).

    Entries are typically tuples of the form:  (priority number, data).
    '''

    def _init(self, maxsize):
        self.queue = []

    def _qsize(self):
        return len(self.queue)

    def _put(self, item):
        heappush(self.queue, item)

    def _get(self):
        return heappop(self.queue)
multiprocessing
这个包实现了自己的 Queue,它跟 queue.Queue 类似,是设计给进程间通信用的.
同时还有一个专门的 multiprocessing.JoinableQueue 类型,可以让任务管理变得更
方便.
asyncio
Python 3.4 新提供的包,里面有 Queue、LifoQueue、PriorityQueue 和
JoinableQueue,这些类受到queue和 multiprocessing 模块的影响,但是为异步编程里的任务管理提供了专门的便利.
heapq
跟上面三个模块不同的是,heapq 没有队列类,而是提供了 heappush 和 heappop
方法,让用户可以把可变序列当作堆队列或者优先队列来使用.
sorted
def sorted(iterable: Iterable[_T], *,
           key: Optional[Callable[[_T], Any]] = ...,
           reverse: bool = ...) -> List[_T]: ...

iterable: 可迭代对象
key: 指定排序的关键字
reverse: 如果设置为True, 序列将会以降序输出, 默认False(升序)
In[13]: l = [28, 14, '28', 5, '9', '1', 0, 6, '23', 19]
In[14]: sorted(l, key=int)
Out[14]: [0, '1', 5, 6, '9', 14, 19, '23', 28, '28']
In[15]: sorted(l, key=str)
Out[15]: [0, '1', 14, 19, '23', 28, '28', 5, 6, '9']
sorted 和 list.sort 背后的排序算法是 Timsort,它是一种自适应算法,会根据原
始数据的顺序特点交替使用插入排序和归并排序,以达到最佳效率.这样的算法被证
明是很有效的,因为来自真实世界的数据通常是有一定的顺序特点的.维基百科上有
一个条目是关于这个算法的(https://en.wikipedia.org/wiki/Timsort).
迭代器和生成器
只要含有__iter__()方法的就是可迭代的
凡是可以被for循环的数据类型就一定含有__iter__()方法
迭代器协议和可迭代对象
-
迭代器协议是指:对象必须提供一个
next方法,执行该方法要么返回迭代中的下一项,要么就引起一个StopIteration异常,以终止迭代 (只能往后走不能往前退) -
可迭代对象:实现了迭代器协议的对象(如何实现:对象内部定义一个
__iter__()方法) -
协议是一种约定,可迭代对象实现了迭代器协议,python的内部工具(如for循环,sum,min,max函数等)使用迭代器协议访问对象.
同时含有__iter__()方法和__next()__方法的就是迭代器,__next()__方法返回迭代器的下一个元素__iter()__方法,返回迭代器对象本身
class Fabs(object):
    def __init__(self,max):
        self.max = max
        self.n, self.a, self.b = 0, 0, 1  #特别指出:第0项是0,第1项是第一个1.整个数列从1开始

    def __iter__(self):
        return self

    def __next__(self):
        if self.n < self.max:
            r = self.b
            self.a, self.b = self.b, self.a + self.b
            self.n = self.n + 1
            return r
        raise StopIteration()


for key in Fabs(5):
    print(key)


1
1
2
3
5
__iter(self)__只会被调用一次,而__next(self)__会被调用 n 次,直到出现StopIteration异常.
生成器
# 列表推导式
In[32]: [x for x in range(10)]
Out[32]: [0, 1, 2, 3, 4, 5, 6, 7, 8, 9]

# 生成器表达式
In[33]: (x for x in range(10))
Out[33]: <generator object <genexpr> at 0x00000298CD87CDE0>
函数中不使用return,而是使用yield
In[57]: def func(x):
   ...:     while x < 10:
   ...:         yield x
   ...:         x += 1
   ...:
In[58]: a = func(5)
In[59]: a
Out[59]: <generator object func at 0x00000298CD9A7408>
In[60]: a.__iter__()
Out[60]: <generator object func at 0x00000298CD9A7408>
In[61]: a.__next__()
Out[61]: 5
In[62]: a.__next__()
Out[62]: 6
In[63]: a.__next__()
Out[63]: 7
In[64]: a.__next__()
Out[64]: 8
In[65]: a.__next__()
Out[65]: 9
In[66]: a.__next__()
Traceback (most recent call last):
  File "D:\Anaconda3\lib\site-packages\IPython\core\interactiveshell.py", line 2961, in run_code
    exec(code_obj, self.user_global_ns, self.user_ns)
  File "<ipython-input-66-d34d2a8c0899>", line 1, in <module>
    a.__next__()
StopIteration
调用一次返回一次值,省内存
函数传参
In[2]: def func(x, y, *z):
  ...:     print (x, y, z)
  ...:
In[3]: func(1, 2, 3, 4, 5)
1 2 (3, 4, 5)
In[4]: def func(x, *y, **z):
  ...:     print (x, y, z)
  ...:
In[5]: func(1, 2, 3, 4, 5)
1 (2, 3, 4, 5) {}
In[4]: def func(x, *y, **z):
  ...:     print (x, y, z)
  ...:
In[6]: func(1, name="xxx", age=10)
1 () {'name': 'xxx', 'age': 10}
In[7]: func(1, 2, name="xxx", age=10)
1 (2,) {'name': 'xxx', 'age': 10}
In[8]: def func(*y, **z):
  ...:     print(y, z)
  ...:
In[9]: func([1, 2, 3, 4])
([1, 2, 3, 4],) {}
In[10]: func(*[1, 2, 3, 4])
(1, 2, 3, 4) {}
In[11]: func([1, 2, 3, 4], name='xxx', age=20)
([1, 2, 3, 4],) {'name': 'xxx', 'age': 20}
In[13]: func([1, 2, 3, 4], {'name':'xxx', 'age':20})
([1, 2, 3, 4], {'name': 'xxx', 'age': 20}) {}
In[14]: func([1, 2, 3, 4], **{'name':'xxx', 'age':20})
([1, 2, 3, 4],) {'name': 'xxx', 'age': 20}
In[15]: func([1, 2, 3, 4], *{'name':'xxx', 'age':20})
([1, 2, 3, 4], 'name', 'age') {}
传参传引用,id一样
name = 2

def func(x):
    print(id(x), name)


print(id(name), name)
func(name)

# 输出
140711685123872 2
140711685123872 2
for..in..
In[24]: def chick_in(old, new):
   ...:      for x in old:
   ...:         print (x, '-----')
   ...:         old.remove(x)
   ...:         new.append(x)
   ...:
In[26]: s1 = ['A', 'B', 'C', 'D', 'E', 'F', 'G']
In[27]: s2 = []
In[28]: chick_in(s1, s2)
A -----
C -----
E -----
G -----
for in 操作下标, remove操作值
开始时下标为0的值是A,下标为1的值是B s1 = ['A', 'B', 'C', 'D', 'E', 'F', 'G']
当A被移除后,下标为1的值就变成了C ,此时 s1 = [ 'B', 'C', 'D', 'E', 'F', 'G']
异常
try:
    do...
except Exception as e:
    do...
else:
    # 如果代码块不抛出异常会执行此行代码!
    do...
finally:
    # 不管代码块是否抛出异常都会执行此行代码
    do...
python中一切皆对象
函数,类,变量等都是对象(加个()就能调用)
都可以作为参数进行传递(闭包)
全局变量和局部变量
函数内部优先读取局部变量,可以读取全局变量,但无法赋值name= 'xxx',
但是对于可变对象,可以对内部元素进行赋值
name = [1, 2]

def func():
    name.append(3)
    return name

print(func())
LEGB 代表名字查找顺序:
locals->enclosing function->globals->__builtins__
locals 是函数内的名字空间,包括局部变量和形参
enclosing 外部嵌套函数的名字空间(闭包中常见)
globals 全局变量,函数定义所在模块的名字空间
builtins 内置模块的名字空间
魔法函数
魔法方法的存在是为了被 Python 解释器调用的,你自己并不需要调用它们,https://docs.python.org/3/reference/datamodel.html
__eq__
==, 会被调用两次
class P:
    def __init__(self, name):
        self.name = name

    def __str__(self):
        return self.name

    def __eq__(self, other):
        """ Return self==value. """
        print(self, "__eq__", other)
        return super(P, self).__eq__(other)

    def __gt__(self, other):
        """ Return self>value. """
        return super(P, self).__gt__(other)

    def __ge__(self, other):
        """ Return self>=value. """
        return super(P, self).__ge__(other)

    def __lt__(self, other):
        """ Return self<value. """
        return super(P, self).__lt__(other)

    def __le__(self, other):
        """ Return self<=value. """
        return super(P, self).__le__(other)

p1 = P("张三")
p2 = P("李四")

print(p1==p2)
print(p1 is p2)
print(f"p1.id: {id(p1)}, p2.id: {id(p2)}")


张三 __eq__ 李四
李四 __eq__ 张三
False
False
p1.id: 2021456161592, p2.id: 2021456161648
__getitem__和__setitem__
可迭代对象
In[18]: class Company:
   ...:     def __init__(self, employee_list):
   ...:         self.employee = employee_list
   ...:
   ...:     def __getitem__(self, item):
   ...:         return self.employee[item]
   ...:
In[19]: company = Company(['A', 'B', 'C'])
In[20]: for em in company:
   ...:     print(em)
   ...:
A
B
C
In[21]: company[:2]
Out[21]: ['A', 'B']
    def __len__(self):
        return len(self.employee)
def __len__(self):供len(company)使用(len())
实现__getitem__方法,对象就变成可迭代的了,可以实现切片操作
import collections

Card = collections.namedtuple('Card', ['rank', 'suit'])


class FrenchDeck:
    ranks = [str(n) for n in range(2, 11)] + list('JQKA')

    suits = 'spades diamonds clubs hearts'.split()

    def __init__(self):
        self._cards = [Card(rank, suit) for suit in self.suits
                       for rank in self.ranks]

    def __len__(self):
        return len(self._cards)

    def __getitem__(self, position):
        return self._cards[position]


suit_values = dict(spades=3, hearts=2, diamonds=1, clubs=0)


def spades_high(card):
    rank_value = FrenchDeck.ranks.index(card.rank)

    return rank_value * len(suit_values) + suit_values[card.suit]


if __name__ == '__main__':
    deck = FrenchDeck()
    print(len(deck))
    print(deck[51])
迭代通常是隐式的,譬如说一个集合类型没有实现 contains 方法,那么 in 运算符
就会按顺序做一次迭代搜索.于是,in 运算符可以用在我们的 FrenchDeck 类上,因为
它是可迭代的:
>>> Card('Q', 'hearts') in deck
True
>>> Card('7', 'beasts') in deck
False
__delitem__
删除属性时调用
class A:
    def __setitem__(self, key, value):
        print('__setitem__', key, value)
        self.__dict__[key]=value

    def __getitem__(self, item):
        print('__getitem__', item)
        return item

    def __delitem__(self, key):
        print('__delitem__', key)
        self.__dict__.pop(key)


if __name__ == '__main__':
    a = A()
    a['name'] = 'IIce'
    a['age']
    del a['name']

__setitem__ name IIce
__getitem__ age
__delitem__ name
__repr__和__str__
In[14]: class A:
   ...:     def __str__(self):
   ...:         return '__str__'
   ...:
   ...:     def __repr__(self):
   ...:         return '__repr__'
   ...:
In[15]: a = A()
In[16]: a
Out[16]: __repr__
In[17]: print(a)
__str__
__repr__和__str__这两个方法都是用于显示的,__str__是面向用户的,而__repr__面向程序员.
函数str 用于将值转化为适于人阅读的形式,而repr 转化为供解释器读取的形式
__repr__ 和__str__的区别在于,后者是在 str() 函数被使用,或是在用 print 函数
打印一个对象的时候才被调用的,并且它返回的字符串对终端用户更友好.
如果你只想实现这两个特殊方法中的一个,__repr__ 是更好的选择,因为如果一个对象
没有__str__函数,而 Python 又需要调用它的时候,解释器会用 __repr__ 作为替代.
__bool__
默认情况下,我们自己定义的类的实例总被认为是真的,除非这个类对__bool__或者__len__ 函数有自己的实现.bool(x) 的背后是调用x.__bool__() 的结果;如果不存在 __bool__ 方法,那么 bool(x) 会尝试调用 x.__len__().若返回 0,则 bool 会返回False;否则返回 True.
__enter__和__exit__
上下文管理器,想要使用with,就必须实现这两个方法
使用with语句写法
with open('test.txt') as f:
    print(f.read())
with返回的并不是上下文管理器,而是__enter__方法的返回值
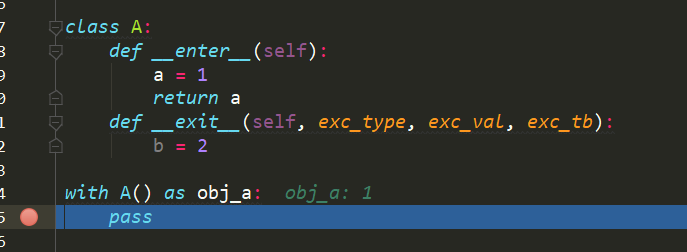
上面一段代码我们在__enter__中返回了一个a,所以下面as后的obj_a就是1
    def __enter__(self):
        self.push()
        return self

    def __exit__(self, exc_type, exc_value, tb):
        self.pop(exc_value)

        if BROKEN_PYPY_CTXMGR_EXIT and exc_type is not None:
            reraise(exc_type, exc_value, tb)
exit方法接收三个参数,分别是异常类型,异常消息,和详细的异常堆栈信息
exit方法需要返回一个boolean类型的值,如果返回True,那么外部就不会抛出异常,如果返回False,那么还会在外部抛出异常,如果什么都不返回,按照False处理.
__getattr__和__setattr__
__getattr__: 找不到属性时调用
class A:
    def __init__(self, name):
        self.name = name

    def __getattr__(self, item):
        return item


if __name__ == '__main__':
    a = A('aaa')
    print(a.name)   # aaa
    print(a.age)    # age
__setattr__: 给属性赋值时调用
class A:
    def __init__(self, name):
        self.name = name

    def __getattr__(self, item):
        return item

    def __setattr__(self, key, value):
        print(key, value)
        self.__dict__[key] = value

if __name__ == '__main__':
    a = A('aaa')
    a.name = 'bbb'

name aaa
name bbb
__setattr__函数调用了两次,一次是初始化,一次是a.name = 'bbb',
如果在__setattr__函数中使用self.key=value进行赋值,会无限递归
__delattr__
删除属性时调用
class A:
    def __init__(self, name):
        self.name = name

    def __getattr__(self, item):
        return item

    def __setattr__(self, key, value):
        print(key, value)
        self.__dict__[key] = value

    def __delattr__(self, item):
        print('__delattr__')
        self.__dict__.pop(item)

if __name__ == '__main__':
    a = A('aaa')
    a.name = 'bbb'
    del a.name
item和attr的区别
item是通过[]来调用的,attr是通过.来调用的
In[2]: class A:
  ...:     def __setitem__(self, key, value):
  ...:         print('__setitem__', key, value)
  ...:         self.__dict__[key]=value
  ...:
  ...:     def __getitem__(self, item):
  ...:         print('__getitem__', item)
  ...:         return self.__dict__[item]
  ...:
  ...:     def __delitem__(self, key):
  ...:         print('__delitem__', key)
  ...:         self.__dict__.pop(key)
  ...:
  ...:     def __setattr__(self, key, value):
  ...:         print('__setattr__', key, value)
  ...:         self.__dict__[key]=value
  ...:
  ...:     def __getattr__(self, item):
  ...:         print('__getattr__', item)
  ...:         return self.__dict__[item]
  ...:
  ...:     def __delattr__(self, key):
  ...:         print('__delattr__', key)
  ...:         self.__dict__.pop(key)
  ...:
In[3]: a = A()
In[4]: a.name = "IIce"
__setattr__ name IIce

In[5]: a['age'] = 20
__setitem__ age 20

# 此处调用的是`__getattribute__`方法
In[6]: a.name
Out[6]: 'IIce'

In[7]: a['age']
__getitem__ age
Out[7]: 20

In[8]: a['name']
__getitem__ name
Out[8]: 'IIce'

In[9]: a.__dict__
Out[9]: {'name': 'IIce', 'age': 20}

In[10]: del a.name
__delattr__ name

In[11]: del a['age']
__delitem__ age

In[12]: a.__dict__
Out[12]: {}
__getattribute__
调用对象的属性时调用这个方法,不论属性是否存在
class A:
    def __init__(self, name):
        self.name = name

    def __getattr__(self, item):
        return item

    # def __setattr__(self, key, value):
    #     print(key, value)
    #     self.__dict__[key] = value

    def __delattr__(self, item):
        print('__delattr__')

    def __getattribute__(self, item):
        print('__getattribute__', item)

if __name__ == '__main__':
    a = A('aaa')
    a.name = 'bbb'
    # del a.name
    a.age

    a.name

__getattribute__ age
__getattribute__ name
当属性不存在时,__getattribute__函数并没有调用__getattr__函数,
如果想要调用__getattr__函数,需要在__getattribute__函数中抛出异常,只能使用AttributeError
class A:
    def __init__(self, name):
        self.name = name

    def __getattr__(self, item):
        print('__getattr__', item)
        return item

    # def __setattr__(self, key, value):
    #     print(key, value)
    #     self.__dict__[key] = value

    def __delattr__(self, item):
        print('__delattr__')

    def __getattribute__(self, item):
        print('__getattribute__', item)
        raise AttributeError("抛出异常")

if __name__ == '__main__':
    a = A('aaa')
    a.name = 'bbb'
    a.age
    a.name


__getattribute__ age
__getattr__ age
__getattribute__ name
__getattr__ name
class object:

    ...

    def __getattribute__(self, *args, **kwargs): # real signature unknown
            """ Return getattr(self, name). """
            pass
__iter__和__next__
__new__和__init__
class A:
    def __new__(cls, *args, **kwargs):
        print("new")
        return super().__new__(cls)

    def __init__(self):
        print("init")


if __name__ == '__main__':
    A()

new
init
__new__是用来生成类的, __init__是用来生成对象的
描述符
描述符本质就是一个新式类,在这个新式类中,至少实现了__get__(),__set__(),__delete__()中的一个,这也被称为描述符协议
__get__():调用一个属性时,触发
__set__():为一个属性赋值时,触发
__delete__():采用del删除属性时,触发
描述符本身应该定义成新式类,被代理的类也应该是新式类,
必须把描述符定义成这个类的类属性,不能为定义到构造函数中,
要严格遵循该优先级,优先级由高到底分别是,
1.类属性
2.数据描述符
3.实例属性
4.非数据描述符
5.找不到的属性触发__getattr__()
class Point:
    x = 0
    y = 0

    def __init__(self, x=0, y=0):
        self.x = x
        self.y = y

    # instance: Line实例对象, owner: Line类
    def __get__(self, instance, owner):
        return instance.__dict__[self]

    def __set__(self, instance, value):
        instance.__dict__[self] = value


class Line:
    start = Point()
    end = Point()

    # def __init__(self, start, end):
    #     self.start = start
    #     self.end = end


if __name__ == '__main__':
    start = (1, 1)
    end = (2, 0)
    line = Line()
    line.start = start
    line.end = end
    print(line.start)
    print(line.end)
    print(line.__dict__)
    print(Line.__dict__)

(1, 1)
(2, 0)
{<__main__.Point object at 0x0000027987D34A90>: (1, 1), <__main__.Point object at 0x0000027987D34BA8>: (2, 0)}

{'__module__': '__main__', 'start': <__main__.Point object at 0x0000027987D34A90>, 'end': <__main__.Point object at 0x0000027987D34BA8>, '__dict__': <attribute '__dict__' of 'Line' objects>, '__weakref__': <attribute '__weakref__' of 'Line' objects>, '__doc__': None}
数据描述符:至少实现了__set__()
非数据描述符:没有实现__set__()
__missing__
所有的映射类型在处理找不到的键的时候,都会牵扯到__missing__方法.这也是这个方法称作“missing”的原因.虽然基类dict并没有定义这个方法,但是dict是知道有这么个东西存在的.也就是说,如果有一个类继承了 dict,然后这个继承类提供了__missing__ 方法,那么在__getitem__碰到找不到的键的时候,Python 就会自动调用它,而不是抛出一个KeyError异常.
__missing__ 方法只会被__getitem__调用(比如在表达式 d[k] 中).
提供__missing__方法对get或者 __contains__(in 运算符会用到这个方法)这些方法的使用没有影响.
class StrKeyDict0(dict): ➊
    def __missing__(self, key):
        if isinstance(key, str): ➋
            raise KeyError(key)
        return self[str(key)] ➌

    def get(self, key, default=None):
        try:
            return self[key] ➍
        except KeyError:
            return default ➎

    def __contains__(self, key):
        return key in self.keys() or str(key) in self.keys() ➏
❶ StrKeyDict0 继承了 dict.
❷ 如果找不到的键本身就是字符串,那就抛出 KeyError 异常.
❸ 如果找不到的键不是字符串,那么把它转换成字符串再进行查找.
❹ get 方法把查找工作用 self[key] 的形式委托给 __getitem__,这样在宣布查找失败之前,还能通过__missing__再给某个键一个机会.
❺ 如果抛出 KeyError,那么说明__missing__也失败了,于是返回 default.
❻ 先按照传入键的原本的值来查找(我们的映射类型中可能含有非字符串的键),如果没找到,再用str()方法把键转换成字符串再查找一次.
下面来看看为什么 isinstance(key, str) 测试在上面的__missing__中是必需的.如果没有这个测试,只要str(k)返回的是一个存在的键,那么__missing__方法是没问题的,不管是字符串键还是非字符串键,它都能正常运行.但是如果 str(k) 不是一个存在的键,代码就会陷入无限递归.这是因为__missing__的最后一行中的self[str(key)] 会调用 __getitem__,而这个str(key)又不存在,于是__missing__ 又会被调用.
为了保持一致性,__contains__ 方法在这里也是必需的.这是因为k in d这个操作会调用它,但是我们从dict继承到的 __contains__ 方法不会在找不到键的时候调用__missing__ 方法.__contains__ 里还有个细节,就是我们这里没有用更具 Python 风格的方式——k in my_dict——来检查键是否存在,因为那也会导致 __contains__ 被递归调用.为了避免这一情况,这里采取了更显式的方法,直接在这个self.keys()里查询.
像 k in my_dict.keys() 这种操作在 Python 3 中是很快的,而且即便映射类型对象很庞大也没关系.这是因为dict.keys()的返回值是一个“视图”.视图就像一个集合,而且跟字典类似的是,在视图里查找一个元素的速度很快.
深入类和对象
鸭子模型
class Duck:
    def walk(self):
        print("duck is walk")

    def swim(self):
        print("duck is swim")

    def quack(self):
        print("duck is quack")

class Person:
    def walk(self):
        print("person is walk")

    def swim(self):
        print("person is swim")

    def speak(self):
        print("person is speak")

def in_the_forest(Duck):
    duck.walk()
    duck.swim()

def game():
    duck = Duck()
    person = Person()
    in_the_forest(duck)
    in_the_forest(person)

game()

duck is walk
duck is swim
person is walk
person is swim
使用鸭子模型不用去考虑类型是否匹配,只要保证有那个属性即可.
优点是编写的代码数量更少,看起来也更加简洁,可以把精力更多地放在业务逻辑上面;
缺点是无法保证变量的类型,从而在程序的运行期有可能发生跟类型相关的错误.这好像在商店买了一包牛肉辣条,但是要真正吃到嘴里才知道是不是牛肉味.
# list.extend

    def extend(self, iterable): # real signature unknown; restored from __doc__
        """ L.extend(iterable) -> None -- extend list by appending elements from the iterable """
        pass
抽象基类(abc)
import abc


class CacheBase(metaclass=abc.ABCMeta):
    @abc.abstractmethod
    def get(self, key):
        pass

    @abc.abstractmethod
    def set(self, key, value):
        pass


class RedisCache(CacheBase):
    def get(self, key):
        pass

    def set(self, key, value):
        pass
使用abc模块创建抽象基类,被装饰器@abc.abstractmethod装饰的方法在子类中必须实现
类变量和实例变量
In[11]: class Point:
   ...:     ori = 0
   ...:
   ...:     def __init__(self, x, y):
   ...:         self.x = x
   ...:         self.y = y
   ...:
In[12]: p = Point(3, 4)
In[13]: print(p.__dict__)
{'x': 3, 'y': 4}

# 改变类变量ori的值
In[14]: Point.__dict__
Out[14]:
mappingproxy({'__dict__': <attribute '__dict__' of 'Point' objects>,
              '__doc__': None,
              '__init__': <function __main__.Point.__init__>,
              '__module__': '__main__',
              '__weakref__': <attribute '__weakref__' of 'Point' objects>,
              'ori': 0})
In[15]: Point.ori = 1
In[16]: Point.__dict__
Out[16]:
mappingproxy({'__dict__': <attribute '__dict__' of 'Point' objects>,
              '__doc__': None,
              '__init__': <function __main__.Point.__init__>,
              '__module__': '__main__',
              '__weakref__': <attribute '__weakref__' of 'Point' objects>,
              'ori': 1})

# 查看实例变量
In[17]: print(p.__dict__)
{'x': 3, 'y': 4}

# 修改实例变量中的ori
In[18]: p.ori
Out[18]: 1
In[19]: print(p.__dict__)
{'x': 3, 'y': 4}
In[22]: p.ori = 5
In[23]: print(p.__dict__)
{'x': 3, 'y': 4, 'ori': 5}
# 修改之后实例变量的字典中多了一个ori的键值对
新式类和经典类
-
创建类的时候,继承object类,该类就是新式类
-
python3里面创建的都是新式类
-
多继承状态下查找“方法”的规则
-
经典类: 深度查找
-
显示类: 广度查找
-
-
新式类增加了slots内置属性, 可以把实例属性的种类锁定到slots规定的范围之中
-
新式类增加了getattribute方法
类的多继承(c3算法)
'''
        Base

    AL       AR

Bl       BC      BR

          C
'''
class Base:
    pass

class AL(Base):
    pass

class AR(Base):
    pass

class BL(AL, AR):
    pass

class BC(AL, AR):
    pass

class BR(AL, AR):
    pass

class C(BL, BC, BR):
    pass

print(C.mro())

[<class '__main__.C'>, <class '__main__.BL'>, <class '__main__.BC'>, <class '__main__.BR'>, <class '__main__.AL'>, <class '__main__.AR'>, <class '__main__.Base'>, <class 'object'>]
__slots__
限制实例的属性,比如,只允许对Student实例添加name和age属性
class Student(object):
    __slots__ = ('name', 'age') # 用tuple定义允许绑定的属性名称
>>> s = Student() # 创建新的实例
>>> s.name = 'Michael' # 绑定属性'name'
>>> s.age = 25 # 绑定属性'age'
>>> s.score = 99 # 绑定属性'score'
Traceback (most recent call last):
  File "<stdin>", line 1, in <module>
AttributeError: 'Student' object has no attribute 'score'
由于'score'没有被放到__slots__中,所以不能绑定score属性,试图绑定score将得到AttributeError的错误.
使用__slots__要注意,__slots__定义的属性仅对当前类实例起作用,对继承的子类是不起作用的:
>>> class GraduateStudent(Student):
...     pass
...
>>> g = GraduateStudent()
>>> g.score = 9999
除非在子类中也定义__slots__,这样,子类实例允许定义的属性就是自身的__slots__加上父类的__slots__.
class A:
    __slots__ = ('name', 'age')


if __name__ == '__main__':
    a = A()
    print(a.__slots__)
    print(a.__dict__)

('name', 'age')
Traceback (most recent call last):
  File "E:/Python/AdvancePython/chapter01/03.py", line 23, in <module>
    print(a.__dict__)
AttributeError: 'A' object has no attribute '__dict__'
类属性
In[30]: class People:
   ...:     country = "china"
   ...:     def __init__(self, name):
   ...:         self.name = name
   ...:
   ...:     def play(self):
   ...:         pass
   ...:
In[31]: People.country
Out[31]: 'china'

# 修改
In[32]: People.country = "CHINA"
In[33]: People.country
Out[33]: 'CHINA'

# 增加
In[34]: People.age = 20
In[35]: People.age
Out[35]: 20
In[36]: People.__dict__
Out[36]:
mappingproxy({'__dict__': <attribute '__dict__' of 'People' objects>,
              '__doc__': None,
              '__init__': <function __main__.People.__init__>,
              '__module__': '__main__',
              '__weakref__': <attribute '__weakref__' of 'People' objects>,
              'age': 20,
              'country': 'CHINA',
              'play': <function __main__.People.play>})

# 删除后在进行查询会报错
In[37]: del People.age
In[38]: People.age
Traceback (most recent call last):
  File "D:\Anaconda3\lib\site-packages\IPython\core\interactiveshell.py", line 2910, in run_code
    exec(code_obj, self.user_global_ns, self.user_ns)
  File "<ipython-input-38-5742e582dacf>", line 1, in <module>
    People.age
AttributeError: type object 'People' has no attribute 'age'

In[39]: People.__dict__
Out[39]:
mappingproxy({'__dict__': <attribute '__dict__' of 'People' objects>,
              '__doc__': None,
              '__init__': <function __main__.People.__init__>,
              '__module__': '__main__',
              '__weakref__': <attribute '__weakref__' of 'People' objects>,
              'country': 'CHINA',
              'play': <function __main__.People.play>})
方法操作同上
实例属性
In[47]: class People:
   ...:     country = "china"
   ...:     def __init__(self, name):
   ...:         self.name = name
   ...:
   ...:     def play(self):
   ...:         pass
   ...:
In[48]: p = People('xxx')
In[50]: p.country
Out[50]: 'china'
In[51]: p.name
Out[51]: 'xxx'

# 修改类属性, 不影响其它实例
In[52]: p.country = 'CHINA'
In[53]: p.country
Out[53]: 'CHINA'

In[54]: p1 = People('yyy')
In[55]: p1.country
Out[55]: 'china'

# 新增属性
In[56]: p1.age = 20
In[57]: p1.age
Out[57]: 20
In[58]: p1.__dict__
Out[58]: {'age': 20, 'name': 'yyy'}

# 删除属性
In[59]: del p1.name
In[60]: p1.__dict__
Out[60]: {'age': 20}

# 修改属性
In[61]: p1.name = 'zzz'
In[62]: p1.__dict__
Out[62]: {'age': 20, 'name': 'zzz'}
In[63]: p1.age = 30
In[64]: p1.__dict__
Out[64]: {'age': 30, 'name': 'zzz'}
方法操作同上
对象与实例属性
In[70]: country = 'CHINA'
In[71]: class People:
   ...:     country = "china"
   ...:     def __init__(self, name):
   ...:         self.name = name
   ...:     def play(self):
   ...:         print(country)
   ...:         print(self.country)
   ...:
In[73]: p = People('xxx')
In[74]: p.play()
CHINA
china
不添加self使用的是全局变量
静态属性(@property)
将方法变成属性
In[3]: class Rect:
  ...:     def __init__(self, h, w):
  ...:         self.h = h
  ...:         self.w = w
  ...:     def area(self):
  ...:         return self.h * self.w
  ...:
In[4]: Rect(20, 30).area()
Out[4]: 600
In[5]: class Rect:
  ...:     def __init__(self, h, w):
  ...:         self.h = h
  ...:         self.w = w
  ...:     @property
  ...:     def area(self):
  ...:         return self.h * self.w
  ...:
In[6]: Rect(20, 30).area
Out[6]: 600
可进一步设置
class Rect:
    def __init__(self, h, w):
        self.h = h
        self.w = w

    @property
    def area(self):
        return self.h * self.w

    @area.getter
    def area(self):
        return 'getter'

    @area.setter
    def area(self, key):
        print('setter')

if __name__ == '__main__':
    a = Rect(4, 5)
    print(a.area)
    a.area=30

# 打印的不再是20,而是getter
getter
setter
另一种方法
property(fget=None, fset=None, fdel=None, doc=None)
classmethod 和 staticmethod
<<流畅的Python>>
- classmethod 第一个参数是类,不是实例对象
- staticmethod 不需要传入实例或者类
class A:
    @classmethod
    def clss(cls):
        pass

    @staticmethod
    def stac():
        pass
https://www.zhihu.com/question/20021164
_, __, __xx__
_xxx"单下划线" 开始的成员变量叫做保护变量,意思是只有类实例和子类实例能访问到这些变量,需通过类提供的接口进行访问;不能用'from module import *'导入__xxx类中的私有变量/方法名 (Python的函数也是对象,所以成员方法称为成员变量也行得通.), " 双下划线" 开始的是私有成员,意思是只有类对象自己能访问,连子类对象也不能访问到这个数据.__xxx__系统定义名字,前后均有一个“双下划线” 代表python里特殊方法专用的标识,如__init__()代表类的构造函数
super
多继承中的super调用顺序是按照mro表来进行的
'''
        Base

    AL       AR

Bl      BC      BR

        C
'''
class Base:
    base = "base"
    def __init__(self):
        print("class : Base")
        super(Base, self).__init__()

class AL(Base):
    def __init__(self):
        print("class : AL")
        super(AL, self).__init__()

class AR(Base):
    def __init__(self):
        print("class : AR")
        super(AR, self).__init__()

class BL(AL, AR):
    def __init__(self):
        print("class : BL")
        super(BL, self).__init__()

class BC(AL, AR):
    def __init__(self):
        print("class : BC")
        super(BC, self).__init__()

class BR(AL, AR):
    def __init__(self):
        print("class : BR")
        super(BR, self).__init__()

class C(BL, BC, BR):
    base = "c"
    def __init__(self):
        print("class : C")
        super(C, self).__init__()


print(C.__mro__)
print(C())

(<class '__main__.C'>, <class '__main__.BL'>, <class '__main__.BC'>, <class '__main__.BR'>, <class '__main__.AL'>, <class '__main__.AR'>, <class '__main__.Base'>, <class 'object'>)

class : C
class : BL
class : BC
class : BR
class : AL
class : AR
class : Base
<__main__.C object at 0x00000197D6345048>
super调用的是mro表中的下一个类的方法,而不是父类
contextmanager
contextmanager可以简化上下文管理器,不需要我们编写__enter__和__exit__函数.他给了我们一个机会,让我们把之前一个不是上下文管理器的类变成一个上下文管理器,而不需要我们去修改这个类的源代码
其中yield的作用,是中断当前函数执行流程,先去执行yield出去的部分的代码执行流程
下面的代码的作用,在书籍前后自动加上《 》
from contextlib import contextmanager


@contextmanager
def book_mark():
    print('<<', end='')
    yield
    print('>>', end='')


with book_mark():
    print('钢铁',end='')
反射
hasattr
def hasattr(*args, **kwargs): # real signature unknown
    """
    Return whether the object has an attribute with the given name.

    This is done by calling getattr(obj, name) and catching AttributeError.
    """
    pass
getattr
def getattr(object, name, default=None): # known special case of getattr
    """
    getattr(object, name[, default]) -> value

    Get a named attribute from an object; getattr(x, 'y') is equivalent to x.y.
    When a default argument is given, it is returned when the attribute doesn't
    exist; without it, an exception is raised in that case.
    """
    pass
setattr
def setattr(x, y, v): # real signature unknown; restored from __doc__
    """
    Sets the named attribute on the given object to the specified value.

    setattr(x, 'y', v) is equivalent to ``x.y = v''
    """
    pass
delattr
def delattr(x, y): # real signature unknown; restored from __doc__
    """
    Deletes the named attribute from the given object.

    delattr(x, 'y') is equivalent to ``del x.y''
    """
    pass
序列类
容器序列
list、tuple 和 collections.deque 这些序列能存放不同类型的数据.
扁平序列
str、bytes、bytearray、memoryview 和 array.array,这类序列只能容纳一种
类型.
容器序列存放的是它们所包含的任意类型的对象的引用,而扁平序列里存放的是值而不
是引用.换句话说,扁平序列其实是一段连续的内存空间.由此可见扁平序列其实更加紧
凑,但是它里面只能存放诸如字符、字节和数值这种基础类型.
序列类型还能按照能否被修改来分类.
可变序列
list、bytearray、array.array、collections.deque 和 memoryview.
不可变序列
tuple、str 和 bytes.
序列(Sequence):
Sequence.register(tuple)
Sequence.register(str)
Sequence.register(range)
Sequence.register(memoryview)


class ByteString(Sequence):

    """This unifies bytes and bytearray.

    XXX Should add all their methods.
    """

    __slots__ = ()

ByteString.register(bytes)
ByteString.register(bytearray)
可变序列(MutableSequence)
MutableSequence.register(list)
MutableSequence.register(bytearray)  # Multiply inheriting, see ByteString

In[3]: a, b = [1, 2, 3], [4, 5, 6]

In[4]: a + b
Out[4]: [1, 2, 3, 4, 5, 6]

In[5]: a += b
In[6]: a
Out[6]: [1, 2, 3, 4, 5, 6]

In[7]: a.extend(b)  # 无返回值
In[8]: a
Out[8]: [1, 2, 3, 4, 5, 6, 4, 5, 6]

In[9]: c = (7, 8, 9)
In[10]: a += c
In[11]: a
Out[11]: [1, 2, 3, 4, 5, 6, 4, 5, 6, 7, 8, 9]

In[12]: a + c
Traceback (most recent call last):
  File "D:\Anaconda3\lib\site-packages\IPython\core\interactiveshell.py", line 3267, in run_code
    exec(code_obj, self.user_global_ns, self.user_ns)
  File "<ipython-input-12-e81e582b6fa9>", line 1, in <module>
    a + c
TypeError: can only concatenate list (not "tuple") to list
+=调用__iadd__
class MutableSequence(Sequence):
    ...

    def extend(self, values):
        'S.extend(iterable) -- extend sequence by appending elements from the iterable'
        for v in values:
            self.append(v)

    ...

    def __iadd__(self, values):
        self.extend(values)
        return self
MappingProxyType
types 模块中引入了一个封装类名叫 MappingProxyType. 如果给这个类一个映射, 它会返回一个只读的映射视图. 虽然是个只读视图, 但是它是动态的. 这意味着如果对原映射做出了改动, 我们通过这个视图可以观察到, 但是无法通过这个视图对原映射做出修改.
>>> from types import MappingProxyType
>>> d = {1:'A'}
>>> d_proxy = MappingProxyType(d)
>>> d_proxy
mappingproxy({1: 'A'})
>>> d_proxy[1] ➊
'A'
>>> d_proxy[2] = 'x' ➋
Traceback (most recent call last):
File "<stdin>", line 1, in <module>
TypeError: 'mappingproxy' object does not support item assignment
>>> d[2] = 'B'
>>> d_proxy ➌
mappingproxy({1: 'A', 2: 'B'})
>>> d_proxy[2]
'B'
>>>
➊ d 中的内容可以通过 d_proxy 看到.
➋ 但是通过 d_proxy 并不能做任何修改.
➌ d_proxy 是动态的, 也就是说对 d 所做的任何改动都会反馈到它上面.
bisect
python的针对有序序列的插入和排序操作的一个模块, 利用二分查找算法
bisect
bisect(seq, item)
返回元素在序列中的位置, 该位置满足的条件是: 当把元素插入到这个位置时,该序列还能保持升序, 也就是在说这个函数返回的位置前面的值, 都小于或等于元素的值, 其中 seq 必须是一个有序的序列.
In[10]: lst = [x for x in range(10)]
In[11]: lst
Out[11]: [0, 1, 2, 3, 4, 5, 6, 7, 8, 9]
In[12]: bisect.bisect(lst, 3)
Out[12]: 4
In[13]: bisect.bisect_left(lst, 3)
Out[13]: 3
In[14]: bisect.bisect_right(lst, 3)
Out[14]: 4
# Create aliases
bisect = bisect_right
insort = insort_right
根据分数返回成绩
In[16]: def grade(score, breakpoints=[60, 70, 80, 90], grades='FDCBA'):
   ...:     i = bisect.bisect(breakpoints, score)
   ...:     return grades[i]
   ...:
In[17]: [grade(score) for score in [33, 99, 77, 70, 89, 90, 100]]
Out[17]: ['F', 'A', 'C', 'C', 'B', 'A', 'A']
insort
bisect.insort(seq, item)
将元素插入到序列中, 并保持序列的升序顺序
In[18]: lst = [x for x in range(10)]
In[19]: lst
Out[19]: [0, 1, 2, 3, 4, 5, 6, 7, 8, 9]
In[20]: bisect.insort(lst, 10)
In[21]: lst
Out[21]: [0, 1, 2, 3, 4, 5, 6, 7, 8, 9, 10]
这两个函数都有一个控制范围的参数, lo表示起始位置, hi表示结束位置, 默认是序列的长度
def insort_right(a, x, lo=0, hi=None):
    """Insert item x in list a, and keep it sorted assuming a is sorted.

    If x is already in a, insert it to the right of the rightmost x.

    Optional args lo (default 0) and hi (default len(a)) bound the
    slice of a to be searched.
    """

    if lo < 0:
        raise ValueError('lo must be non-negative')
    if hi is None:
        hi = len(a)
    while lo < hi:
        mid = (lo+hi)//2
        if x < a[mid]: hi = mid
        else: lo = mid+1
    a.insert(lo, x)

def bisect_right(a, x, lo=0, hi=None):
    """Return the index where to insert item x in list a, assuming a is sorted.

    The return value i is such that all e in a[:i] have e <= x, and all e in
    a[i:] have e > x.  So if x already appears in the list, a.insert(x) will
    insert just after the rightmost x already there.

    Optional args lo (default 0) and hi (default len(a)) bound the
    slice of a to be searched.
    """

    if lo < 0:
        raise ValueError('lo must be non-negative')
    if hi is None:
        hi = len(a)
    while lo < hi:
        mid = (lo+hi)//2
        if x < a[mid]: hi = mid
        else: lo = mid+1
    return lo
array
如果列表的内容只包含一种类型的话, 数组可能比列表更好
推导式
In[10]: a = [i**2 for i in range(1, 10)]
In[11]: a
Out[11]: [1, 4, 9, 16, 25, 36, 49, 64, 81]
In[12]: type(a)
Out[12]: list

In[13]: b = (i ** 2 for i in range(1, 10))
In[14]: type(b)
Out[14]: generator
In[15]: b
Out[15]: <generator object <genexpr> at 0x0000025874D9D660>
dict
collections.abc 模块中有 Mapping 和 MutableMapping 这两个抽象基类,它们的作用是为 dict 和其他类似的类型定义形式接口.

collections.abc 中的MutableMapping和它的超类的UML类图(箭头从子
类指向超类,抽象类和抽象方法的名称以斜体显示)
In[16]: from collections.abc import MutableMapping

In[18]: isinstance(dict(), MutableMapping)
Out[18]: True
字典的键一定是可散列的数据
原子不可变数据类型(str、bytes 和数值类型)都是可散列类型,frozenset 也是
可散列的,因为根据其定义,frozenset 里只能容纳可散列类型.元组的话,只有
当一个元组包含的所有元素都是可散列类型的情况下,它才是可散列的.来看下面的
元组tt、tl 和 tf:
>>> tt = (1, 2, (30, 40))
>>> hash(tt)
8027212646858338501
>>> tl = (1, 2, [30, 40])
>>> hash(tl)
Traceback (most recent call last):
File "<stdin>", line 1, in <module>
TypeError: unhashable type: 'list'
>>> tf = (1, 2, frozenset([30, 40]))
>>> hash(tf)
-4118419923444501110
常用方法
class dict(object):
    """
    dict() -> new empty dictionary
    dict(mapping) -> new dictionary initialized from a mapping object's
        (key, value) pairs
    dict(iterable) -> new dictionary initialized as if via:
        d = {}
        for k, v in iterable:
            d[k] = v
    dict(**kwargs) -> new dictionary initialized with the name=value pairs
        in the keyword argument list.  For example:  dict(one=1, two=2)
    """
    # 清空字典
    def clear(self): # real signature unknown; restored from __doc__
        """ D.clear() -> None.  Remove all items from D. """
        pass

    # 返回一个字典的浅复制
    def copy(self): # real signature unknown; restored from __doc__
        """ D.copy() -> a shallow copy of D """
        pass

    # seq = ('name', 'age', 'sex')
    # dict = dict.fromkeys(seq)
    # print ("新的字典为 : %s" %  str(dict))
    # 新的字典为 : {'age': None, 'name': None, 'sex': None}
    #
    # dict = dict.fromkeys(seq, 10)
    # print ("新的字典为 : %s" %  str(dict))
    # 新的字典为 : {'age': 10, 'name': 10, 'sex': 10}
    @staticmethod # known case
    def fromkeys(*args, **kwargs): # real signature unknown
        """ Returns a new dict with keys from iterable and values equal to value. """
        pass

    # 返回指定键的值,如果值不在字典中返回default值
    def get(self, k, d=None): # real signature unknown; restored from __doc__
        """ D.get(k[,d]) -> D[k] if k in D, else d.  d defaults to None. """
        pass

    # 以列表返回可遍历的(键, 值) 元组数组
    def items(self): # real signature unknown; restored from __doc__
        """ D.items() -> a set-like object providing a view on D's items """
        pass

    # 返回一个迭代器,可以使用 list() 来转换为列表
    def keys(self): # real signature unknown; restored from __doc__
        """ D.keys() -> a set-like object providing a view on D's keys """
        pass

    # 删除字典给定键 key 所对应的值,返回值为被删除的值.key值必须给出. 否则,返回default值.
    def pop(self, k, d=None): # real signature unknown; restored from __doc__
        """
        D.pop(k[,d]) -> v, remove specified key and return the corresponding value.
        If key is not found, d is returned if given, otherwise KeyError is raised
        """
        pass

    # 随机返回并删除字典中的一对键和值(一般删除末尾对).
    def popitem(self): # real signature unknown; restored from __doc__
        """
        D.popitem() -> (k, v), remove and return some (key, value) pair as a
        2-tuple; but raise KeyError if D is empty.
        """
        pass

    # 和get()类似, 但如果键不存在于字典中,将会添加键并将值设为default
    def setdefault(self, k, d=None): # real signature unknown; restored from __doc__
        """ D.setdefault(k[,d]) -> D.get(k,d), also set D[k]=d if k not in D """
        pass

    # 把字典dict2的键/值对更新到dict里
    def update(self, E=None, **F): # known special case of dict.update
        """
        D.update([E, ]**F) -> None.  Update D from dict/iterable E and F.
        If E is present and has a .keys() method, then does:  for k in E: D[k] = E[k]
        If E is present and lacks a .keys() method, then does:  for k, v in E: D[k] = v
        In either case, this is followed by: for k in F:  D[k] = F[k]
        """
        pass

    # 返回一个迭代器,可以使用 list() 来转换为列表
    def values(self): # real signature unknown; restored from __doc__
        """ D.values() -> an object providing a view on D's values """
        pass
class dict(MutableMapping[_KT, _VT], Generic[_KT, _VT]):
    # NOTE: Keyword arguments are special. If they are used, _KT must include
    #       str, but we have no way of enforcing it here.
    @overload
    def __init__(self, **kwargs: _VT) -> None: ...
    @overload
    def __init__(self, map: Mapping[_KT, _VT], **kwargs: _VT) -> None: ...
    @overload
    def __init__(self, iterable: Iterable[Tuple[_KT, _VT]], **kwargs: _VT) -> None: ...

    def __new__(cls: Type[_T1], *args: Any, **kwargs: Any) -> _T1: ...

    def clear(self) -> None: ...
    def copy(self) -> Dict[_KT, _VT]: ...
    def popitem(self) -> Tuple[_KT, _VT]: ...
    def setdefault(self, k: _KT, default: Optional[_VT] = ...) -> _VT: ...
    @overload
    def update(self, __m: Mapping[_KT, _VT], **kwargs: _VT) -> None: ...
    @overload
    def update(self, __m: Iterable[Tuple[_KT, _VT]], **kwargs: _VT) -> None: ...
    @overload
    def update(self, **kwargs: _VT) -> None: ...
    def keys(self) -> KeysView[_KT]: ...
    def values(self) -> ValuesView[_VT]: ...
    def items(self) -> ItemsView[_KT, _VT]: ...
    @staticmethod
    @overload
    def fromkeys(seq: Iterable[_T]) -> Dict[_T, Any]: ...  # TODO: Actually a class method (mypy/issues#328)
    @staticmethod
    @overload
    def fromkeys(seq: Iterable[_T], value: _S) -> Dict[_T, _S]: ...
    def __len__(self) -> int: ...
    def __getitem__(self, k: _KT) -> _VT: ...
    def __setitem__(self, k: _KT, v: _VT) -> None: ...
    def __delitem__(self, v: _KT) -> None: ...
    def __iter__(self) -> Iterator[_KT]: ...
    def __str__(self) -> str: ...
UserDict
UserDict 并不是 dict 的子类, 但是 UserDict 有一个叫作 data 的属性, 是 dict 的实例, 这个属性实际上是 UserDict 最终存储数据的地方. UserDict 的子类就能在实现__setitem__的时候避免不必要的递归, 也可以让__contains__里的代码更简洁
from collections import UserDict

class MyDict(UserDict):
    def __setitem__(self, key, value):
        super(MyDict, self).__setitem__(key, value)
    ...
UserDict的__getitem__方法
class UserDict(_collections_abc.MutableMapping):

    ...

    def __getitem__(self, key):
        if key in self.data:
            return self.data[key]
        if hasattr(self.__class__, "__missing__"):
            return self.__class__.__missing__(self, key)
        raise KeyError(key)
OrderedDict
这个类型在添加键的时候会保持顺序,因此键的迭代次序总是一致的.
OrderedDict 的popitem方法默认删除并返回的是字典里的最后一个元素,但是如
果像my_odict.popitem(last=False)这样调用它,那么它删除并返回第一个被添加进
去的元素.
OrderedDict 内部维护着一个根据键插入顺序排序的双向链表.每次当一个新的元素插入进来的时候, 它会被放到链表的尾部.对于一个已经存在的键的重复赋值不会改变键的顺序.
需要注意的是,一个OrderedDict的大小是一个普通字典的两倍,因为它内部维护着另外一个链表. 所以如果你要构建一个需要大量 OrderedDict 实例的数据结构的时候(比如读取100,000 行 CSV数据到一个 OrderedDict 列表中去), 那么你就得仔细权衡一下是否使用 OrderedDict 带来的好处要大过额外内存消耗的影响.
ChainMap
将多个字典或映射合并为一个单一的映射
a = {'x': 1, 'z': 3 }
b = {'y': 2, 'z': 4 }

from collections import ChainMap
c = ChainMap(a,b)
print(c['x']) # Outputs 1 (from a)
print(c['y']) # Outputs 2 (from b)
print(c['z']) # Outputs 3 (from a)
如果出现重复键,那么第一次出现的映射值会被返回. 因此,例子程序中的c['z']总是会返回字典 a 中对应的值,而不是 b 中对应的值.
对于字典的更新或删除操作总是影响的是列表中第一个字典
Counter
这个映射类型会给键准备一个整数计数器. 每次更新一个键的时候都会增加这个计数器. 所以这个类型可以用来给可散列表对象计数, 或者是当成多重集来用——多重集合就是集合里的元素可以出现不止一次.Counter实现了+和-运算符用来合并记录, 还有像 most_common([n]) 这类很有用的方法. most_common([n]) 会按照次序返回映射里最常见的 n 个键和它们的计数
统计一个序列中元素出现的个数
words = [
    'look', 'into', 'my', 'eyes', 'look', 'into', 'my', 'eyes',
    'the', 'eyes', 'the', 'eyes', 'the', 'eyes', 'not', 'around', 'the',
    'eyes', "don't", 'look', 'around', 'the', 'eyes', 'look', 'into',
    'my', 'eyes', "you're", 'under'
]
from collections import Counter
word_counts = Counter(words)
# 出现频率最高的3个单词
top_three = word_counts.most_common(3)
print(top_three)
# Outputs [('eyes', 8), ('the', 5), ('look', 4)]
set
去重集合
和数学中的集合类似,可以实现集合的交集,并集等

collections.abc 中,MutableSet和它的超类的UML类图(箭头从子类指
向超类, 抽象类和抽象方法的名称以斜体显示, 其中省略了反向运算符方法)
空set
In[60]: a = set()
In[61]: type(a)
Out[61]: set
In[62]: b = {}
In[63]: type(b)
Out[63]: dict
求needles 的元素在 haystack 里出现的次数, 两个变量都是 set 类型
found = len(needles & haystack)
像{1, 2, 3}这种字面量句法相比于构造方法(set([1, 2, 3])) 要更快且更易读.
后者的速度要慢一些, 因为Python必须先从 set 这个名字来查询构造方法, 然后新建一个列表, 最后再把这个列表传入到构造方法里. 但是如果是像 {1, 2, 3} 这样的字面量,Python会利用一个专门的叫作BUILD_SET的字节码来创建集合.
frozenset
frozenset创建后不可更改, 可以作为dict的key
集合中的元素必须是可散列的,set 类型本身是不可散列的, 但是 frozenset 可以. 因
此可以创建一个包含不同frozenset 的set
dict和set的背后
想要理解 Python 里字典和集合类型的长处和弱点, 它们背后的散列表是绕不开的一环.这一节将会回答以下几个问题.
- Python 里的 dict 和 set 的效率有多高?
- 为什么它们是无序的?
- 为什么并不是所有的 Python 对象都可以当作 dict 的键或 set 里的元素?
- 为什么 dict 的键和 set 元素的顺序是跟据它们被添加的次序而定的, 以及为什么在
- 映射对象的生命周期中, 这个顺序并不是一成不变的?
- 为什么不应该在迭代循环 dict 或是 set 的同时往里添加元素?
字典中的散列表
散列表其实是一个稀疏数组(总是有空白元素的数组称为稀疏数组). 在一般的数据结构教材中, 散列表里的单元通常叫作表元(bucket). 在 dict 的散列表当中, 每个键值对都占用一个表元, 每个表元都有两个部分, 一个是对键的引用, 另一个是对值的引用. 因为所有表元的大小一致, 所以可以通过偏移量来读取某个表元.
因为Python 会设法保证大概还有三分之一的表元是空的, 所以在快要达到这个阈值的时候, 原有的散列表会被复制到一个更大的空间里面.
如果要把一个对象放入散列表, 那么首先要计算这个元素键的散列值. Python 中可以用hash() 方法来做这件事情, 接下来会介绍这一点.
-
散列值和相等性
内置的hash()方法可以用于所有的内置类型对象. 如果是自定义对象调用hash()的话, 实际上运行的是自定义的__hash__. 如果两个对象在比较的时候是相等的,那它们的散列值必须相等, 否则散列表就不能正常运行了. 例如, 如果1 == 1.0为8真, 那么hash(1) == hash(1.0)也必须为真, 但其实这两个数字(整型和浮点)的内部结构是完全不一样的.
从 Python 3.3 开始,str、bytes和datetime对象的散列值计算过程中多了随机的“加盐”这一步. 所加盐值是Python进程内的一个常量, 但是每次启动Python 解释器都会生成一个不同的盐值. 随机盐值的加入是为了防止 DOS 攻击而采取的一种安全措施. -
散列表算法
为了获取my_dict[search_key]背后的值, Python 首先会调用hash(search_key)来计算search_key的散列值, 把这个值最低的几位数字当作偏移量, 在散列表里查找表元(具体取几位, 得看当前散列表的大小). 若找到的表元是空的, 则抛出KeyError异常. 若不是空的, 则表元里会有一对found_key:found_value. 这时候 Python 会检验search_key == found_key是否为真, 如果它们相等的话, 就会返回found_value.如果search_key和found_key不匹配的话, 这种情况称为散列冲突. 发生这种情况是因为, 散列表所做的其实是把随机的元素映射到只有几位的数字上, 而散列表本身的索引又只依赖于这个数字的一部分. 为了解决散列冲突, 算法会在散列值中另外再取几位, 然后用特殊的方法处理一下, 把新得到的数字再当作索引来寻找表元.若这次找到的表元是空的, 则同样抛出KeyError; 若非空, 或者键匹配,则返回这个值; 或者又发现了散列冲突, 则重复以上的步骤.
从字典中取值的算法流程图; 给定一个键, 这个算法要么返回一个值,要么抛出
KeyError异常添加新元素和更新现有键值的操作几乎跟上面一样. 只不过对于前者, 在发现空表元的时候会放入一个新元素; 对于后者, 在找到相对应的表元后, 原表里的值对象会被替换成新值.另外在插入新值时, Python 可能会按照散列表的拥挤程度来决定是否要重新分配内存
为它扩容. 如果增加了散列表的大小, 那散列值所占的位数和用作索引的位数都会随
之增加, 这样做的目的是为了减少发生散列冲突的概率.表面上看, 这个算法似乎很费事, 而实际上就算 dict 里有数百万个元素, 多数的搜
索过程中并不会有冲突发生, 平均下来每次搜索可能会有一到两次冲突. 在正常情况
下, 就算是最不走运的键所遇到的冲突的次数用一只手也能数过来.
dict的实现及其导致的结果
-
键必须是可散列的
一个可散列的对象必须满足以下要求.
(1) 支持hash()函数, 并且通过__hash__()方法所得到的散列值是不变的.
(2) 支持通过__eq__()方法来检测相等性.
(3) 若a == b为真, 则hash(a) == hash(b)也为真.
所有由用户自定义的对象默认都是可散列的, 因为它们的散列值由id()来获取, 而
且它们都是不相等的.如果你实现了一个类的
__eq__方法, 并且希望它是可散列的, 那么它一定要有个恰当的__hash__方法, 保证在a == b为真的情况下hash(a) == hash(b)也必定为真. 否则就会破坏恒定的散列表算法, 导致由这些对象所组成的字典和集合完全失去可靠性, 这个后果是非常可怕的. 另一方面, 如果一个含有自定义的__eq__依赖的类处于可变的状态, 那就不要在这个类中实现__hash__方法, 因为它的实例是不可散列的. -
字典在内存上的开销巨大
由于字典使用了散列表, 而散列表又必须是稀疏的,这导致它在空间上的效率低下.举例而言, 如果你需要存放数量巨大的记录, 那么放在由元组或是具名元组构成的列表中会是比较好的选择; 最好不要根据 JSON 的风格, 用由字典组成的列表来存放这些记录. 用元组取代字典就能节省空间的原因有两个: 其一是避免了散列表所耗费的空间, 其二是无需把记录中字段的名字在每个元素里都存一遍.在用户自定义的类型中,
__slots__属性可以改变实例属性的存储方式, 由dict变 成tuple -
键查询很快
dict的实现是典型的空间换时间: 字典类型有着巨大的内存开销, 但它们提供了无
视数据量大小的快速访问——只要字典能被装在内存里. -
键的次序取决于添加顺序
当往dict里添加新键而又发生散列冲突的时候, 新键可能会被安排存放到另一个位
置. 于是下面这种情况就会发生: 由dict([key1, value1), (key2, value2)]
和dict([key2, value2], [key1, value1])得到的两个字典, 在进行比较的时
候, 它们是相等的; 但是如果在key1和key2被添加到字典里的过程中有冲突发生的话, 这两个键出现在字典里的顺序是不一样的.
示例 展示了这个现象. 这个示例用同样的数据创建了3个字典, 唯一的区别就
是数据出现的顺序不一样. 可以看到, 虽然键的次序是乱的, 这3个字典仍然被视作相等的.DIAL_CODES = [ (86, 'China'), (91, 'India'), (1, 'United States'), (62, 'Indonesia'), (55, 'Brazil'), (92, 'Pakistan'), (880, 'Bangladesh'), (234, 'Nigeria'), (7, 'Russia'), (81, 'Japan'), ] d1 = dict(DIAL_CODES) ➊ print('d1:', d1.keys()) d2 = dict(sorted(DIAL_CODES)) ➋ print('d2:', d2.keys()) d3 = dict(sorted(DIAL_CODES, key=lambda x:x[1])) ➌ print('d3:', d3.keys()) assert d1 == d2 and d2 == d3 ➍➊ 创建 d1 的时候, 数据元组的顺序是按照国家的人口排名来决定的.
➋ 创建 d2 的时候, 数据元组的顺序是按照国家的电话区号来决定的.
➌ 创建 d3 的时候, 数据元组的顺序是按照国家名字的英文拼写来决定的.
➍ 这些字典是相等的, 因为它们所包含的数据是一样的. 示例 3-18 里是上面例子的输出.
示例的输出中, 3 个字典的键的顺序是不一样的d1: dict_keys([880, 1, 86, 55, 7, 234, 91, 92, 62, 81]) d2: dict_keys([880, 1, 91, 86, 81, 55, 234, 7, 92, 62]) d3: dict_keys([880, 81, 1, 86, 55, 7, 234, 91, 92, 62]) -
往字典里添加新键可能会改变已有键的顺序
无论何时往字典里添加新的键, Python 解释器都可能做出为字典扩容的决定. 扩容导
致的结果就是要新建一个更大的散列表, 并把字典里已有的元素添加到新表里. 这个过程中可能会发生新的散列冲突, 导致新散列表中键的次序变化. 要注意的是, 上面提到的这些变化是否会发生以及如何发生, 都依赖于字典背后的具体实现, 因此你不能很自信地说自己知道背后发生了什么.如果你在迭代一个字典的所有键的过程中同时对字典进行修改, 那么这个循环很有可能会跳过一些键——甚至是跳过那些字典中已经有的键.由此可知,
不要对字典同时进行迭代和修改. 如果想扫描并修改一个字典, 最好分成两步来进行: 首先对字典迭代, 以得出需要添加的内容, 把这些内容放在一个新字典里; 迭代结束之后再对原有字典进行更新.
在 Python 3 中,.keys()、.items()和.values()方法返回的都是字典 视图. 也就是说, 这些方法返回的值更像集合, 而不是像 Python 2 那样返回列表.视图还有动态的特性, 它们可以实时反馈字典的变化.
set的实现以及导致的结果
set 和 frozenset 的实现也依赖散列表, 但在它们的散列表里存放的只有元素的引用
(就像在字典里只存放键而没有相应的值) .
在上面提到的字典和散列表的几个特点, 对集合来说几乎都是适用的. 为了避免太多重复的内容, 这些特点总结如下.
- 集合里的元素必须是可散列的.
- 集合很消耗内存.
- 可以很高效地判断元素是否存在于某个集合.
- 元素的次序取决于被添加到集合里的次序.
- 往集合里添加元素, 可能会改变集合里已有元素的次序.
小结
字典算得上是 Python 的基石. 除了基本的 dict 之外, 标准库还提供现成且好用的特殊映射类型, 比如 defaultdict、 OrderedDict、 ChainMap 和 Counter. 这些映射类型都属于 collections 模块, 这个模块还提供了便于扩展的UserDict类.
大多数映射类型都提供了两个很强大的方法: setdefault 和 update, setdefault 方法可以用来更新字典里存放的可变值(比如列表) , 从而避免了重复的键搜索. update方法则让批量更新成为可能, 它可以用来插入新值或者更新已有键值对, 它的参数可以是包含(key, value)这种键值对的可迭代对象, 或者关键字参数. 映射类型的构造方法也会利用update方法来让用户可以使用别的映射对象、 可迭代对象或者关键字参数来创建新对象.
在映射类型的 API 中, 有个很好用的方法是 __missing__, 当对象找不到某个键的时
候, 可以通过这个方法自定义会发生什么.
collections.abc 模块提供了Mapping和MutableMapping这两个抽象基类, 利用它们, 我们可以进行类型查询或者引用. 不太为人所知的 MappingProxyType 可以用来创建不可变映射对象, 它被封装在types模块中. 另外还有Set和MutableSet这两个抽象基类.
dict 和 set 背后的散列表效率很高, 对它的了解越深入, 就越能理解为什么被保存的元
素会呈现出不同的顺序, 以及已有的元素顺序会发生变化的原因. 同时, 速度是以牺牲空
间为代价而换来的.
Python 标准库中的“8.3. collections—Container datatypes”一节
https://docs.python.org/3/library/collections.html 提到了关于一些映射类型的例子和使用技巧. 如果想要创建新的映射类型, 或者是体会一下现有的映射类型的实现方式, Python模块 Lib/collections/__init__.py 的源码是一个很好的参考.
一个经典的参数错误
In[71]: def add(x, y):
   ...:     x += y
   ...:     return x
   ...:
In[72]: a, b = 1, 2
In[73]: add(a, b)
Out[73]: 3
In[74]: a, b
Out[74]: (1, 2)

# a的值被改变了
In[75]: a, b = [1, 2], [3, 4]
In[76]: add(a, b)
Out[76]: [1, 2, 3, 4]
In[77]: a, b
Out[77]: ([1, 2, 3, 4], [3, 4])


In[78]: a, b = (1, 2), (3, 4)
In[79]: add(a, b)
Out[79]: (1, 2, 3, 4)
In[80]: a, b
Out[80]: ((1, 2), (3, 4))
def f(x, l=[]):
    for i in range(x):
        l.append(i**2)
    print(l)

f(2)
f(3, [1, 2, 3])
f(4)

[0, 1]
[1, 2, 3, 0, 1, 4]
[0, 1, 0, 1, 4, 9]
class Company:
    def __init__(self, name, staffs=[]):
        self.name = name
        self.staffs = staffs

    def add(self, staff_name):
        self.staffs.append(staff_name)

    def remove(self, staff_name):
        self.staffs.remove(staff_name)


if __name__ == "__main__":
    com1 = Company("com1", ["bobby1", "bobby2"])
    com1.add("bobby3")
    com1.remove("bobby1")
    print(Company.__init__.__defaults__)    # ([],)
    print(com1.staffs)  # ['bobby2', 'bobby3']

    com2 = Company("com2")
    com2.add("bobby")
    print(Company.__init__.__defaults__)  # (['bobby'],)
    print(com2.staffs)  # ['bobby']


    com3 = Company("com3")
    com3.add("bobby5")
    print(Company.__init__.__defaults__)  # (['bobby', 'bobby5'],)

    print(com2.staffs)  # ['bobby', 'bobby5']
    print(com3.staffs)  # ['bobby', 'bobby5']
    print(com2.staffs is com3.staffs)  # True
list属于可变参数
元类编程
创建类的一种方法
def create_class(name):
    if name == "mi":
        class Mi:
            def __str__(self):
                return "Mi_Str"

        return Mi
    elif name == "apple":
        class Apple:
            def __str__(self):
                return "Apple_Str"

        return Apple


if __name__ == "__main__":
    Phone = create_class("mi")
    my_obj = Phone()
    print(my_obj, type(my_obj))

Mi_Str <class '__main__.create_class.<locals>.Mi'>
用type创建类,type的用法
type(object_or_name, bases, dict)
type(object) -> the object's type
type(name, bases, dict) -> a new type
def say(self):
    print("say")

class BaseClass():
    def answer(self):
        print("answer")


if __name__ == "__main__":
    User = type("User", (BaseClass, ), {"name": "user", "say": say})
    User().say()
    User().answer()
    print(type(User()))

say
answer
<class '__main__.User'>
元类就是创建类的类 对象<-class(对象)<-type
python中类的实例化过程,会首先寻找metaclass,通过metaclass去创建类
# 必须继承type
class MetaClass(type):
    def __new__(cls, *args, **kwargs):
        print('MetaClass.__new__')
        return super().__new__(cls, *args, **kwargs)


class User(metaclass=MetaClass):
    def __init__(self, name):
        print('User.__init__')
        self.name = name

    def __str__(self):
        return "user"


if __name__ == '__main__':
    u = User('xxx')
    print(u)

MetaClass.__new__
User.__init__
user
网络编程
并发: 一段时间内, 多个程序在同一个cpu上运行, 但任意时刻只有一个程序在运行
并行: 任意时刻, 有多个程序在多个cpu上运行
同步: 代码调用IO操作时, 必须等待IO操作完成才返回
异步: 代码调用IO操作时, 不必等IO操作完成就返回
阻塞:
非阻塞:
TCP
TCP需要建立连接,一次只能服务一台客户端
TCP会出现粘包现象

# 服务端
import socket
import threading
import time


def tcplink(sock, addr):
    print('Accept new connection from %s:%s...' % addr)
    sock.send(b'Welcome!')
    while True:
        data = sock.recv(1024)
        time.sleep(1)
        if not data or data.decode('utf-8') == 'exit':
            break
        sock.send(('Hello, %s!' % data.decode('utf-8')).encode('utf-8'))
    sock.close()
    print('Connection from %s:%s closed.' % addr)

s = socket.socket(socket.AF_INET, socket.SOCK_STREAM)
s.bind(('127.0.0.1', 9999))
s.listen(5)

print("服务器启动")

while True:
    sock, addr = s.accept()
    t = threading.Thread(target=tcplink, args=(sock, addr))
    t.start()
# 客户端
import socket

s = socket.socket(socket.AF_INET, socket.SOCK_STREAM)
# 建立连接:
s.connect(('127.0.0.1', 9999))
# 接收欢迎消息:
while True:
    print(s.recv(1024).decode('utf-8'))
    msg = input(">>>")
    if msg == "exit":
        break
    s.send(msg.encode("utf-8"))
s.close()
UDP

UDP不需要建立连接,可以同时服务多台客户端
# 服务端
import socket

s = socket.socket(socket.AF_INET, socket.SOCK_DGRAM)

s.bind(('127.0.0.1', 9999))

print("服务器启动")

while True:
    data, addr = s.recvfrom(1024)
    print('Received from %s:%s.' % addr)
    s.sendto(b'Hello, %s!' % data, addr)
# 客户端
import socket

s = socket.socket(socket.AF_INET, socket.SOCK_DGRAM)
while True:
    # 发送数据:
    data = input(">>>")
    if data == "exit":
        break
    s.sendto(data.encode("utf-8"), ('127.0.0.1', 9999))
    # 接收数据:
    print(s.recv(1024).decode('utf-8'))
s.close()
进程和线程
{% post_link 进程和线程 进程和线程 %}
协程
协程:是单线程下的并发,又称微线程,纤程.英文名Coroutine.一句话说明什么是线程:协程是一种用户态的轻量级线程,即协程是由用户程序自己控制调度的.
需要强调的是:
- python的线程属于内核级别的,即由操作系统控制调度(如单线程遇到io或执行时间过长就会被迫交出cpu执行权限,切换其他线程运行)
- 单线程内开启协程,一旦遇到io,就会从应用程序级别(而非操作系统)控制切换,以此来提升效率(!!!非io操作的切换与效率无关)对比操作系统控制线程的切换,用户在单线程内控制协程的切换
优点如下:
- 协程的切换开销更小,属于程序级别的切换,操作系统完全感知不到,因而更加轻量级
- 单线程内就可以实现并发的效果,最大限度地利用cpu,没有锁的概念
缺点如下:
- 协程的本质是单线程下,无法利用多核,可以是一个程序开启多个进程,每个进程内开启多个线程,每个线程内开启协程
- 协程指的是单个线程,因而一旦协程出现阻塞,将会阻塞整个线程
总结协程特点:
必须在只有一个单线程里实现并发
修改共享数据不需加锁
用户程序里自己保存多个控制流的上下文栈
附加:一个协程遇到IO操作自动切换到其它协程(如何实现检测IO,yield、greenlet都无法实现,就用到了gevent模块(select机制))
Greenlet
from greenlet import greenlet
import asynchat
import asyncio
import asyncore


def eat(name):
    print('%s eat 1' %name)
    g2.switch('egon')
    print('%s eat 2' %name)
    g2.switch()

def play(name):
    print('%s play 1' %name)
    g1.switch()
    print('%s play 2' %name)

g1=greenlet(eat)
g2=greenlet(play)

g1.switch('egon')#可以在第一次switch时传入参数,以后都不需要
单纯的切换(在没有io的情况下或者没有重复开辟内存空间的操作),反而会降低程序的执行速度
greenlet只是提供了一种比generator更加便捷的切换方式,当切到一个任务执行时如果遇到io,那就原地阻塞,仍然是没有解决遇到IO自动切换来提升效率的问题
Gevent
Gevent 是一个第三方库,可以轻松通过gevent实现并发同步或异步编程,在gevent中用到的主要模式是Greenlet, 它是以C扩展模块形式接入Python的轻量级协程. Greenlet全部运行在主程序操作系统进程的内部,但它们被协作式地调度
#用法
g1=gevent.spawn(func,1,,2,3,x=4,y=5)创建一个协程对象g1,spawn括号内第一个参数是函数名,如eat,后面可以有多个参数,可以是位置实参或关键字实参,都是传给函数eat的

g2=gevent.spawn(func2)

g1.join() #等待g1结束

g2.join() #等待g2结束

#或者上述两步合作一步:gevent.joinall([g1,g2])

g1.value#拿到func1的返回值
遇到IO阻塞时会自动切换任务
import gevent
def eat(name):
    print('%s eat 1' %name)
    gevent.sleep(2)
    print('%s eat 2' %name)

def play(name):
    print('%s play 1' %name)
    gevent.sleep(1)
    print('%s play 2' %name)


g1=gevent.spawn(eat,'egon')
g2=gevent.spawn(play,name='egon')
g1.join()
g2.join()
#或者gevent.joinall([g1,g2])
print('主')
上例gevent.sleep(2)模拟的是gevent可以识别的io阻塞,而time.sleep(2)或其他的阻塞,gevent是不能直接识别的需要用下面一行代码,打补丁,就可以识别了from gevent import monkey;monkey.patch_all()必须放到被打补丁者的前面,如time,socket模块之前或者我们干脆记忆成:要用gevent,需要将from gevent import monkey;monkey.patch_all()放到文件的开头
from gevent import monkey;monkey.patch_all()

import gevent
import time
def eat():
    print('eat food 1')
    time.sleep(2)
    print('eat food 2')

def play():
    print('play 1')
    time.sleep(1)
    print('play 2')

g1=gevent.spawn(eat)
g2=gevent.spawn(play)
gevent.joinall([g1,g2])
print('主')


eat food 1
play 1
play 2
eat food 2
主
以下的内容算是进阶的吧
把函数视为对象
一等函数
在 Python 中, 函数是一等对象. 编程语言理论家把"一等对象"定义为满足下述条件的程序实体:
*. 在运行时创建
*. 能赋值给变量或数据结构中的元素
*. 能作为参数传给函数
*. 能作为函数的返回结果
在 Python 中, 整数,字符串和字典都是一等对象----没什么特别的.
In[2]: def func(x):
  ...:     '''
  ...:     阶乘
  ...:     :param x:
  ...:     :return:x!
  ...:     '''
  ...:     return 1 if x < 2 else x * func(x - 1)
  ...:
In[3]: func(2)
Out[3]: 2
In[4]: func(5)
Out[4]: 120
In[5]: type(func)
Out[5]: function
In[6]: print(type(func))
<class 'function'>
In[7]: print(func.__doc__)

    阶乘
    :param x:
    :return:x!
函数func是function类的一个实例
高阶函数
接受函数为参数,或者把函数作为结果返回的函数是高阶函数(higher-order function)
如: map, sorted, filter, reduce等
在 Python 3 中, map 和 filter 还是内置函数, 但是由于引入了列表推导和生成器表达式, 它们变得没那么重要了. 列表推导或生成器表达式具有 map 和 filter 两个函数的功能, 而且更易于阅读
reduce位于functools模块, 这个函数最常用于求和, 但是内置的有sum函数, 所以reduce有啥作用
可调用对象
除了用户定义的函数, 调用运算符(即 ())还可以应用到其他对象上. 如果想判断对象能否调用, 可以使用内置的 callable() 函数, Python 数据模型文档列出了 7 种可调用对象.
- 用户定义的函数
使用def语句或lambda表达式创建 - 内置函数
使用C 语言(CPython)实现的函数, 如len或time.strftime. - 内置方法
使用C语言实现的方法,如dict.get - 方法
在类的定义体中定义的函数 - 类
调用类时会运行类的__new__方法创建一个实例,然后运行__init__方法,初始化实例,最后把实例返回给调用方。因为 Python 没有 new 运算符,所以调用类相当于调用函数。(通常,调用类会创建那个类的实例,不过覆盖__new__方法的话,也可能出现其他行为。) - 类的实例
如果类定义了__call__方法,那么它的实例可以作为函数调用。 - 生成器函数
使用yield关键字的函数或方法。调用生成器函数返回的是生成器对象。生成器函数在很多方面与其他可调用对象不同。生成器函数还可以作
为协程
函数内省
列出常规对象没有而函数有的属性
>>> class C: pass
>>> obj = C()
>>> def func(): pass
>>> sorted(set(dir(func)) - set(dir(obj)))
['__annotations__', '__call__', '__closure__', '__code__', '__defaults__',
'__get__', '__globals__', '__kwdefaults__', '__name__', '__qualname__']
>>>
| 名称 | 类型 | 说明 |
|---|---|---|
__annotations__ |
dict |
参数和返回值的注解 |
__call__ |
method-wrapper |
实现 () 运算符;即可调用对象协议 |
__closure__ |
tuple |
函数闭包,即自由变量的绑定(通常是 None) |
__code__ |
code |
编译成字节码的函数元数据和函数定义体 |
__defaults__ |
tuple |
形式参数的默认值 |
__get__ |
method-wrapper |
实现只读描述符协议 |
__globals__ |
dict |
函数所在模块中的全局变量 |
__kwdefaults__ |
dict |
仅限关键字形式参数的默认值 |
__name__ |
str |
函数名称 |
__qualname__ |
str |
函数的限定名称,如 Random.choice (参阅PEP3155,https://www.python.org/dev/peps/pep-3155/) |
__defaults__、__code__ 和 __annotations__ 属性,IDE 和框架使用它们提取关于函数签名的信息
参数传递
一个*参数只能出现在函数定义中最后一个位置参数后面,而 **参数只能出现在最后一个参数。 有一点要注意的是,在*参数后面仍然可以定义其他参数。
def a(x, *args, y):
    pass

def b(x, *args, y, **kwargs):
    pass
tag 函数用于生成 HTML 标签
def tag(name, *content, cls=None, **attrs):
    """生成一个或多个HTML标签"""
    if cls is not None:
        attrs['class'] = cls
    if attrs:
        attr_str = ''.join(' %s="%s"' % (attr, value)
                           for attr, value
                           in sorted(attrs.items()))
    else:
        attr_str = ''
    if content:
        return '\n'.join('<%s%s>%s</%s>' %
                         (name, attr_str, c, name) for c in content)
    else:
        return '<%s%s />' % (name, attr_str)
>>> tag('br')  ➊
'<br />'
>>> tag('p', 'hello')  ➋
'<p>hello</p>'
>>> print(tag('p', 'hello', 'world'))
<p>hello</p>
<p>world</p>
>>> tag('p', 'hello', id=33)  ➌
'<p id="33">hello</p>'
>>> print(tag('p', 'hello', 'world', cls='sidebar'))  ➍
<p class="sidebar">hello</p>
<p class="sidebar">world</p>
>>> tag(content='testing', name="img")  ➎
'<img content="testing" />'
>>> my_tag = {'name': 'img', 'title': 'Sunset Boulevard',
...           'src': 'sunset.jpg', 'cls': 'framed'}
>>> tag(**my_tag)  ➏
'<img class="framed" src="sunset.jpg" title="Sunset Boulevard" />'
❶ 传入单个定位参数,生成一个指定名称的空标签。
❷ 第一个参数后面的任意个参数会被 *content 捕获,存入一个元组。
❸ tag 函数签名中没有明确指定名称的关键字参数会被 **attrs 捕获,存入一个字典。
❹ cls 参数只能作为关键字参数传入。
❺ 调用 tag 函数时,即便第一个定位参数也能作为关键字参数传入。
❻ 在 my_tag 前面加上 **,字典中的所有元素作为单个参数传入,同名键会绑定到对应
的具名参数上,余下的则被 **attrs 捕获。
获取参数信息
函数对象有个 __defaults__ 属性,它的值是一个元组,里面保存着定位参数和关键字参数的默认值。仅限关键字参数的默认值在__kwdefaults__ 属性中。然而,参数的名称在 __code__ 属性中, 它的值是一个 code 对象引用,自身也有很多属性。
In[19]: def clip(text, max_len=80):
   ...:     """在max_len前面或后面的第一个空格处截断文本
   ...:     """
   ...:     end = None
   ...:     if len(text) > max_len:
   ...:         space_before = text.rfind(' ', 0, max_len)
   ...:         if space_before >= 0:
   ...:             end = space_before
   ...:         else:
   ...:             space_after = text.rfind(' ', max_len)
   ...:         if space_after >= 0:
   ...:             end = space_after
   ...:     if end is None:  # 没找到空格
   ...:         end = len(text)
   ...:     return text[:end].rstrip()
   ...:
In[20]: clip.__defaults__
Out[20]: (80,)
In[21]: clip.__code__
Out[21]: <code object clip at 0x000002432532A390, file "<ipython-input-19-df4d465d87d3>", line 1>
In[22]: clip.__code__.co_varnames
Out[22]: ('text', 'max_len', 'end', 'space_before', 'space_after')
In[23]: clip.__code__.co_argcount
Out[23]: 2
可以看出,这种组织信息的方式并不是最便利的。参数名称在__code__.co_varnames中,不过里面还有函数定义体中创建的局部变量。因此,参数名称是前N个字符串,N的值由 __code__.co_argcount确定。顺便说一下,这里不包含前缀为*或 ** 的变长参数。参数的默认值只能通过它们在 __defaults__元组中的位置确定,因此要从后向前扫描才能把参数和默认值对应起来。在这个示例中clip函数有两个参数,text 和max_len,其中一个有默认值,即 80,因此它必然属于最后一个参数,即 max_len。这有违常理。
使用 inspect 模块
from inspect import signature
sig = signature(clip)
sig
Out[28]: <Signature (text, max_len=80)>
for name, param in sig.parameters.items():
    print(param.kind, ":", name, "=", param.default)

POSITIONAL_OR_KEYWORD : text = <class 'inspect._empty'>
POSITIONAL_OR_KEYWORD : max_len = 80
inspect.signature 函数返回一个 inspect.Signature 对象,它有一个 parameters 属性,这是一个有序映射,把参数名和 inspect.Parameter 对象对应起来。各个 Parameter 属性也有自己的属性,例如 name、default 和 kind。特殊的inspect._empty 值表示没有默认值,考虑到 None 是有效的默认值(也经常这么做),而且这么做是合理的。
kind 属性的值是 _ParameterKind 类中的 5 个值之一,列举如下。
POSITIONAL_OR_KEYWORD
可以通过定位参数和关键字参数传入的形参(多数 Python 函数的参数属于此类)。VAR_POSITIONAL
定位参数元组。VAR_KEYWORD
关键字参数字典。KEYWORD_ONLY
仅限关键字参数(Python 3 新增)。POSITIONAL_ONLY
仅限定位参数;目前,Python 声明函数的句法不支持,但是有些使用C 语言实现且不接受关键字参数的函数(如divmod)支持。
除了 name、default 和 kind,inspect.Parameter 对象还有一个 annotation(注解)属性,它的值通常是 inspect._empty,但是可能包含 Python 3 新的注解句法提供的函数签名元数据.
inspect.Signature 对象有个 bind 方法,它可以把任意个参数绑定到签名中的形参上,所用的规则与实参到形参的匹配方式一样。框架可以使用这个方法在真正调用函数前验证参数
函数注解
为函数声明中的参数和返回值附加元数据
def clip(text:str, max_len:'int > 0'=80) -> str:
    """在max_len前面或后面的第一个空格处截断文本
    """
    end = None
    if len(text) > max_len:
        space_before = text.rfind(' ', 0, max_len)
        if space_before >= 0:
            end = space_before
        else:
            space_after = text.rfind(' ', max_len)
            if space_after >= 0:
                end = space_after
    if end is None:  # 没找到空格
        end = len(text)
    return text[:end].rstrip()
函数声明中的各个参数可以在 : 之后增加注解表达式。如果参数有默认值,注解放在参数名和=号之间。如果想注解返回值,在)和函数声明末尾的 : 之间添加 -> 和一个表达式。那个表达式可以是任何类型。注解中最常用的类型是类(如 str 或 int)和字符串
(如 'int > 0')。max_len 参数的注解用的是字符串。
注解不会做任何处理,只是存储在函数的 __annotations__ 属性(一个字典)中
>>> clip.__annotations__
{'text': <class 'str'>, 'max_len': 'int > 0', 'return': <class 'str'>}
Python 对注解所做的唯一的事情是,把它们存储在函数的 __annotations__ 属性里。仅此而已,Python 不做检查、不做强制、不做验证,什么操作都不做。换句话说,注解对Python 解释器没有任何意义。注解只是元数据,可以供 IDE、框架和装饰器等工具使用。
函数式编程的包
operator模块
operator 模块中有一类函数,能替代从序列中取出元素或读取对象属性的lambda表达式:因此,itemgetter 和 attrgetter 其实会自行构建函数。
In[39]: a = ['a', 'c', 'r', 'd']
In[40]: itemgetter(a)
Out[40]: operator.itemgetter(['a', 'c', 'r', 'd'])
In[41]: itemgetter(a[1])
Out[41]: operator.itemgetter('c')
itemgetter 使用 [] 运算符,因此它不仅支持序列,还支持映射和任何实现__getitem__ 方法的类。
attrgetter 与 itemgetter 作用类似,它创建的函数根据名称提取对象的属性。如果把多个属性名传给 attrgetter,它也会返回提取的值构成的元组。此外,如果参数名中包含 .(点号),attrgetter 会深入嵌套对象,获取指定的属性
methodcaller的作用与attrgetter 和 itemgetter 类似,它会自行创建函数。methodcaller 创建的函数会在对象上调用参数指定的方法
>>> from operator import methodcaller
>>> s = 'The time has come'
>>> upcase = methodcaller('upper')
>>> upcase(s)
'THE TIME HAS COME'
>>> hiphenate = methodcaller('replace', ' ', '-')
>>> hiphenate(s)
'The-time-has-come'
class attrgetter:
    """
    Return a callable object that fetches the given attribute(s) from its operand.
    After f = attrgetter('name'), the call f(r) returns r.name.
    After g = attrgetter('name', 'date'), the call g(r) returns (r.name, r.date).
    After h = attrgetter('name.first', 'name.last'), the call h(r) returns
    (r.name.first, r.name.last).
    """
    __slots__ = ('_attrs', '_call')

    def __init__(self, attr, *attrs):
        if not attrs:
            if not isinstance(attr, str):
                raise TypeError('attribute name must be a string')
            self._attrs = (attr,)
            names = attr.split('.')
            def func(obj):
                for name in names:
                    obj = getattr(obj, name)
                return obj
            self._call = func
        else:
            self._attrs = (attr,) + attrs
            getters = tuple(map(attrgetter, self._attrs))
            def func(obj):
                return tuple(getter(obj) for getter in getters)
            self._call = func

    def __call__(self, obj):
        return self._call(obj)

    def __repr__(self):
        return '%s.%s(%s)' % (self.__class__.__module__,
                            self.__class__.__qualname__,
                            ', '.join(map(repr, self._attrs)))

    def __reduce__(self):
        return self.__class__, self._attrs

class itemgetter:
    """
    Return a callable object that fetches the given item(s) from its operand.
    After f = itemgetter(2), the call f(r) returns r[2].
    After g = itemgetter(2, 5, 3), the call g(r) returns (r[2], r[5], r[3])
    """
    __slots__ = ('_items', '_call')

    def __init__(self, item, *items):
        if not items:
            self._items = (item,)
            def func(obj):
                return obj[item]
            self._call = func
        else:
            self._items = items = (item,) + items
            def func(obj):
                return tuple(obj[i] for i in items)
            self._call = func

    def __call__(self, obj):
        return self._call(obj)

    def __repr__(self):
        return '%s.%s(%s)' % (self.__class__.__module__,
                            self.__class__.__name__,
                            ', '.join(map(repr, self._items)))

    def __reduce__(self):
        return self.__class__, self._items

class methodcaller:
    """
    Return a callable object that calls the given method on its operand.
    After f = methodcaller('name'), the call f(r) returns r.name().
    After g = methodcaller('name', 'date', foo=1), the call g(r) returns
    r.name('date', foo=1).
    """
    __slots__ = ('_name', '_args', '_kwargs')

    def __init__(*args, **kwargs):
        if len(args) < 2:
            msg = "methodcaller needs at least one argument, the method name"
            raise TypeError(msg)
        self = args[0]
        self._name = args[1]
        if not isinstance(self._name, str):
            raise TypeError('method name must be a string')
        self._args = args[2:]
        self._kwargs = kwargs

    def __call__(self, obj):
        return getattr(obj, self._name)(*self._args, **self._kwargs)

    def __repr__(self):
        args = [repr(self._name)]
        args.extend(map(repr, self._args))
        args.extend('%s=%r' % (k, v) for k, v in self._kwargs.items())
        return '%s.%s(%s)' % (self.__class__.__module__,
                            self.__class__.__name__,
                            ', '.join(args))

    def __reduce__(self):
        if not self._kwargs:
            return self.__class__, (self._name,) + self._args
        else:
            from functools import partial
            return partial(self.__class__, self._name, **self._kwargs), self._args
functools.partial偏函数
functools.partial 这个高阶函数用于部分应用一个函数。部分应用是指,基于一个函数创建一个新的可调用对象,把原函数的某些参数固定。使用这个函数可以把接受一个或多个参数的函数改编成需要回调的 API,这样参数更少。
使用 partial 把一个两参数函数改编成需要单参数的可调用对象
>>> from operator import mul
>>> from functools import partial
>>> triple = partial(mul, 3)  ➊
>>> triple(7)  ➋
21
>>> list(map(triple, range(1, 10)))  ➌
[3, 6, 9, 12, 15, 18, 21, 24, 27]
➊ 使用mul创建 triple 函数,把第一个定位参数定为 3。
➋ 测试 triple 函数。
➌ 在 map 中使用 triple;在这个示例中不能使用 mul

 浙公网安备 33010602011771号