Avalonia 中自定义 ViewLocator 实现导航切换
005 Avalonia 中自定义 ViewLocator 实现导航切换
1. 前言
在 .NET 中实现页面的切换不像 Web 前端那样的方便,如何优雅的实现导航切换又是一件很是头疼的事情,我在我自己的WPF里面,光是切换页面这件事就有各种各样的写法。
本文将收集一些 Avalonia 中可行的页面切换方案,特别是实现侧栏导航效果。
我知道侧栏导航使用 TabControl 这种方式算是不错的选择,但是如果涉及普通跳转导航切换,TabControl 无法承载自定义的其他视图,所以使用 TabControl 是一件不太可行的事情。
2. 准备
我们打算做以下的几页呈现,主要的内容包括:首页、收藏页、用户信息页、设置页和内容页,主要的原型是一个音乐播放器。

3. 如何进行简单的导航?
导航的基础我们参考自这里 https://docs.avaloniaui.net/zh-Hans/docs/tutorials/todo-list-app/navigate-views 。
但是也仅是参考,实际上我们可能需要做一个 ViewLocator 视图定位器来进行页面的导航。
视图定位器不是什么很新的概念,我记得在很多 MVVM 框架里面就有类似的东西,虽然我从来没有怎么研究过,我会觉得被 ViewLocator 限制过于束手束脚了,不是很灵活,还是直接在 DataContext 里面 new 出 ViewModel 会亲和一些,但是 ViewLocator 确实是一种比较科学的管理方式。
ViewLocator 本质上干的是将 ViewModel 去匹配对应的 View 这件事,很多时候,大家会通过建立字典或者直接反射来实现,这两种都是不错的方式。在 Avalonia 的示例里面用到的机制是 ContentControl 的 DataTemplate 填入内容可以显示视图的特别机制,这在 WPF 里面也足够常见,但是似乎确实没有什么文章看到。
4. 我的 ViewLocator
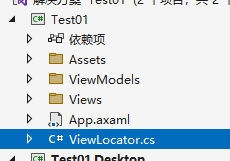
我在项目中直接加入了一个 ViewLocator.cs 文件。

此外加入了若干的 View 和 ViewModel,这些都是最简单的 View 和 ViewModel,我们来看一对示例就知道了。
ViewModels/HomeViewModel.cs
namespace Test01.ViewModels
{
    public class HomeViewModel:ViewModelBase
    {
    }
}
Views/HomeView.axaml,我将其背景设置成了红色,注意看 Background = "Red"。
<UserControl x:Class="Test01.Views.HomeView"
             xmlns="https://github.com/avaloniaui"
             xmlns:x="http://schemas.microsoft.com/winfx/2006/xaml"
             xmlns:d="http://schemas.microsoft.com/expression/blend/2008"
             xmlns:mc="http://schemas.openxmlformats.org/markup-compatibility/2006"
             d:DesignHeight="450"
             d:DesignWidth="800"
             Background="Red"
             mc:Ignorable="d">
    Welcome to Avalonia!
</UserControl>
总之我们有这些:你可以按你自己的喜欢来创建。

下面就是 ViewLocator 的具体内容,代码如下:
using Avalonia.Controls;
using Avalonia.Controls.Templates;
using System;
using Test01.ViewModels;
using Test01.Views;

namespace Test01
{
    ///<summary>视图定位器。</summary>
    public class ViewLocator : IDataTemplate
    {
        public Control? Build(object? param)
        {
            if (param is MainViewModel) return new MainView();
            if (param is CollectionViewModel) return new CollectionView();
            if (param is HomeViewModel) return new HomeView();
            if (param is OptionSettingConfigViewModel) return new OptionSettingConfigView();
            if (param is UserInfoViewModel) return new UserInfoView();
            if (param is VideoContentViewModel) return new VideoContentView();
            throw new NotImplementedException();
        }

        public bool Match(object? data)
        {
            return data is ViewModelBase;
        }
    }
}
我们来对比一下 Avalonia 文档的内容:
using Avalonia.Controls;
using Avalonia.Controls.Templates;
using System;
using ToDoList.ViewModels;

namespace ToDoList
{
    public class ViewLocator : IDataTemplate
    {
        public Control Build(object data)
        {
            var name = data.GetType().FullName!.Replace("ViewModel", "View");
            var type = Type.GetType(name);

            if (type != null)
            {
                return (Control)Activator.CreateInstance(type)!;
            }
            else
            {
                return new TextBlock { Text = "Not Found: " + name };
            }
        }

        public bool Match(object data)
        {
            return data is ViewModelBase;
        }
    }
}
本质上就是一个指定 ViewModel 转为对应的 View 的转换器,为特定的 ViewModel 实例出自己对应的 View,剩下无论是写死,还是结合特性,还是用类名整理来反射的方式进行组织,都是可以的方案,实际实现也无非是这些而已。
随后将其放在 App.xaml 中
<Application x:Class="Test01.App"
             xmlns="https://github.com/avaloniaui"
             xmlns:x="http://schemas.microsoft.com/winfx/2006/xaml"
             xmlns:local="using:Test01"
             RequestedThemeVariant="Default">
    <!--  "Default" ThemeVariant follows system theme variant. "Dark" or "Light" are other available options.  -->

    <Application.DataTemplates>
        <local:ViewLocator />
    </Application.DataTemplates>

    <Application.Styles>
        <FluentTheme />
    </Application.Styles>
</Application>
5. Shell 化
我们将 MainViewModel 作为全局的上下文,对应的 MainView 是整个应用程序最为顶层的界面。
using CommunityToolkit.Mvvm.ComponentModel;
using CommunityToolkit.Mvvm.Input;

namespace Test01.ViewModels;

public partial class MainViewModel : ViewModelBase
{
    #region props

    [ObservableProperty]
    private ViewModelBase _currentViewModel;

    [ObservableProperty]
    private HomeViewModel _homeViewModel = new HomeViewModel();

    [ObservableProperty]
    private CollectionViewModel _collectionViewModel = new CollectionViewModel();

    [ObservableProperty]
    private UserInfoViewModel _userInfoViewModel = new UserInfoViewModel();

    [ObservableProperty]
    private OptionSettingConfigViewModel _optionSettingConfigViewModel = new OptionSettingConfigViewModel();

    [ObservableProperty]
    private VideoContentViewModel _videoContentViewModel = new VideoContentViewModel();

    #endregion

    #region ctors

    public MainViewModel()
    {
        CurrentViewModel = HomeViewModel;
    }

    #endregion

    #region methods

    [RelayCommand]
    public void GotoHome()
    {
        CurrentViewModel = HomeViewModel;
    }

    [RelayCommand]
    public void GotoCollection()
    {
        CurrentViewModel = CollectionViewModel;
    }

    [RelayCommand]
    public void GotoUserInfo()
    {
        CurrentViewModel = UserInfoViewModel;
    }

    #endregion

}
MainView.xaml 的定义如下:
<UserControl x:Class="Test01.Views.MainView"
             xmlns="https://github.com/avaloniaui"
             xmlns:x="http://schemas.microsoft.com/winfx/2006/xaml"
             xmlns:app="using:Test01"
             xmlns:d="http://schemas.microsoft.com/expression/blend/2008"
             xmlns:mc="http://schemas.openxmlformats.org/markup-compatibility/2006"
             xmlns:vm="clr-namespace:Test01.ViewModels"
             d:DesignHeight="450"
             d:DesignWidth="800"
             x:DataType="vm:MainViewModel"
             mc:Ignorable="d">

    <UserControl.DataContext>
        <vm:MainViewModel />
    </UserControl.DataContext>

    <Grid ColumnDefinitions="1*,1*">
        <StackPanel>
            <Button Width="80"
                    Height="30"
                    Command="{Binding GotoHomeCommand}" />
            <Button Width="80"
                    Height="30"
                    Command="{Binding GotoCollectionCommand}" />
            <Button Width="80"
                    Height="30"
                    Command="{Binding GotoUserInfoCommand}" />
        </StackPanel>
        <ContentControl Grid.Column="1" Content="{Binding CurrentViewModel}" />
    </Grid>


</UserControl>
MainWindow.xaml 的定义如下,就是默认的样子,其他都没有什么改动:
<Window x:Class="Test01.Views.MainWindow"
        xmlns="https://github.com/avaloniaui"
        xmlns:x="http://schemas.microsoft.com/winfx/2006/xaml"
        xmlns:d="http://schemas.microsoft.com/expression/blend/2008"
        xmlns:mc="http://schemas.openxmlformats.org/markup-compatibility/2006"
        xmlns:views="clr-namespace:Test01.Views"
        xmlns:vm="using:Test01.ViewModels"
        Title="Test01"
        Width="300"
        Height="200"
        Icon="/Assets/avalonia-logo.ico"
        mc:Ignorable="d">

    <views:MainView />


</Window>
6. 简单搭起的样子


 浙公网安备 33010602011771号