直接在x86硬件上显示图片(无os)
1 任务
为了学习计算机底层和os,我给自己布置了一个任务:在x86硬件上,使用c和nasm来显示一张bmp图片。完成这个任务,前后估计花了2个月的业余时间。
这个任务涉及了很多知识点,包括:启动区、保护模式、nasm汇编、c和nasm汇编互调、ld链接、硬盘io读取、显卡调色板模式、bmp图片格式、bios中断指令、c指针操作内存、borch虚拟机、binutils工具集、makefile等。
2 环境
ubuntu
borchs
nasm和 c
PS:c代码遵循google的C++ 风格指南,使用gnu99标准。
3步骤
3.1 生成一个10M的硬盘镜像
bximage是borchs软件包的一个小工具,可以用于生成硬盘或软盘镜像。打开终端,输入:bximage。按照如下图所示的,一步一步地操作。

最终会在当前目录下,生成一个名为10M.img的文件。
3.2 准备一张320*200的bmp图片
为简单起见,屏幕的分辨率使用320*200。因此我们的bmp图片的大小320*200。我准备了一张图片,如下,这是我家主子的靓照。

将文件命名为cat-666.bmp,然后写入到#201扇区
dd if=src/cat-666.bmp of=10M.img bs=512 seek=201 conv=notrunc
3.3 引导区
引导区位于启动盘的#0扇区,为计算机启动后首次执行的代码。为简单起见,我们的引导区仅完成以下功能:
- 设置vga模式设置显示模式为320*200。
- 配置了配置了5个gdt表项,用作程序运行的内存空间。
- 跳入32位保护模式。
- 读取内核至内存0x100000
- 跳至内核入口。
具体代码如下:boot.asm
  1 ;设置堆栈段和栈指针
  2     mov    eax, cs
  3     mov     ss, eax
  4     mov     sp, 0x7c00
  5
  6
  7 set_vga:
  8     mov    ax, 0x0013              ;;0x0013为 320*200*8bit
  9     int    0x10                ;int 0x10
 10
 11 set_gdt:
 12     ;GDT 开始于 0x7e00
 13     mov     ax, 0x7e00
 14     mov     bx, ax;
 15
 16     ; null_descriptor,这是处理器的要求
 17     mov     dword [bx + 0x00], 0x00000000
 18     mov     dword [bx + 0x04], 0x00000000
 19
 20     ; code 启动区
 21     mov     dword [bx + 0x08], 0x7c0001ff    ;base:0x7c00,limit: 1ff,512B
 22     mov     dword [bx + 0x0c], 0x00409A00    ;粒度为1B,
 23
 24     ; code kernel
 25     mov     dword [bx + 0x10], 0x000000ff    ; base: 0x10_0000, limit:0xff,1MB
 26     mov     dword [bx + 0x14], 0x00c09a10    ; 粒度为4KB,
 27
 28     ; data
 29     mov     dword [bx + 0x18], 0x0000ffff    ;base: 0, limit:0xf_ffff, 4GB
 30     mov     dword [bx + 0x1c], 0x00cf9200    ;粒度为4KB,
 31
 32     ; stack
 33     mov     dword [bx + 0x20], 0x7a00fffe    ; base: 0x7a00, limit:0xfffe
 34     mov     dword [bx + 0x24], 0x00cf9600    ; 粒度为4KB,
 35
 36     ;初始化描述符表寄存器 GDTR
 37     mov     word [cs: gdt_desc + 0x7c00], 39    ;描述符表的界限
 38     lgdt     [cs: gdt_desc + 0x7c00]
 39
 40     in    al, 0x92            ;南桥芯片内的端口
 41     or     al, 0000_0010B
 42     out    0x92, al                        ;打开A20
 43
 44     cli                    ;中断机制尚未工作
 45
 46     mov    eax, cr0
 47     or     eax, 1
 48     mov     cr0, eax                        ;设置PE位
 49
 50     ;以下进入保护模式 ...
 51     jmp     dword 0x0008: mode32_start    ;16位的描述符选择子:32位偏移
 52
 53
 54
 55     [bits 32]
 56 mode32_start:
 57     mov     eax, 0x0018            ;加载数据段选择子
 58     mov     es, eax;
 59     mov     ds, eax;
 60
 61
 62 ; 读取内核,并且跳入。读取200个扇区至 0x10_0000
 63 read_kernel:
 64     mov    dx, 0x1f2;
 65     mov     al, 200                ; 200个扇区
 66     out     dx, al                ;
 67
 68     mov     dx, 0x1f3            ;
 69     mov    al ,0x01            ; 1号扇区(第2个扇区), zero-based
 70     out     dx, al;
 71
 72     mov    dx, 0x1f4            ;
 73     mov    al, 0x00            ;
 74     out    dx, al                ;
 75
 76     mov     dx, 0x1f5            ;
 77     mov     al, 0x00;
 78     out     dx, al;
 79
 80     mov     dx, 0x1f6            ;
 81     mov    al, 0xe0            ;
 82     out    dx, al                ;
 83
 84     ; ask for read
 85     mov    dx, 0x1f7            ;
 86     mov    al, 0x20            ;
 87     out    dx, al                ;
 88
 89     ; wait for finish
 90     mov    dx, 0x1f7            ;
 91 _rk_wait:
 92     in     al,dx                ;
 93     and     al, 0x88            ;
 94     cmp     al, 0x08            ;
 95     jnz     _rk_wait            ;
 96
 97     ;read data to bx
 98     mov     ebx, 0x10_0000            ;
 99     mov     cx, 256 *  200            ;  n * 256;
100     mov     dx, 0x1f0            ;
101
102 _rk_read_loop:
103     in     ax, dx;
104     mov     word[ebx], ax;            ; 每次读2个字节
105     add     ebx, 2;
106     loop     _rk_read_loop            ;
107
108     ; jump to kernel, 段选择子
109     jmp     dword 0x0010:0
110
111
112     hlt;
113
114
115 ;-------------------------------------------------------------------------------
116 gdt_desc:    dw 0
117         dd 0x00007e00              ; GDT的物理地址,刚好在启动区之后
118 ;-------------------------------------------------------------------------------
119 times     510-($-$$) db 0
120 db    0x55, 0xaa
编译
nasm boot.asm -f bin -o boot.bin
写入到硬盘镜像(写入到#0扇区)
dd if=boot.bin of=10M.img bs=512 count=1 conv=notrunc
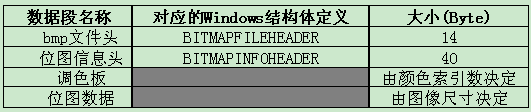
3.4 bmp文件的结构
BMP文件格式,又称为Bitmap(位图)或是DIB(Device-Independent Device,设备无关位图),是Windows系统中广泛使用的图像文件格式。其结构如下图所示:
参考:https://www.cnblogs.com/kingmoon/archive/2011/04/18/2020097.html
参考bmp的结构定义,编写如下头文件:bmp.h
  1 #ifndef _OS_BMP_H_
  2 #define _OS_BMP_H_
  3
  4 #include <stdint.h>
  5
  6 typedef struct {
  7   /**
  8    * 文件类型,
  9    */
 10   char type[2];
 11
 12   /**
 13    * 位图大小
 14    */
 15   uint32_t size;
 16
 17   /**
 18    * 保留位
 19    */
 20   uint16_t reserved1;
 21
 22   /**
 23   * 保留位
 24   */
 25   uint16_t reserved2;
 26
 27   /**
 28    * 图像数据偏移量
 29    */
 30   uint32_t off_bits;
 31
 32 } __attribute__ ((packed)) BitMapFileHeader;
 33
 34 /**
 35  * 信息头
 36  */
 37 typedef struct {
 38   /**
 39    * BitMapFileHeader 字节数
 40    */
 41   uint32_t size;
 42
 43   /**
 44    * 位图宽度
 45    */
 46   uint32_t width;
 47
 48   /**
 49    * 位图高度,正位正向,反之为倒图
 50    */
 51   uint32_t height;
 52
 53   /**
 54    * 为目标设备说明位面数,其值将总是被设为1
 55    */
 56   uint16_t planes;
 57
 58   /**
 59    * 说明比特数/象素,为1、4、8、16、24、或32。
 60    */
 61   uint16_t bit_count;
 62
 63   /**
 64    * 图象数据压缩的类型没有压缩的类型:BI_RGB
 65    */
 66   uint32_t compression;
 67
 68   /**
 69    * 图像数据区大小,以字节为单位
 70    */
 71   uint32_t image_size;
 72
 73   /**
 74    * 水平分辨率
 75    */
 76   uint32_t x_pixel_per_meter;
 77
 78   /**
 79    * 垂直分辨率
 80    */
 81   uint32_t y_pixel_per_meter;
 82
 83   /**
 84    * 位图实际使用的彩色表中的颜色索引数
 85    */
 86   uint32_t color_used;
 87
 88   /**
 89    * 对图象显示有重要影响的索引数,0都重要。
 90    */
 91   uint32_t color_important;
 92 } __attribute__ ((packed)) BitMapInfoHeader;
 93
 94 /*
 95  * 颜色结构体
 96  */
 97 typedef struct {
 98   /**
 99    *
100    */
101   uint8_t blue;
102
103   /**
104    *
105    */
106   uint8_t green;
107
108   /**
109    *
110    */
111   uint8_t red;
112
113   /**
114    * 保留值
115    */
116   uint8_t reserved;
117
118 } __attribute__ ((packed)) RGB;
119
120 #endif //_OS_BMP_H_
代码说明:
- 定义了3个结构体BitMapFileHeader(文件头)、 BitMapInfoHeader(位图信息头)、RGB(颜色)
- 需要特别注意的是,在类型定义中加入了__attribute__ ((packed))修饰。它的作用就是告诉编译器取消结构体在编译过程中的优化对齐,按照实际占用字节数进行对齐,是GCC特有的语法。不加入这个的话,会导致程序在读取bmp数据时发生错位。
3.5 io操作
在这个任务中需要直接操作硬件,比如读取硬盘扇区、端口读写、打开中断、读取eflags标志等,这部分功能的代码将使用nasm来编写,然后导出相应的方法让c来调用。
nasm代码如下:x86.asm
;数据区
[section .data] ;

;代码区
[section .text] ;

global read_sector;
global io_hlt ;
;
global io_in8;
global io_in16;
global io_in32;
global io_out8;
global io_out16;
global io_out32;
;
global io_read_eflags;
global io_write_eflags;
;
global io_cli;
global io_sti;


;
;功能    : 读取一个扇区
;入口    : 无
;出口    : 无
;堆栈使用: 无
;全局变量:
;函数签名:void read_sector(int sector, int dst);
read_sector:
    mov    ecx, [esp + 4]            ;参数1:sector
    mov    ebx, [esp + 8]            ;参数2:dst

    mov    dx, 0x1f2            ;
    mov     al, 0x01            ;1 sector
    out     dx, al                ;
    mov    dx, 0x1f3            ;
    mov    al, cl                ;0-7
    out    dx, al                ;

    mov     dx, 0x1f4            ;
    mov     al, ch                ;8-15
    out    dx, al

    mov    dx, 0x1f5            ;
    mov    al, 0x00            ;16-23
    out     dx, al                ;

    mov     dx, 0x1f6            ;
    mov     al, 0xe0            ;
    out     dx, al                ;

    ; ask for read
    mov     dx, 0x1f7            ;
    mov     al, 0x20            ;
    out     dx, al                ;

    ; wait for finish
    mov     dx, 0x1f7            ;
_rs_wait:
    in      al, dx                ;
    and     al, 0x88            ;
    cmp     al, 0x08            ;
    jnz     _rs_wait            ;

    ;read data to bx
    mov     cx, 256                ;
    mov     dx, 0x1f0            ;

_rs_read_loop:
    in      ax, dx                ;
    mov     word[ebx], ax            ;
    add     ebx, 2                ;
    loop    _rs_read_loop            ;

    ret                    ;


;功能    :  挂起
;入口    : 无
;出口    : 无
;堆栈使用: 无
;全局变量:
;函数签名:void io_hlt(void);
io_hlt:
    hlt                    ;
    ret;


;功能    : 读取 eflags
;函数签名: int read_eflags(void);
io_read_eflags:
    pushfd                    ;将 eflags 压入栈
    pop    eax                ;将 eflags 弹出并保存至eax
    ret

;功能    : 往端口写入1个字节
;函数签名: void io_out8(int port, int value);
io_out8:
    mov     edx, [esp + 4]            ;参数1: port
    mov     al, [esp + 8]            ;参数2:value
    out     dx, al
    ret


;功能    : 从端口读取1个字节
;函数签名:uint8_t io_in8(int port);
io_in8:
    mov    edx, [esp + 4]            ;参数1: port
    mov    eax, 0                ;将数据置为0,防止干扰
    in    al, dx                ;
    ret


;功能    : 从端口读取2个字节
;函数签名:uint16_t io_in16(int port);
io_in16:
    mov    edx, [esp + 4]            ;参数1: port
    mov    eax, 0                ;将数据置为0,防止干扰
    in    ax, dx                ;
    ret


;功能    : 从端口读取4个字节
;函数签名:uint32_t io_in32(int port);
io_in32:
    mov    edx, [esp + 4]            ;参数1: port
    mov    eax, 0                ;将数据置为0,防止干扰
    in    eax, dx                ;
    ret


;功能    : 往端口写入2个字节
;函数签名: void io_out16(int port, int value);
io_out16:
    mov     edx, [esp + 4]            ;参数1: port
    mov     al, [esp + 8]            ;参数2:value
    out     dx, ax
    ret


;功能    : 往端口写入4个字节
;函数签名: void io_out32(int port, int value);
io_out32:
    mov     edx, [esp + 4]            ;参数1: port
    mov     al, [esp + 8]            ;参数2:value
    out     dx, eax
    ret


;功能    : 关闭中断
;函数签名: void io_cli(void);
io_cli:
    cli                    ; clean interrupt flag
    ret


;功能    : 打开中断
;函数签名: void io_sti(void);
io_sti:
    sti                    ; set interrupt flag
    ret


;功能    : 写入 eflags
;函数签名: void write_eflags(int flags);
io_write_eflags:
    mov     eax, [esp + 4]            ;参数1:eflags
    push     eax                ;将参数 eflags压入栈中
    popfd                    ;从栈中弹出eflags的值并将之写入到 EFLAGS 寄存器
    ret
代码说明:
- 导出函数使用global关键字。比如global read_sector,将导出read_sector函数。
- 函数的参数使用栈来存储,次序为从右到左,使用esp栈指针来访问。
- 所有的函数都放在section .text 中。
- 整型类型的返回值可以放在eax/ax/dx寄存中进行返回。
编译
nasm -f elf -o x86.o x86.asm
为了便于c代码调用上面的代码,我们还需要创建一个头文件:x86.h:
#ifndef _OS_X86_H_
#define _OS_X86_H_

#include <stdint.h>

/**
 * 读取扇区的数据
 * @param sector 扇区号。
 * @param dst 目标地址
 */
void read_sector(int sector, uint8_t *dst);

/**
 * 挂起
 */
void io_hlt();


/**
 * 读取 eflags
 * @return
 */
uint32_t io_read_eflags();

/**
 * 写入 eflags
 * @param flags
 */
void io_write_eflags(uint32_t flags);


/**
 * 从端口读取1个字节
 * @param port 端口号
 * @return 端口上的数据
 */
uint8_t io_in8(uint16_t port);

/**
 * 从端口读取2个字节
 * @param port 端口号
 * @return 端口上的数据
 */
uint16_t io_in16(uint16_t port);

/**
 * 从端口读取4个字节
 * @param port 端口号
 * @return 端口上的数据
 */
uint32_t io_in32(uint16_t port);

/**
 * 往端口写入1个字节
 * @param port 端口号
 * @param value 要写入的值
 * @return
 */
void io_out8(uint16_t port, uint8_t value);

/**
 * 往端口写入2个字节
 * @param port 端口号
 * @param value 要写入的值
 * @return
 */
void io_out16(uint16_t port, uint16_t value);

/**
 * 往端口写入4个字节
 * @param port 端口号
 * @param value 要写入的值
 * @return
 */
void io_out32(uint16_t port, uint32_t value);

/**
 * 关闭中断
 */
void io_cli();

/**
 * 打开中断
 */
void io_sti();

#endif //_OS_X86_H_
代码说明:
- 函数的签名要跟nasm文件中的保持一致,包括函数名,参数个数、参数类型。
- 在调用的时候跟普通的头文件一样,先引入x86.h,然后调用相应的方法。
3.6 内核代码
在内核代码中,执行以下操作:
- 读取bmp文件所在的起始个扇区。从该扇区数据中取出文件大小,决定要还要继续读几个扇区,接着读完所有扇区。
- 从bmp数据中取出调色板数据,然后用它来更改显卡的调色板。
- 从bmp数据中取出图像数据,写入到图像缓冲区。
代码如下:kernel.c
 1 #include <stdint.h>
 2 #include "x86.h"
 3 #include "bmp.h"
 4
 5 // 视频缓冲区的内存位置
 6 #define VIDEO_BUFFER_MEMORY_LOC 0x0a0000
 7 // bmp文件的内存位置
 8 #define BMP_FILE_MEMORY_LOC 0x200000
 9 // bmp文件所在的起始扇区
10 #define BMP_FILE_SECTOR 201
11
12 int main(void) {
13   // 读扇区的索引,
14   uint32_t sector_read_index = BMP_FILE_SECTOR;
15   // 读文件的索引
16   uint8_t *file_read_index = (uint8_t *) BMP_FILE_MEMORY_LOC;
17
18   // 读取bmp文件所在的第1个扇区
19   read_sector(sector_read_index, file_read_index);
20   file_read_index = file_read_index + 512;
21   sector_read_index++;
22
23   // 文件头
24   BitMapFileHeader *bmp_header = (BitMapFileHeader *) BMP_FILE_MEMORY_LOC;
25   uint32_t file_size = bmp_header->size;
26
27   // 图像数据偏移
28   uint32_t off_bits = bmp_header->off_bits;
29
30   // 需要再读取几个扇区?
31   int more_sectors = (file_size / 512) - 1;
32   if (file_size % 512 != 0) {
33     more_sectors++;
34   }
35
36   // 读取更多扇区
37   for (int i = 0; i < more_sectors; i++) {
38     read_sector(sector_read_index, file_read_index);
39     sector_read_index++;
40     file_read_index += 512;
41   }
42
43   //*********************调色板设置 *************
44   // 读取调色板数据
45   // 调色板数据开始于文件偏移 54
46   RGB *palette_index = (RGB *) (BMP_FILE_MEMORY_LOC + 54);
47   //
48   uint32_t eflags = io_read_eflags();
49   io_cli();
50
51   // 写入0号调色板
52   io_out8(0x03c8, 0);
53
54   // 写入调色板数据
55   for (int i = 0; i < 256; ++i) {
56     RGB rgb = *palette_index;
57     // 必须除以4,因为 vga 只能显示64色
58     io_out8(0x03c9, rgb.red / 4);
59     io_out8(0x03c9, rgb.green / 4);
60     io_out8(0x03c9, rgb.blue / 4);
61     palette_index++;
62   }
63
64   io_write_eflags(eflags);
65
66   // 位图信息头
67   BitMapInfoHeader *info_header = (BitMapInfoHeader *) (BMP_FILE_MEMORY_LOC + 14);
68   // 数据位数组
69   uint8_t *file_bits = (uint8_t *) (BMP_FILE_MEMORY_LOC + off_bits);
70   // 坐标点的内存地址
71   uint8_t *p = 0;
72   //
73   for (int i = 0; i < info_header->image_size; i++) {
74     // x 坐标
75     int x = i % info_header->width;
76     // y 坐标
77     int y = (info_header->height - 1) - (i / info_header->width);
78     // 点(x,y)的内存地址
79     p = (uint8_t *) (VIDEO_BUFFER_MEMORY_LOC + x + y * info_header->width);
80     *p = *file_bits;
81     file_bits++;
82   }
83
84   // use this to avoid to reset
85   while (1) {
86     io_hlt();
87   }
88   return 0;
89 }
关键代码说明:
- 在写入调色板之前,eflags要先暂存,然后再回写。
- bmp的数据是从下往上,从左往右存储的,所以显示的时候要反过来。
- 对视频缓冲区内存区域的读写用到了指针。定义一个指针uint8_t *p, p为坐标点的内存地址,然后使用*p = *file_bits来修改该内存的值。
编译
gcc -c -std=gnu99 -fno-stack-protector -m32 -Wall -o kernel.o kernel.c
3.7 链接
链接脚本如下:kernel.ld
  1 OUTPUT_FORMAT("elf32-i386")
  2 OUTPUT_ARCH(i386)
  3 ENTRY(main)
  4
  5 SECTIONS
  6 {
  7 	. = 0x040000;
  8 	.text :  {
  9 		*(.text)
 10 	}
 11 	.data : {
 12 		*(.data)
 13 	}
 14 	.bss : {
 15 		*(.bss)
 16 	}
 17 	/DISCARD/ : {
 18 		*(.eh_frame .note.GNU-stack)
 19 	}
 20 }
 21
 22
脚本说明:
- OUTPUT_FORMAT("elf32-i386") 表示输出格式为efl32 32位格式。
- ENTRY(main) 表示入口函数为main
- /DISCARD/表示忽略.eh_frame段和.note.GNU-stack
链接
ld -s -T kernel.ld -o kernel.out kernel.o x86.o
注意,对象文件(*.o)的次序要正确,否则运行的时候会出错。次序的原则是被依赖的放在后面。
3.8 .text段提取
链接后的文件kernel.out是一个elf类型的文件,它包含了elf头信息、.text、.data等。通过readelf命令可以查看efl文件的结构。
readelf -a kernel.out
命令结果如下:
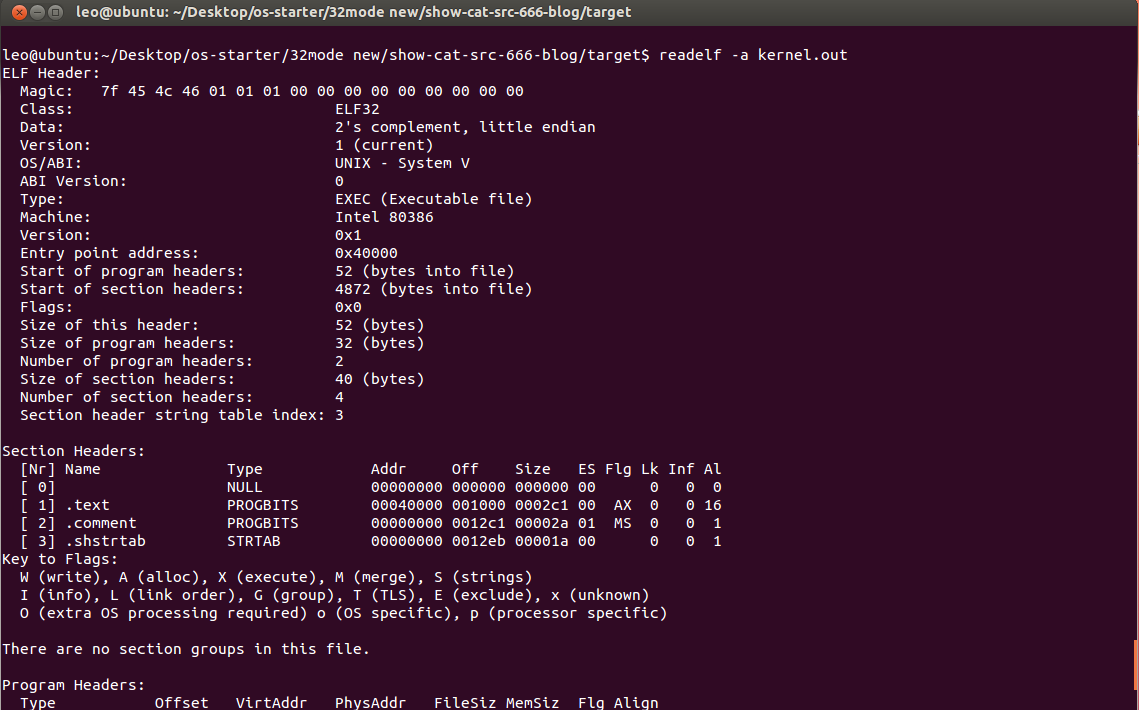
我们仅需要 .text段 。这个时候通过objcopy来提取kernel.out中的.text段,如下:
objcopy -S -O binary -j .text kernel.out kernel.bin
将kernel.bin写入到硬盘镜像(从#1扇区开始)
dd if=target/kernel.bin of=10M.img bs=512 seek=1 count=200 conv=notrunc
3.9 放入borch虚拟机中运行
配置一个虚拟机,配置如下,bochsrc :
  1 ###############################################################
  2 # Configuration file for Bochs
  3 ###############################################################
  4
  5 # how much memory the emulated machine will have
  6 megs: 32
  7
  8 # filename of ROM images
  9 romimage: file=/usr/local/share/bochs/BIOS-bochs-latest
 10 vgaromimage: file=/usr/local/share/bochs/VGABIOS-lgpl-latest
 11
 12 # what disk images will be used
 13 #floppya: 1_44=a.img, status=inserted
 14 ata0-master: type=disk, mode=flat, path="10M.img", cylinders=20, heads=16, spt=63
 15
 16 # choose the boot disk.
 17 #boot: floppy
 18 boot: disk
 19
 20
 21 # where do we send log messages?
 22 # log: bochsout.txt
 23 # disable the mouse
 24 mouse: enabled=0
 25
 26 # enable key mapping, using US layout as default.
 27 keyboard_mapping: enabled=1, map=/usr/local/share/bochs/keymaps/x11-pc-us.map
 28
 29
关键配置说明:
- megs: 32 表示内存为32M
- boot: disk 表示从硬盘启动
- ata0-master: path="10M.img", 设置了硬盘镜像的路径
- vgaromimage: file=VGABIOS-lgpl-latest 表示显卡的rom镜像为VGABIOS-lgpl-latest,如果设置错误,显示就会不正常。
- keyboard_mapping: enabled=1, 用于设置键盘布局,这里采用美式键盘布局。
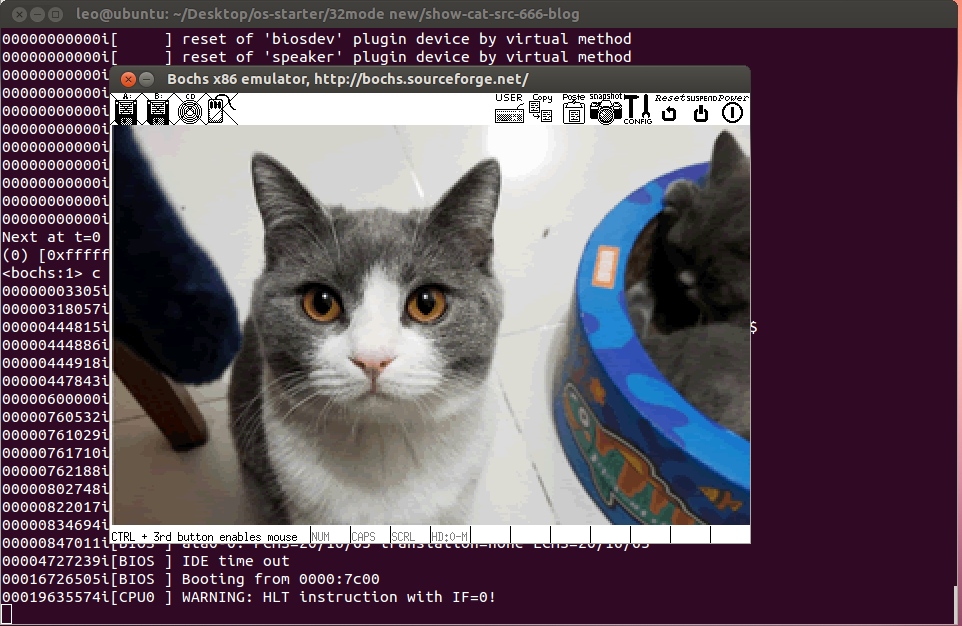
启动虚拟机
bochs -q
效果如下:
3.10 makefile
用makefile将上面零散的命令整合一下。脚本如下,Makefile:
  1 .PHONY : all clean run install
  2
  3 CFLAGS = -std=gnu99  -fno-stack-protector  -m32 -Wall
  4
  5 all: target/boot.bin target/kernel.bin install
  6
  7 target/boot.bin : src/boot.asm
  8 	nasm src/boot.asm -f bin -o target/boot.bin
  9
 10 target/kernel.bin : target/kernel.out
 11 	objcopy -S -O binary -j .text  target/kernel.out target/kernel.bin
 12
 13 target/x86.o :  src/x86.asm
 14 	nasm -f elf -o target/x86.o src/x86.asm
 15
 16 target/kernel.o : src/kernel.c
 17 	gcc -c $(CFLAGS)  -o target/kernel.o src/kernel.c
 18
 19 # x86.o要放到最后,否则会无法运行
 20 target/kernel.out : target/kernel.o target/x86.o
 21 	ld -s -T kernel.ld -o target/kernel.out target/kernel.o  target/x86.o
 22
 23
 24
 25 install :
 26 	# #0扇区
 27 	dd if=target/boot.bin of=10M.img bs=512 count=1 conv=notrunc
 28 	# #1 ~ #200 扇区
 29 	dd if=target/kernel.bin of=10M.img bs=512 seek=1 count=200 conv=notrunc
 30 	# #201扇区开始
 31 	dd if=src/cat-666.bmp of=10M.img bs=512 seek=201  conv=notrunc
 32
 33
 34 run :
 35 	make all
 36 	bochs -q
 37
 38
 39 clean :
 40 	-rm target/*.bin
 41 	-rm target/*.o
 42 	-rm target/*.out
 43
 44
 45
 46
脚本说明:
- 将源文件放到src目录下,将目标文件放到target目录下。
- make run 为运行。
- make install 为安装。
- make clean 为清理。
3.11 内存和硬盘布局
内存布局
|
物理地址 |
内容 |
|
0x7c00 ~ 0x7dff |
启动区 |
|
0x7e00~ 0x7eff |
gdt |
|
0x100000~0x1fffff |
内核,大小1M。 |
|
0x200000开始 |
图片。 |
|
0x0a0000-0xaf9ff |
图像缓冲区 |
硬盘布局
|
扇区 |
内容 |
|
#0 |
boot.bin |
|
#1 ~ #200 |
kernel.bin |
|
#201 |
cat-6666.bmp |
4 参考资料
- 《x86汇编语言 从实模式到保护模式》
- 《Linux0.11内核完全注释》
- 《30天自制操作系统》
- 《一步一步学习linux汇编语言程序设计》
- 《xv6》
你的点赞与分享是对我最大的支持

 浙公网安备 33010602011771号