Zookeeper集群搭建(多节点,单机伪集群,Docker集群)
Zookeeper介绍
原理简介
ZooKeeper是一个分布式的、开源的分布式应用程序协调服务。它公开了一组简单的原语,分布式应用程序可以在此基础上实现更高级别的同步、配置维护、组和命名服务。它的设计易于编程,并使用了一个数据模型样式后熟悉的目录树结构的文件系统。它在Java中运行,并且有Java和C的绑定。
集群模型
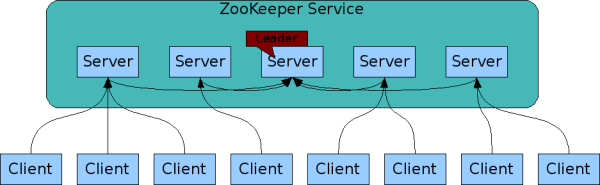
在Zokeeper集群中,server有3重角色和四种状态
| 角色 | 状态 |
|---|---|
| leader,follower,observer | leading,following,observing,looking |
| Zookeeper不同状态 |
LOOKING:当前Server正在寻找leader。
LEADING:当前Server为选举出的leader。
FOLLOWING:leader已经选举出来,当前Server与之同步。
OBSERVING:observer在大多数情况下与follower完全一致,但是他们不参加选举和投票,仅接受(observing)选举和投票的结果。
Zookeeper集群模型如图所示:
Zookeeper基于内存存储,数组存储模型类似于Linux文件系统模型,基于根节点/存储
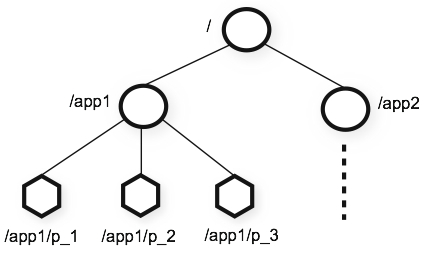
zookeeper节点
zookeeper模型是由一个leader和多个follower构成,这就说明leader是单节点的,单节点面临的问题就是有可能单机故障,从这点来看zookeeper似乎并不可靠,但实际生产中zookeeper是极其可靠的,从某个角度来说zookeeper可以快速自我修复,这种修复就是在leader故障后,follower之间通信快速选举恢复出一个新的leader,选举的标准要求
可用节点数量 > 总节点数量/2
并且选举要避免脑裂这种情况,集群的脑裂通常是发生在节点之间通信不可达的情况下,集群会分裂成不同的小集群,小集群各自选出自己的master节点,导致原有的集群出现多个master节点的情况,这就是脑裂。
多节点集群
zookeeper下载
下载地址:http://archive.apache.org/dist/zookeeper/
在Zookeeper3.5.5以后需要下载名称带有bin的才是编译的可执行包,没有带bin的为源码包无法使用。
环境配置
搭建zookeeper集群需要的外部环境准备
VMware Workstation 15
JDK1.8
zookeeper-3.5.6
搭建zookeeper集群前测试一下各主机间是否互通
| 主机名 | 操作系统 | IP |
|---|---|---|
| node1 | CentOS 7 | 192.168.189.128 |
| node2 | CentOS 7 | 192.168.189.129 |
| node3 | CentOS 7 | 192.168.189.130 |
注:后面所有操作都在node1 192.168.189.128执行
这里需要对对多台Linux机器执行相同的命令,推荐一个好用的命令行工具
Secure CRT
打开View–>Command Window,下方弹出空白会话窗口,输入要执行的命令,鼠标右键点击Send Commands to All Sessions,对所有虚拟机会话都执行命令。
使用Secure CRT对三台虚拟机创建目录
mkdir /usr/local/zookeeper
将zookeeper安装包上传至192.168.189.128 目录/usr/local/zookeeper/解压
tar -zxvf apache-zookeeper-3.5.6-bin.tar.gz
配置zookeeper环境变量
export ZOOKEEPER_HOME=/usr/local/zookeeper/apache-zookeeper-3.5.6-bin
export PATH=\(PATH:\)ZOOKEEPER_HOME/bin
进入zookeeper配置目录/usr/local/zookeeper/apache-zookeeper-3.5.6-bin/conf,修改配置文件
cp zoo_sample.cfg zoo.cfg
vim zoo.cfg
配置文件
The number of milliseconds of each tick
tickTime=2000
# The number of ticks that the initial
# synchronization phase can take
initLimit=10
# The number of ticks that can pass between
# sending a request and getting an acknowledgement
syncLimit=5
# the directory where the snapshot is stored.
# do not use /tmp for storage, /tmp here is just
# example sakes.
dataDir=/tmp/zookeeper
# the port at which the clients will connect
clientPort=2181
# the maximum number of client connections.
# increase this if you need to handle more clients
#maxClientCnxns=60
# Be sure to read the maintenance section of the
# administrator guide before turning on autopurge.
# http://zookeeper.apache.org/doc/current/zookeeperAdmin.html#sc_maintenance
# The number of snapshots to retain in dataDir
#autopurge.snapRetainCount=3
# Purge task interval in hours
# Set to "0" to disable auto purge feature
#autopurge.purgeInterval=1
配置文件说明
tickTime:zookeeper维持心跳的间隔时间单位。
initLimit:允许follower连接并同步到Leader的初始化连接时间,以tickTime为单位,当初始化连接时间超过该值,则表示连接失败
syncLimit:follower与leader之间通信应答时间长度,如果follower在间隔(syncLimit * tickTime)不能与leader通信,此follower将会被丢弃
dataDir:zookeeper保存数据的目录,包含快照日志,事务日志
clientPort:Zookeeper服务器与客户端通信端口,通过这个端口接收客户端请求
在zoo.cfg文件末尾追加server.x=A:B:C
server.1=192.168.189.128:2888:3888
server.2=192.168.189.129:2888:3888
server.3=192.168.189.130:2888:3888
x:表示本机zookeeper server id,数值与myid中值一致
A:表示本机zookeeper server ip
B:leader与follower之间通信端口
C:zookeeper启动时选举leader通信端口
使用secure CRT在三台虚拟机上,创建dataDir 和 dataLogDir的保存路径
dataDir:/var/zookeeper/data/
dataLogDir:/var/zookeeper/log/
执行命令
mkdir -p /var/zookeeper/{data,log}
这里补充一下,zookeeper服务器日志有关事项
事务日志、快照日志、log4j日志zookeeper默认将快照日志和事务日志的存储在zoo.cfg中dataDir配置的路径,实际应用中,还可以为事务日志专门配置存储地址,指定dataLogDir路径,建议将事务日志(dataLogDir)与快照日志(dataLog)单独配置,zookeeper集群进行频繁的数据读写操作是,会产生大量的事务日志信息,将两类日志分开存储会提高系统性能,而且,可以允许将两类日志存在在不同的存储介质上,减少磁盘压力。
zookeeper节点是由人为规划的,在部署集群前已经规划好每台机器的server id,这样可以让每台zookeeper server在启动后选举出leader,因此需要在zoo.cfg文件中dataDir的路径下创建一个myid文件,将上述server.X的X写入到myid文件中
echo 1 > /var/zookeeper/data/myid
ssh root@192.168.189.129 "echo '2' >> pwd"
ssh root@192.168.189.130 "echo '3' >> pwd"
配置完成后,直接将node1上 /usr/local/zookeeper/apache-zookeeper-3.5.6-bin/文件分发至node2,node3
scp -r /usr/local/zookeeper/apache-zookeeper-3.5.6-bin/ root@192.168.189.129:pwd
scp -r /usr/local/zookeeper/apache-zookeeper-3.5.6-bin/ root@192.168.189.129:pwd
分发node1中/etc/profile至node2,node3,然后使用secure CRT执行
source /etc/profile
启动服务
使用secure CRT执行
zkServer.sh start-foreground | start
start-foreground 前台阻塞启动
start 后台启动
查看zookeeper server 状态
zkServer.sh status
正常启动后,使用zookeeper客户端连接
zkCli.sh -server ip:port | zkCli.sh
zkCli.sh -server ip:port 指定要连接的zookeeper server服务器
zkCli.sh 默认 zkCli.sh -server localhost:2181
启动异常
依次启动zookeeper server 过程中,会寻找已经配置的主机,这个过程会报异常,等待一会,leader选举出来以后,zookeeper 集群稳定后,就可以正常访问。
启动后 zookeeper 如果一直报如下错误
java.net.NoRouteToHostException: No route to host
防火墙
查看防火墙状态:systemctl status firewalld.service
关闭防火墙:systemctl stop firewalld.service
SELinux
查看状态:/usr/sbin/sestatus -v
临时关闭:setenforce 0
永久关闭:修改/etc/selinux/config文件将 SELINUX=enforcing 改为 SELINUX=disabled
中间路由器状态
检查网络间是否互通
配置文件
查看zoo.cfg中server状态是否正确,myid文件是否配置
单机伪集群
zookeeper集群在实际生产中,为了保证其可以高效的响应处理请求,都是单机部署一个节点,这里伪集群搭建可以用来学习,解决无法创建多台虚拟机环境这种状况,考虑集群部署的方式,伪集群其实也就是分别指定节点路径,比较简单,这里简单模拟。
创建配置文件zoo1.cfg、zoo2.cfg、zoo3.cfg
cp zoo_sample.cf /usr/local/etc/zookeeper/zoo1.cfg
cp zoo_sample.cf /usr/local/etc/zookeeper/zoo2.cfg
cp zoo_sample.cf /usr/local/etc/zookeeper/zoo3.cfg
配置文件内容:
zoo1.cfg
The number of milliseconds of each tick
tickTime=2000
# The number of ticks that the initial
# synchronization phase can take
initLimit=10
# The number of ticks that can pass between
# sending a request and getting an acknowledgement
syncLimit=5
# the directory where the snapshot is stored.
# do not use /tmp for storage, /tmp here is just
# example sakes.
dataDir=/usr/zookeeper/zoo1/data
dataLogDir=/usr/zookeeper/zoo1/log
# the port at which the clients will connect
clientPort=2181
# the maximum number of client connections.
# increase this if you need to handle more clients
#maxClientCnxns=60
# Be sure to read the maintenance section of the
# administrator guide before turning on autopurge.
# http://zookeeper.apache.org/doc/current/zookeeperAdmin.html#sc_maintenance
# The number of snapshots to retain in dataDir
#autopurge.snapRetainCount=3
# Purge task interval in hours
# Set to "0" to disable auto purge feature
#autopurge.purgeInterval=1
server.1=localhost:2887:3887
server.2=localhost:2888:3888
server.3=localhost:2889:3889
zoo2.cfg
The number of milliseconds of each tick
tickTime=2000
# The number of ticks that the initial
# synchronization phase can take
initLimit=10
# The number of ticks that can pass between
# sending a request and getting an acknowledgement
syncLimit=5
# the directory where the snapshot is stored.
# do not use /tmp for storage, /tmp here is just
# example sakes.
dataDir=/usr/zookeeper/zoo2/data
dataLogDir=/usr/zookeeper/zoo2/log
# the port at which the clients will connect
clientPort=2182
# the maximum number of client connections.
# increase this if you need to handle more clients
#maxClientCnxns=60
# Be sure to read the maintenance section of the
# administrator guide before turning on autopurge.
# http://zookeeper.apache.org/doc/current/zookeeperAdmin.html#sc_maintenance
# The number of snapshots to retain in dataDir
#autopurge.snapRetainCount=3
# Purge task interval in hours
# Set to "0" to disable auto purge feature
#autopurge.purgeInterval=1
server.1=localhost:2887:3887
server.2=localhost:2888:3888
server.3=localhost:2889:3889
zoo3.cfg
The number of milliseconds of each tick
tickTime=2000
# The number of ticks that the initial
# synchronization phase can take
initLimit=10
# The number of ticks that can pass between
# sending a request and getting an acknowledgement
syncLimit=5
# the directory where the snapshot is stored.
# do not use /tmp for storage, /tmp here is just
# example sakes.
dataDir=/usr/zookeeper/zoo3/data
dataLogDir=/usr/zookeeper/zoo3/log
# the port at which the clients will connect
clientPort=2183
# the maximum number of client connections.
# increase this if you need to handle more clients
#maxClientCnxns=60
# Be sure to read the maintenance section of the
# administrator guide before turning on autopurge.
# http://zookeeper.apache.org/doc/current/zookeeperAdmin.html#sc_maintenance
# The number of snapshots to retain in dataDir
#autopurge.snapRetainCount=3
# Purge task interval in hours
# Set to "0" to disable auto purge feature
#autopurge.purgeInterval=1
server.1=localhost:2887:3887
server.2=localhost:2888:3888
server.3=localhost:2889:3889
创建dataDir和dataLogDir
mkdir /usr/local/zookeeper/zoo1/{data,log}
mkdir /usr/local/zookeeper/zoo2/{data,log}
mkdir /usr/local/zookeeper/zoo3/{data,log}
创建myid文件
echo 1 > /usr/local/zookeeper/zoo1/data/myid
echo 2 > /usr/local/zookeeper/zoo2/data/myid
echo 3 > /usr/local/zookeeper/zoo3/data/myid
启动zkServer服务
zkServer.sh start /usr/local/etc/zookeeper/zoo1.cfg
zkServer.sh start /usr/local/etc/zookeeper/zoo2.cfg
zkServer.sh start /usr/local/etc/zookeeper/zoo3.cfg
Docker集群
如果使用容器化技术来部署就显得简单的多,而且也可以在单机环境创建多个zookeeper实例,这里借助docker官方提供的编排工具docker-compose,可以参考官方网站:https://hub.docker.com/
docker使用环境
CentOS 7
docker-ce
创建目录
mkdir /usr/local/docker
拉取官方zookeeper镜像
docker pull zookeeper
在/usr/local/docker目录创建docker-compose.yml文件,依旧以三个节点为例
version: '3.1'
services:
zoo1:
image: zookeeper
restart: always
hostname: zoo1
ports:
- 2181:2181
environment:
ZOO_MY_ID: 1
ZOO_SERVERS: server.1=0.0.0.0:2888:3888;2181 server.2=zoo2:2888:3888;2181 server.3=zoo3:2888:3888;2181
zoo2:
image: zookeeper
restart: always
hostname: zoo2
ports:
- 2182:2181
environment:
ZOO_MY_ID: 2
ZOO_SERVERS: server.1=zoo1:2888:3888;2181 server.2=0.0.0.0:2888:3888;2181 server.3=zoo3:2888:3888;2181
zoo3:
image: zookeeper
restart: always
hostname: zoo3
ports:
- 2183:2181
environment:
ZOO_MY_ID: 3
ZOO_SERVERS: server.1=zoo1:2888:3888;2181 server.2=zoo2:2888:3888;2181 server.3=0.0.0.0:2888:3888;2181
通过docker启动zookeeper,在docker-compose.yml所在目录
docker-compose up
查看docker容器运行状态
$ docker-compose ps
Name Command State Ports
-------------------------------------------------------------------------------------------------
zookeeper_1 /docker-entrypoint.sh zkSe ... Up 0.0.0.0:2181->2181/tcp, 2888/tcp, 3888/tcp
zookeeper_2 /docker-entrypoint.sh zkSe ... Up 0.0.0.0:2182->2181/tcp, 2888/tcp, 3888/tcp
zookeeper_3 /docker-entrypoint.sh zkSe ... Up 0.0.0.0:2183->2181/tcp, 2888/tcp, 3888/tcp
搭建zookeeper集群的几种方案,如有错误欢迎指正。
实战应用
Zookeeper作为分布式配置中心和分布式锁的应用,可以参考:http://starslight.gitee.io/zookeeper
本文来自博客园,作者:星光Starsray,转载请注明原文链接:https://www.cnblogs.com/starsray/p/12267506.html

 浙公网安备 33010602011771号