
Java中使用MongoUtils对mongodb数据库进行增、删、查、改
本文主要介绍在java应用中如何使用MongoUtils工具类对 mongodb进行增、删、查、改操作。
一、配置
1、将 common.jar库引入到项目环境中: (源代码:https://gitee.com/cnsugar/common,可直接下载lib目录下的jar文件使用)
如果是maven项目,可以通过mvn install命令将common.jar加入到本地仓库:
mvn install:install-file -Dfile=D:\lib\common-1.0.jar -DgroupId=com.cnsugar -DartifactId=common -Dversion=1.0 -Dpackaging=jar
然后在pom.xml中加入以下配置:
<dependency>
    <groupId>com.cnsugar</groupId>
    <artifactId>common</artifactId>
    <version>1.0</version>
</dependency>
也可以直接将jar文件放到项目中,用下面的方式引入:
<dependency>
    <groupId>com.cnsugar</groupId>
    <artifactId>common</artifactId>
    <version>1.0</version>
    <scope>system</scope>
    <systemPath>${project.basedir}/lib/common-1.0.jar</systemPath>
</dependency>
2、用同样的方式将 common-mongodb.jar库引入到项目环境中: (源代码:https://gitee.com/cnsugar/common-mongondb,可直接下载lib目录下的jar文件使用)
3、增加依赖包
    <properties>
        <fastjson-version>1.2.23</fastjson-version>
        <spring.version>4.2.8.RELEASE</spring.version>
        <spring.mongodb-version>1.9.5.RELEASE</spring.mongodb-version>
        <mongo-version>3.3.0</mongo-version>
    </properties>

    <dependencies>
        <dependency>
            <groupId>com.alibaba</groupId>
            <artifactId>fastjson</artifactId>
            <version>${fastjson-version}</version>
        </dependency>

        <dependency>
            <groupId>org.springframework</groupId>
            <artifactId>spring-jdbc</artifactId>
            <version>${spring.version}</version>
        </dependency>
        <!-- mongo -->
        <dependency>
            <groupId>org.springframework.data</groupId>
            <artifactId>spring-data-mongodb</artifactId>
            <version>${spring.mongodb-version}</version>
            <exclusions>
                <exclusion>
                    <groupId>org.springframework</groupId>
                    <artifactId>*</artifactId>
                </exclusion>
            </exclusions>
        </dependency>
        <dependency>
            <groupId>org.mongodb</groupId>
            <artifactId>mongo-java-driver</artifactId>
            <version>${mongo-version}</version>
        </dependency>
    </dependencies>
4、增加spring配置文件
mongodb-config.properties
#集群模式
#mongodb.hosts=10.10.10.239:20000,10.10.10.224:20000,10.10.10.238:20000

#单机模式
mongodb.host=192.168.241.34
mongodb.port=27017

#数据库名称
mongodb.dataname=DataGateway
spring-context-config.xml
<?xml version="1.0" encoding="UTF-8"?>
<beans xmlns="http://www.springframework.org/schema/beans"
       xmlns:xsi="http://www.w3.org/2001/XMLSchema-instance"
       xsi:schemaLocation="http://www.springframework.org/schema/beans
          http://www.springframework.org/schema/beans/spring-beans-4.0.xsd">

    <bean id="propertyConfigurer" class="org.springframework.beans.factory.config.PropertyPlaceholderConfigurer">
        <property name="locations">
            <list>
                <value>classpath:mongodb-config.properties</value>
            </list>
        </property>
    </bean>
</beans>
如果需要在项目中读取其他配置文件中的内容,可以将org.springframework.beans.factory.config.PropertyPlaceholderConfigurer 换成 com.cnsugar.common.config.SystemConfig,可以直接使用SystemConfig中的静态get方法读取配置文件。
spring-context-mongodb.xml
<?xml version="1.0" encoding="UTF-8"?>
<beans xmlns="http://www.springframework.org/schema/beans"
    xmlns:xsi="http://www.w3.org/2001/XMLSchema-instance" xmlns:context="http://www.springframework.org/schema/context"
    xmlns:mongo="http://www.springframework.org/schema/data/mongo"
    xsi:schemaLocation="http://www.springframework.org/schema/context http://www.springframework.org/schema/context/spring-context.xsd
          http://www.springframework.org/schema/data/mongo http://www.springframework.org/schema/data/mongo/spring-mongo.xsd
          http://www.springframework.org/schema/beans http://www.springframework.org/schema/beans/spring-beans.xsd">
    <mongo:mongo-client id="mongo"
        host="${mongodb.host}"
        port="${mongodb.port}">
        <mongo:client-options connections-per-host="10"
            threads-allowed-to-block-for-connection-multiplier="5"
            connect-timeout="30000"
            socket-timeout="60000"
            write-concern="SAFE" />
    </mongo:mongo-client>
    <bean id="mongoSupport" class="com.cnsugar.common.mongodb.MongoSupport">
        <constructor-arg name="mongo" ref="mongo" />
        <constructor-arg name="dbname" value="${mongodb.dataname}" />
    </bean>
</beans>
  mongo-client配置属性说明:
        id: MongoClient的名称,默认值:mongoClient
        port: 连到到MongoDB服务器的端口号,默认:27017
        host: 连接到MongoDB服务器的host,默认:localhost
        replica-set: 逗号分隔的的副本集集合,格式为host:port,host:port
        credentials: 用户身份认证逗号分隔的配置,格式:username:password@database,如果传递的认证包含逗号,则使用单引号括起来
   client-options配置属性说明:
        description: 描述
        min-connections-per-host: 客户端最小连接数
        connections-per-host: 客户端最大连接数,超过了将会被阻塞,默认100
        threads-allowed-to-block-for-connection-multiplier: 可被阻塞的线程数因子,默认值为5,如果connectionsPerHost配置为10,那么最多能阻塞50个线程,超过50个之后就会收到一个异常
        max-wait-time: 阻塞线程获取连接的最长等待时间,默认120000 ms
        max-connection-idle-time: 连接池连接最大空闲时间
        max-connection-life-time: 连接池连接的最大存活时间
        connect-timeout: 连接超时时间,默认值是0,就是不超时
        socket-timeout: socket超时时间,默认值是0,就是不超时
        socket-keep-alive: keep alive标志,默认false
        server-selection-timeout: 服务器查询超时时间,它定义驱动在抛出异常之前等待服务器查询成功,默认30s,单位milliseconds
        read-preference: MongoDB有5种ReadPreference模式:
            primary    主节点,默认模式,读操作只在主节点,如果主节点不可用,报错或者抛出异常。
            primaryPreferred   首选主节点,大多情况下读操作在主节点,如果主节点不可用,如故障转移,读操作在从节点。
            secondary    从节点,读操作只在从节点, 如果从节点不可用,报错或者抛出异常。
            secondaryPreferred    首选从节点,大多情况下读操作在从节点,特殊情况(如单主节点架构)读操作在主节点。
            nearest    最邻近节点,读操作在最邻近的成员,可能是主节点或者从节点。
        write-concern: WriteConcern的7种写入安全机制抛出异常的级别:
            NONE: 没有异常抛出
            NORMAL: 仅抛出网络错误异常,没有服务器错误异常,写入到网络就返回。
            SAFE: 抛出网络错误异常、服务器错误异常;并等待服务器完成写操作。
            MAJORITY: 抛出网络错误异常、服务器错误异常;并多数主服务器完成写操作。
            FSYNC_SAFE: 抛出网络错误异常、服务器错误异常;写操作等待服务器将数据刷新到磁盘。
            JOURNAL_SAFE: 抛出网络错误异常、服务器错误异常;写操作等待服务器提交到磁盘的日志文件。
            REPLICAS_SAFE: 抛出网络错误异常、服务器错误异常;等待至少2台服务器完成写操作。
        heartbeat-frequency: 驱动用来确保集群中服务器状态的心跳频率
        min-heartbeat-frequency: 驱动重新检查服务器状态最少等待时间
        heartbeat-connect-timeout: 集群心跳连接的超时时间
        heartbeat-socket-timeout: 集群心跳连接的socket超时时间
        ssl: 驱动是否使用ssl进行连接,默认是false
        ssl-socket-factory-ref: 用来进行ssl连接的SSLSocketFactory,如果配置为none,则使用SSLSocketFactory.getDefault()
二、使用示例
测试之前先新建一个实体类TestEntity,增加@Collection注解指明对应mongodb中test表。mongodb在新增数据时会自动生成一个主键_id,如果要以_id为条件进行操作需要转成ObjectId对象才能使用,继承MongoEntity可以调用getObjectId()自动处理。
如果要控制字段的顺序,可在字段上添加@JSONField注解,用ordinal属性进行控制。如果表中的字段名与实体中的字段名不一致,可以添加name属性进行设置(如下面的代码,实体中testScore字段对应的数据库中的名字为test_score)。
@Collection("test")
public class TestEntity extends MongoEntity {
    @JSONField(ordinal = 2)
    private String name;

    @JSONField(ordinal = 3)
    private int status;

    @JSONField(name="test_score", ordinal = 4)
    private Float testScore;

    private Date onTime = new Date();

    @JSONField(serialize = false)
    private String msgId;//不需要保存到数据库中的字段,serialize设为false

    //setter、getter方法
}
1、新增示例
使用save方法进行新增数据,批量新增用saveAll方法。
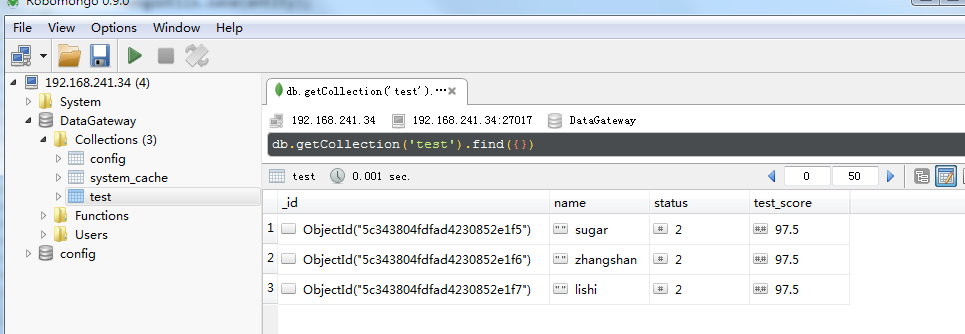
  @org.junit.Test
    public void testSave() {
        //保存实体对象
        TestEntity entity = new TestEntity();
        entity.setName("sugar");
        entity.setStatus(2);
        entity.setTestScore(97.5f);
        MongoUtils.save(entity);

        //保存map对象,需要指定集合名称
        Map<String, Object> map = new HashMap<>();
        map.put("name", "zhangshan");
        map.put("status", 2);
        map.put("test_score", 97.5f);
        MongoUtils.save(map, "test");

        //保存Document对象,与map类似,需要指定集合名称
        Document doc = new Document();
        doc.put("name", "lisi");
        doc.put("status", 2);
        doc.put("test_score", 97.5f);
        MongoUtils.save(doc, "test");
    }
使用Robomongo客户端查看执行后的结果如下:
2、更新
调用update开头的方法进行更新操作,更新条件使用Filters对象设置,更新内容使用Update对象设置;批量更新用updateAll方法。
  @org.junit.Test
    public void testUpdate() {
        //更新java对象,必须要指定id,如果字段值为null,不会更新旧的数据
        TestEntity entity = new TestEntity();
        entity.setId("5c343804fdfad4230852e1f5");
        entity.setName("sugar2");
        entity.setStatus(1);
        MongoUtils.update(entity);

        //自定义更新的集合名、条件、字段
        String collectionName = "test";
        Bson filter = Filters.eq("_id", new ObjectId("5c343804fdfad4230852e1f6"));
        Update update = new Update();
        update.set("name", "zhangshan2");
        update.inc("status", 1);//相当于status += 1
        MongoUtils.update(collectionName, filter, update);
    }
更新后的结果如下图:

3、查询
调用find开头的方法进行查询,查询条件使用Filters对象设置;分页查询用findPage。
    @org.junit.Test
    public void testQuery() {
        //查询出实体列表
        List<TestEntity> ll = MongoUtils.findAll(TestEntity.class);
        System.out.println(ll);

        //查询Document对象列表,需要指定集合名
        List<Document> list = MongoUtils.findAll("test");
        System.out.println(list);

        //用Filters生成条件查询,查询名字以2结尾的数据
        List<TestEntity> ll2 = MongoUtils.find(TestEntity.class, Filters.regex("name", ".*2"));
        System.out.println(ll2);

        //分页查询,查询分数大于90的数据,查询第1页,每页10条
        Page page = new Page(10, 1);
        page.setClazz(TestEntity.class);//指定列表中的对象类型
        page = MongoUtils.findPage(page, Filters.gt("test_score", 90));
        System.out.println(page.getList());
    }
4、删除
调用delete开头的方法进行删除操作,条件使用Filters对象设置
  @org.junit.Test
    public void testDelete() {
        //根据ID删除
        MongoUtils.deleteById("test", "587482defdfad41a9c94c9b6");

        //删除一条数据
        MongoUtils.deleteOne("test", Filters.eq("_id", new ObjectId("587482defdfad41a9c94c9b6")));

        //批量删除
        List<ObjectId> del = new ArrayList<ObjectId>();
        del.add(new ObjectId("587482defdfad41a9c94c9b6"));
        del.add(new ObjectId("58748350fdfad41a1c5fba14"));
        del.add(new ObjectId("5874930ffdfad40df031215a"));
        MongoUtils.deleteAll("test", Filters.in("_id", del));
    }
5、数据聚合分析
使用count或mapReduce进行数据聚合分析;
  @org.junit.Test
    public void testCount() {
        //统计test表数据总数
        long count = MongoUtils.count("test");

        //统计test表中status=2的数据总数
        long count2 = MongoUtils.count("test", Filters.eq("status", 2));

        //根据status进行分组统计
        List<Document> list = MongoUtils.count("test", new String[]{"status"});
        System.out.println(list);

        //自定义mapReduce函数进行数据分析,按天统计数据总数和status=1的总数
        StringBuilder mapFunction = new StringBuilder("function(){emit(");
        mapFunction.append("new Date(this.onTime).toLocaleDateString()");
        mapFunction.append(",{count:1, send:this.status==1?1:0}");
        mapFunction.append(");}");
        StringBuilder reduceFunction = new StringBuilder("function(key, values){");
        reduceFunction.append("var _total = 0, _send = 0;");
        reduceFunction.append("values.forEach(function(val){_total += val.count; _send += val.send;});");
        reduceFunction.append("return {count:_total, send:_send};");
        reduceFunction.append("}");
        List<Document> list2 = MongoUtils.mapReduce("test", mapFunction.toString(), reduceFunction.toString());
        System.out.println(list2);
    }
更多使用方法请参考:http://doc.tinnar.cn/javadoc/common-mongodb/com/cnsugar/common/mongodb/MongoUtils.html

