


Windos7下JumpList的实现
Windows7就要发布了,近期,就要和MS组织一次社区Win7发布活动,正好这次也讲Win7的TaskBar开发,所以就把要讲的东西组织成Blog,分享给出来,以供参考。
对于Windows7 TaskBar的开发功能是基于COM组件来实现的,这些组织提供了操作Windos7特性的一些功能。开发人员只要对COM操作就可以,但更为幸福的是,微软已经开发出一些kit,我们直接用这些kit,就可以用C#对Windos7的新功能进行编程了。
对于这个kit,可以从
其中的WindowsAPICodePack和RegistrationHelper是封装TaskBar操作的项目,我们直接用他们的dll或exe就可以。
在做JumpList时,我们用到Microsoft.WindowsAPICodePack.dll,Microsoft.WindowsAPICodePack.Shell.dll和Windows7.DesktopIntegration.Registration.exe
当新建一个WPF应用程序时,需要在引用中添加这三个可执行文件。
在对任务栏编和前,先来认识一下ApplicationID,在Win7中,ApplicationID不是窗口的唯一标识,也不是它的GUID,ApplicationID只是一串用来标识窗体的字符串。它最大长度为128个字符,我们来命名ApplicationID时,遵循的约定为“Company.Product.SubProduct.Version”。这个ApplicationID可以和进程,程序的快捷方式,窗体,JumpList,文档注册类型等关联起来。
在用ApplicationID以前,必需先注册它,本质上这个注册是对注册表的操作。
具体代如下:
 static RegistryKey classesRoot;
2
private static void RegisterProgId(string progId, string appId,3
string openWith)4
 {
{

5
 RegistryKey progIdKey = classesRoot.CreateSubKey(progId);
6
progIdKey.SetValue("FriendlyTypeName", "@shell32.dll,-8975");7
progIdKey.SetValue("DefaultIcon", "@shell32.dll,-47");8
progIdKey.SetValue("CurVer", progId);9
progIdKey.SetValue("AppUserModelID", appId);10
RegistryKey shell = progIdKey.CreateSubKey("shell");11
shell.SetValue(String.Empty, "Open");decimal 12
shell = shell.CreateSubKey("Open");13
shell = shell.CreateSubKey("Command");14
shell.SetValue(String.Empty, openWith);15
shell.Close();16
progIdKey.Close();17
 }
}18
关于Win7的TaskBar有几种效果,下面分别来说一下。
JumpList
效果图如下。
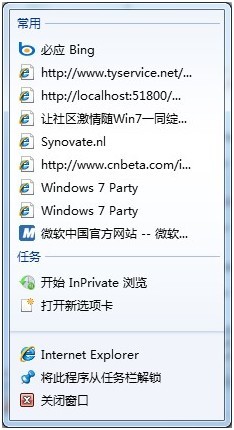
在图中,下方的三个选项是系统默认就有的,常用和任务,则是必需写代码来完成的。其实JumpList就是提供了一组快键方式。并且对快键方式进行分组分类。
首先来说一下添加和清除任务项,任务就是应用程序外的其他小工具的便键调用。
首先要注册一下ApplicationID,名称为
TaskbarManager.Instance.ApplicationId = "MS.TaskBarDemo.JumpList.1.0";
要有一个JumpList对象
private Microsoft.WindowsAPICodePack.Taskbar.JumpList jumplist = Microsoft.WindowsAPICodePack.Taskbar.JumpList.CreateJumpList();2
jumplist.Refresh();3
现在来实现添加任务列表
string systemFolder = Environment.GetFolderPath(Environment.SpecialFolder.System);2
//创建计算器3
IJumpListTask calcTask = new JumpListLink(Path.Combine(systemFolder, "calc.exe"), "打开计算器")4
{5
IconReference = new IconReference(Path.Combine(systemFolder, "calc.exe"), 0)6
};7
jumplist.AddUserTasks(calcTask, new JumpListSeparator());8
jumplist.Refresh();9
清除任务列表如下
jumplist.ClearAllUserTasks();2
jumplist.Refresh();3
上面这些类,都是Microsoft.WindowsAPICodePack.dll和Microsoft.WindowsAPICodePack.Shell.dll封装的,这两个项目都是开源的。其实真正添加任务的工作(包括后面自定义Category)都是jumplist.Refresh()这个方法完成的。
不防我们来看一下,运用VS地“转到定义”会转到一个名为“TaskbarCOMInterfaces”的一个页面。
[ComImportAttribute()]2
[GuidAttribute("6332DEBF-87B5-4670-90C0-5E57B408A49E")]3
[InterfaceTypeAttribute(ComInterfaceType.InterfaceIsIUnknown)]4
internal interface ICustomDestinationList5
{6
……7
[PreserveSig]8
HRESULT AddUserTasks(9
[MarshalAs(UnmanagedType.Interface)] IObjectArray poa);10
……11
}12
可以看到,在win7中,JumpList的编程是通过COM组件来实现的。
我为简单,建议开发时用MS封装好的Kit,这样编程更高效。
自定义Category,通常是把自己的类型或系统识别的类型添加成快捷方式。操作代码如下:
//创建自己定义Category2
JumpListCustomCategory myCategory;3
private void AddCategory_But_Click(object sender, RoutedEventArgs e)4
{5
myCategory = new JumpListCustomCategory(“Category名称”);6
jumplist.AddCustomCategories(myCategory); 7
jumplist.Refresh();8
}9
10
//创建子类型11
private void subCategory_BUT_Click(object sender, RoutedEventArgs e)12
{13
string path = Assembly.GetExecutingAssembly().Location;14
JumpListItem jli = new JumpListItem(path); 15
myCategory.AddJumpListItems(jli); 16
jumplist.Refresh();17
}18
19
//创建子连接20
private void addLink_BUT_Click(object sender, RoutedEventArgs e)21
{22
string path = @"F://a.wmv";23
JumpListLink jll = new JumpListLink(path, "连接");24
myCategory.AddJumpListItems(jll);25
jumplist.Refresh(); 26
}27
《asp.net core精要讲解》 https://ke.qq.com/course/265696
《asp.net core 3.0》 https://ke.qq.com/course/437517
《asp.net core项目实战》 https://ke.qq.com/course/291868
《基于.net core微服务》 https://ke.qq.com/course/299524

 浙公网安备 33010602011771号