饮冰三年-人工智能-Docker-52-Docker镜像
上一节:饮冰三年-人工智能-Docker-51-Docker常用命令
五、镜像
1:什么是Docker镜像
镜像是一种轻量级、可执行的独立软件包,用来打包软件运行环境和基于运行环境开发的软件,它包含运行某个软件所需的所有内容,包括代码、运行时、库、环境变量和配置文件。
UnionFS(联合文件系统):Union文件系统(UnionFS)是一种分层、轻量级并且高性能的文件系统,它支持对文件系统的修改作为一次提交来一层层的叠加,同时可以将不同目录挂载到同一个虚拟文件系统下(unite several directories into a single virtual filesystem)。Union 文件系统是 Docker 镜像的基础。镜像可以通过分层来进行继承,基于基础镜像(没有父镜像),可以制作各种具体的应用镜像。

Docker镜像加载原理:
docker的镜像实际上由一层一层的文件系统组成,这种层级的文件系统UnionFS。
bootfs(boot file system)主要包含bootloader和kernel, bootloader主要是引导加载kernel, Linux刚启动时会加载bootfs文件系统,在Docker镜像的最底层是bootfs。这一层与我们典型的Linux/Unix系统是一样的,包含boot加载器和内核。当boot加载完成之后整个内核就都在内存中了,此时内存的使用权已由bootfs转交给内核,此时系统也会卸载bootfs。
rootfs (root file system) ,在bootfs之上。包含的就是典型 Linux 系统中的 /dev, /proc, /bin, /etc 等标准目录和文件。rootfs就是各种不同的操作系统发行版,比如Ubuntu,Centos等等。
。 
最大的一个好处就是 - 共享资源
比如:有多个镜像都从相同的 base 镜像构建而来,那么宿主机只需在磁盘上保存一份base镜像,
同时内存中也只需加载一份 base 镜像,就可以为所有容器服务了。而且镜像的每一层都可以被共享。
2:Docker镜像常用的命令
具体命令可参考上一节相关内容
docker run -it -p 8080:8080 tomcat
docker run -it -P tomcat 随机分配的端口

3:构建镜像之commit命令
我们并不推荐使用通过 docker commit 命令,而是应该使用更加灵活、更加强大的Dockerfile来构建Docker镜像。不过,为了对docker有一个更全面的了解,我们还是会先介绍一下如何是使用 docker commit 构建Docker镜像。
3.1 创建 Docker Hub 账号
首先在 https://hub.docker.com/ 上注册一个账号。并登录成功! 
3.2 从 Hub 上下载 tomcat 镜像到本地把那个运行成功
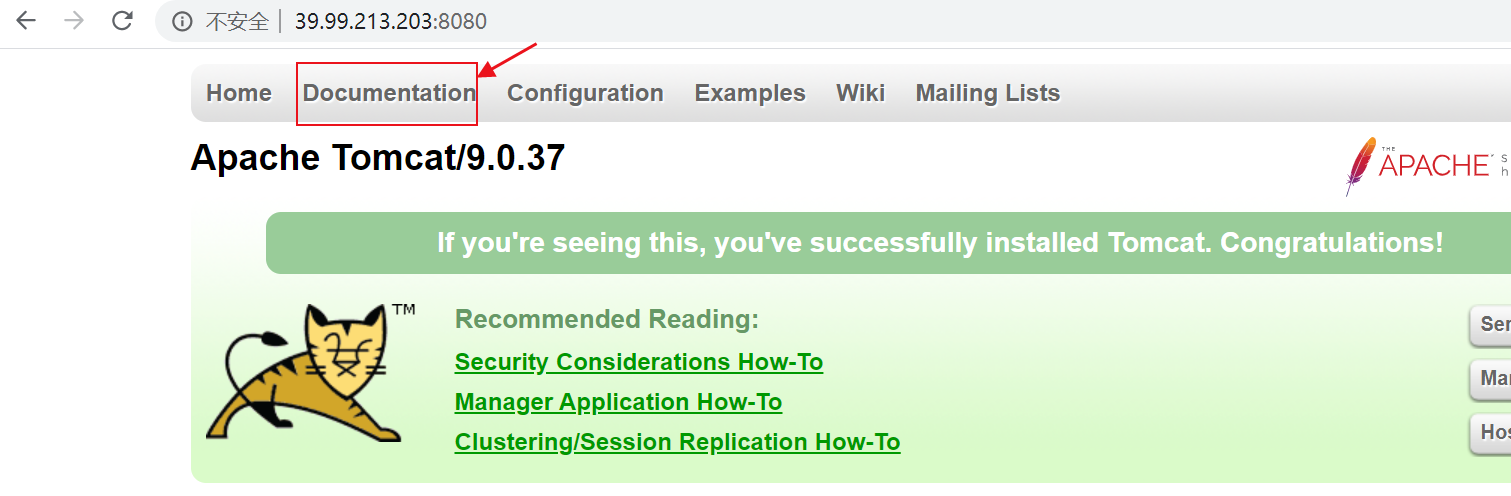
docker run -it -p 8080:8080 tomcat
ps:解决docker启动tomcat容器访问端口显示404的问题,页面显示 源服务器未能找到目标资源的表示或者是不愿公开一个已经存在
- 1:先查看防火墙状况


# 关闭防火墙
systemctl stop firewalld.service
# 禁止防火墙开机启动
systemctl disable firewalld.service
# 启动docker
systemctl start docker
# 重启docker
systemctl restart docker
- 2:那么使用如下命名进入tomcat的目录
docker exec -it 559f370266d5 /bin/bash
查看当前文件夹内的所有文件 ls
进入webapps文件夹下,如果显示total 0,我们就需要把webapps.dist中的内容复制到webapps文件夹下
cd webapps
rm -f webapps
cp -r webapps.dist webapps
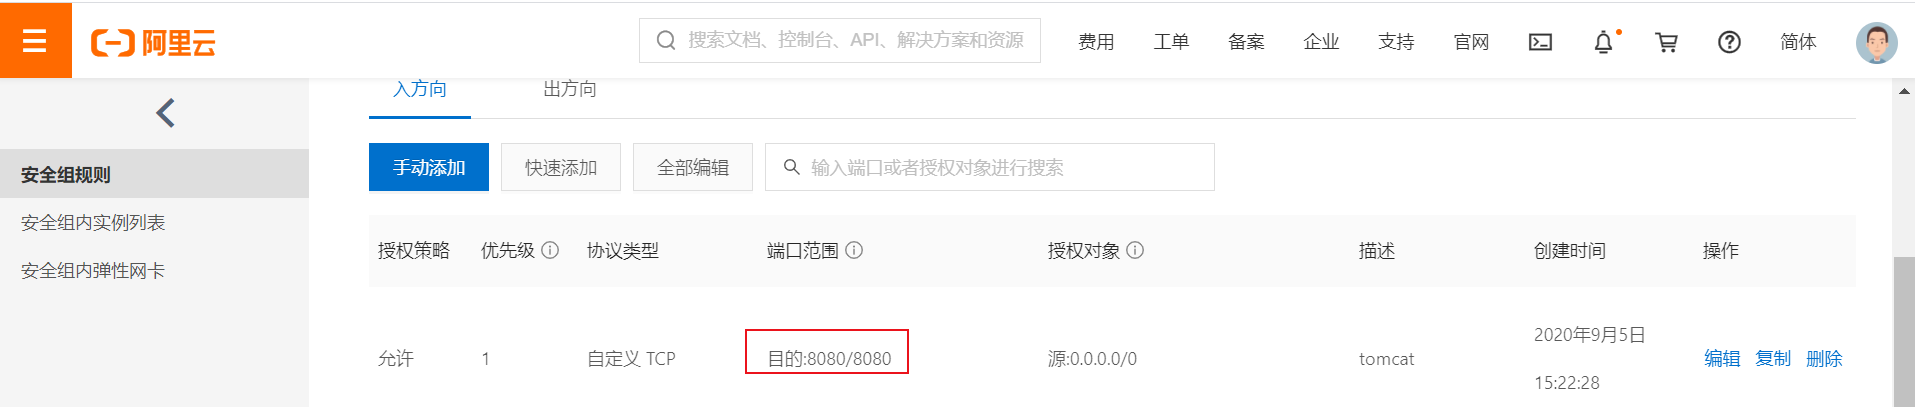
- 3:如果使用的阿里云的云服务器,别忘记设置相应的安全组规则

3.3 自定制容器
一般来说:我们不是真正的创建新镜像,而是基于一个已有的基础镜像,进行修改,从而构建一个新镜像而已。
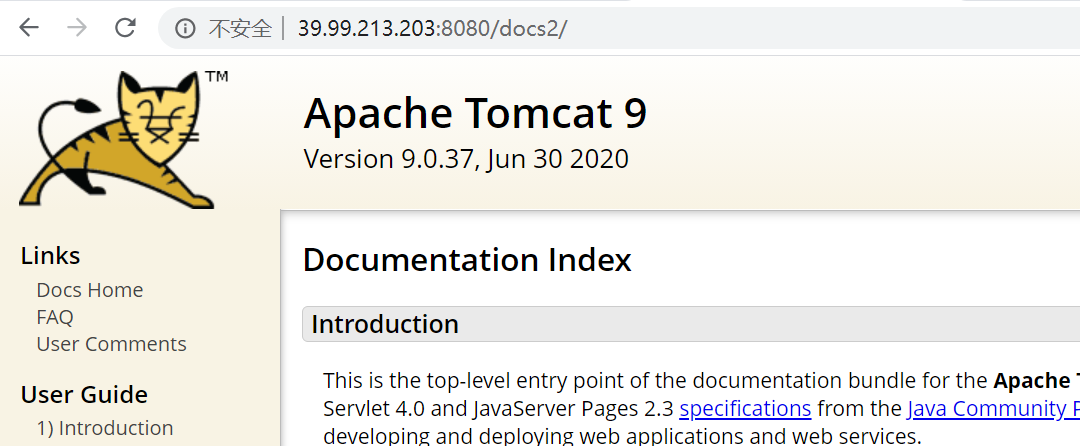
修改上一步镜像产生tomcat文档,(将docs修改为docs2)即当前的tomcat运行实例是一个没有文档内容的容器

效果如下:

3.4 提交定制容器
docker commit -a="杨小可" -m="没有说明文档的tomcat" 559f370266d5 2012094016/tomcat20200905

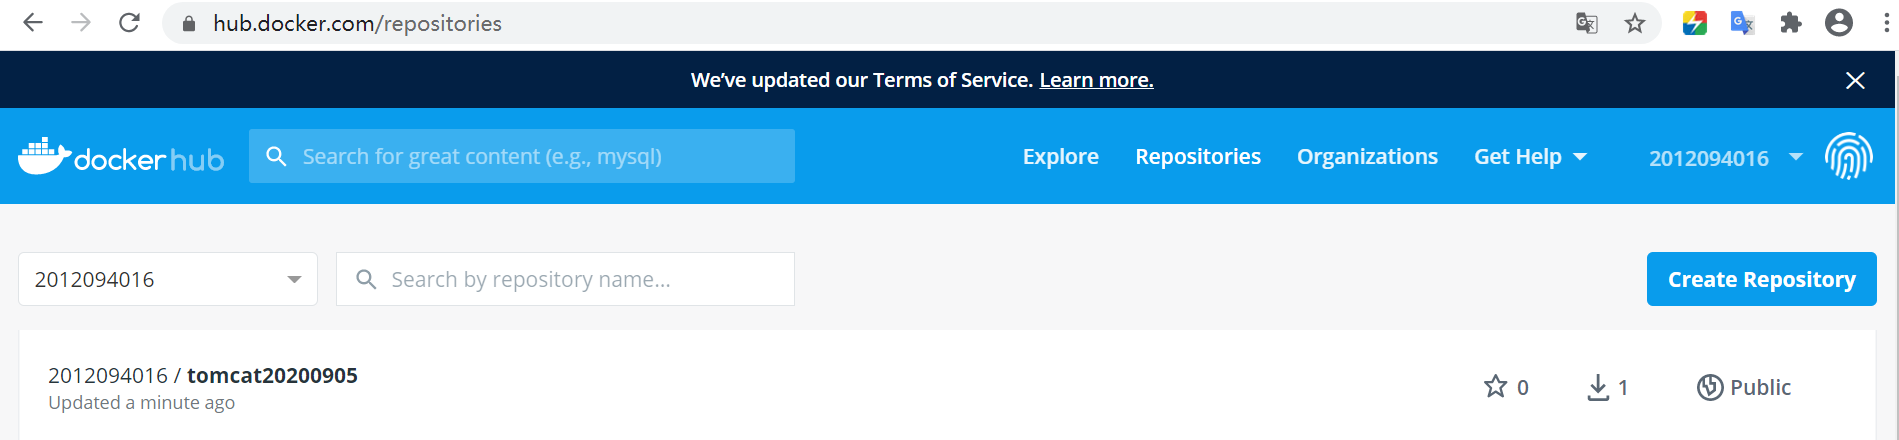
3.5 推送到远端
建功立业、名垂青史的时候到了
docker push 2012094016/tomcat20200905

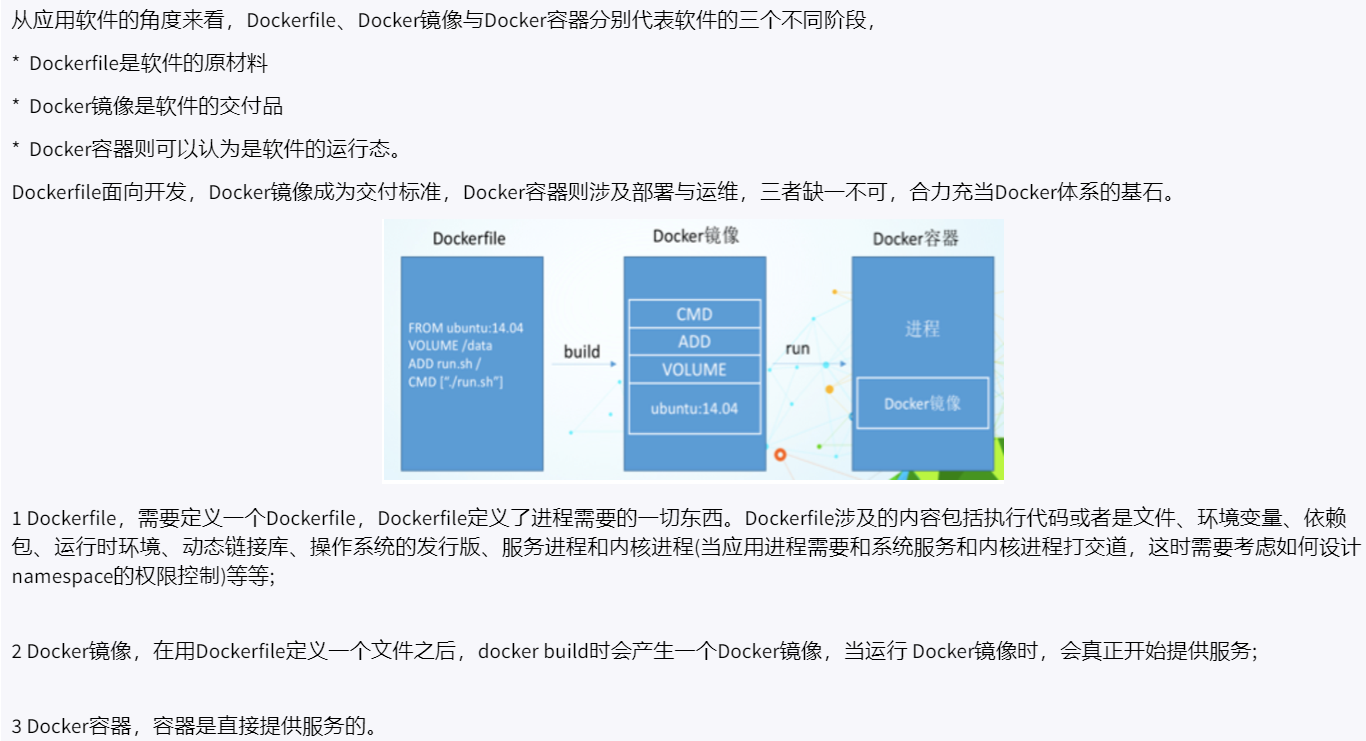
4:构建镜像之 Dockerfile 文件
Dockerfile 是用来构建Docker镜像的构建文件,是由一系列命令和参数构成的脚本
构建三部曲
- 编写 Dockerfile 文件
- docker build
- docker run


4.1 自定义mycentos镜像

自定义mycentos目的使我们自己的镜像具备如下:
- 登陆后的默认路径
- vim编辑器
- 查看网络配置ifconfig支持
步骤:
1:编写
mkdir mydocker
cd mydocker
touch Dockerfile
chmod 755 Dockerfile
vim Dockerfile
FORM centos
MAINTAINER yangke<1692134188@qq.com>

ENV MYPATH /usr/local
WORKDIR $MYPATH

RUN yum -y install vim
RUN yum -y install net-tools

EXPOSE 80
CMD echo $MYPATH
CMD echo "success----------ok"
CMD /bin/bash
2:构建
docker build -t 新镜像名字:TAG .
docker build -t yangocnetos:20200905 . # 会看到 docker build 命令最后有一个 . . 表示当前目录

3:运行
docker run -it 新镜像名字:TAG
docker run -t yangocnetos:20200905


5:构建镜像
5.1 用 Dockerfile 构建镜像
创建一个示例仓库
mkdir static_web

cd  static_web

touch Dockerfile
我们创建了一个名为 static_web 的目录用来保存 Dockerfile ,这个目录就是我们的构建环境( build environment ),Docker 称此环境为上下文(context)或者构建上下文( build context)。Docker 会在构建镜像时将构建上下文和该上下文中的文件和目录上传到 Docker 守护进程。这样 Docker 守护进程就能直接访问用户想在镜像中存储的任何代码、文件或者其他数据。
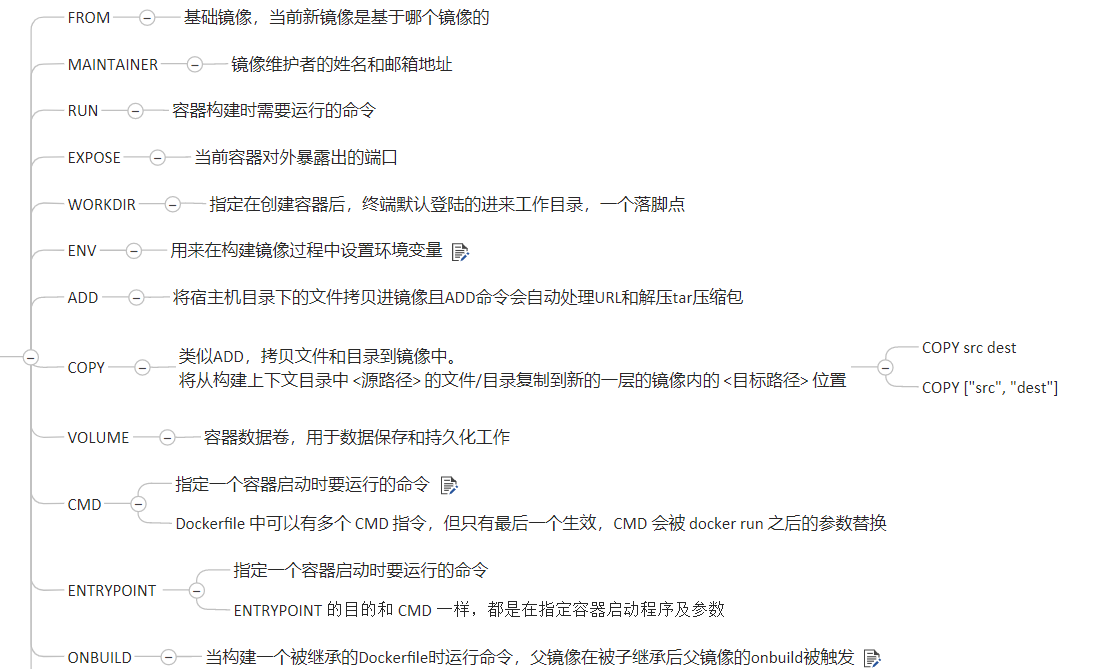
#基于 node 镜像
FROM node
#指定维护者信息
MAINTAINER yango 842221695@qq.com

#指定下一条命令的运行目录
WORKDIR /usr/local
#新建路径
RUN mkdir work
#在 /usr/local 的基础上指定运行目录,所以当前目录为:/usr/local/work
WORKDIR work
#安装必要的组件
RUN npm install express
RUN npm install express-generator -g
RUN npm install supervisor -g
RUN express myapp -e
#将当前目录下的文件,复制到 /usr/local/work/ 下
#COPY . /usr/local/work/
WORKDIR /usr/local/work/myapp
RUN npm install
WORKDIR /usr/local/work/myapp
#启动 express 应用
CMD supervisor ./bin/www
#暴露容器 3000 端口
EXPOSE 3000
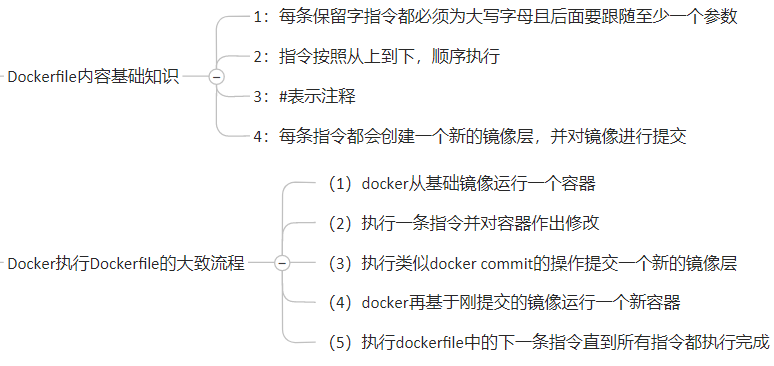
Dockerfile 由一系列指令和参数组成。每条指令,如 FROM,都必须为大写字母,且后面要跟一个参数。
Dockerfile 中的指令会按照顺序从上到下执行,所以要根据需求合理安排指令的顺序。
Dockerfile 中的第一条指令必须是 FROM。FROM 指令指定一个已存在的镜像,后续指令都将基于该镜像进行,这个镜像被称为基础镜像(base image)
5.3 基于 Dockerfile 构建新镜像
cd  static_web.
sudo docker build -t="2012094016/static_web" .
执行docker build 命令时,Dockerfile 中所有的指令都会被执行并且提交,并在该命令成功结束后返回一个新镜像。
Sending build context to Docker daemon   2.56kB
Step 1/14 : FROM node
 ---> 40ce906a3734
Step 2/14 : MAINTAINER yango 842221695@qq.com
 ---> Running in 411df953b1dc
Removing intermediate container 411df953b1dc
 ---> dd524617272d
Step 3/14 : WORKDIR /usr/local
 ---> Running in 366b3dab3633
Removing intermediate container 366b3dab3633
 ---> 1794d0794b80
Step 4/14 : RUN mkdir work
 ---> Running in 07d6faaab03c
Removing intermediate container 07d6faaab03c
 ---> f498bb2bed9b
Step 5/14 : WORKDIR work
 ---> Running in dcd075746ec5
Removing intermediate container dcd075746ec5
 ---> f1d39eb4051a
Step 6/14 : RUN npm install express
 ---> Running in 8fd07342f96d
npm WARN saveError ENOENT: no such file or directory, open '/usr/local/work/package.json'
npm notice created a lockfile as package-lock.json. You should commit this file.
npm WARN enoent ENOENT: no such file or directory, open '/usr/local/work/package.json'
npm WARN work No description
npm WARN work No repository field.
npm WARN work No README data
npm WARN work No license field.

+ express@4.17.1
added 50 packages from 37 contributors and audited 50 packages in 28.567s
found 0 vulnerabilities

Removing intermediate container 8fd07342f96d
 ---> ca9775afd524
Step 7/14 : RUN npm install express-generator -g
 ---> Running in 8fe89d188667
npm WARN deprecated mkdirp@0.5.1: Legacy versions of mkdirp are no longer supported. Please update to mkdirp 1.x. (Note that the API surface has changed to use Promises in 1.x.)
/usr/local/bin/express -> /usr/local/lib/node_modules/express-generator/bin/express-cli.js
+ express-generator@4.16.1
added 10 packages from 13 contributors in 49.516s
Removing intermediate container 8fe89d188667
 ---> fe72518947f4
Step 8/14 : RUN npm install supervisor -g
 ---> Running in 9a21e1c0723e
/usr/local/bin/node-supervisor -> /usr/local/lib/node_modules/supervisor/lib/cli-wrapper.js
/usr/local/bin/supervisor -> /usr/local/lib/node_modules/supervisor/lib/cli-wrapper.js
+ supervisor@0.12.0
added 1 package from 28 contributors in 3.83s
Removing intermediate container 9a21e1c0723e
 ---> 514a9bf1c6f3
Step 9/14 : RUN express myapp -e
 ---> Running in b30e0423ec6d

  warning: option `--ejs' has been renamed to `--view=ejs'


   create : myapp/
   create : myapp/public/
   create : myapp/public/javascripts/
   create : myapp/public/images/
   create : myapp/public/stylesheets/
   create : myapp/public/stylesheets/style.css
   create : myapp/routes/
   create : myapp/routes/index.js
   create : myapp/routes/users.js
   create : myapp/views/
   create : myapp/views/error.ejs
   create : myapp/views/index.ejs
   create : myapp/app.js
   create : myapp/package.json
   create : myapp/bin/
   create : myapp/bin/www

   change directory:
     $ cd myapp

   install dependencies:
     $ npm install

   run the app:
     $ DEBUG=myapp:* npm start

Removing intermediate container b30e0423ec6d
 ---> 025262ae1892
Step 10/14 : WORKDIR /usr/local/work/myapp
 ---> Running in a8f9a77bf10c
Removing intermediate container a8f9a77bf10c
 ---> eef7c2dc3c63
Step 11/14 : RUN npm install
 ---> Running in 09bc61f003f3
npm notice created a lockfile as package-lock.json. You should commit this file.
added 54 packages from 38 contributors and audited 55 packages in 10.527s
found 0 vulnerabilities

Removing intermediate container 09bc61f003f3
 ---> cc1224956b03
Step 12/14 : WORKDIR /usr/local/work/myapp
 ---> Running in b60b122ae810
Removing intermediate container b60b122ae810
 ---> 29283effe59e
Step 13/14 : CMD supervisor ./bin/www
 ---> Running in f0f32604001c
Removing intermediate container f0f32604001c
 ---> 03ba7fc15b4c
Step 14/14 : EXPOSE 3000
 ---> Running in f8808b2e2fdd
Removing intermediate container f8808b2e2fdd
 ---> f466127aa033
Successfully built f466127aa033
Successfully tagged 2012094016/static_web:latest
我们使用了 doucker build 命令来构建新镜像。我们通过 -t 选项为新镜像指定设置了仓库和名称。本例中仓库为:2012094016,镜像名为:static_web。
还可以在构建镜像时为镜像设置标签
sudo docker build -t="2012094016/static_web:V1" .
如果没有指定标签,Docker 会自动为镜像设置一个 latest 标签。

上面命令中最后的.告诉Docker到本地目录中去找 Dockerfile 文件。也可以指定一个Git仓库地址来指定Dockerfile位置。
sudo docker build -t="2012094016/static_web:V1" git@github.com:2012094016/docker-static_web
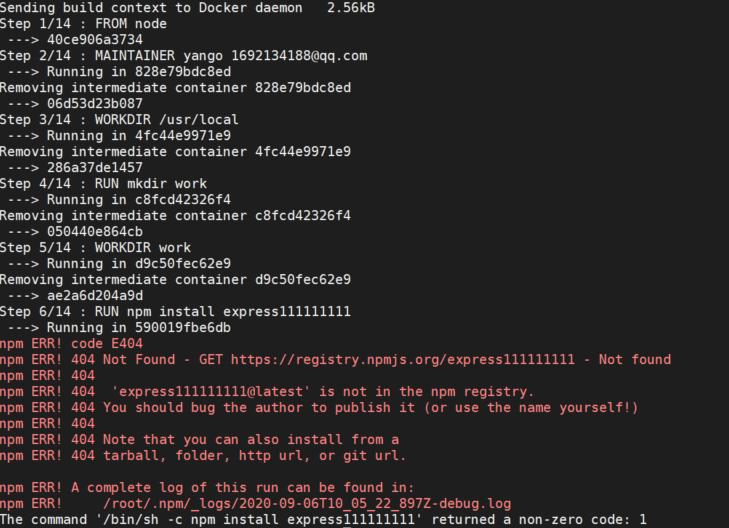
5.4 指令失败会怎样
假设,我们将Dockerfile中的安装包名称写错
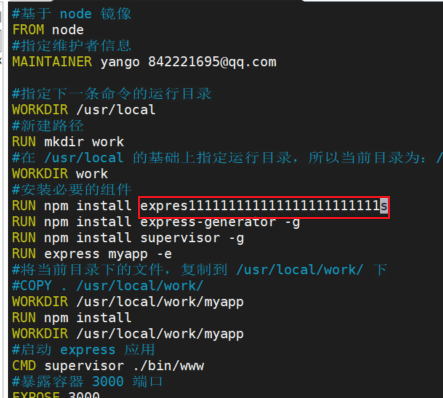
会提示报错的
上一节: 饮冰三年-人工智能-Docker-53-Docker容器数据卷

 浙公网安备 33010602011771号